summary
On the first page of Baidu, this question basically comes from the same article. I didn't find the original article address, so I attached a reprint: Expand Shader Graph in Unity 2019.2 to realize custom lighting
However, like the title, this implementation is based on the 2019.2 version, and there will be various problems when migrating to the newer version.
This blog records the problems and solutions I encountered when trying to migrate the main light related content to the URP rendering pipeline of the latest version of Unity (2020.2).
Pre problem
This article requires you to understand at least:
- Create file based custom nodes and sub graphs in Unity.
At the same time, if you can have the following abilities, you can get a more smooth reading experience (of course not):
- Downloaded Unity 2021.2
- Simple contact with Unity's URP Shader code, and used Shader Graph.
- Know how to visit non-existent websites, or be able to log in to Github.
Solution
The solution of this article is based on the project on Github Shader Graph Custom Lighting Sample Project This project is based on Unity 2019.2.
Directly using the solution in the link mentioned in my overview will report all kinds of errors and even fail to compile successfully (pointing to Baidu).
The useful parts of this Github repository include the following paths. The rest of the repository is an example made by the author himself:
- \Assets\Includes
- \Assets\Sub Graphs
The files under these two folders provide some lighting nodes. The. hlsl file in the Includes folder is the source file of the custom node.
The direct migration function is basically normal, and there may be some small bug s, but as long as it doesn't appear, you can treat it as non-existent.
This blog only makes the Get Main Light node based on this Git warehouse to obtain the main light source information, which solves the problem that shadows from the main light source cannot be accepted when migrating to version 2021.2. If this problem also occurs in other versions, you can also try the solution of this blog.
At the same time, the node settings in the original warehouse are slightly modified to provide an easier to use precision control method.
Source file (. hlsl)
First, the source file MainLight.hlsl of the custom main light source node is given
#ifndef CUSTOM_LIGHTING_INCLUDED
#define CUSTOM_LIGHTING_INCLUDED

#pragma multi_compile _ _MAIN_LIGHT_SHADOWS
#pragma multi_compile _ _MAIN_LIGHT_SHADOWS_CASCADE
#pragma multi_compile _ _SHADOWS_SOFT

void MainLight_float(float3 WorldPos, out float3 Direction, out float3 Color, out float DistanceAtten, out float ShadowAtten)
{
#if SHADERGRAPH_PREVIEW
    Direction = float3(-0.5, 0.5, 0);
    Color = float3(1, 0.95, 0.8);
    DistanceAtten = 1;
    ShadowAtten = 1;
#else
#if SHADOWS_SCREEN
    float4 clipPos = TransformWorldToHClip(WorldPos);
    float4 shadowCoord = ComputeScreenPos(clipPos);
#else
    float4 shadowCoord = TransformWorldToShadowCoord(WorldPos);
#endif
    Light mainLight = GetMainLight(shadowCoord);
    Direction = mainLight.direction;
    Color = mainLight.color;
    DistanceAtten = mainLight.distanceAttenuation;
    ShadowAtten = mainLight.shadowAttenuation;
#endif
}

void MainLight_half(float3 WorldPos, out half3 Direction, out half3 Color, out half DistanceAtten, out half ShadowAtten)
{
#if SHADERGRAPH_PREVIEW
    Direction = half3(0.5, 0.5, 0);
    Color = half3(1, 0.95, 0.8);
    DistanceAtten = 1;
    ShadowAtten = 1;
#else
#if SHADOWS_SCREEN
    half4 clipPos = TransformWorldToHClip(WorldPos);
    half4 shadowCoord = ComputeScreenPos(clipPos);
#else
    half4 shadowCoord = TransformWorldToShadowCoord(WorldPos);
#endif
    Light mainLight = GetMainLight(shadowCoord);
    Direction = mainLight.direction;
    Color = mainLight.color;
    DistanceAtten = mainLight.distanceAttenuation;
    ShadowAtten = mainLight.shadowAttenuation;
#endif
}

#endif
This file deletes the remaining functions in the original warehouse CustomLighting.hlsl, leaving only MainLight_float and MainLight_half is used for operations with different precision.
At the same time, three pragma are added to the file header to fix the shadow problem. (ShadowAtten before repair cannot be used normally, but other Out parameters are normal)
Among them, the first_ MAIN_LIGHT_SHADOWS is a parameter that is only used to generate shadows. In fact, it is not required (we only need to accept shadows here), so it is completely OK to delete them.
Second parameter_ MAIN_LIGHT_SHADOWS_CASCADE is a key parameter used to accept shadows. It cannot be missing. If it is missing, ShadowAtten will fail.
Third parameter_ SHADOWS_SOFT can soften the shadow edge. If you comment out the shadow with hard edge, you can adopt or delete it as needed.
Three pragma added:
#pragma multi_compile _ _MAIN_LIGHT_SHADOWS
#pragma multi_compile _ _MAIN_LIGHT_SHADOWS_CASCADE
#pragma multi_compile _ _SHADOWS_SOFT
Finally, the initial settings of the two functions in the Shader Graph node preview are modified to make it easier to detect whether the modification works.
Specifically, I make the lighting direction different under different precision, so that the lighting direction in node preview changes when switching precision. In addition, the light is not pure white but slightly yellow (realized by modifying the Color). When the lighting Color is added to the operation, it will affect the preview image.
For float precision:
#if SHADERGRAPH_PREVIEW
    Direction = float3(-0.5, 0.5, 0);
    Color = float3(1, 0.95, 0.8);
    DistanceAtten = 1;
    ShadowAtten = 1;
#else
For half precision:
#if SHADERGRAPH_PREVIEW
    Direction = half3(0.5, 0.5, 0);
    Color = half3(1, 0.95, 0.8);
    DistanceAtten = 1;
    ShadowAtten = 1;
#else
Subgraph
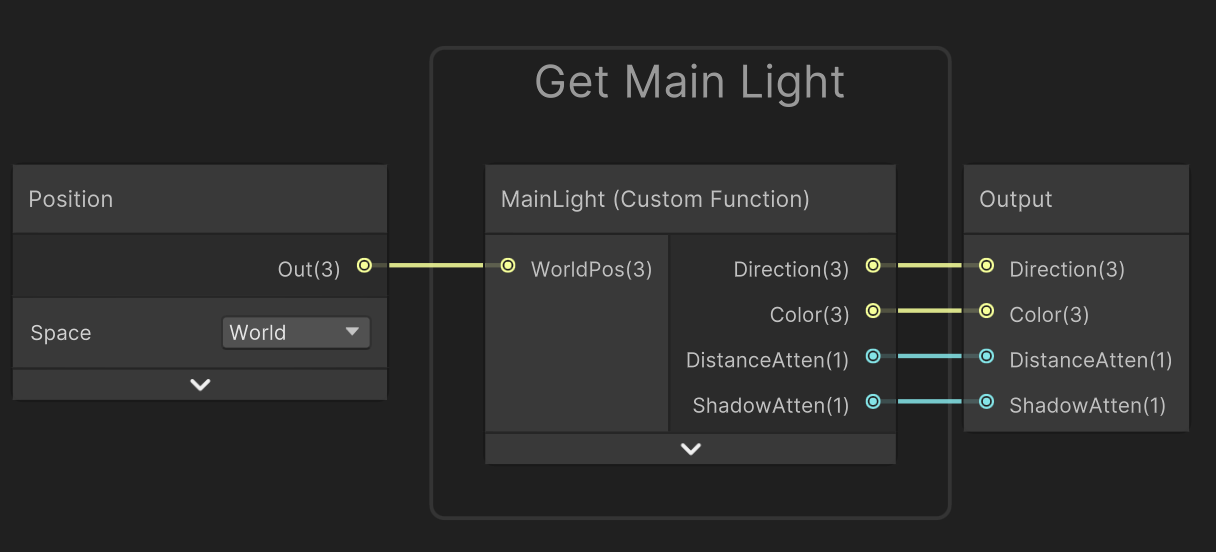
The sub graph maintains the same name as the warehouse, Get Main Light, and is the same as the original warehouse on the node connection:

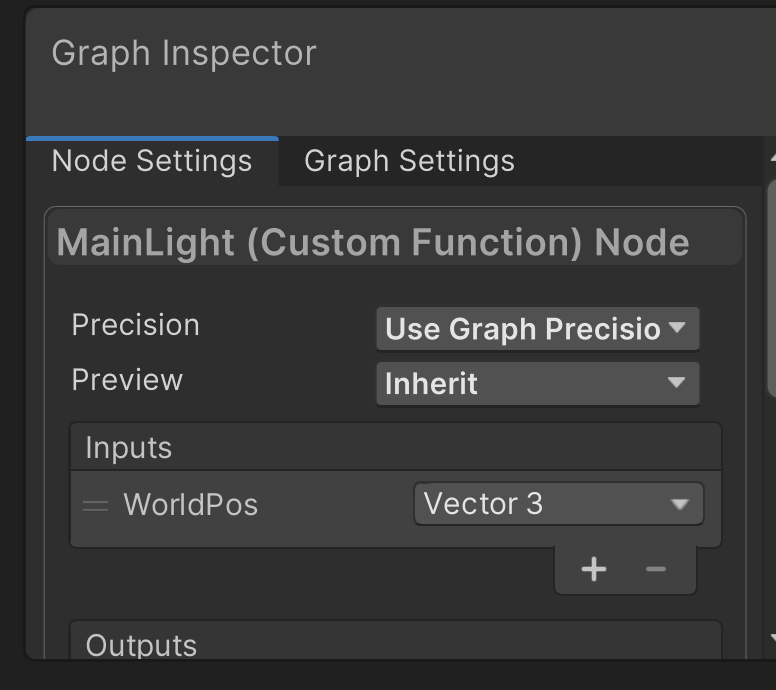
Set the Precision of the MainLight node to Use Graph Precision:

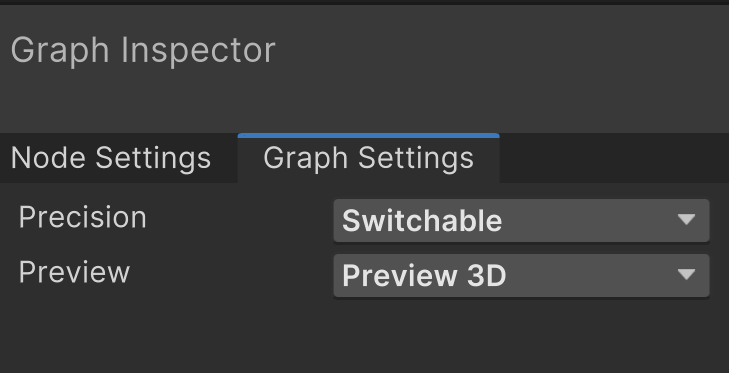
Then set the Precision to Switchable in the Graph Settings, so that you can directly change the Precision in the Shader Graph when using the sub graph.

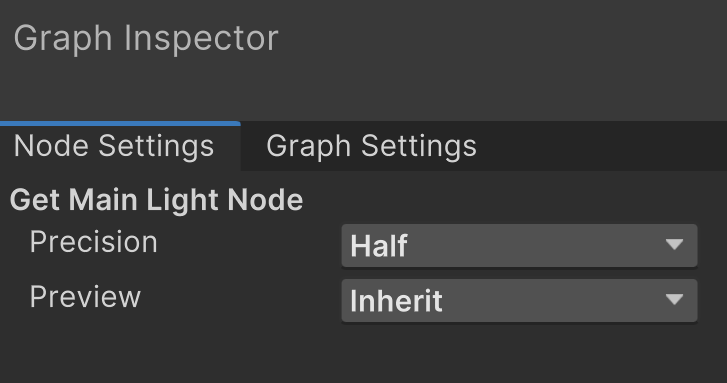
When you need to change the Precision, you only need to set the Precision in the node attribute of the subgraph where this subgraph is used:

According to the previous settings, when we change the accuracy, the lighting direction in the node preview interface should change, so that we can be sure that the called function has indeed changed.