In many games, you can see special effects such as dissipation, combustion and so on.
For example:
So write a simple shader code to dissipate special effects today!!!
(learning) Zhuang understand Video learned, strong novice learning Zhuang understand (video)
Step 1: think about what we can see!
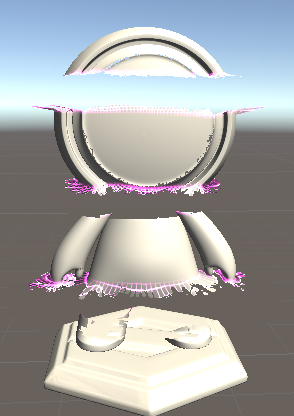
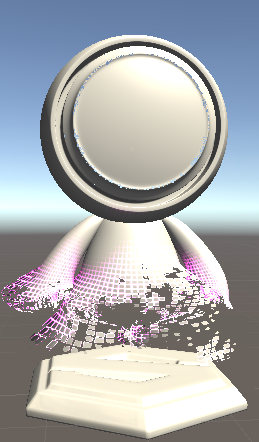
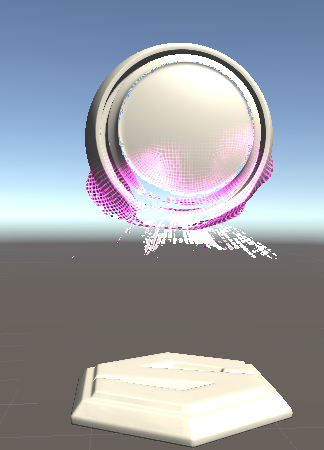
We can see the dissipation of the grid. In this dissipation process:
First: mesh offset, we can simply offset the vertex to the normal direction, so we need to have a mesh mask map first.
Second: some meshes at the front point dissipate in advance, so we need the random gray mask of the model mesh.
Third: in the second figure, it can be seen that this does not dissipate together at the same height, indicating that there is radian. Here we use the model surface slope mask.
Then, the sampling times are saved, so it can be combined in one graph.
Step 2: how to write:
First, get and define 2 maps and control parameters:
        [Header(Effect)]
        _EffMap01   ("Special effect texture 1",2D) = "gray"{}
        _EffMap02   ("Special effect texture 2",2D) = "gray"{}
        [HDR]_EffCol     ("Special effect color",Color) = (0,0,0,0)
        _EffParams  ("X: Wave density Y: Wave velocity Z: Degree of confusion W: dissipation strength ",vector) = (0.03,3.0,0.3,2.5)


        uniform sampler2D _EffMap01;
        uniform sampler2D _EffMap02 ;
        uniform float3 _EffCol;
        uniform float4 _EffParams;
The first image is the mesh related map made earlier, and the latter is the noise disturbance image.
Then we write the vertex animation first:
float4 CyberpunkAnim(float noise,float mask,float3 normal,inout float3 vertex){
                //Sawtooth wave
                float baseMask = abs(frac(vertex.y * _EffParams.x - _Time.x * _EffParams.y) - 0.5) * 2.0;

                //Return value
                return baseMask;
            }
The two pictures can't see what wave it is. Here, the intensity can be controlled behind the sawtooth wave, which can be displayed many times. It's better.
Why does sawtooth wave write that!!
f(x) = abs(frac(x))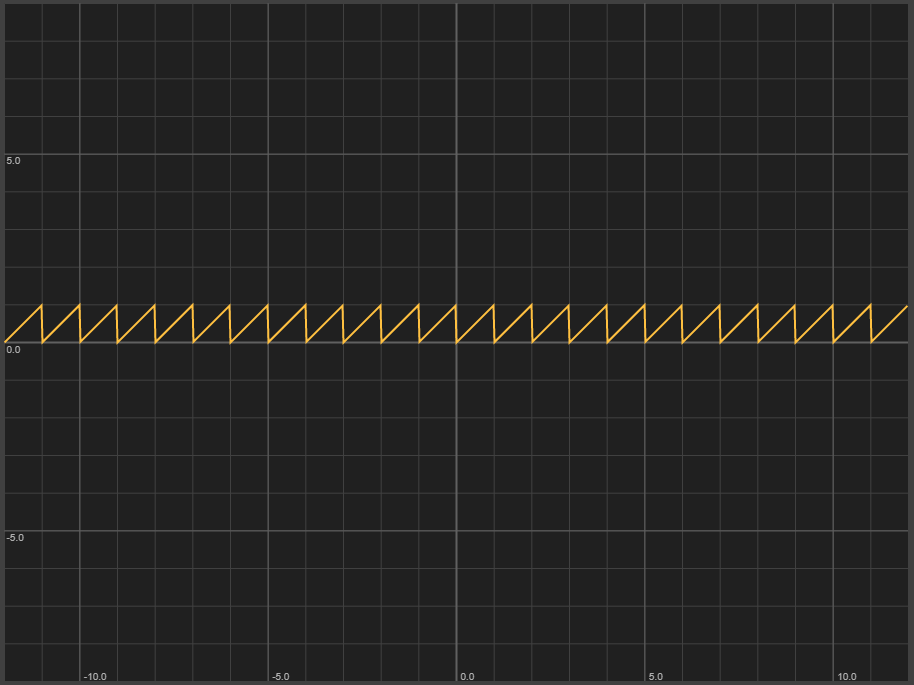
Then the value range of this wave is between [0,1], so output this directly
There is a serious sense of sawtooth, and there is no effect of slow fluctuation, so
f(x) = frac(x)-0.5

The value range is controlled between [- 0.5,0.5]
f(x) = abs(frac(x)-0.5) * 2

The value range can be controlled at [0,1], and the sense of sawtooth is eliminated, with obvious fluctuation
With the combination of time, speed and intensity, there is a simple fluctuation effect.
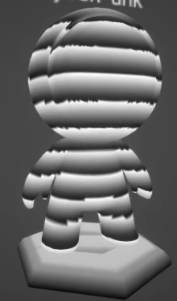
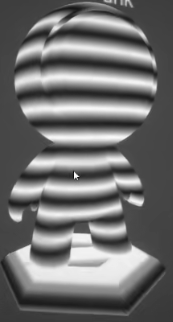
In order to make our waves less continuous, we controlled the time of white to be twice that of black.
baseMask = min(1.0,baseMask * 2.0);
f(x) = min(1.0,(abs(frac(x)-0.5) * 2) * 2)
It is equivalent to that the original value range [0,1] becomes [0,2], and then y=1 intercepts the graph, so the value range is still between [0,1].
                //noise offset sawtooth wave
                baseMask += (noise - 0.5) * _EffParams.z;
In the vertex processing stage, the noise disturbance graph is sampled first, and remember that the noise interval is also between [0,1] and [- 0.5,0.5].
Key points:
                //smoothstep out all levels of Mask
                float4 effectMask = float4(0,0,0,0);
                effectMask.x = smoothstep(0.0,0.9,baseMask);
                effectMask.y = smoothstep(0.2,0.7,baseMask);
                effectMask.z = smoothstep(0.4,0.5,baseMask);
smoothstep(a, b, x)
f(x) = smoothstep(0.2,0.7,x)
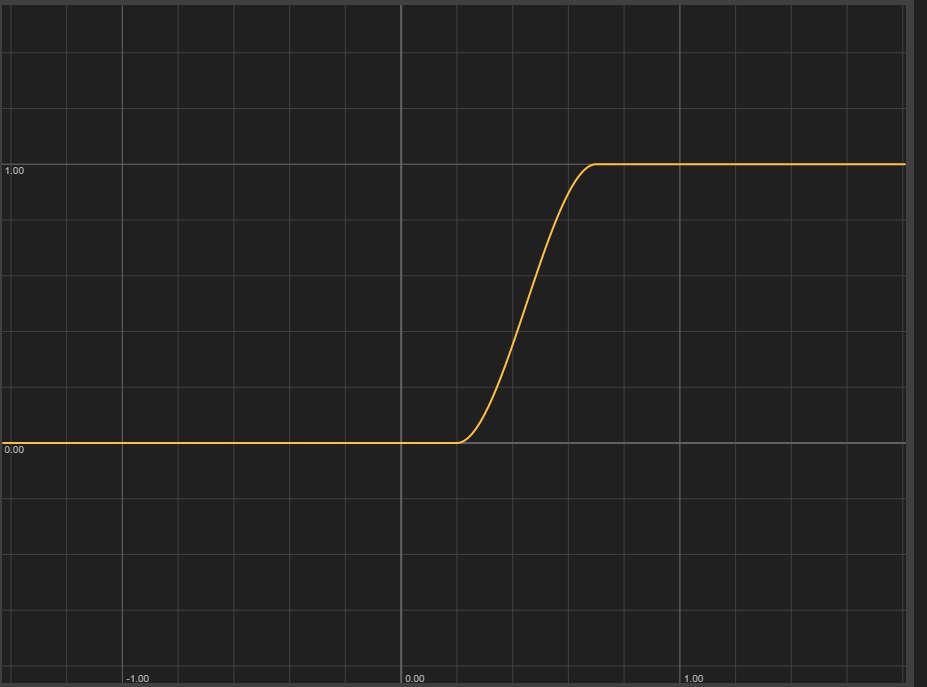
smoothstep will give us a very smooth process. Less than the former is 0, greater than the latter is 1, and the middle is 3a^2-2a^3.
Then three are used as the control of rgb channels, which is also a display range.
                //Vertex color mask
                effectMask.w = mask;
                //vertex animation
                vertex.xz += normal.xz * (1.0-effectMask.y) * _EffParams.w * mask;
The last is the offset of the vertex to the normal direction. It can be seen from the previous two figures that there is only offset within the fluctuation range, and then the range of g channel is used. Other ranges can depend on their own needs and dissipation intensity. Don't forget that the base doesn't dissipate, so use the upper mask.
Finally, paste the grid map to control!
                float3 _EffMap01_var = tex2D(_EffMap01, i.uv1).xyz;
                float meshMask = _EffMap01_var.x;
                float faceRandomMask = _EffMap01_var.y;
                float faceSlopeMask = _EffMap01_var.z;
Sample the mesh map and get the xyz channel content. x: Mesh mask, y: model mesh random grayscale mask. z: Model face slope mask.
                // Get EffectMask
                float smallMask = i.effectMask.x;
                float midMask = i.effectMask.y;
                float bigMask = i.effectMask.z;
                float baseMask = i.effectMask.w;
Gets the value of each channel returned by the vertex animation. xyz: three range sizes, w: base mask.
// Calculate Opacity
    float midOpacity= saturate(floor(min(faceRandomMask, 0.999999) + midMask));
    float bigOpacity= saturate(floor(min(faceSlopeMask, 0.999999) + bigMask));
    float opacity = lerp(1.0, min(bigOpacity, midOpacity), baseMask);
The first two lines are the superposition of random gray mask and medium range of model grid, slope mask and large range of model surface.
Finally, the implementation of the two is determined, and the base mask is controlled.
// Superimposed self luminescence
    float meshEmitInt = (bigMask - smallMask) * meshMask;
    meshEmitInt = meshEmitInt * meshEmitInt;
    float3 emission = _EffCol * meshEmitInt * baseMask;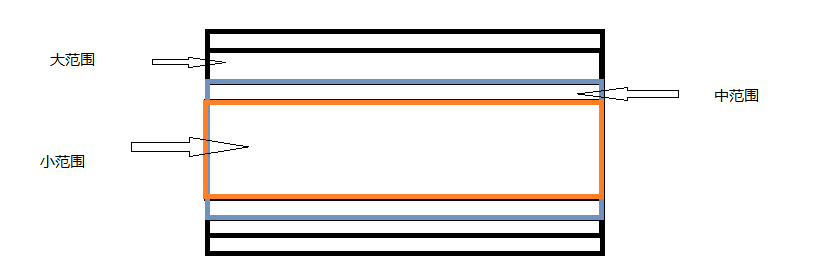
The last is self illumination. In front, the range of self illumination is controlled between large range and small range. I will display the special effect self illumination color.