zabbix is a free, open source and commercial server monitoring software with strong expansibility and simple deployment. It is a good solution for server load monitoring.
ZABBIX is divided into three modules: server and agent, proxy. server is composed of zabbix, mysql, php and middleware. it is used to provide Web pages and periodically rotate training to check each monitored host. agent runs on the monitored host, collects host information regularly, and proxy is placed on the firewall as forwarding agent.
To deploy zabbix, you need to prepare the following materials
Server side
1. mysql, I use docker here. https://hub.docker.com/r/alexzhuo/mysql/
2. zabbix-server, I also use docker here: https://hub.docker.com/r/zabbix/zabbix-server-mysql/
3. zabbix middleware is also docker: https://hub.docker.com/r/zabbix/zabbix-web-nginx-mysql/
No matter what operating system you are on, the server can deploy only three docker s, which is very easy and reduces many compatibility problems.
Monitored terminal
Download the corresponding rpm or deb package installation
It is difficult to build the server and easy to build the client, so let's introduce the steps of building the server first.
First, pull three dockers to the local area. Because the domestic speed of docker hub is very slow, the server can not connect to the public network, so I save d them here on other computers, and then installed them directly on the monitoring host.
[root@localhost ~]# docker load < /root/mysql.tar
745f5be9952c: Loading layer [==================================================>] 135.7 MB/135.7 MB
85782553e37a: Loading layer [==================================================>] 15.87 kB/15.87 kB
29660d0e5bb2: Loading layer [==================================================>] 11.78 kB/11.78 kB
440e02c3dcde: Loading layer [==================================================>] 4.608 kB/4.608 kB
56827159aa8b: Loading layer [==================================================>] 3.072 kB/3.072 kB
8cb043c85445: Loading layer [==================================================>] 477.9 MB/477.9 MB
f5ceb2bf1cc3: Loading layer [==================================================>] 139.4 MB/139.4 MB
Loaded image: alexzhuo/mysql:5.7                                                ] 557.1 kB/139.4 MB
Loaded image ID: sha256:d0bfd2b961fd0f801f86de053356379c2355e70f480972ee06b87a55333e1175
Loaded image ID: sha256:f04c878f4fb0cfd82f7e138a7138e4e40e00199d4fef570e99ac7ef4a0d30d3a
[root@localhost ~]# docker load < /root/zabbix-server-mysql.tar
ef763da74d91: Loading layer [==================================================>] 5.058 MB/5.058 MB
19023d040ef1: Loading layer [==================================================>] 98.01 MB/98.01 MB
7de75a51a1ef: Loading layer [==================================================>]    12 MB/12 MB
14e240c7dfd1: Loading layer [==================================================>] 5.632 kB/5.632 kB
37f180052c31: Loading layer [==================================================>] 36.35 kB/36.35 kB
Loaded image: zabbix/zabbix-server-mysql:alpine-3.4.4                           ]    512 B/36.35 kB
[root@localhost ~]# docker load < /root/zabbix-web-nginx-mysql.tar
cb0e385a9b35: Loading layer [==================================================>] 141.2 MB/141.2 MB
2bfd8c2624ee: Loading layer [==================================================>] 3.072 kB/3.072 kB
176bad0b5cef: Loading layer [==================================================>] 36.15 MB/36.15 MB
56c77e189281: Loading layer [==================================================>] 5.632 kB/5.632 kB
fbcdf5e59ad3: Loading layer [==================================================>] 4.608 kB/4.608 kB
bf7269ea0868: Loading layer [==================================================>] 5.632 kB/5.632 kB
5b6aed9c7e11: Loading layer [==================================================>] 3.584 kB/3.584 kB
9aff7fe48c6a: Loading layer [==================================================>] 4.608 kB/4.608 kB
9d962e9eaeec: Loading layer [==================================================>]  25.6 kB/25.6 kB
09cd8c1a9355: Loading layer [==================================================>] 3.584 kB/3.584 kB
0b16c5f8e035: Loading layer [==================================================>] 36.35 kB/36.35 kB
Loaded image: zabbix/zabbix-web-nginx-mysql:alpine-3.4.4                        ]    512 B/36.35 kB
Then we start three docker s in sequence: mysql, zabbix-server, zabbix php middleware, as follows
docker run -itd -p 3306:3306 alexzhuo/mysql:5.7 /etc/start_mysql.sh
This will start mysql, open the host 3306 port, MySQL user name root, password 123456, database name mysql, you can use MySQL client login to see, now is an empty database, nothing.
Note that the table space location of mysql is the / var/lib/mysql directory in docker. If your docker stops, the table space will be lost and the monitoring data will be lost. If you want to monitor data persistence, you need to upload the directory of / var/lib/mysql to the host through the - v parameter. See ReadMe on the docker home page for the implementation method.
Then start the zabbix server program and open the host 10051 port
docker run --name some-zabbix-server-mysql -e DB_SERVER_HOST="192.166.1.187" -e MYSQL_DATABASE="zabbix" -e MYSQL_USER="root" -e MYSQL_PASSWORD="123456" -p 10051:10051 -d zabbix/zabbix-server-mysql:alpine-3.4.4
among
DB_SERVER_HOST: Is the IP address of the database. Since the 3306 port of mysql has just been mapped to the host, the IP here is the IP of the host.
MYSQL_DATABASE: It is the name of the database. It is the name used by zabbix-server when building the database. Generally, just fill in zabbix.
MYSQL_USER: It's the user name of mysql. The docker above me opens root, so fill in root here.
MYSQL_PASSWORD: It's mysql's password. The root's password in docker is 123456. If you use your own MySQL database, just follow the actual situation.
After startup, you can use it
To see the zabbix boot process, the normal log is as followsdocker logs some-zabbix-server-mysql
[root@localhost mysql]# docker logs some-zabbix-server-mysql
** Deploying Zabbix server with mysql database
** Preparing the system
** Preparing Zabbix server
********************
* DB_SERVER_HOST: 192.166.1.187
* DB_SERVER_PORT: 3306
* DB_SERVER_DBNAME: zabbix
* DB_SERVER_ZBX_USER: root
* DB_SERVER_ZBX_PASS: 123456
********************
** Creating 'root' user in MySQL database
** Database 'zabbix' does not exist. Creating...
** Creating 'zabbix' schema in MySQL
** Fill the schema with initial data
** Preparing Zabbix server configuration file
** Updating '/etc/zabbix/zabbix_server.conf' parameter "ListenPort": ''... removed
** Updating '/etc/zabbix/zabbix_server.conf' parameter "SourceIP": ''... removed
** Updating '/etc/zabbix/zabbix_server.conf' parameter "LogType": 'console'... added
** Updating '/etc/zabbix/zabbix_server.conf' parameter "LogFile": ''... removed
** Updating '/etc/zabbix/zabbix_server.conf' parameter "LogFileSize": ''... removed
** Updating '/etc/zabbix/zabbix_server.conf' parameter "PidFile": ''... removed
** Updating '/etc/zabbix/zabbix_server.conf' parameter "DebugLevel": ''... removed
** Updating '/etc/zabbix/zabbix_server.conf' parameter "DBHost": '192.166.1.187'... added
** Updating '/etc/zabbix/zabbix_server.conf' parameter "DBName": 'zabbix'... updated
** Updating '/etc/zabbix/zabbix_server.conf' parameter "DBUser": 'root'... updated
** Updating '/etc/zabbix/zabbix_server.conf' parameter "DBPort": '3306'... added
** Updating '/etc/zabbix/zabbix_server.conf' parameter "DBPassword": '123456'... added
** Updating '/etc/zabbix/zabbix_server.conf' parameter "StartPollers": ''... removed
** Updating '/etc/zabbix/zabbix_server.conf' parameter "StartIPMIPollers": ''... removed
** Updating '/etc/zabbix/zabbix_server.conf' parameter "StartPollersUnreachable": ''... removed
** Updating '/etc/zabbix/zabbix_server.conf' parameter "StartTrappers": ''... removed
** Updating '/etc/zabbix/zabbix_server.conf' parameter "StartPingers": ''... removed
** Updating '/etc/zabbix/zabbix_server.conf' parameter "StartDiscoverers": ''... removed
** Updating '/etc/zabbix/zabbix_server.conf' parameter "StartHTTPPollers": ''... removed
** Updating '/etc/zabbix/zabbix_server.conf' parameter "StartTimers": ''... removed
** Updating '/etc/zabbix/zabbix_server.conf' parameter "StartEscalators": ''... removed
** Updating '/etc/zabbix/zabbix_server.conf' parameter "JavaGateway": ''... removed
** Updating '/etc/zabbix/zabbix_server.conf' parameter "JavaGatewayPort": ''... removed
** Updating '/etc/zabbix/zabbix_server.conf' parameter "StartJavaPollers": ''... removed
** Updating '/etc/zabbix/zabbix_server.conf' parameter "StartVMwareCollectors": ''... removed
** Updating '/etc/zabbix/zabbix_server.conf' parameter "VMwareFrequency": ''... removed
** Updating '/etc/zabbix/zabbix_server.conf' parameter "VMwarePerfFrequency": ''... removed
** Updating '/etc/zabbix/zabbix_server.conf' parameter "VMwareCacheSize": ''... removed
** Updating '/etc/zabbix/zabbix_server.conf' parameter "VMwareTimeout": ''... removed
** Updating '/etc/zabbix/zabbix_server.conf' parameter "SNMPTrapperFile": ''... removed
** Updating '/etc/zabbix/zabbix_server.conf' parameter "StartSNMPTrapper": ''... removed
** Updating '/etc/zabbix/zabbix_server.conf' parameter "HousekeepingFrequency": ''... removed
** Updating '/etc/zabbix/zabbix_server.conf' parameter "MaxHousekeeperDelete": ''... removed
** Updating '/etc/zabbix/zabbix_server.conf' parameter "SenderFrequency": ''... removed
** Updating '/etc/zabbix/zabbix_server.conf' parameter "CacheSize": ''... removed
** Updating '/etc/zabbix/zabbix_server.conf' parameter "CacheUpdateFrequency": ''... removed
** Updating '/etc/zabbix/zabbix_server.conf' parameter "StartDBSyncers": ''... removed
** Updating '/etc/zabbix/zabbix_server.conf' parameter "HistoryCacheSize": ''... removed
** Updating '/etc/zabbix/zabbix_server.conf' parameter "HistoryIndexCacheSize": ''... removed
** Updating '/etc/zabbix/zabbix_server.conf' parameter "TrendCacheSize": ''... removed
** Updating '/etc/zabbix/zabbix_server.conf' parameter "ValueCacheSize": ''... removed
** Updating '/etc/zabbix/zabbix_server.conf' parameter "Timeout": ''... removed
** Updating '/etc/zabbix/zabbix_server.conf' parameter "TrapperTimeout": ''... removed
** Updating '/etc/zabbix/zabbix_server.conf' parameter "UnreachablePeriod": ''... removed
** Updating '/etc/zabbix/zabbix_server.conf' parameter "UnavailableDelay": ''... removed
** Updating '/etc/zabbix/zabbix_server.conf' parameter "UnreachableDelay": ''... removed
** Updating '/etc/zabbix/zabbix_server.conf' parameter "AlertScriptsPath": '/usr/lib/zabbix/alertscripts'... added
** Updating '/etc/zabbix/zabbix_server.conf' parameter "ExternalScripts": '/usr/lib/zabbix/externalscripts'... added
** Updating '/etc/zabbix/zabbix_server.conf' parameter "FpingLocation": '/usr/sbin/fping'... added
** Updating '/etc/zabbix/zabbix_server.conf' parameter "Fping6Location": '/usr/sbin/fping6'... added
** Updating '/etc/zabbix/zabbix_server.conf' parameter "SSHKeyLocation": '/var/lib/zabbix/ssh_keys'... added
** Updating '/etc/zabbix/zabbix_server.conf' parameter "LogSlowQueries": ''... removed
** Updating '/etc/zabbix/zabbix_server.conf' parameter "StartProxyPollers": ''... removed
** Updating '/etc/zabbix/zabbix_server.conf' parameter "ProxyConfigFrequency": ''... removed
** Updating '/etc/zabbix/zabbix_server.conf' parameter "ProxyDataFrequency": ''... removed
** Updating '/etc/zabbix/zabbix_server.conf' parameter "SSLCertLocation": '/var/lib/zabbix/ssl/certs/'... added
** Updating '/etc/zabbix/zabbix_server.conf' parameter "SSLKeyLocation": '/var/lib/zabbix/ssl/keys/'... added
** Updating '/etc/zabbix/zabbix_server.conf' parameter "SSLCALocation": '/var/lib/zabbix/ssl/ssl_ca/'... added
** Updating '/etc/zabbix/zabbix_server.conf' parameter "LoadModulePath": '/var/lib/zabbix/modules/'... added
** Updating '/etc/zabbix/zabbix_server.conf' parameter "TLSCAFile": ''... removed
** Updating '/etc/zabbix/zabbix_server.conf' parameter "TLSCRLFile": ''... removed
** Updating '/etc/zabbix/zabbix_server.conf' parameter "TLSCertFile": ''... removed
** Updating '/etc/zabbix/zabbix_server.conf' parameter "TLSKeyFile": ''... removed
** Cleaning the system
########################################################
** Executing supervisord
2017-12-18 02:39:00,234 CRIT Set uid to user 0
2017-12-18 02:39:00,234 CRIT Set uid to user 0
2017-12-18 02:39:00,235 WARN Included extra file "/etc/supervisor/conf.d/supervisord_zabbix.conf" during parsing
2017-12-18 02:39:00,235 WARN Included extra file "/etc/supervisor/conf.d/supervisord_zabbix.conf" during parsing
2017-12-18 02:39:00,254 INFO RPC interface 'supervisor' initialized
2017-12-18 02:39:00,254 INFO RPC interface 'supervisor' initialized
2017-12-18 02:39:00,255 INFO supervisord started with pid 1
2017-12-18 02:39:00,255 INFO supervisord started with pid 1
2017-12-18 02:39:01,259 INFO spawned: 'zabbix-server' with pid 120
2017-12-18 02:39:01,259 INFO spawned: 'zabbix-server' with pid 120
Starting Zabbix Server. Zabbix 3.4.4 (revision 74338).
Press Ctrl+C to exit.
   120:20171218:023901.292 Starting Zabbix Server. Zabbix 3.4.4 (revision 74338).
   120:20171218:023901.292 ****** Enabled features ******
   120:20171218:023901.292 SNMP monitoring:           YES
   120:20171218:023901.292 IPMI monitoring:           YES
   120:20171218:023901.292 Web monitoring:            YES
   120:20171218:023901.292 VMware monitoring:         YES
   120:20171218:023901.292 SMTP authentication:       YES
   120:20171218:023901.292 Jabber notifications:       NO
   120:20171218:023901.292 Ez Texting notifications:  YES
   120:20171218:023901.292 ODBC:                      YES
   120:20171218:023901.292 SSH2 support:              YES
   120:20171218:023901.292 IPv6 support:              YES
   120:20171218:023901.292 TLS support:               YES
   120:20171218:023901.292 ******************************
   120:20171218:023901.292 using configuration file: /etc/zabbix/zabbix_server.conf
   120:20171218:023901.304 current database version (mandatory/optional): 03040000/03040005
   120:20171218:023901.304 required mandatory version: 03040000
   120:20171218:023901.334 server #0 started [main process]
   121:20171218:023901.334 server #1 started [configuration syncer #1]
   122:20171218:023901.335 server #2 started [alerter #1]
   123:20171218:023901.335 server #3 started [alerter #2]
   124:20171218:023901.335 server #4 started [alerter #3]
   125:20171218:023901.335 server #5 started [housekeeper #1]
   126:20171218:023901.336 server #6 started [timer #1]
   127:20171218:023901.336 server #7 started [http poller #1]
   128:20171218:023901.336 server #8 started [discoverer #1]
   129:20171218:023901.336 server #9 started [history syncer #1]
   130:20171218:023901.336 server #10 started [history syncer #2]
   132:20171218:023901.337 server #12 started [history syncer #4]
   133:20171218:023901.337 server #13 started [escalator #1]
   131:20171218:023901.338 server #11 started [history syncer #3]
   134:20171218:023901.338 server #14 started [proxy poller #1]
   135:20171218:023901.338 server #15 started [self-monitoring #1]
   137:20171218:023901.339 server #17 started [poller #1]
   139:20171218:023901.339 server #19 started [poller #3]
   138:20171218:023901.339 server #18 started [poller #2]
   141:20171218:023901.340 server #21 started [poller #5]
   142:20171218:023901.341 server #22 started [unreachable poller #1]
   150:20171218:023901.342 server #30 started [preprocessing manager #1]
   144:20171218:023901.342 server #24 started [trapper #2]
   136:20171218:023901.343 server #16 started [task manager #1]
   145:20171218:023901.343 server #25 started [trapper #3]
   153:20171218:023901.344 server #33 started [preprocessing worker #3]
   143:20171218:023901.344 server #23 started [trapper #1]
   152:20171218:023901.348 server #32 started [preprocessing worker #2]
   140:20171218:023901.348 server #20 started [poller #4]
   146:20171218:023901.349 server #26 started [trapper #4]
   149:20171218:023901.349 server #29 started [alert manager #1]
   151:20171218:023901.351 server #31 started [preprocessing worker #1]
   147:20171218:023901.353 server #27 started [trapper #5]
   148:20171218:023901.356 server #28 started [icmp pinger #1]
2017-12-18 02:39:02,358 INFO success: zabbix-server entered RUNNING state, process has stayed up for > than 1 seconds (startsecs)
2017-12-18 02:39:02,358 INFO success: zabbix-server entered RUNNING state, process has stayed up for > than 1 seconds (startsecs)
[root@localhost mysql]#
If the above log appears, it proves that the zabbix server has started successfully.
The most common problem is that the database is not connected, as follows
[root@localhost ~]# docker logs some-zabbix-server-mysql
** Deploying Zabbix server with mysql database
** Preparing the system
** Preparing Zabbix server
********************
* DB_SERVER_HOST: 172.17.0.2
* DB_SERVER_PORT: 3306
* DB_SERVER_DBNAME: zabbix
* DB_SERVER_ZBX_USER: root
* DB_SERVER_ZBX_PASS: 123456
********************
**** MySQL server is not available. Waiting 5 seconds...
**** MySQL server is not available. Waiting 5 seconds...
**** MySQL server is not available. Waiting 5 seconds...
**** MySQL server is not available. Waiting 5 seconds...
**** MySQL server is not available. Waiting 5 seconds...
**** MySQL server is not available. Waiting 5 seconds...
**** MySQL server is not available. Waiting 5 seconds...
**** MySQL server is not available. Waiting 5 seconds...
**** MySQL server is not available. Waiting 5 seconds...
**** MySQL server is not available. Waiting 5 seconds...
**** MySQL server is not available. Waiting 5 seconds...
**** MySQL server is not available. Waiting 5 seconds...
**** MySQL server is not available. Waiting 5 seconds...
**** MySQL server is not available. Waiting 5 seconds...
**** MySQL server is not available. Waiting 5 seconds...
**** MySQL server is not available. Waiting 5 seconds...
Once the zabbix server is successfully started, the middleware can be started. The middleware also specifies the database. The startup command is as follows
docker run --name zabbix-web-nginx-mysql -e DB_SERVER_HOST="192.166.1.187" -e MYSQL_DATABASE="zabbix" -e MYSQL_USER="root" -e MYSQL_PASSWORD="123456" -e ZBX_SERVER_HOST="192.166.1.187" -e PHP_TZ="Asia/Shanghai" -p 8080:80 -d zabbix/zabbix-web-nginx-mysql:alpine-3.4.4
DB_SERVER_HOST: Just like zabbix-server above, fill in the address of mysql database. Since port 3306 has been mapped to the host, fill in the address of the host.
ZBX_SERVER_HOST: The address of zabbix-server, which is the docker opened in the previous step. Since we have mapped 10051 to the host, we fill in the address of the host.
PHP_TZ: Fill in the time zone so that when you look at the graph, the time shown is the local time.
- p 8080:80: It maps docker port 80 to host port 8080 and can be accessed directly through 8080.
Then you can use
docker logs zabbix-web-nginx-mysql
Command View Startup Log
If the following log appears, the startup is successful
[root@localhost mysql]# docker logs zabbix-web-nginx-mysql
** Deploying Zabbix frontend (nginx) with mysql database
** Preparing the system
** Preparing Zabbix web-interface
********************
* DB_SERVER_HOST: 192.166.1.187
* DB_SERVER_PORT: 3306
* DB_SERVER_DBNAME: zabbix
* DB_SERVER_ZBX_USER: root
* DB_SERVER_ZBX_PASS: 123456
********************
** Disable default vhosts
** Adding Zabbix virtual host (HTTP)
**** Impossible to enable SSL support for Nginx. Certificates are missed.
** Preparing Zabbix frontend configuration file
** Updating '/etc/php5/conf.d/99-zabbix.ini' parameter "max_execution_time": '600'... updated
** Updating '/etc/php5/conf.d/99-zabbix.ini' parameter "memory_limit": '128M'... updated
** Updating '/etc/php5/conf.d/99-zabbix.ini' parameter "post_max_size": '16M'... updated
** Updating '/etc/php5/conf.d/99-zabbix.ini' parameter "upload_max_filesize": '2M'... updated
** Updating '/etc/php5/conf.d/99-zabbix.ini' parameter "max_input_time": '300'... updated
** Updating '/etc/php5/conf.d/99-zabbix.ini' parameter "date.timezone": 'Asia/Beijing'... added
** Cleaning the system
########################################################
** Executing supervisord
2017-12-18 02:45:09,049 CRIT Set uid to user 0
2017-12-18 02:45:09,049 CRIT Set uid to user 0
2017-12-18 02:45:09,049 WARN Included extra file "/etc/supervisor/conf.d/supervisord_zabbix.conf" during parsing
2017-12-18 02:45:09,049 WARN Included extra file "/etc/supervisor/conf.d/supervisord_zabbix.conf" during parsing
2017-12-18 02:45:09,068 INFO RPC interface 'supervisor' initialized
2017-12-18 02:45:09,068 INFO RPC interface 'supervisor' initialized
2017-12-18 02:45:09,068 INFO supervisord started with pid 1
2017-12-18 02:45:09,068 INFO supervisord started with pid 1
2017-12-18 02:45:10,071 INFO spawned: 'nginx' with pid 29
2017-12-18 02:45:10,071 INFO spawned: 'nginx' with pid 29
2017-12-18 02:45:10,073 INFO spawned: 'php-fpm' with pid 30
2017-12-18 02:45:10,073 INFO spawned: 'php-fpm' with pid 30
[18-Dec-2017 02:45:10] WARNING: Nothing matches the include pattern '/etc/php5/fpm.d/*.conf' from /etc/php5/php-fpm.conf at line 15.
2017-12-18 02:45:11,117 INFO success: nginx entered RUNNING state, process has stayed up for > than 1 seconds (startsecs)
2017-12-18 02:45:11,117 INFO success: nginx entered RUNNING state, process has stayed up for > than 1 seconds (startsecs)
2017-12-18 02:45:11,117 INFO success: php-fpm entered RUNNING state, process has stayed up for > than 1 seconds (startsecs)
2017-12-18 02:45:11,117 INFO success: php-fpm entered RUNNING state, process has stayed up for > than 1 seconds (startsecs)
Then you can access port 8080 of the host.
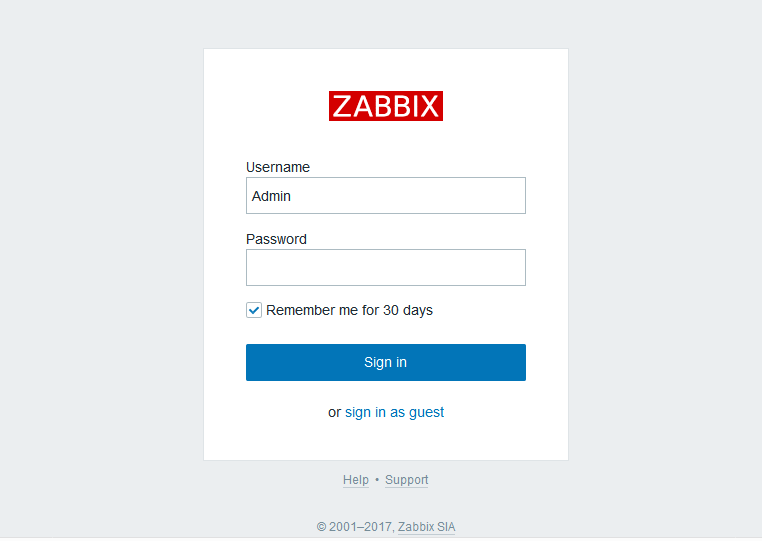
Default username: Admin
Default password: Zabbix
Note that the ie browser is not supported
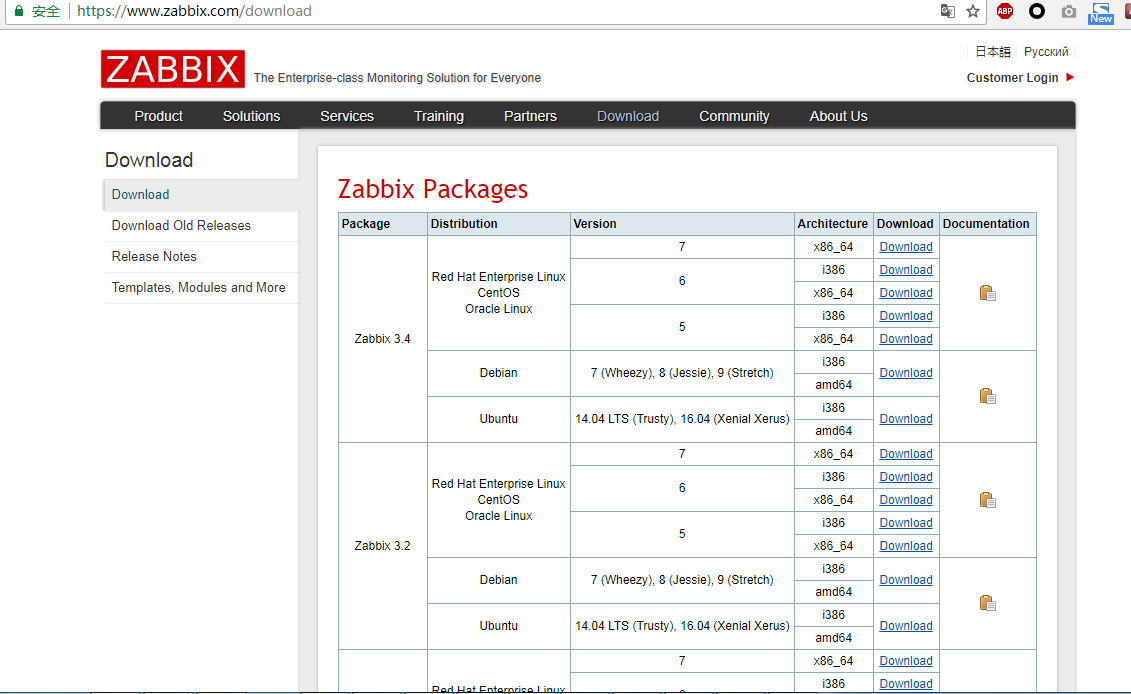
Then go to the Zabbix website and choose the appropriate installation package according to the operating system you want to monitor. I chose zabbix-agent-3.4.4-2.el7.x86_64.rpm here because my operating system is Redhat 7.2.
The installation process is as follows
[root@resinapp1 ~]# yum localinstall ./zabbix-agent-3.4.4-2.el7.x86_64.rpm
Loaded plug-ins: langpacks, product-id, search-disabled-repos, subscription-manager
This system is not registered to Red Hat Subscription Management. You can use subscription-manager to register.
Checking. / zabbix-agent-3.4.4-2.el7.x86_64.rpm: zabbix-agent-3.4.4-2.el7.x86_64
 . / zabbix-agent-3.4.4-2.el7.x86_64.rpm will be installed
 Resolving dependencies
 --> Inspecting business
 The package zabbix-agent.x86_64.0.3.4.4-2.el7 will be installed
 --> Resolving Dependency Completion
base                                                                                                                           | 4.1 kB  00:00:00
centos                                                                                                                         | 3.6 kB  00:00:00
epel                                                                                                                           | 4.3 kB  00:00:00

Dependency Resolution

======================================================================================================================================================
 Package Architecture Version Source Size
======================================================================================================================================================
Installing:
 zabbix-agent                    x86_64                    3.4.4-2.el7                      /zabbix-agent-3.4.4-2.el7.x86_64                    1.3 M

Transaction summary
======================================================================================================================================================
Install 1 package

Total: 1.3 M
 Installation Size: 1.3 M
Is this ok [y/d/N]: y
Downloading packages:
Running transaction check
Running transaction test
Transaction test succeeded
Running transaction
  Installation in progress: zabbix-agent-3.4.4-2.el7.x86_64 1/1
  Verification: zabbix-agent-3.4.4-2.el7.x86_64 1/1

Installed:
  zabbix-agent.x86_64 0:3.4.4-2.el7

Complete!
[root@resinapp1 ~]#
After installation, you need to modify / etc / ZABBIX / zabbix_agent d.conf, this file
Find the inside
Server=127.0.0.1
ServerActive=127.0.0.1
Change the ip address to the ip address of the monitoring host. Here I am 192.166.1.187.
You can open the client program.
systemctl start zabbix-agent.service
In Red Hat 6 and ubuntu
service zabbix-agent start
After booting up, you can see that port 10050 is open.
[root@resinapp1 sbin]# netstat -anpt | grep 10050
tcp        0      0 0.0.0.0:10050           0.0.0.0:*               LISTEN      19990/zabbix_agentd
tcp6       0      0 :::10050                :::*                    LISTEN      19990/zabbix_agentd
[root@resinapp1 sbin]#
[root@resinapp1 sbin]# ps aux | grep zabbix
zabbix   19990  0.0  0.0  86904  1280 ?        S    12:03   0:00 /usr/sbin/zabbix_agentd -c /etc/zabbix/zabbix_agentd.conf
zabbix   19991  0.0  0.0  86904  1608 ?        S    12:03   0:00 /usr/sbin/zabbix_agentd: collector [idle 1 sec]
zabbix   19992  0.0  0.0  86904  1856 ?        S    12:03   0:00 /usr/sbin/zabbix_agentd: listener #1 [waiting for connection]
zabbix   19993  0.0  0.0  86904  1852 ?        S    12:03   0:00 /usr/sbin/zabbix_agentd: listener #2 [waiting for connection]
zabbix   19994  0.0  0.0  86904  1852 ?        S    12:03   0:00 /usr/sbin/zabbix_agentd: listener #3 [waiting for connection]
zabbix   19995  0.0  0.0  87032  2140 ?        S    12:03   0:00 /usr/sbin/zabbix_agentd: active checks #1 [idle 1 sec]
root     20028  0.0  0.0 112664   968 pts/0    S+   12:04   0:00 grep --color=auto zabbix
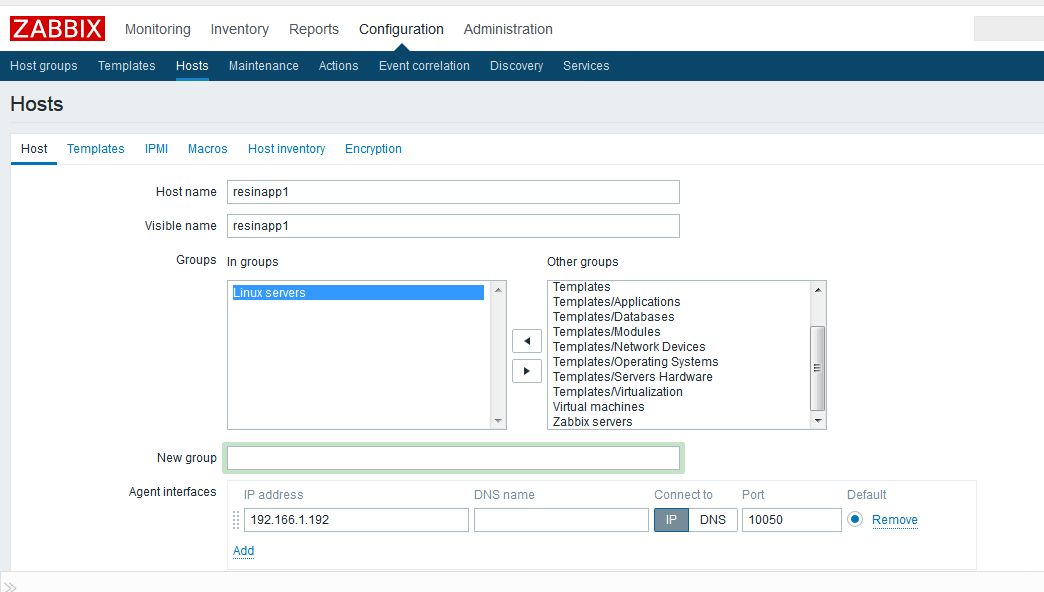
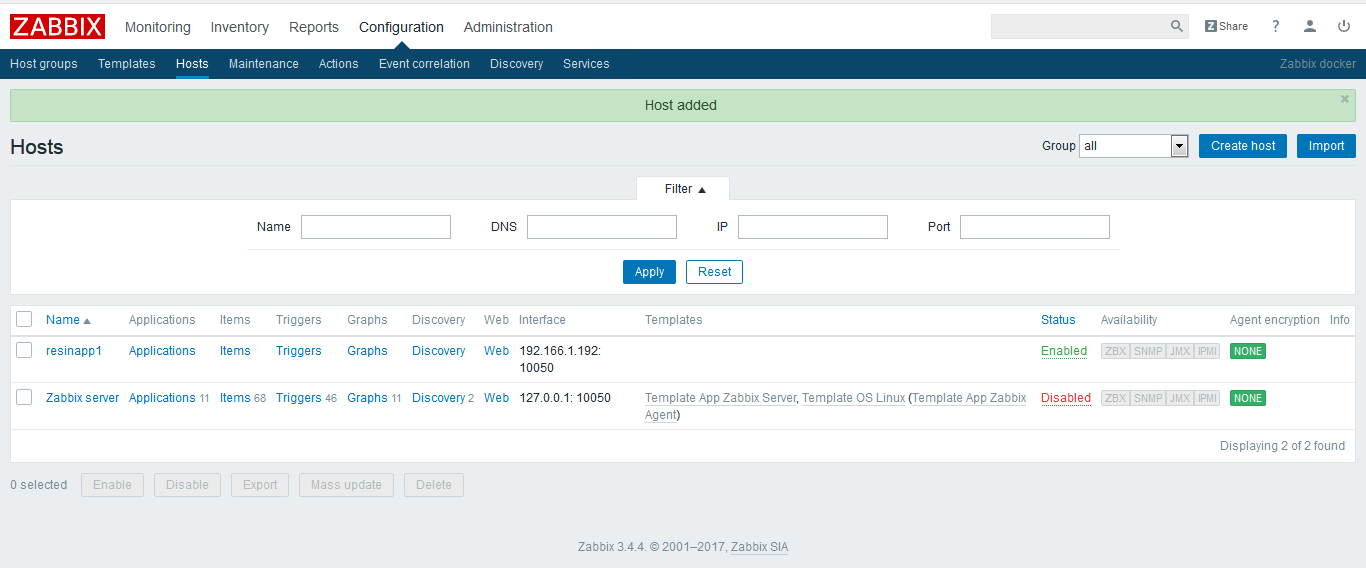
Then we can go back to the server page of zabbix and add the host we just had.

Find the Creat Host in Configuration - "Hosts" and fill in the IP and Groups of the monitored host.
Then switch to the Templates tab and select a monitoring template based on the host type.
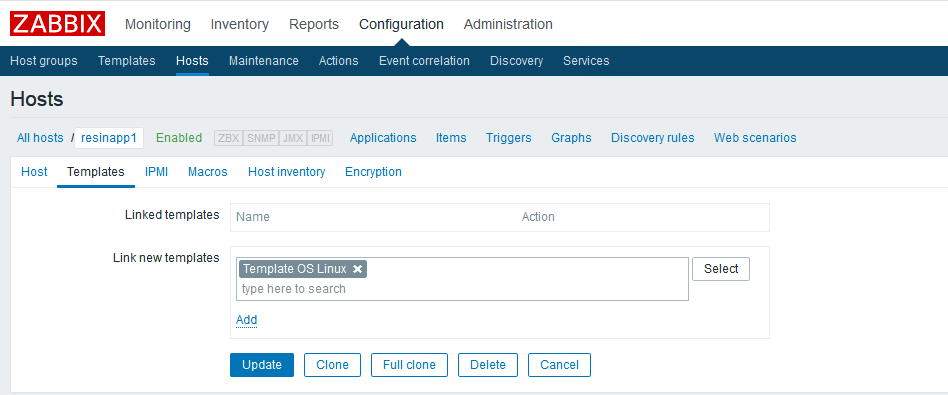
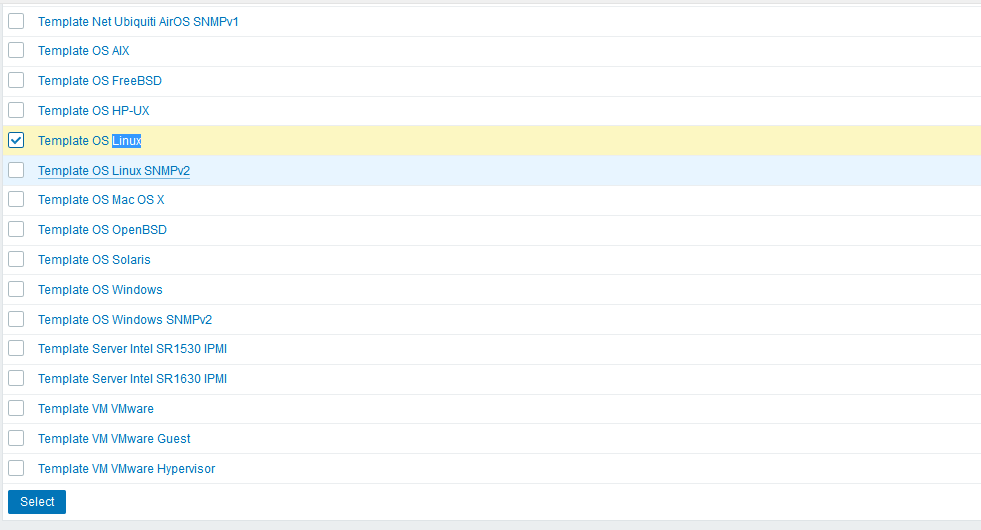
Different templates correspond to different monitoring indicators and different images.
Then click the bottom Add button to add a monitored host
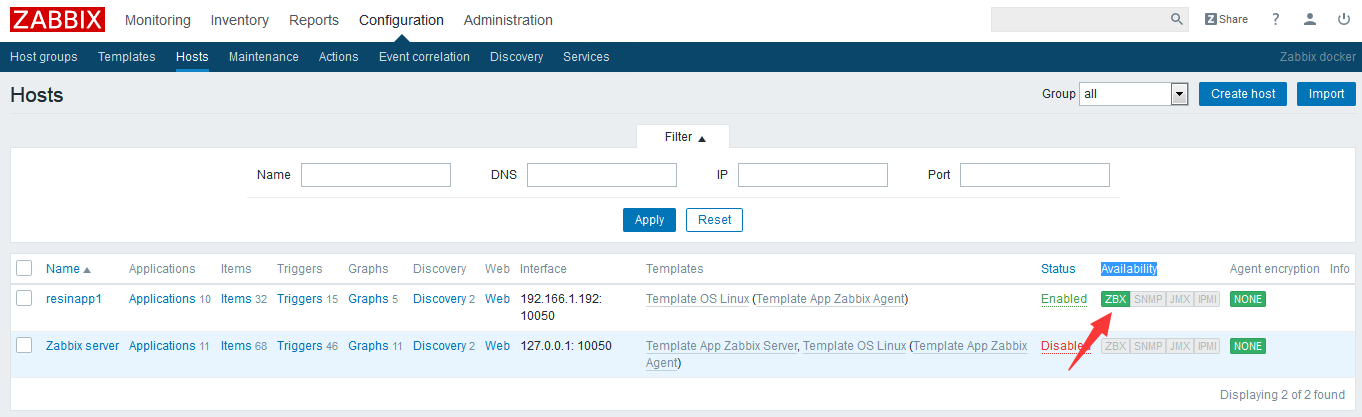
When the ZBX in Aviliability turns green, it means that the zabbix server can get the status of the monitored host normally. If it is red, it means that the network has problems. It is necessary to check the network connectivity between the zabbix host and the monitored server.
Then you can see the CPU occupancy and other parameters of this host, and the building is basically completed.
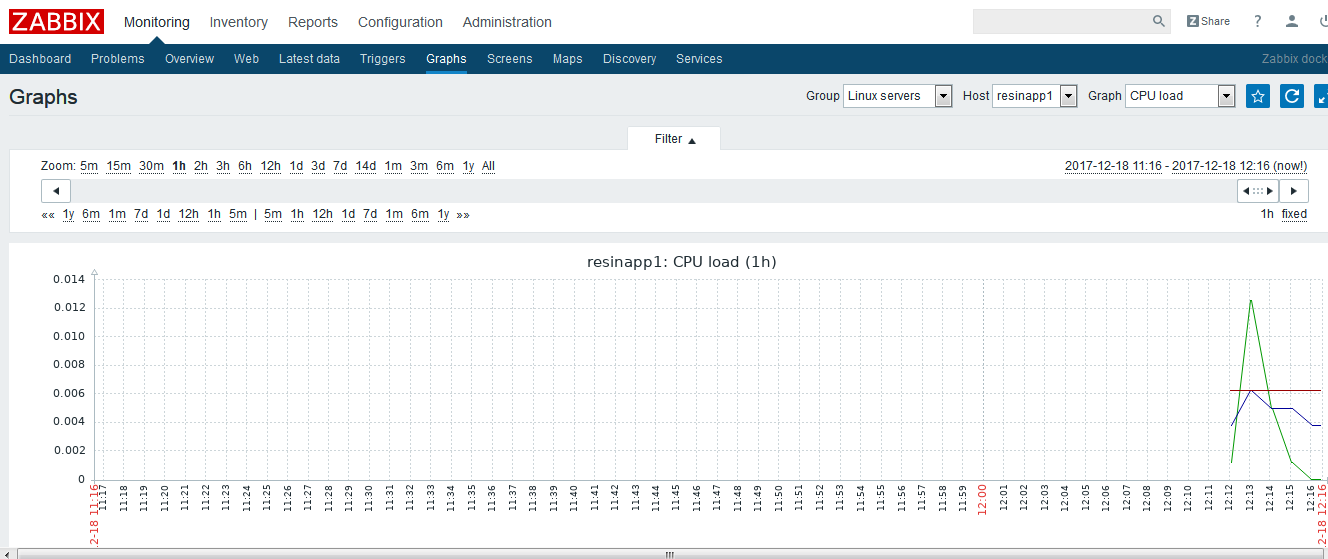
If the time in the image is not displayed correctly, then the time zone should not be set properly, and the setting of the time zone should be checked.