1, Thymeleaf
1.1 introduction to Thymeleaf
Thymeleaf is an XML/XHTML/HTML5 template engine, which can be used for application development in Web and non Web environments. It is an open source Java library, based on the Apache License 2.0 license, created by Daniel Fern á ndez. The author is also the author of java encryption library Jasypt. Thymeleaf provides an optional module for integrating Spring MVC. In application development, you can use thymeleaf to completely replace JSP or other template engines, such as Velocity, FreeMarker, etc. The main goal of thymeleaf is to provide a well formed template creation method that can be displayed correctly by the browser, so it can also be used as static modeling. You can use it to create validated XML and HTML templates. Instead of writing logic or code, developers simply add tag attributes to the template. Next, these tag attributes perform pre-defined logic on the DOM (document object model).
Its features are: out of the box, Thymeleaf allows you to work with six templates, each called a template pattern:
- XML
- Valid XML
- XHTML
- Valid XHTML
- HTML5
- Old HTML5
All of these patterns refer to well formed XML files, with the exception of the Legacy HTML5 pattern, which allows you to work with HTML5 files that contain independent (non closed) tags, tag attributes that have no value, or tag attributes that are not written between quotes. In order to process files in this particular mode, Thymeleaf will first perform the transformation, converting your files to well formed XML files, which are still fully effective HTML5 (actually the recommended way to create HTML5 code).
Also note that validation works only with XML and XHTML Templates. However, these are the first mock exam types that Thymeleaf can handle, and users can always define their own patterns by specifying the methods and results of the template in this mode. In this way, anything that can be modeled as a DOM tree (whether it's XML or not) can be effectively treated as a template by thymeleaf.
2.2 spring boot integrates thymeleaf
Using springboot to integrate with Thymeleaf can greatly reduce the amount of code using only Thymeleaf, so let's make
Using spring boot integration to use thmeleaf
The implementation steps are as follows:
Create a springboot project
Add the starting dependency of thymeleaf
Add start dependency of spring web
Write html use syntax of thymelaf to get the value of the variable corresponding to the background passing
Write controller to set the value of variable into model
- (1) Create project
Create a stand-alone project, springboot thymeleaf, which is the Demo for the case project as the contact entry point.
pom.xml rely on
<?xml version="1.0" encoding="UTF-8"?>
<project xmlns="http://maven.apache.org/POM/4.0.0"
    xmlns:xsi="http://www.w3.org/2001/XMLSchema-instance"
    xsi:schemaLocation="http://maven.apache.org/POM/4.0.0
http://maven.apache.org/xsd/maven-4.0.0.xsd">
  <modelVersion>4.0.0</modelVersion>
  <groupId>com.itheima</groupId>
  <artifactId>springboot-thymeleaf</artifactId>
  <version>1.0-SNAPSHOT</version>
  <parent>
    <groupId>org.springframework.boot</groupId>
    <artifactId>spring-boot-starter-parent</artifactId>
    <version>2.1.4.RELEASE</version>
  </parent>
  <dependencies>
    <!--web Start dependence-->
    <dependency>
      <groupId>org.springframework.boot</groupId>
      <artifactId>spring-boot-starter-web</artifactId>
    </dependency>
    <!--thymeleaf to configure-->
    <dependency>
      <groupId>org.springframework.boot</groupId>
      <artifactId>spring-boot-starter-thymeleaf</artifactId>
    </dependency>
  </dependencies>
</project>
- (2) Create package com.itheima.thymeleaf . and create the startup class ThymeleafApplication
@SpringBootApplication
public class ThymeleafApplication {
  public static void main(String[] args) {
    SpringApplication.run(ThymeleafApplication.class,args);
 }
}
- (3) Create application.yml
Set the cache setting of thymeleaf to false. Cached by default, for testing.
spring:
thymeleaf:
 cache: false
- (4) Control layer
Create a controller to test the background settings data into the model.
establish com.itheima.controller.TestController, the code is as follows:
@Controller
@RequestMapping("test")
public class TestController {

    @RequestMapping("/hello")
    public String hello(Model model){
        model.addAttribute("hello","hello thymeleaf");
        return "demo";
    }

}
Create html
Create the templates directory in resources and the templates directory demo.html , the code is as follows:
<!DOCTYPE html>
<html xmlns:th="http://www.thymeleaf.org">
<head>
    <meta charset="UTF-8">
    <title>Thymeleaf introduction</title>
</head>
<body>

<h1 th:text="${hello}"></h1>
Note: this namespace must be written
<html xmlns:th="http://www.thymeleaf.org">
explain
Explanation:
<html  xmlns:th= " http://www.thymeleaf.org ">: this statement uses the thymeleaf tag
 < p th:text = "${Hello}" >
Similar to EL expression.
test
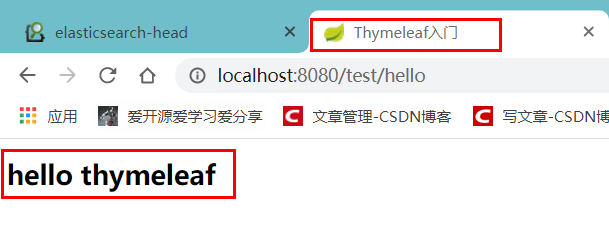
Start the system and access the
http://localhost:8080/test/hello
effect:
2.3 basic syntax of Thymeleaf
- (1)th:action
Define the background controller path, similar to the action attribute of the < form > tag.
For example:
<form th:action="@{/test/hello}" >
  <input th:type="text"  th:name="id">
  <button>Submit</button>
</form>

- (2)th:each
Object traversal, similar to the < C: foreach > tag in jstl.
establish com.itheima.model.User, the code is as follows:
public class User {
  private Integer id;
  private String name;
  private String address;
  //..get..set
}
Controller add data
/***
* Visit / test/hello to jump to demo1 page
* @param model
* @return
*/
@RequestMapping("/hello")
public String hello(Model model){
  model.addAttribute("hello","hello welcome");
  //Aggregate data
  List<User> users = new ArrayList<User>();
  users.add(new User(1,"Zhang San","Shenzhen"));
  users.add(new User(2,"Li Si","Beijing"));
  users.add(new User(3,"Wang Wu","Wuhan"));
//Similar to the key value form of Map
  model.addAttribute("users",users);
  return "demo1";
}
Page output
<table>
    <th>
        <td>subscript</td>
        <td>number</td>
        <td>full name</td>
        <td>address</td>
    </th>

    <tr th:each="user,userStat:${users}">
        <td>
            Subscript:<span th:text="${userStat.index}"></span>
        </td>
        <td th:text="${user.id}"></td>
        <td th:text="${user.name}"></td>
        <td th:text="${user.address}"></td>
    </tr>

</table>
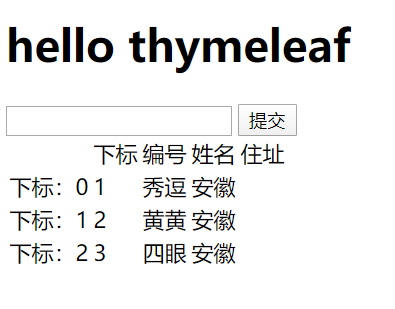
Test effect
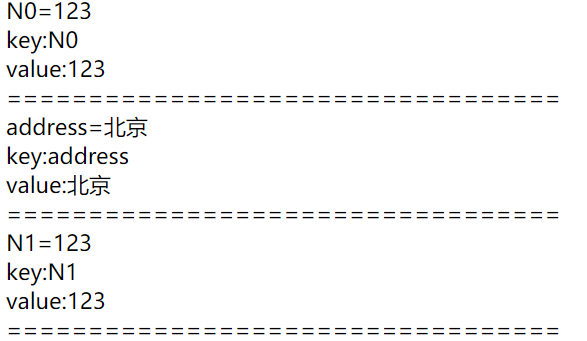
- (3) Map output
Add Map in the background
      //Map definition
        Map<String,Object> dataMap = new HashMap<String,Object>();
        dataMap.put("N0","123");
        dataMap.put("address","Shenzhen");
        dataMap.put("N1","123");
        dataMap.put("address","Beijing");
        model.addAttribute("dataMap",dataMap);
<div th:each="map,mapStat:${dataMap}">
  <div th:text="${map}"></div>
 key:<span th:text="${mapStat.current.key}"></span><br/>
 value:<span th:text="${mapStat.current.value}"></span><br/>
 ==============================================
</div>

- (4) Array output
Add array in the background
//Store an array
String[] names = {"Zhang San","Li Si","Wang Wu"};
model.addAttribute("names",names);
Page output
<div th:each="name,nameStats:${names}"> ====================== <span th:text="${nameStats.count}"></span> <span th:text="${name}"></span> </div>
Output effect:

- (5)Date output
Background add date
//date
model.addAttribute("now",new Date());
Page output
<div>
  <span th:text="${#dates.format(now,'yyyy-MM-dd hh:ss:mm')}"></span>
</div>
effect:
- (6)th:if condition
Add age in background
//if condition
model.addAttribute("age",22);
Page output
<div>
  <span th:if="${(age>=18)}">Finally grown up!</span>
</div>
Test effect:
- (7)th:fragment defines a module
You can define a separate module and create a footer.html The code is as follows:
<!DOCTYPE html>
<html xmlns:th="http://www.thymeleaf.org">
<head>
  <meta http-equiv="Content-Type" content="text/html;charset=charset=utf-8">
  <title>fragment</title>
</head>
<body>
<div id="C" th:fragment="copy" >
 //About us<br/>
</div>
</body>
- (8)th:include
You can directly import th:fragment and the following code in demo1.html:
<div id="A" th:include="footer::copy"></div>
Effect demonstration: