1. Prepare the environment
- If you have an older version Vue cli, uninstall it
1 npm uninstall vue-cli -g //Or yarn global remove Vue cli
- Install new version
cnpm install -g @vue/cli //yarn global add @vue/cli
- vue -V
2. Create project
- Create a project and write the project name
vue create <Project Name>//Humps (including uppercase letters) are not supported for file names
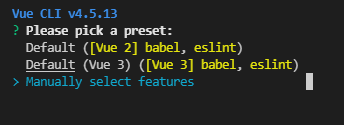
- Select preset
one Default (babel, eslint): the default setting (direct enter) is very suitable for quickly creating a prototype of a new project. There is no npm package with any auxiliary functions
two Manually select features: the user-defined configuration (press the arrow key ↓) is a production oriented project we need and an npm package that provides optional functions
3.Manually select features: the user-defined configuration (press the arrow key ↓) is a production oriented project we need, and provides an npm package with optional functions

- Custom preset
? Check the features needed for your project: (Press <space> to select, <a> to toggle all, <i> to invert selection)
>( ) Babel //Transcoder, which can convert ES6 code to ES5 code for execution in the existing environment.
( ) TypeScript// TypeScript is a superset of JavaScript (suffix. js) (suffix. ts). It contains and extends the syntax of JavaScript. It needs to be compiled and output as JavaScript to run in the browser. At present, few people use it again
( ) Progressive Web App (PWA) Support// Progressive Web application
( ) Router // vue router
( ) Vuex // vuex (state management mode of vue)
( ) CSS Pre-processors // CSS preprocessor (e.g. less, sass)
( ) Linter / Formatter // Code style checking and formatting (e.g. ESlint)
( ) Unit Testing // unit tests
( ) E2E Testing // e2e (end to end) test
After selecting enter directly, you will be prompted to select the specific toolkit for the corresponding function, and select one you are good at or widely used (for Baidu in case of problems). The brief introduction is as follows:
① Whether to use history router:

Vue router uses the characteristics of the browser's own hash mode and history mode to realize front-end routing (by calling the interface provided by the browser)
② css preprocessor
It mainly solves browser compatibility and simplifies CSS code for CSS Other issues

③ ESLint:
A plug-in javascript code detection tool is provided. ESLint + Prettier / / is widely used

④ When to detect:

⑤ Unit test:
? Pick a unit testing solution: (Use arrow keys)
>Mocha + Chai / / Mocha is flexible and only provides a simple test structure. If other functions are required, other libraries / plug-ins need to be added. Must be installed in a global environment
 Jest / / easy to install and configure. Built in Istanbul, you can view the test coverage. Compared with Mocha, it has simple configuration, simple test code, easy integration with babel and rich expect
⑥ How to store configuration:

⑦ Do you want to save this configuration (y: record this configuration, and then you need to give a name; n: do not record this configuration):

⑧ Completion of Construction:

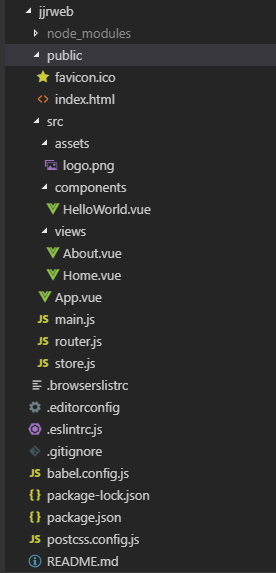
Project structure

It has been streamlined a lot, but it is still different from Vue 2.0. The basic usage changes are not very large
① vuex (status management):
vue cli 2 : Vuex is NPM installed by itself after the construction is completed, which is not included in the construction process. You can see that the vuex default folder (store) of vue cli 2 contains three js files: action (store some asynchronous methods calling the external API interface, and then commit changes to change the changes data), index (initialize the changes data, which is the outlet of the store), and changes (a collection of methods for processing synchronous execution of data logic, and the only method for store data change in vuex commit changes)
Vuex in vue cli 3: vuex is a preset included in the building process for selection. By default, vue cli 3 uses only one store.js instead of the three JS files in the original store folder. action, changes, state and getters of the store There are many uses of
② router:
vue cli 2 : " router/index.js "
vue cli 3: "router.js" (same usage and doing)
③ Remove static , New public folder
vue cli 2 : Static is the default folder for storing static resources in webpack. When packaging, a copy will be directly copied to dist folder and will not be compiled by webpack
vue cli 3 : abandon static Two processing methods of "static resources" in public Vue cli 3 are added:
Processed by webpack: resources imported in JavaScript or referenced through "relative path" in template/CSS will be compiled and compressed
Without webpack processing: placed in public The resources referenced in the directory or through the absolute path will be "directly copied" without any compilation and compression
④ index.html :
vue cli 2 : "index.html "
vue cli 3 : "public/index.html" this template will be deleted html-webpack-plugin Processed
⑤ src/views:
vue cli 3 The new views folder is used to store "pages" and distinguish them components
⑥ Remove the build (define rules according to the configuration in config) and config (configure parameters of different environments) folders:
vue cli 3 You can configure these through command line parameters, or vue.config.js (create a file with the same name as vue.config.js in the root directory) devServer Field configuration development server
⑦ babel.config.js:
Configure Babel. The Vue CLI uses the new configuration format in Babel 7 Babel.config.js . babelrc or package.json Medium babel Different fields, this configuration file will not use the scheme based on file location, but will be consistently applied to all files under the project root directory, including node_modules Internal dependency. It is officially recommended to always use it in Vue CLI projects babel.config.js Replace other formats.
⑧ Changes to some other files in the root directory:
All the previous configuration files are preset when vue create is built, or you can use the command parameters Configured in vue.config.js
Create a new vue.config.js in the root directory as needed and configure it yourself. eg: (simple configuration. For more configuration details, see the official website: Configuration reference | Vue CLI)
module.exports = {
  baseUrl: '/',// The root path when deploying the application (default '/') or relative path (with usage restrictions)
  outputDir: 'dist',// Directory of production environment build files generated at runtime (default 'dist', which will be cleared before build)
  assetsDir: '',//Directory (relative to outputDir) where the generated static resources (s, css, img, fonts) are placed (default '')
  indexPath: 'index.html',//Specifies that the output path of the generated index.html (relative to outputDir) can also be an absolute path.
  pages: {//The path and file name configured in pages must exist in your document directory, otherwise an error will be reported when starting the service
    index: {//It is optional except entry
      entry: 'src/index/main.js',// Page entry. Each "page" should have a corresponding JavaScript entry file
      template: 'public/index.html',// Template source
      filename: 'index.html',// Output in dist/index.html
      title: 'Index Page',// When using the title option, use in the template: < title > <% = htmlwebpackplugin. Options. Title% > < / Title >
      chunks: ['chunk-vendors', 'chunk-common', 'index'] // By default, the blocks included in this page will include the extracted general chunks and vendor chunk s
    },
    subpage: 'src/subpage/main.js'//Official explanation: when the entry only string format is used, the template will be deduced as' public/subpage.html '. If it cannot be found, it will fall back to' public/index.html ', and the output file name will be deduced as' subpage.html'
  },
  lintOnSave: true,// Check when saving
  productionSourceMap: true,// Does the production environment generate sourceMap files
  css: {
    extract: true,// Whether to use the css separation plug-in ExtractTextPlugin
    sourceMap: false,// Open CSS source maps
    loaderOptions: {},// css preset configuration item
    modules: false// Enable CSS modules for all CSS / pre processor files
  },
  devServer: {// Environment configuration
    host: 'localhost',
    port: 8080,
    https: false,
    hotOnly: false,
    open: true, //Configure auto start browser
    proxy: {// Configure multiple proxies (configure one proxy: 'http://localhost:4000 ' )
      '/api': {
        target: '<url>',
        ws: true,
        changeOrigin: true
      },
      '/foo': {
        target: '<other_url>'
      }
    }
  },
  pluginOptions: {// Third party plug-in configuration
    // ...
  }
};
After upgrading Vue cli to 3, a lot of configuration files are reduced and all configuration items are condensed into vue.config.js. Therefore, it is important to understand and use vue.config.js.
Here is an article about the comprehensive configuration of vue-cli3 for your reference, https://segmentfault.com/a/1190000017008697
Hot update configuration
Add in vue.config.js
1 chainWebpack: config => {
2 / / repair HMR
3     config.resolve.symlinks(true);
4 },
You need to comment out the hot update to modify the css part // extract: true,
css: {
     //extract: true, / / whether to use the css separation plug-in ExtractTextPlugin
     sourceMap: false,// Open CSS source maps
     loaderOptions: {},// css preset configuration item
     modules: false// Enable CSS modules for all CSS / pre processor files
},
In this way, the hot update configuration is completed!
3. vue ui graphical interface to create a project
vue ui