| instructions | describe |
|---|
| {{}} | Interpolation expression |
| v-text | Update text content in element |
| v-html | Update innerHTML in element |
| v-if | Conditionally render elements based on the true and false values of the expression. |
| v-else-if | express v-if The else if block. Can be called chained. |
| v-else | by v-if perhaps v-else-if Add else block. |
| v-for | Render elements or template blocks multiple times based on source data. |
| v-on | Bind event listener. |
| v-bind | Dynamically bind one or more attribute s, or a component prop to an expression. |
| v-once | Render elements and components only once. |
1. Interpolation expression {}
- In the HTML page, we need to obtain the data in Vue. At this time, we can obtain it through interpolation expression.
<!DOCTYPE html>
<html lang="en">

<head>
  <meta charset="UTF-8" />
  <title>Common instructions</title>
</head>

<body>
  <div id="root">
    <div>{{message}}</div>
  </div>
  <script src="https://unpkg.com/vue@next"></script>
  <script>
    const app = Vue.createApp({
      data() {
        return {
          message: "hello world"
        };
      }
    });
    const vm = app.mount('#root');
  </script>
</body>

</html>

2. v-text
- Update element textContent.
<!DOCTYPE html>
<html lang="en">

<head>
  <meta charset="UTF-8" />
  <title>Common instructions</title>
</head>

<body>
  <div id="root">
  </div>
  <script src="https://unpkg.com/vue@next"></script>
  <script>
    const app = Vue.createApp({
      data() {
        return {
          message: "hello world"
        };
      },
      template: `
        <div v-text="message"></div>
      `
    });
    const vm = app.mount('#root');
  </script>
</body>

</html>

3. v-html
- Update element innerHTML.
<!DOCTYPE html>
<html lang="en">

<head>
  <meta charset="UTF-8" />
  <title>Common instructions</title>
</head>

<body>
  <div id="root">
  </div>
  <script src="https://unpkg.com/vue@next"></script>
  <script>
    const app = Vue.createApp({
      data() {
        return {
          html: "<i style='color:red;'>hello world</i>"
        };
      },
      template: `
        <div v-html="html"></div>
      `
    });
    const vm = app.mount('#root');
  </script>
</body>

</html>

4. v-if
- Conditionally render elements based on the true and false values of the expression. On switching, the element and its data binding / component are destroyed and rebuilt.
<!DOCTYPE html>
<html lang="en">

<head>
  <meta charset="UTF-8" />
  <title>Common instructions</title>
</head>

<body>
  <div id="root">
  </div>
  <script src="https://unpkg.com/vue@next"></script>
  <script>
    const app = Vue.createApp({
      data() {
        return {
          b1: true,
          b2: false,
          message1: "hello world true",
          message2: "hello world false"
        };
      },
      template: `
        <div v-if="b1">{{message1}}</div>
        <div v-if="b2">{{message2}}</div>
      `
    });
    const vm = app.mount('#root');
  </script>
</body>

</html>

5. v-else-if
- The previous sibling element must have v-if or v-else-if.
- express v-if The else if block. Can be called chained.
<!DOCTYPE html>
<html lang="en">

<head>
  <meta charset="UTF-8" />
  <title>Common instructions</title>
</head>

<body>
  <div id="root">
  </div>
  <script src="https://unpkg.com/vue@next"></script>
  <script>
    const app = Vue.createApp({
      data() {
        return {
          b1: true,
          b2: false,
        };
      },
      template: `
        <div v-if="b2">v-if</div>
        <div v-else-if="b1">v-else-if</div>
        <div v-else>v-else</div>
      `
    });
    const vm = app.mount('#root');
  </script>
</body>

</html>

6. v-else
- The previous sibling element must have v-if or v-else-if.
- by v-if perhaps v-else-if Add else block.
<!DOCTYPE html>
<html lang="en">

<head>
  <meta charset="UTF-8" />
  <title>Common instructions</title>
</head>

<body>
  <div id="root">
  </div>
  <script src="https://unpkg.com/vue@next"></script>
  <script>
    const app = Vue.createApp({
      data() {
        return {
          // b1: true,
          b2: false,
          // message1: "hello world true",
          // message2: "hello world false"
        };
      },
      template: `
        <div v-if="b2">v-if</div>
        <div v-else>v-else</div>
      `
    });
    const vm = app.mount('#root');
  </script>
</body>

</html>

7. v-for
7.1 use v-for Corresponding an array to a set of elements
- We can use v-for Instruction renders a list based on an array. v-for Instructions need to be used item in items Form, where items is the source data array, and item Is the alias of the array element being iterated.
- stay v-for Block, we can access the properties of all parent scopes. v-for It also supports an optional second parameter, the index of the current preceding item.
- v-for The default behavior of tries to modify elements in place instead of moving them. To force it to reorder elements, you need to use a special attribute key To provide a sort prompt:
<!DOCTYPE html>
<html lang="en">

<head>
  <meta charset="UTF-8" />
  <title>Common instructions</title>
</head>

<body>
  <ul id="root">
  </ul>
  <script src="https://unpkg.com/vue@next"></script>
  <script>
    // Use v-for to correspond an array to a set of elements
    const app = Vue.createApp({
      data() {
        return {
          parentMessage: 'Parent',
          items: [{ message: 'Hello' }, { message: 'world' }]
        };
      },
      template: `
        <li v-for="(item, index) in items" :key="index">
          {{ parentMessage }}--{{ index }}--{{ item.message }}
        </li>
      `
    });
    const vm = app.mount('#root');
  </script>
</body>

</html>

seven point two Array update detection
- one Change function using array push, pop, shift, unshift, splice, sort, reverse
vm.items.pop();
- two Direct replacement array
vm.items = [{message: "666666"}];
- three Directly update the contents of the array
vm.items[0] = {message: "111111"};
seven point three stay v-for Objects used in
- You can use it, too v-for To traverse the properties of an object.
- You can also provide the second parameter as the property name (that is, the key name).
- You can also use the third parameter as an index.
<!DOCTYPE html>
<html lang="en">

<head>
  <meta charset="UTF-8" />
  <title>Common instructions</title>
</head>

<body>
  <ul id="root">
  </ul>
  <script src="https://unpkg.com/vue@next"></script>
  <script>
    // Using objects in v-for
    const app = Vue.createApp({
      data() {
        return {
          myObject: {
            name: 'ZS',
            age: 18,
            sex: 'male'
          }
        };
      },
      template: `
        <li v-for="(value, key, index) in myObject">
          {{ index }}--{{ key }}--{{ value }}
        </li>
      `
    });
    const vm = app.mount('#root');
  </script>
</body>

</html>

seven point four stay v-for Range of values used in
<!DOCTYPE html>
<html lang="en">
<head>
<meta charset="UTF-8" />
<title>Common instructions</title>
</head>
<body>
<ul id="root">
</ul>
<script src="https://unpkg.com/vue@next"></script>
<script>
// Range of values used in v-for
const app = Vue.createApp({
template: `
<span v-for="item in 10" :key="item">
{{ item }}  
</span>
`
});
const vm = app.mount('#root');
</script>
</body>
</html>

8. v-on
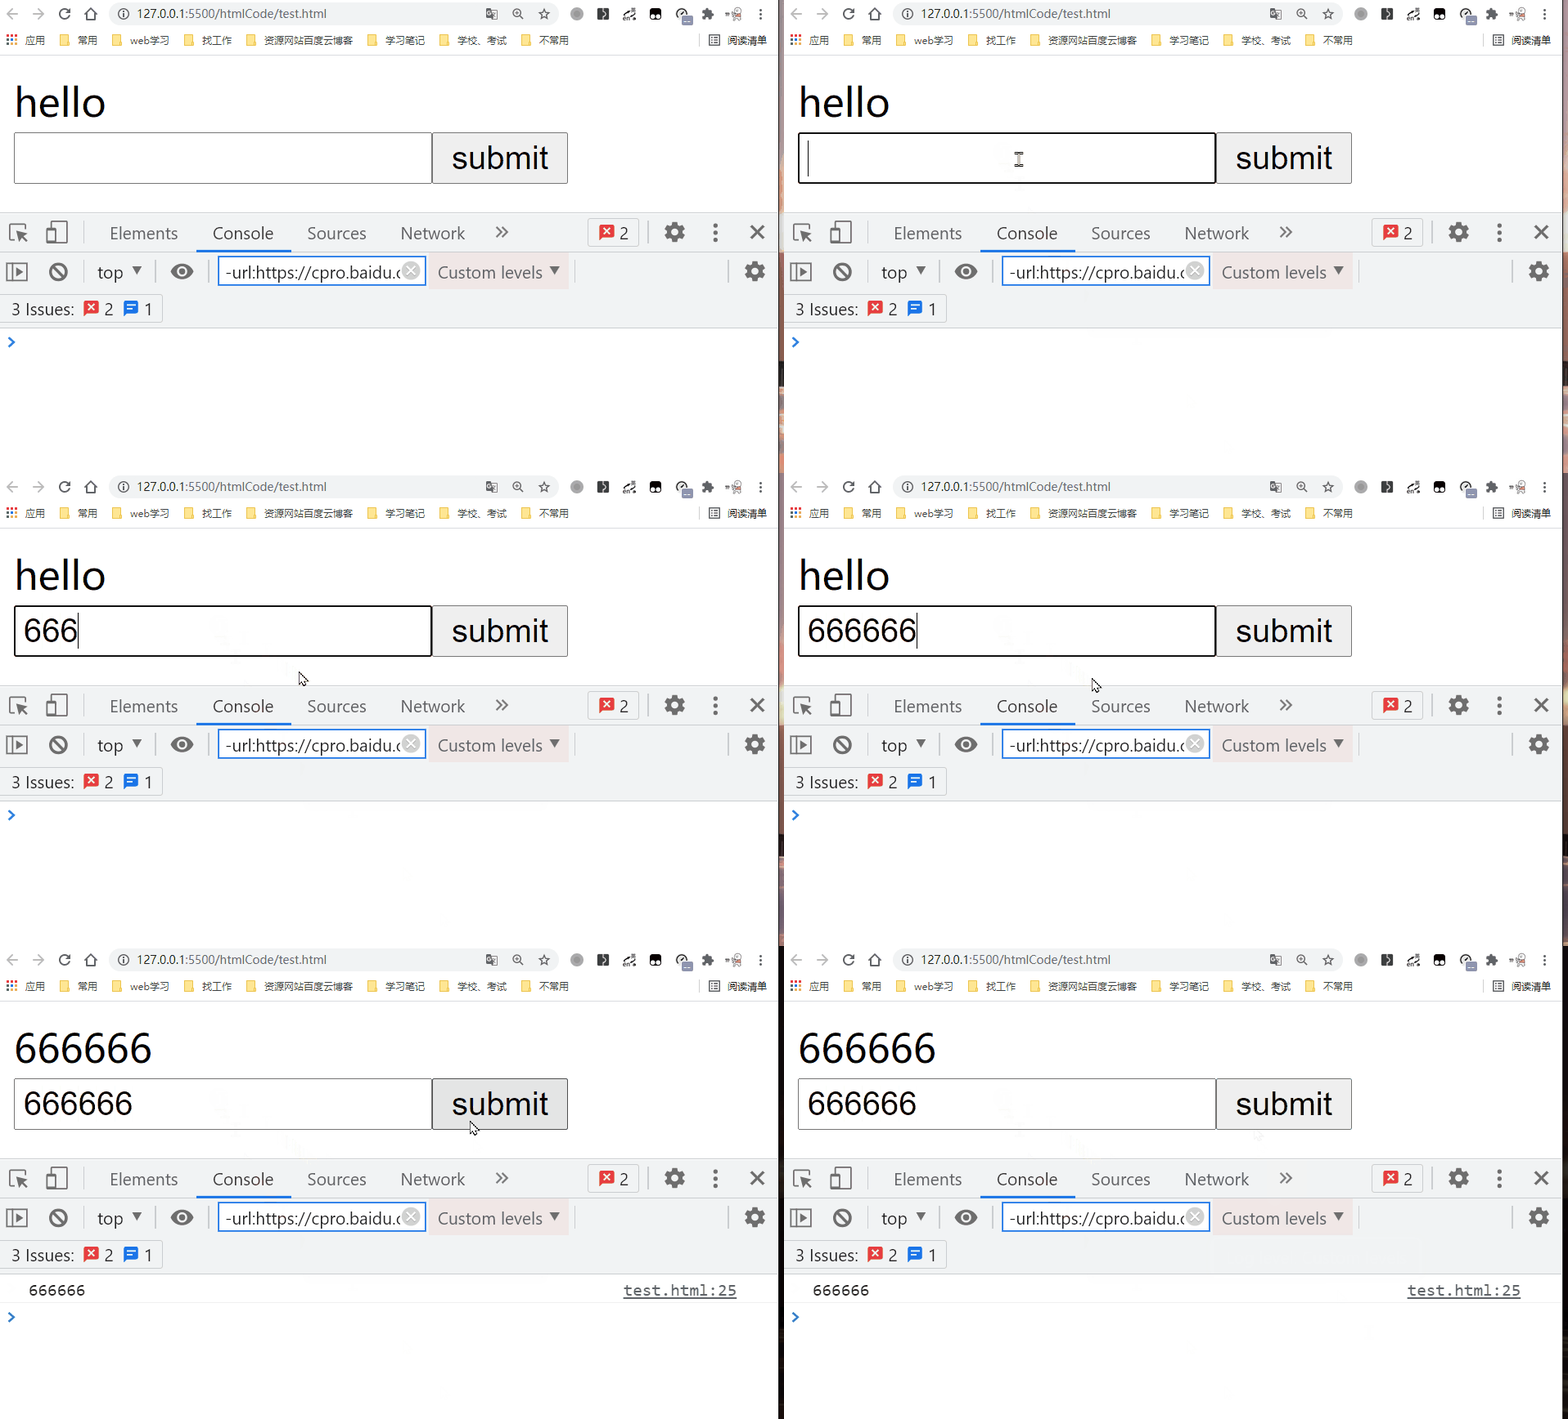
- Bind event listener. The event type is specified by the parameter. An expression can be the name of a method or an inline statement, or it can be omitted without modifiers.
- Using the. prevent modifier equals the call event.preventDefault().
- We can use v-on Directive (usually abbreviated as the @ symbol) to listen for DOM events and execute some JavaScript when the event is triggered. Usage is v-on:click="methodName" Or use shortcuts @ click="methodName"
<!DOCTYPE html>
<html lang="en">

<head>
  <meta charset="UTF-8" />
  <title>Common instructions</title>
</head>

<body>
  <div id="root">
  </div>
  <script src="https://unpkg.com/vue@next"></script>
  <script>
    const app = Vue.createApp({
      data(){
        return {
          message: 'hello'
        };
      },
      methods: {
        handleSubmit(){
          const inputValue = document.getElementById('inputValue');
          this.message = inputValue.value;
          console.log(this.message);
        }
      },
      template: `
        <div>{{message}}</div>
        <form action='https://www.baidu.com'>
          <input type='text' id='inputValue'/>
          <input type='submit' value='submit' v-on:click.prevent='handleSubmit'/>
        </form>
      `
    });
    const vm = app.mount('#root');
  </script>
</body>

</html>

9. v-bind
- Dynamically bind one or more attribute s, or a component prop to an expression.
- In binding class or style attribute, other types of values, such as arrays or objects, are supported.
9.1 String Syntax
- We can pass it on to : class (v-bind:class A string:
<!DOCTYPE html>
<html lang="en">

<head>
  <meta charset="UTF-8" />
  <title>Common instructions</title>
  <style>
    .red {
      color: red;
    }
  </style>
</head>

<body>
  <div id="root">
  </div>
  <script src="https://unpkg.com/vue@next"></script>
  <script>
    const app = Vue.createApp({
      data() {
        return {
          classString: 'red'
        };
      },
      template: `
        <div :class="classString">
          Hello World
        </div>
      `
    });
    const vm = app.mount('#root');
  </script>
</body>

</html>

9.2 object syntax
- We can pass it on to : class (v-bind:class An object to dynamically switch classes:
<!DOCTYPE html>
<html lang="en">

<head>
  <meta charset="UTF-8" />
  <title>Common instructions</title>
  <style>
    .red {
      color: red;
    }

    .green {
      color: green;
    }
  </style>
</head>

<body>
  <div id="root">
  </div>
  <script src="https://unpkg.com/vue@next"></script>
  <script>
    const app = Vue.createApp({
      data() {
        return {
          classObject: { red: false, green: true },
        };
      },
      template: `
        <div :class="classObject">
          Hello World
        </div>
      `
    });
    const vm = app.mount('#root');
  </script>
</body>

</html>

9.3 array syntax
- We can pass an array to : class to apply a list of classes:
<!DOCTYPE html>
<html lang="en">

<head>
  <meta charset="UTF-8" />
  <title>Common instructions</title>
  <style>
    .red {
      color: red;
    }

    .green {
      color: green;
    }
  </style>
</head>

<body>
  <div id="root">
  </div>
  <script src="https://unpkg.com/vue@next"></script>
  <script>
    const app = Vue.createApp({
      data() {
        return {
          classArray: ['red', 'green'],
        };
      },
      template: `
        <div :class="classArray">
          Hello World
        </div>
      `
    });
    const vm = app.mount('#root');
  </script>
</body>

</html>

9.4 use on components
- When you use on a custom component with a single root element class attribute, these classes will be added to the element. Existing classes on this element will not be overwritten.
- If your component has multiple root elements, you need to define which parts will receive this class. have access to $ attrs Component properties do this.
<!DOCTYPE html>
<html lang="en">

<head>
  <meta charset="UTF-8" />
  <title>Common instructions</title>
  <style>
    .red {
      color: red;
    }

    .green {
      color: green;
    }

    .italic {
      font-style: italic;
    }
  </style>
</head>

<body>
  <div id="root">
  </div>
  <script src="https://unpkg.com/vue@next"></script>
  <script>
    const app = Vue.createApp({
      data() {
        return {
          italic: 'italic',
          classObject: { red: false, green: true },
        };
      },
      template: `
        <div>
          <demo1 :class="classObject"
          v-bind:italic='italic'></demo1>
          <demo2 :class="classObject"
          v-bind:italic='italic'></demo2>
        </div>
      `
    });

    app.component('demo1', {
      props: ['italic'],
      template: `
      <div :class="$attrs.class">one</div>
      <div :class="italic">two</div>
      `
    })

    app.component('demo2', {
      props: ['italic'],
      template: `
          <div :class="italic">three</div>
        `
    })

    const vm = app.mount('#root');
  </script>
</body>

</html>

10. v-once
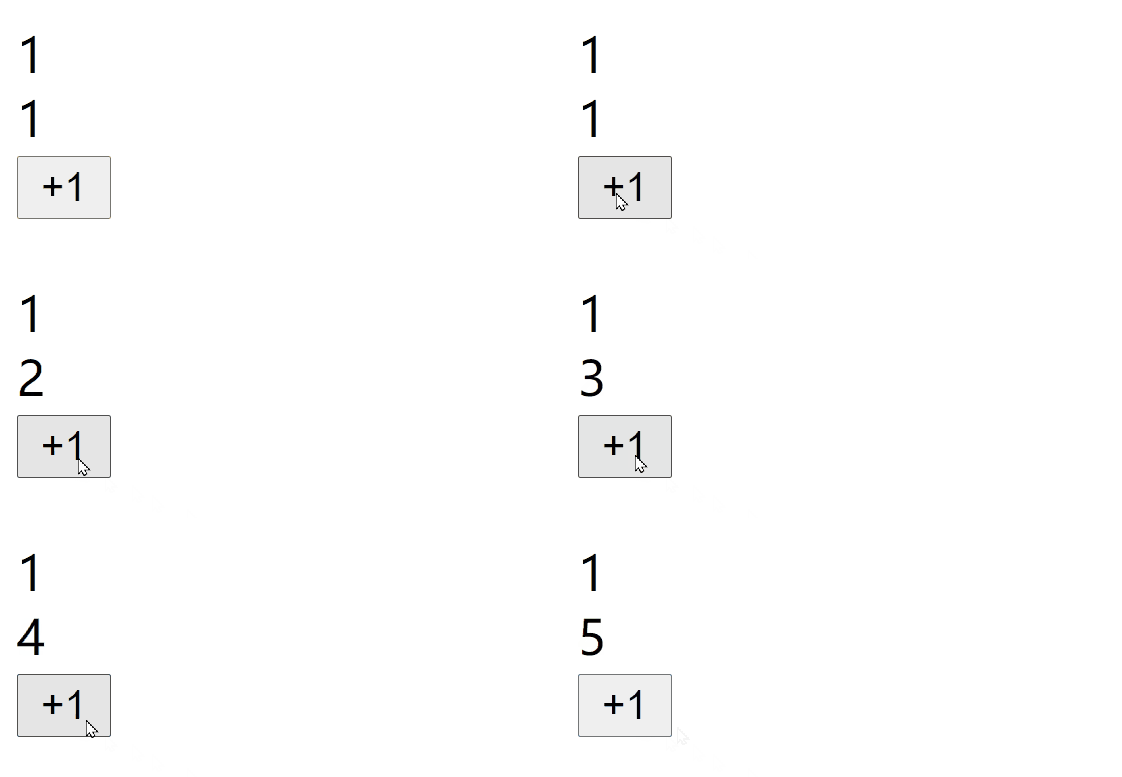
- Render elements and components only once. For subsequent re rendering, the element / component and all its child nodes are treated as static content and skipped. This can be used to optimize update performance.
<!DOCTYPE html>
<html lang="en">

<head>
  <meta charset="UTF-8" />
  <title>Common instructions</title>
</head>

<body>
  <div id="root">
  </div>
  <script src="https://unpkg.com/vue@next"></script>
  <script>
    const app = Vue.createApp({
      data() {
        return {
          message: 1
        };
      },
      methods: {
        handleClick() {
          this.message++;
        }
      },
      template: `
        <div v-once>{{message}}</div>
        <div>{{message}}</div>
        <button @click=handleClick>+1</button>
      `
    });
    const vm = app.mount('#root');
  </script>
</body>

</html>


