1. Create a vue project
1.1 Install @vue/cli
# Global installation of vue-cli scaffolding
npm install -g @vue/cli
 Copy code
Wait until the installation is complete to start the next step
1.2 Initialization Project
vue create vue-cli3-project
- Choose a Presupposition
You can choose the default default, which includes babel,eslint
We choose more features for Manual select features
Enter later to select plug-in
- Plugin selection
Here we choose (Babel, Router, Vuex, Css preprocessor, Linter / Formatter format checking, Unit test framework)
- Routing mode selection
Whether to use history mode routing (Yes)
-
Select a css preprocessor (Sass/SCSS)
-
Select an eslint configuration
Select ESLint + Standard config here. Personally, I prefer this code specification.
- Choose when to do eslink validation
Lint on save is checked
If you are using the vscode editor, you can configure the eslink plug-in to automatically format the code
7. Choose Test Framework (Mocha + Chai)
8. Choose where to write these configuration files (In dedicated config files)
- Do you want to save this default configuration? (y)
If you choose, next time you create a vue project, you can use the default file directly without having to configure it again.
Waiting for Dependency Completion
2. Automatic registration of global components
Create a global directory under the components directory, where you place some components that need to be globally registered.
The function of index.js is to export component objects by introducing main.vue
Create an index.js in components to scan global objects and register automatically.
// components/index.js
import Vue from 'vue'

// Automatically load files at the end of.js in the global directory
const componentsContext = require.context('./global', true, /\.js$/)

componentsContext.keys().forEach(component => {
  const componentConfig = componentsContext(component)
  /**
  * Compatible with import export and require module.export
  */
  const ctrl = componentConfig.default || componentConfig
  Vue.component(ctrl.name, ctrl)
})
Finally, you can import this index.js into the main.js entry file.
3. Routing automatic introduction
Using routing in Vue project, I believe people who want to know are already familiar with how to use it. To add a new page, you need to configure the information of the page in the routing configuration.
If there are more and more pages, how can we make our routing more concise?
3.1 Split Routing
Split routing according to different business modules
Export a routing configuration array in each sub-module
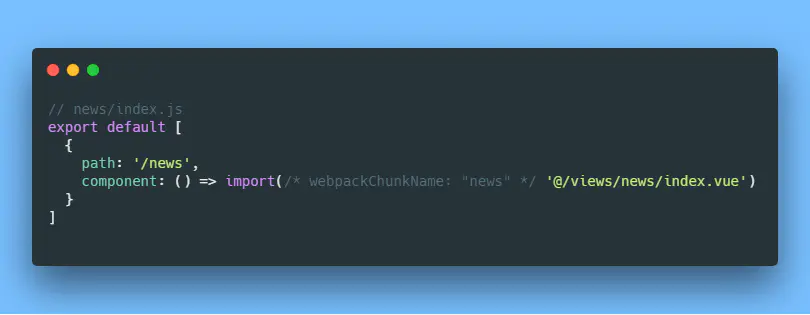
Import all sub-modules in root index.js

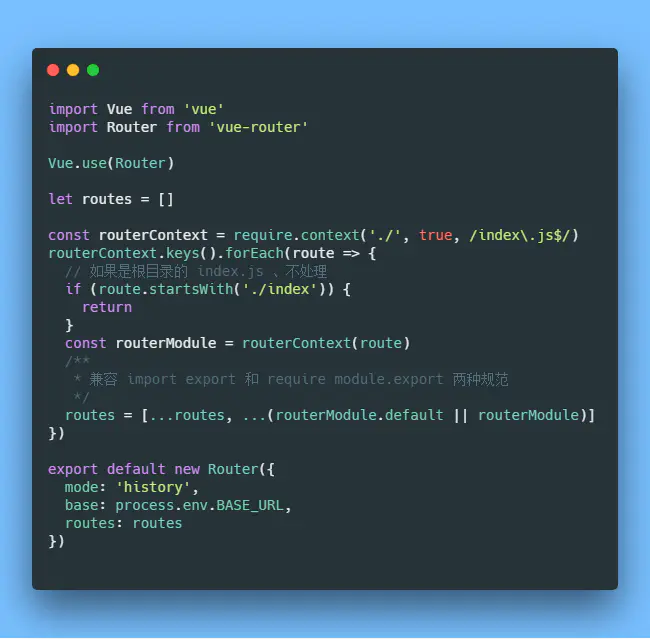
3.2 Automatic Scanning Submodule Routing and Importing
As our business becomes larger and larger, every time we add new business modules, we need to add a sub-routing module under the routing, and then import it into index.js.
So how to simplify this operation?
Through the above automatic scanning global component registration, we can also achieve automatic scanning sub-module routing and import.
5. axios packaging
- Install axios
npm install axios --save
// or
yarn add axios
//Copy code
5.1 Configure different environments
Create three new environment variable files in the root directory
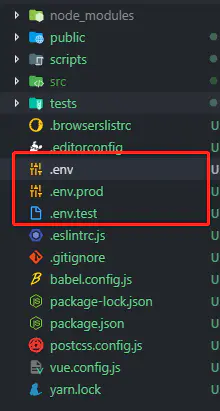
Enter different addresses, such as dev's api address and test's api address.
# // .env
NODE_ENV = "development"
BASE_URL = "https://easy-mock.com/mock/5c4c50b9888ef15de01bec2c/api"
//Copy code
Then create a new vue.config.js in the root directory
// vue.config.js
module.exports = {
  chainWebpack: config => {
    // Here is the configuration of the environment, where different environments correspond to different BASE_URL s, so that the request addresses of axios are different.
    config.plugin('define').tap(args => {
      args[0]['process.env'].BASE_URL = JSON.stringify(process.env.BASE_URL)
      return args
    })
  }
}
//Copy code
Then create an api folder under the src directory and create an index.js to configure the configuration information for axios
// src/api/index.js
import axios from 'axios'
import router from '../router'
import { Message } from 'element-ui'
const service = axios.create({
  // Setting timeout time
  timeout: 60000,
  baseURL: process.env.BASE_URL
})
// When post ing requests, we need to add a request header, so we can make a default setup here.
// That is, set the request header of post to application/x-www-form-urlencoded;charset=UTF-8
service.defaults.headers.post['Content-Type'] = 'application/x-www-form-urlencoded;charset=UTF-8''
export default service
//Copy code
5.2 Request Response Encapsulation
import axios from 'axios'
import router from '../router'
import { Message } from 'element-ui'
const service = axios.create({
  // Setting timeout time
  timeout: 60000,
  baseURL: process.env.BASE_URL
})

/**
 * Pre-request interception
 * Used to handle operations that need to be done before requests
 */
service.interceptors.request.use(config => {
  const token = localStorage.getItem('token')
  if (token) {
    config.headers['Authorization'] = token
  }
  return config
}, (error) => {
  return Promise.reject(error)
})
/**
 * Request response interception
 * Used to handle operations that need to be returned after the request
 */
service.interceptors.response.use(response => {
  const responseCode = response.status
  // If the return status code is 200, the interface request is successful and the data can be obtained normally.
  // Otherwise, throw a mistake.
  if (responseCode === 200) {
    return Promise.resolve(response)
  } else {
    return Promise.reject(response)
  }
}, error => {
  // If the server returns a situation that does not start at 2, it will enter the callback.
  // Different operations can be performed according to the status code returned from the back end
  const responseCode = error.response.status
  switch (responseCode) {
    // 401: Not logged in
    case 401:
      // Jump to the login page
      router.replace({
        path: '/login',
        query: {
          redirect: router.currentRoute.fullPath
        }
      })
      break
    // 403: token expires
    case 403:
      // Pop-up error message
      Message({
        type: 'error',
        message: 'Logon information expires, please log in again'
      })
      // Clear token
      localStorage.removeItem('token')
      // Jump to the login page and pass the page you want to browse to FulPath. After successful login, jump to the page you need to visit.
      setTimeout(() => {
        router.replace({
          path: '/login',
          query: {
            redirect: router.currentRoute.fullPath
          }
        })
      }, 1000)
      break
    // 404 request does not exist
    case 404:
      Message({
        message: 'Network request does not exist',
        type: 'error'
      })
      break
    // Other errors, throw the error prompt directly
    default:
      Message({
        message: error.response.data.message,
        type: 'error'
      })
  }
  return Promise.reject(error)
})

export default service
//Copy code
Message method is a message prompt component provided by element-ui. Everyone can replace it according to their own message prompt component.
5.3 Disruption Processing
Adding processing logic to response interception
service.interceptors.response.use(response => {
  const responseCode = response.status
  // If the return status code is 200, the interface request is successful and the data can be obtained normally.
  // Otherwise, throw a mistake.
  if (responseCode === 200) {
    return Promise.resolve(response.data)
  } else {
    return Promise.reject(response)
  }
}, error => {
  // Outage or request timeout status
  if (!error.response) {
    // Request timeout status
    if (error.message.includes('timeout')) {
      console.log('Overtime')
      Message.error('Request timeout, please check whether the network is connected properly')
    } else {
      // Can display disconnection components
      console.log('Break the net.')
      Message.error('The request failed. Please check if the network is connected.')
    }
    return
  }
  // Eliminate other code······
  return Promise.reject(error)
})
//Copy code
5.4 Packaged Picture Upload
// src/api/index.js
export const uploadFile = formData => {
  const res = service.request({
    method: 'post',
    url: '/upload',
    data: formData,
    headers: { 'Content-Type': 'multipart/form-data' }
  })
  return res
}
//Copy code
call
async uploadFile (e) {
  const file = document.getElementById('file').files[0]
  const formdata = new FormData()
  formdata.append('file', file)
  await uploadFile(formdata)
}
//Copy code
5.5 Request Display Loading Effect
let loading = null
service.interceptors.request.use(config => {
  // Show the load box before the request
  loading = Loading.service({
    text: 'Loading in progress......'
  })
  // Eliminate other code······
  return config
}, (error) => {
  return Promise.reject(error)
})
service.interceptors.response.use(response => {
  // Close the load box after the request responds
  if (loading) {
    loading.close()
  }
 // Eliminate other code······
}, error => {
  // Close the load box after the request responds
  if (loading) {
    loading.close()
  }
  // Eliminate other code······
  return Promise.reject(error)
})
//Copy code
6. Skillfully Use Mixins

6.1 Packaging store Common Method
Suppose there is a scenario where we encapsulate the function of getting a news list through vuex
import Vue from 'vue'
import Vuex from 'vuex'
import { getNewsList } from '../api/news'
Vue.use(Vuex)
const types = {
  NEWS_LIST: 'NEWS_LIST'
}
export default new Vuex.Store({
  state: {
    [types.NEWS_LIST]: []
  },
  mutations: {
    [types.NEWS_LIST]: (state, res) => {
      state[types.NEWS_LIST] = res
    }
  },
  actions: {
    [types.NEWS_LIST]: async ({ commit }, params) => {
      const res = await getNewsList(params)
      return commit(types.NEWS_LIST, res)
    }
  },
  getters: {
    getNewsResponse (state) {
      return state[types.NEWS_LIST]
    }
  }
})
//Copy code
Then on the news list page, we call Action and getters through mapAction, mapGetters, and we need to write these codes.
import { mapActions, mapGetters } from 'vuex'

computed: {
    ...mapGetters(['getNewsResponse'])
},
methods: {
    ...mapActions(['NEWS_LIST'])
}
//Copy code
Assuming that the interface to get the news list needs to be re-invoked on another page, we have to write the above code again, right?
Do you copy and paste wood?
If the interface suddenly adds a parameter, does not every code that uses the interface have to add this parameter?
Copy and paste for a while, and demand for a change, you will be cool.

Since it's duplicated code, we definitely need to reuse it, and the Mixin provided by Vue plays a big role.
- Encapsulate news-mixin.js to create a mixins directory under src to manage all mixins and create a new news-mixin.js
import { mapActions, mapGetters } from 'vuex'
export default {
  computed: {
    ...mapGetters(['getNewsResponse'])
  },
  methods: {
    ...mapActions(['NEWS_LIST'])
  }
}
//Copy code
Then you can call the method directly by introducing the mixin into the components you need to use. No matter how many pages, just introduce this mixin and you can use it directly.
If the requirement is changed, you only need to modify the mixin file.
// news/index.vue
import Vue from 'vue'
import newsMixin from '@/mixins/news-mixin'
export default {
  name: 'news',
  mixins: [newsMixin],
  data () {
    return {}
  },
  async created () {
    await this.NEWS_LIST()
    console.log(this.getNewsResponse)
  }
}
//Copy code
6.2 expansion
In addition to the common method of encapsulating vuex, there are many other things that can also be encapsulated. For example: Paging objects, tabular data, common methods, and so on are not cited one by one. Can see github
If you use it frequently in many places, you can consider encapsulating it as a mixin, but please write a comment. Otherwise someone will scold you behind your back!! You know.
7. optimization
7.1 gzip compression
- Install compression-webpack-plugin plug-in
npm install compression-webpack-plugin --save-dev
// or
yarn add compression-webpack-plugin --dev
//Copy code
- Add configuration in vue.config.js
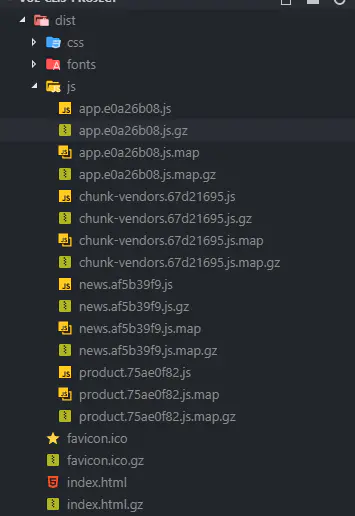
// vue.config.js
const CompressionPlugin = require('compression-webpack-plugin')
module.exports = {
  chainWebpack: config => {
    // Here is the configuration of the environment, where different environments correspond to different BASE_URL s, so that the request addresses of axios are different.
    config.plugin('define').tap(args => {
      args[0]['process.env'].BASE_URL = JSON.stringify(process.env.BASE_URL)
      return args
    })
    if (process.env.NODE_ENV === 'production') {
      // # region Enables GZip Compression
      config
        .plugin('compression')
        .use(CompressionPlugin, {
          asset: '[path].gz[query]',
          algorithm: 'gzip',
          test: new RegExp('\\.(' + ['js', 'css'].join('|') + ')$'),
          threshold: 10240,
          minRatio: 0.8,
          cache: true
        })
        .tap(args => { })

      // #endregion
    }
  }
}
//Copy code
After npm run build, you can see that the generated. gz file is OK. If your server uses nginx, nginx also needs to be configured to turn on GZIP. Here's how to turn on GZIP in nginx
7.2 Third-party libraries refer to cdn
For the libraries such as vue, vue-router, vuex, axios and element-ui, which are not often changed, we let webpack not pack them. By introducing cdn, we can reduce the size of the code, reduce the bandwidth of the server, cache these files to the client, and the client will load faster.
- Configure vue.config.js
const CompressionPlugin = require('compression-webpack-plugin')
module.exports = {
  chainWebpack: config => {
      // Eliminate other code······
      // # region ignores files packaged in the build environment

      var externals = {
        vue: 'Vue',
        axios: 'axios',
        'element-ui': 'ELEMENT',
        'vue-router': 'VueRouter',
        vuex: 'Vuex'
      }
      config.externals(externals)
    const cdn = {
        css: [
          // element-ui css
          '//unpkg.com/element-ui/lib/theme-chalk/index.css'
        ],
        js: [
          // vue
          '//cdn.staticfile.org/vue/2.5.22/vue.min.js',
          // vue-router
          '//cdn.staticfile.org/vue-router/3.0.2/vue-router.min.js',
          // vuex
          '//cdn.staticfile.org/vuex/3.1.0/vuex.min.js',
          // axios
          '//cdn.staticfile.org/axios/0.19.0-beta.1/axios.min.js',
          // element-ui js
          '//unpkg.com/element-ui/lib/index.js'
        ]
      }
      config.plugin('html')
        .tap(args => {
          args[0].cdn = cdn
          return args
        })
      // #endregion
    }
  }
}
//Copy code
- Modify index.html
<!--public/index.html--> <meta charset="utf-8"> <meta http-equiv="X-UA-Compatible" content="IE=edge"> <meta name="viewport" content="width=device-width,initial-scale=1.0"> <link rel="icon" href="<%= BASE_URL %>favicon.ico"> <% if (process.env.NODE_ENV === 'production') { %> <% for(var css of htmlWebpackPlugin.options.cdn.css) { %> <link href="<%=css%>" rel="preload" as="style"> <link rel="stylesheet" href="<%=css%>" as="style"> <% } %> <% for(var js of htmlWebpackPlugin.options.cdn.js) { %> <link href="<%=js%>" rel="preload" as="script"> <script src="<%=js%>"></script> <% } %> <% } %> <title>vue-cli3-project</title> <noscript> <strong>We're sorry but vue-cli3-project doesn't work properly without JavaScript enabled. Please enable it to continue.</strong> </noscript> <div id="app"></div> <!-- built files will be auto injected --> //Copy code
7.3 Total Station cdn
We have replaced third-party libraries with cdn, so can we build js,css and other files with cdn?

Apply for your own cdn domain name
If you want to upload your resources to cdn, you have to have your own CDN domain name, if not, you can Qiniuyun official website Apply for registration
-
Register Qiniuyun Account
-
To create new storage space in Qiniuyun Object Storage Module
-
Input Storage Space Information
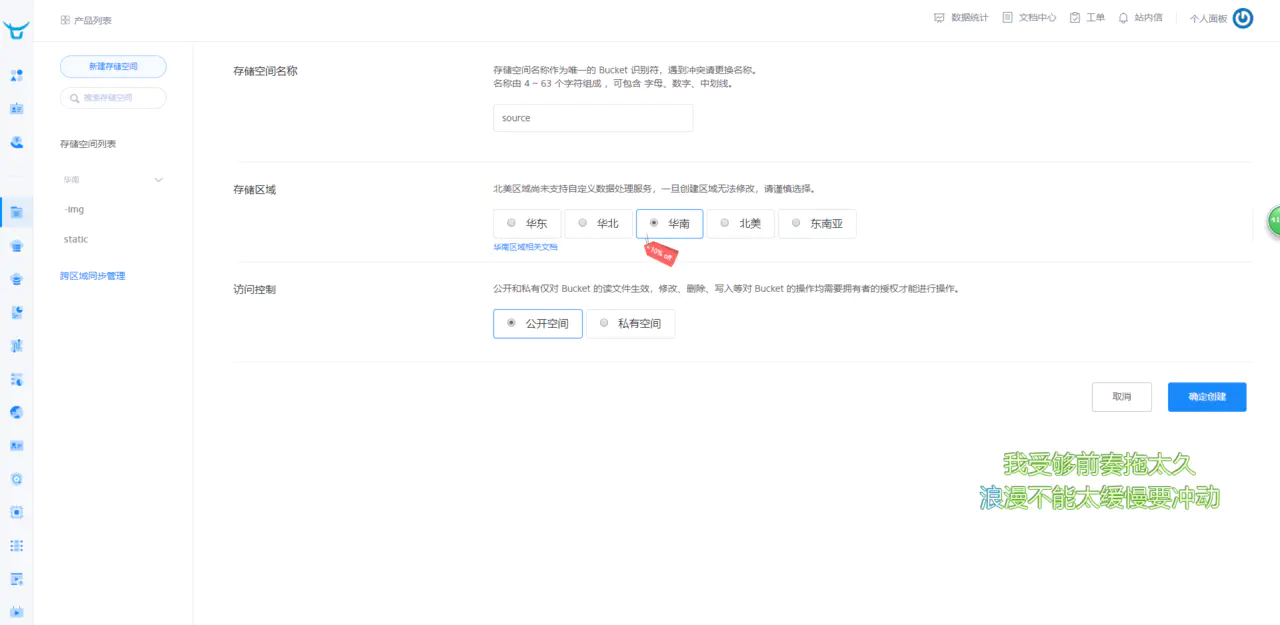
-
Determine creation
-
When created successfully, it will jump to the console page of this storage space.
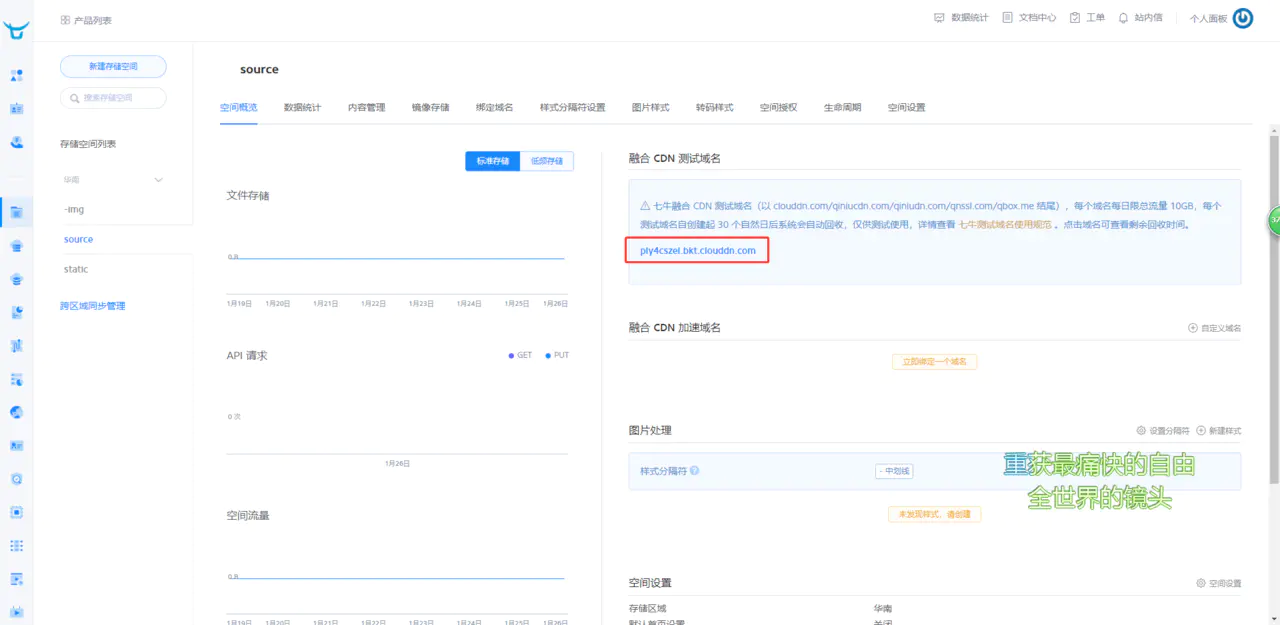
-
One of the domain names is your test domain name.
-
We can upload our js, css and other files in content management, but with so many of our files, it is obviously unreasonable to upload one by one. You're not going to do it.
At this point, these batch and repetitive operations should be launched by our node, let's upload our resource files in batches through node.
Upload the generated js and css resources to qiniu cdn
In Qiniuyun official website Document Center Some people who are interested in how to upload files through node can study it for themselves.
- Look at AccessKey and SecretKey in your personal panel - & gt; Key Management, which will be used later.

- Install required plug-ins
npm install qiniu glob mime --save-dev
 Copy code
- Create an upcdn.js file in the scripts directory
// /scripts/upcdn.js
const qiniu = require('qiniu')
const glob = require('glob')
const mime = require('mime')
const path = require('path')

const isWindow = /^win/.test(process.platform)

let pre = path.resolve(__dirname, '../dist/') + (isWindow ? '\\' : '')

const files = glob.sync(
  `${path.join(
    __dirname,
    '../dist/**/*.?(js|css|map|png|jpg|svg|woff|woff2|ttf|eot)'
  )}`
)
pre = pre.replace(/\\/g, '/')

const options = {
  scope: 'source' // Name of spatial object
}
var config = {
  qiniu: {
    accessKey: '',  // Access Key in Personal Center Key Management
    secretKey: '',  // SecretKey in Personal Center Key Management
    bucket: options.scope,
    domain: 'http://ply4cszel.bkt.clouddn.com'
  }
}
var accessKey = config.qiniu.accessKey
var secretKey = config.qiniu.secretKey

var mac = new qiniu.auth.digest.Mac(accessKey, secretKey)
var putPolicy = new qiniu.rs.PutPolicy(options)
var uploadToken = putPolicy.uploadToken(mac)
var cf = new qiniu.conf.Config({
  zone: qiniu.zone.Zone_z2
})
var formUploader = new qiniu.form_up.FormUploader(cf)
async function uploadFileCDN (files) {
  files.map(async file => {
    const key = getFileKey(pre, file)
    try {
      await uploadFIle(key, file)
      console.log(`Upload success key: ${key}`)
    } catch (err) {
      console.log('error', err)
    }
  })
}
async function uploadFIle (key, localFile) {
  const extname = path.extname(localFile)
  const mimeName = mime.getType(extname)
  const putExtra = new qiniu.form_up.PutExtra({ mimeType: mimeName })
  return new Promise((resolve, reject) => {
    formUploader.putFile(uploadToken, key, localFile, putExtra, function (
      respErr,
      respBody,
      respInfo
    ) {
      if (respErr) {
        reject(respErr)
      }
      resolve({ respBody, respInfo })
    })
  })
}
function getFileKey (pre, file) {
  if (file.indexOf(pre) > -1) {
    const key = file.split(pre)[1]
    return key.startsWith('/') ? key.substring(1) : key
  }
  return file
}

(async () => {
  console.time('Upload files to cdn')
  await uploadFileCDN(files)
  console.timeEnd('Upload files to cdn')
})()
//Copy code
Modify publicPath
Modify the configuration information of vue.config.js so that its publicPath points to the domain name of our cdn
const IS_PROD = process.env.NODE_ENV === 'production'
const cdnDomian = 'http://ply4cszel.bkt.clouddn.com'
module.exports = {
  publicPath: IS_PROD ? cdnDomian : '/',
  // Eliminate other code·······
}
//Copy code
Modify package.json configuration
Modify the package.json configuration so that we can automatically upload resource files to the cdn server after the build is completed
"build": "vue-cli-service build --mode prod && node ./scripts/upcdn.js",
Copy code
Running View Effect
npm run build
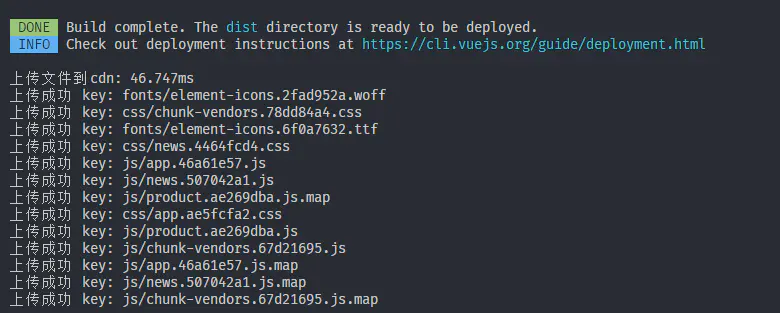
Then go to your cdn console content management to see if the file has been uploaded successfully

8. docker deployment
The centOS 7 environment is used here, but different systems are used. You can refer to the installation methods of other systems.
8.1 Install docker
- Update the Software Library
yum update -y
 Copy code
- Install docker
yum install docker
 Copy code
- Start docker service
service docker start
 Copy code
- Install docker-compose
// Install epel source
yum install -y epel-release
 // Install docker-compose
yum install docker-compose
 Copy code
8.2 Write docker-compose.yaml
version: '2.1'
services:
  nginx:
    restart: always
    image: nginx
    volumes:
      #~/ var/local/nginx/nginx.conf is the local directory and/etc/nginx is the container directory
      - /var/local/nginx/nginx.conf:/etc/nginx/nginx.conf
      #~/ var/local/app/dist is the dist directory after the local build, and/usr/src/app is the container directory.
      - /var/local/app/dist:/usr/src/app
    ports:
      - 80:80
    privileged: true
//Copy code
8.3 Write nginx.conf configuration
#user  nobody;

worker_processes  2;

#Work mode and connection number on line
events {
    worker_connections  1024;   #Maximum concurrency of a single working process processing process
}

http {
    include       mime.types;
    default_type  application/octet-stream;
    #The sendfile instruction specifies whether nginx calls the sendfile function (zero copy mode) to output files. For general applications,
    sendfile        on;
    #tcp_nopush     on;

    #keepalive_timeout  0;
    keepalive_timeout  65;

    # Open GZIP
    gzip  on;

    # # Listen on port 80 and forward requests to port 3000
    server {
        #Monitor port
        listen      80;
        #Encoding format
        charset utf-8;

        # Front-end static file resources
        location / {
	    root  /usr/src/app;
            index index.html index.htm;
            try_files $uri $uri/ @rewrites;
        }
        # Configuration will not display 404 if the resource is not matched and the url is pointed to index.html in the history mode of vue-router.
        location @rewrites {
            rewrite ^(.*)$ /index.html last;
        }
        error_page   500 502 503 504  /50x.html;
        location = /50x.html {
            root   html;
        }
    }
}
8.4 Execute docker-compose
docker-compose -d up

8.5 docker + jenkins Automated Deployment
Using docker + jenkins can automatically deploy the environment after code submission to github. This is too much to talk about. The next chapter is updated.