Teacher LeeVee from the very good Silicon Valley I advertise Silicon Valley
additional
Vue3 Custom Directive | Rookie Bird Tutorial (runoob.com)
index.html
<!DOCTYPE html>
<html lang="en" xmlns:v-on="http://www.w3.org/1999/xhtml" xmlns:v-bind="http://www.w3.org/1999/xhtml">
<head>
    <meta charset="UTF-8">
    <title>Vue Practice</title>
</head>
<body>

<div id="app">

    <h4>{{message}}</h4>
    <!-- v-text: {{school.name}}The content is replaced to set the content of the label -->
    <h4 v-text="message">{{school.name}}</h4>
    <!-- v-html:Parsing introduced html Label Format -->
    <h4 v-html="content"></h4>


    <!-- v-on: Bind events for elements,@and v-on Do the same -->
    <input type="button" value="Single machine event" @click="dolt">
    <input type="button" value="Don't know what to do" @monseenter="dolt">
    <input type="button" value="dblclick" v-on:dblclick="dolt">


    <h4>Counter</h4>
    <!-- Counter -->
    <input type="button" value=" - " @click="ChangeSUB">
    <span>{{Num}}</span>
    <input type="button" value=" + " @click="ChangeSUM">


    <h4>v-show</h4>
    <!-- To change whether an element appears or not, true Is there, false Is Hidden -->
    <img v-show="isShow" src="penguin-01.png" alt="Image Description Information">

    <h4>v-if</h4>
    <!--
    Depending on the truth of the expressed value,and v-show The difference is one operation style, one operation DOM
    Frequently operated element uses v-show,Conversely v-if
     -->

    <h4>v-bind</h4>
    <!-- Setting the properties of an element -->
    <img v-show="isShow" v-bind:src="imgSrc" alt="Image Description Information">


</div>

<script src="vue.js"></script>
<script src="behavior.js"></script>
</body>
</html>
behavior.js
/*
*   el:Mountpoint, app bound to # (ID selector)
*   data: data object
*
* */

let app = new Vue
(
    {
        el: "#app",
        data:
            {
                message: "Hello Word!",
                school: {
                    name: "JiaMin Li",
                    mobile: "****"
                },
                campus: ["ShenZhen", "ShangHai"],
                content: "<a href='#'>v-html tag use </a>',
                Num: 0,
                isShow:true,
                imgSrc:"penguin-01.png"
            },
        methods: {
            dolt: function () {
                alert("Eject")
            },
            ChangeSUB: function () {
                if (this.Num > 0) {
                    this.Num -= 1
                } else {
                    alert("Less than 0")
                }
            },
            ChangeSUM: function () {
                if (this.Num < 5) {
                    this.Num += 1
                } else {
                    alert("More than 5")
                }
            }

        }

    }
)
1 Prepare the Vue.js environment
-
js file acquisition for Vue framework
Download address provided on the official website:https://cdn.jsdelivr.net/npm/vue/dist/vue.js
-
Create an empty vue.js file, copy and paste the contents of the vue.js file provided by the official network into the local vue.js file
Getting Started with 2 Vue
-
Create a project and import the vue.js file into the project's JS folder
-
Create demo01.html (introduce vuejs, define div, create vue instance)
<!DOCTYPE html>
<html lang="en">
<head>
    <meta charset="UTF-8">
    <title>vue Getting started with</title>
    <!--
        stay js Medium Frame:Is actually an external js file
        If we want to use it, we need to HTML Use in Pages script Labeled src Attributes bring it in
    -->
    <script src="../js/vue.js"></script>
</head>
<body>
    <!--
        target:Use vue,Put data models and views together(div)Make a binding
        Implementation Steps:
            1. To specify a region as vue Template(Use Area)
            2. Below this area(Outside)Write a script Label, in script Writing in Tags vue Code
               2.1 var vue = new Vue()
               2.2 adopt json Set up vue Contents
                   1. el: use id A selector indicates which area can be used vue
                   2. data: The data models that represent what we want to declare are all written in data inside
               2.3 Binding data models and views using interpolation expressions

    -->
    <div id="app">
        <div>{{city}}</div>
    </div>
    <script>
        var vue = new Vue({
            "el":"#app",
            "data":{
                "city":"Wuhan"
            }
        })
    </script>
</body>
</html>
3 Declarative Rendering
concept
3.1 Declarations
Declarative is relative to programmatic.
- Declarative: Tell the framework what to do, and the framework does the work
- Programming: Write your own code to do specific things
3.2 Rendering
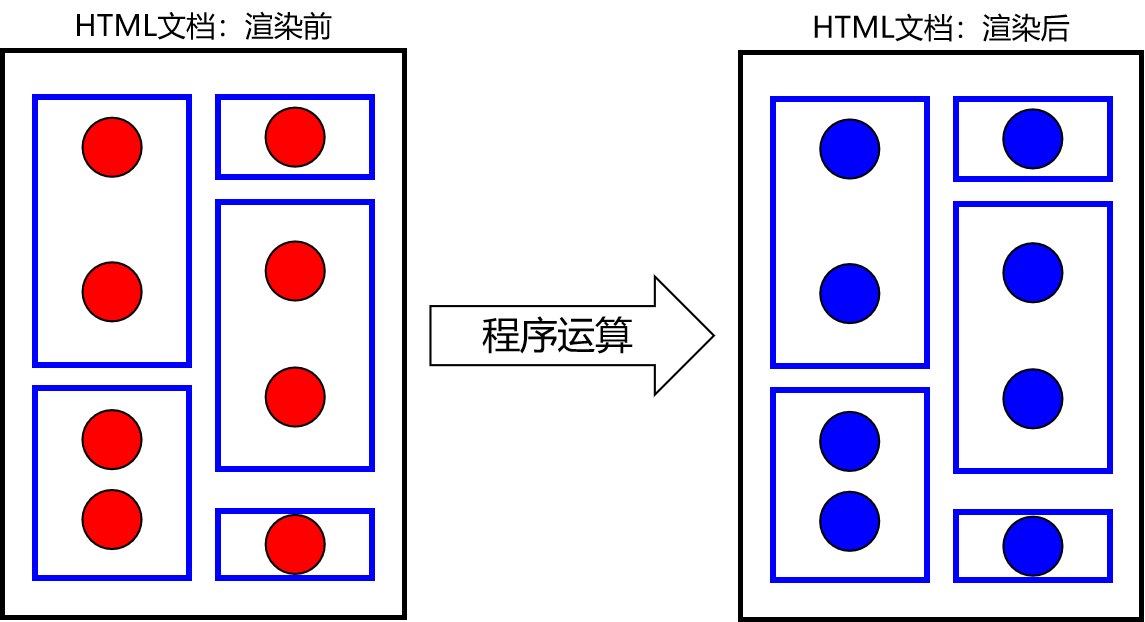
The meaning of the above illustration is explained:
- Blue box: HTML Tags
- Red circle: dynamic, uncertain data
- Blue circle: After program operation, the specific data calculated can be displayed directly on the page.
- Rendering: The process by which a program calculates dynamic data to obtain specific data
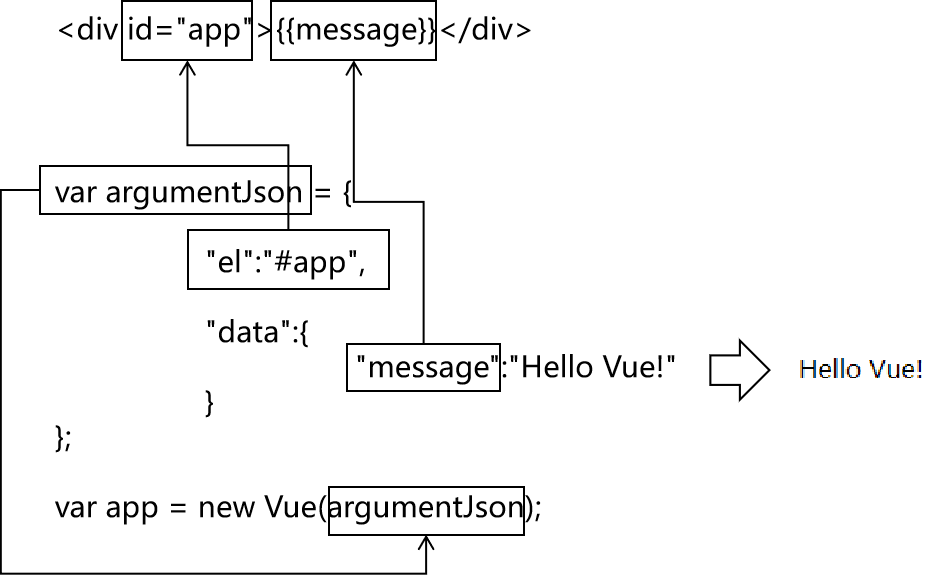
Case explanation
HTML Code
<!-- Use{{}}Format, specifying the data to be rendered -->
<div id="app">{{message}}</div>
vue code
// 1. Create a JSON object as a parameter for the new Vue
var argumentJson = {

	// El specifies the HTML element to which the Vue object is associated. el is the abbreviation for element
	// When an HTML element is specified by an ID attribute value, the syntax format is: #id
	"el":"#app",

	// The data property sets the data stored in the Vue object
	"data":{
		"message":"Hello Vue!"
	}
};

// 2. Create a Vue object and pass in the parameters prepared above
var app = new Vue(argumentJson);
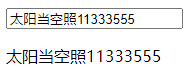
View the responsive effects of declarative rendering
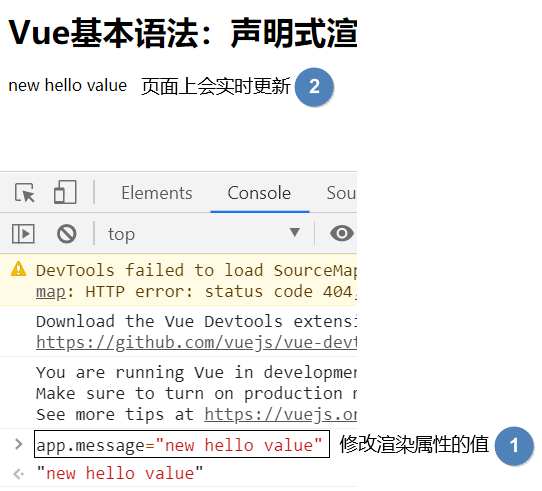
By validating the "responsive" effect of the Vue object, we can see that the Vue object and the HTML tags on the page are indeed always related, and that the Vue does a lot of work behind it.
4 Binding Text
Basic Grammar
v-text="Data model to bind"
Case Code
<!DOCTYPE html>
<html lang="en">
<head>
    <meta charset="UTF-8">
    <title>vue Binding Text</title>
    <!--
        stay js Medium Frame:Is actually an external js file
        If we want to use it, we need to HTML Use in Pages script Labeled src Attributes bring it in
    -->
    <script src="../js/vue.js"></script>
</head>
<body>
<!--
    target:Use vue,Put data models and views together(div)Make a binding
    Implementation Steps:
        1. To specify a region as vue Template(Use Area)
        2. Below this area(Outside)Write a script Label, in script Writing in Tags vue Code
           2.1 var vue = new Vue()
           2.2 adopt json Set up vue Contents
               1. el: use id A selector indicates which area can be used vue
               2. data: The data models that represent what we want to declare are all written in data inside
           2.3 Binding data models and views using interpolation expressions

-->
<div id="app">
    <!--
        v-text It's really about binding the values of the data model inside the label body
    -->
    <div v-text="city"></div>
</div>

<script>
    var vue = new Vue({
        "el":"#app",
        "data":{
            "city":"Wuhan"
        }
    })
</script>
</body>
</html>
5 Binding Element Properties
Basic Grammar
V-bind: The original attribute name of the HTML tag
Case Code
HTML Code
<div id="app">
    <!--
    Binding Properties:
    v-bind:Property Name="data model"
    Abbreviation:
    :Property Name="data model"
    -->
    <input type="text" :id="idValue" :value="inputValue"/>
</div>
Vue Code
var vue = new Vue({
    "el":"#app",
    "data":{
        "inputValue":"Zhang Sanlun",
        "idValue":1
    }
});
Extensions:
v-bind: Attribute name="Attribute value" can be abbreviated as: Attribute name="Attribute value"
6 Bidirectional Data Binding
Ask questions
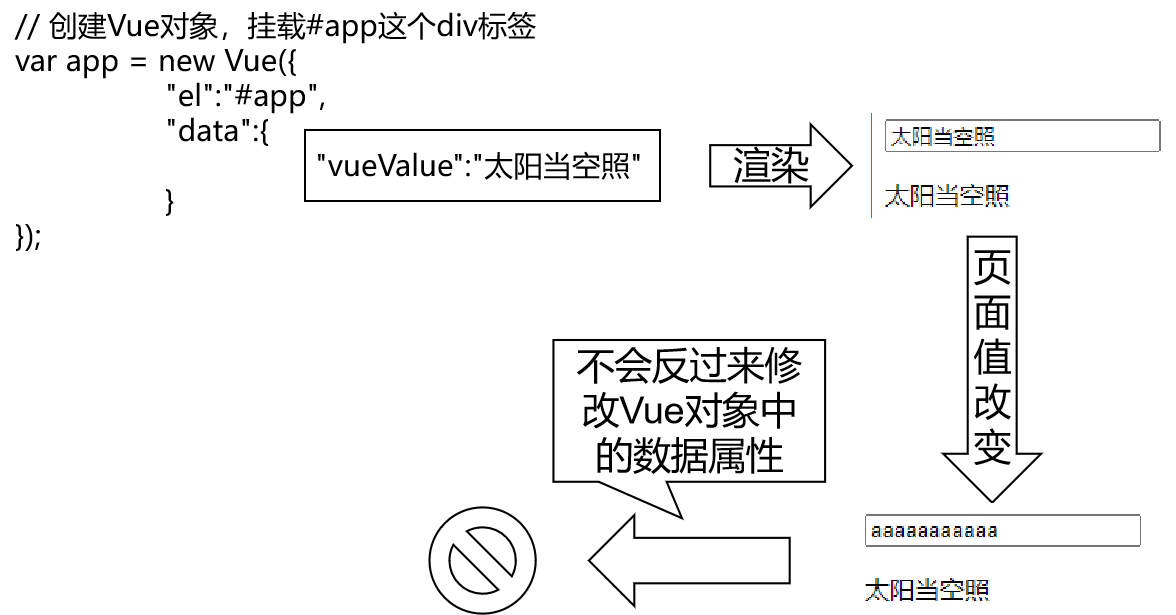
With two-way binding, you can do this: once the data on the page is modified, the data attributes in the Vue object are also modified.
Case Code
HTML Code
<div id="app">
    <!--
    Binding, for form items value attribute,We use v-model:value="data model"

    The role of two-way binding: Easy for users to get the contents of form items through a data model(value)

    Short form of two-way binding:
    v-model="data model"
    -->
    <input type="text" v-model="inputValue"/>
</div>
Vue Code
var vue = new Vue({
    "el":"#app",
    "data":{
        "inputValue":"Zhang Sanlun"
    }
});
Page Effects
The data in the p tag can be modified synchronously with the data in the text box:
Extensions:
-
v-model:value="value" can be abbreviated as v-model="value"
-
trim modifier
In actual development, it is important to consider that users may include before and after spaces when entering data. These before and after spaces are interfering factors in the operation of our program and should be removed. This can be achieved by adding A. trim modifier after the v-model.
<input type="text" v-model.trim="vueValue" />
Vue helps us automatically remove the front and back spaces when the text box loses focus.
7 Conditional Rendering
The value of the data attribute in the Vue object determines whether the HTML page content is rendered.
v-if
HTML Code
<div id="app">
    <!--
    The goal is:isShow by true Then display the picture, isShow by false Hide the picture
    Implementation scheme: Use Vue Conditional rendering
    1. v-if="data model"
    -->
    <img v-if="isShow" src="../img/mm.jpg" width="409" height="292"/>
</div>
Vue Code
var vue = new Vue({
    "el":"#app",
    "data":{
        "isShow":false
    }
});
v-if and v-else
HTML Code
<div id="app">
    <!--
    The goal is:isShow by true Then display the picture, isShow by false Hide the picture
    Implementation scheme: Use Vue Conditional rendering
    1. v-if="data model"
    v-else="data model"
    target: If isShow by true Then show mm.jpg,If is false Then show girl.jpg
    -->
    <img v-if="isShow" src="../img/mm.jpg" width="409" height="292"/>
    <img v-else="isShow" src="../img/girl.jpg">
</div>
Vue Code
var vue = new Vue({
    "el":"#app",
    "data":{
        "isShow":true
    }
});
v-show
HTML Code
<div id="app03">
	<h3>v-show</h3>
	<img v-show="flag" src="/pro03-vue/images/mi.jpg" />
</div>
Vue Code
var app03 = new Vue({
    "el":"#app03",
    "data":{
        "flag":true
    }
});
8 List Rendering
Iterate over a simple array
HTML Code
<div id="app01">
	<ul>
		<!-- Use v-for Grammar Traversal Array -->
		<!-- v-for The value of is in the syntax format: the variable name referencing an array element in Vue Array property name in object -->
		<!-- Use in text label body{{Variable name referencing array element}}Render each array element -->
		<li v-for="fruit in fruitList">{{fruit}}</li>
	</ul>
</div>
Vue Code
var app01 = new Vue({
	"el":"#app01",
	"data":{
		"fruitList": [
			"apple",
			"banana",
			"orange",
			"grape",
			"dragonfruit"
		]
	}
});
Iterate over an array of objects
HTML Code
<style type="text/css">
        /*Set Style*/
        table,th,td {
            border-collapse: collapse;
            border: 1px solid black;
            padding: 5px;
        }
</style>

<div id="app">
	<table>
		<tr>
			<th>number</th>
			<th>Full name</th>
			<th>Age</th>
			<th>major</th>
		</tr>
		<tr v-for="employee in employeeList">
			<td>{{employee.empId}}</td>
			<td>{{employee.empName}}</td>
			<td>{{employee.empAge}}</td>
			<td>{{employee.empSubject}}</td>
		</tr>
	</table>
</div>
Vue Code
var app = new Vue({
	"el":"#app",
	"data":{
		"employeeList":[
			{
				"empId":11,
				"empName":"tom",
				"empAge":111,
				"empSubject":"java"
			},
			{
				"empId":22,
				"empName":"jerry",
				"empAge":222,
				"empSubject":"php"
			},
			{
				"empId":33,
				"empName":"bob",
				"empAge":333,
				"empSubject":"python"
			}
		]
	}
});
9 Event Driven
Case 1: Reverse string order
HTML Code
<div id="app">
    <div v-text="message"></div>
    <!--
    Bind Click Events to Buttons: v-on:Event Name="function"
    Short form of event binding: @Event Name="function"
    -->
    <button type="button" @click="fn1()">Button</button>
    <button type="button" @click="reverseMessage()">strrev</button>
</div>
Vue Code
var vue = new Vue({
    "el":"#app",
    "data":{
        "message":"Hello world"
    },
    "methods":{
        //vue's functions are declared inside methods
        fn1(){
            alert("I was clicked on...")
        },
        reverseMessage(){
            //Reverse the contents of a div, that is, reverse the message
            //1.Cut the message into an array with an empty string
            //this.message
            var arr = this.message.split(""); //["H","e","l","l","o"," ","w","o","r","l","d"]
            //2.Reverse Array
            var reverseArr = arr.reverse(); //["d","l","r","o","w"," ","o","l","l","e","H"]
            //3.Split an array into a string using an empty string
            this.message = reverseArr.join("")
        }
    }
});
Case 2: Getting coordinate information when the mouse moves
HTML Code
<!--style-->
<style>
    #area{
        width: 500px;
        height: 500px;
        border: 1px solid black;
    }
</style>
<div id="app">
    <!--
    Bind the mouse movement event to get the coordinates of the mouse when the mouse movement event triggers
    -->
    <div id="area" @mousemove="recordPosition()"></div>

    <!--
    Displays the coordinates of the current mouse position
    -->
    <p v-text="pointPosition"></p>
</div>
Vue Code
var vue = new Vue({
    "el":"#app",
    "data":{
        "pointPosition":"Mouse coordinates have not been obtained"
    },
    "methods":{
        recordPosition(){
            //Here you get the coordinates of the mouse
            //Evet represents the current event
            this.pointPosition = event.clientX+","+event.clientY
        }
    }
});
Extensions:
v-on: Event name="Function" can be abbreviated as @Event name="Function"
Cancel the default behavior of the control
Control default behavior
- Point hyperlinks jump pages
- The Point Form Submit button submits the form
The default behavior of the control is natural, but if we want to click and see if we want to jump based on our judgment, the default behavior of Brainless jump is not what we expected.
Cancellation Method
Call the **preventDefault()** method of the event object.
Examples of hyperlinks
HTML code:
<div id="app">
    <a href="https://Www.baidu.com "@click=" fn1()">Jump to Baidu</a>
</div>
Vue code:
var vue = new Vue({
    "el":"#app",
    "data":{

    },
    "methods":{
        fn1(){
            console.log("hello world...")


            //Prevent default behavior of controls
            event.preventDefault()
        }
    }
});
Examples of form submission buttons
HTML code:
<div id="app">
    <form action="https://www.baidu.com" method="get">
        User name<input type="text" name="username"/><br/>
        <button type="submit" @click="fn2()">Submit button</button>
    </form>
</div>
JavaScript code:
var vue = new Vue({
    "el":"#app",
    "data":{

    },
    "methods":{
        fn2(){
            console.log("Clicked the submit button of the form...")

            event.preventDefault()
        }
    }
});
Prevent Event Bubbles
<!--style-->
<style>
    #outer{
        width: 400px;
        height: 400px;
        background-color: lightskyblue;
    }

    #inner{
        width: 200px;
        height: 200px;
        background-color: lightgreen;
    }
</style>
<div id="app">
    <div id="outer" @click="fn1()">
        <div id="inner" @click="fn2()"></div>
    </div>
</div>
Clicking on a div inside is also equivalent to clicking on an outer div, which triggers if a click response function is bound to both divs:
So event bubbling is an event that passes continuously to the parent element until the window object.
If this is not what we want, we can use the stopPropagation() function of the event object to block it.
var vue = new Vue({
    "el":"#app",
    "methods":{
        fn1(){
            console.log("Outer div Clicked on...")
        },
        fn2(){
            console.log("Inner div Clicked on...")

            //Clicking on an inner div only causes the inner div to trigger the event, not the outer div, which prevents the event from bubbling
            event.stopPropagation()
        }
    }
})
Vue event modifier
For event modifiers, the description of the Vue website is:
Calling event.preventDefault() or event.stopPropagation() in an event handler is a very common requirement. Although we can easily do this in a method, a better way is that the method only has pure data logic, not to handle DOM event details.
Cancel the default behavior of the control
The default behavior of a control is to:
- Click on the hyperlink to jump to the page
- Click the form submit button to submit the form
The Vue event modifier used to implement this requirement is:.prevent
<a href="http://Www.baidu.com "@click.prevent=" clickAnchor ">Hyperlink</a>

<form action="http://www.baidu.com" method="post">
	<button type="submit" @click.prevent="clickSubmitBtn">Submit Form</button>
</form>
Cancel Event Bubble
The Vue event modifier used to implement this requirement is:.stop
<div id="outterDiv" @click="clickOutterDiv">
	<div id="innerDiv" @click.stop="clickInnerDiv"></div>
</div>
10 Listening Properties
Requirements
<div id="app">
	<p>Honorable name:{{firstName}}</p>
	<p>Name:{{lastName}}</p>
	Honorable name:<input type="text" v-model="firstName" /><br/>
	Name:<input type="text" v-model="lastName" /><br/>
	<p>Full name:{{fullName}}</p>
</div>
Based on the code above, we want to modify the fullName property when the firstName or lastName property changes. At this point, we need to "listen" on the firstName or lastName property.
Specifically, "listening" monitors the message property and calls the function we prepared when the value of the first or last Name property changes.
Vue Code
Declare a function to "listen" on firstName and lastName attributes in the watch attribute:
var app = new Vue({ "el":"#app", "data":{ "firstName":"jim", "lastName":"green", "fullName":"jim green" }, "watch":{ "firstName":function(inputValue){ this.fullName = inputValue + " " + this.lastName; }, "lastName":function(inputValue){ this.fullName = this.firstName + " " + inputValue; } }});
11 case exercises
Demonstration of Functional Effects
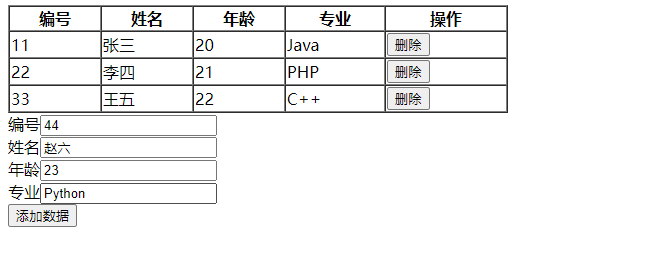
Task Disassembly
- Step 1: Show the table
- Step 2: Show four text boxes
- Step 3: Create a p-tag to display what the user enters in the text box in real time
- Step 4: Click the Add Records button to add records
Step 1: Show the table
HTML Tags
<table>
    <tr>
        <th>number</th>
        <th>Full name</th>
        <th>Age</th>
        <th>major</th>
        <th>operation</th>
    </tr>
    <tr v-for="(emp,index) in employeeList">
        <td v-text="emp.empId"></td>
        <td v-text="emp.empName"></td>
        <td v-text="emp.empAge"></td>
        <td v-text="emp.empSubject"></td>
        <td>
            <button type="button">delete</button>
        </td>
    </tr>
</table>
Vue Code
var vue = new Vue({
    "el":"#app",
    "data":{
        "employeeList":[
            {
                "empId":"1",
                "empName":"Zhang San",
                "empAge":20,
                "empSubject":"Java"
            },
            {
                "empId":"2",
                "empName":"Li Si",
                "empAge":21,
                "empSubject":"PHP"
            },
            {
                "empId":"3",
                "empName":"King Five",
                "empAge":22,
                "empSubject":"C++"
            }
        ]
    }
});
Step 2: Click the Delete button to delete employee information
HTML Tags
<table>
    <tr>
        <th>number</th>
        <th>Full name</th>
        <th>Age</th>
        <th>major</th>
        <th>operation</th>
    </tr>
    <tr v-for="(emp,index) in employeeList">
        <td v-text="emp.empId"></td>
        <td v-text="emp.empName"></td>
        <td v-text="emp.empAge"></td>
        <td v-text="emp.empSubject"></td>
        <td>
            <button type="button" @click="deleteEmployee(index)">delete</button>
        </td>
    </tr>
</table>
Vue Code
    var vue = new Vue({
        "el": "#app",
        "data": {
            "employeeList": [{"empId": "1", "empName": "Zhang San", "empAge": 20, "empSubject": "Java"}, {
                "empId": "2",
                "empName": "Li Si",
                "empAge": 21,
                "empSubject": "PHP"
            }, {"empId": "3", "empName": "King Five", "empAge": 22, "empSubject": "C++"}]
        },
        "methods": {
            deleteEmployee(i)
            //         Delete the line where the current button is located: in fact, delete the corresponding element in the employeeList
            // Delete in employeeList array by subscript
            this.employeeList.splice(i, 1)
        }
    };
Step 3: Bind form and employee information
HTML Tags
<div id="app">
    <table>
        <tr>
            <th>number</th>
            <th>Full name</th>
            <th>Age</th>
            <th>major</th>
            <th>operation</th>
        </tr>
        <tr v-for="(emp,index) in employeeList">
            <td v-text="emp.empId"></td>
            <td v-text="emp.empName"></td>
            <td v-text="emp.empAge"></td>
            <td v-text="emp.empSubject"></td>
            <td>
                <button type="button" @click="deleteEmployee(index)">delete</button>
            </td>
        </tr>
    </table>

    <form>
        number<input v-model="employee.empId" type="text"/><br/>
        Full name<input v-model="employee.empName" type="text"/><br/>
        Age<input v-model="employee.empAge" type="text"/><br/>
        major<input v-model="employee.empSubject" type="text"/><br/>
        <button type="button">Add employee information</button>
    </form>
</div>
Vue Code
var vue = new Vue({
    "el":"#app",
    "data":{
        "employeeList":[
            {
                "empId":"1",
                "empName":"Zhang San",
                "empAge":20,
                "empSubject":"Java"
            },
            {
                "empId":"2",
                "empName":"Li Si",
                "empAge":21,
                "empSubject":"PHP"
            },
            {
                "empId":"3",
                "empName":"King Five",
                "empAge":22,
                "empSubject":"C++"
            }
        ],
        //Data model binds the contents of individual form items
        "employee":{
            "empId":"4",
            "empName":"Zhao Six",
            "empAge":23,
            "empSubject":"Kotlin"
        }
    },
    "methods":{
        deleteEmployee(i){
            //Delete the line where the current button is located: in fact, delete the corresponding element in the employeeList
            //Delete in employeeList array by subscript
            this.employeeList.splice(i,1)
        }
    }
});
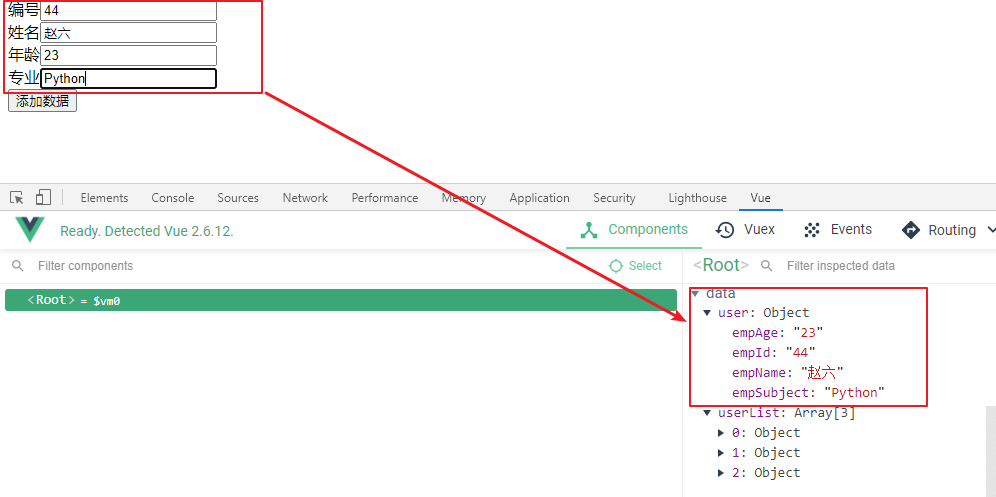
The correct way to test is to try to modify the data property values of the Vue object in the console:
Click the Add Records button
Adding data to a table is simply adding the data entered on the form, this.employee, to the array, this.employeeList
Clearing the form data after adding it is really setting this.employee= {}
HTML Tags
<div id="app">
    <table>
        <tr>
            <th>number</th>
            <th>Full name</th>
            <th>Age</th>
            <th>major</th>
            <th>operation</th>
        </tr>
        <tr v-for="(emp,index) in employeeList">
            <td v-text="emp.empId"></td>
            <td v-text="emp.empName"></td>
            <td v-text="emp.empAge"></td>
            <td v-text="emp.empSubject"></td>
            <td>
                <button type="button" @click="deleteEmployee(index)">delete</button>
            </td>
        </tr>
    </table>

    <form>
        number<input v-model="employee.empId" type="text"/><br/>
        Full name<input v-model="employee.empName" type="text"/><br/>
        Age<input v-model="employee.empAge" type="text"/><br/>
        major<input v-model="employee.empSubject" type="text"/><br/>
        <button type="button" @click="insertEmployee()">Add employee information</button>
    </form>
</div>
Vue Code
var vue = new Vue({
    "el":"#app",
    "data":{
        "employeeList":[
            {
                "empId":"1",
                "empName":"Zhang San",
                "empAge":20,
                "empSubject":"Java"
            },
            {
                "empId":"2",
                "empName":"Li Si",
                "empAge":21,
                "empSubject":"PHP"
            },
            {
                "empId":"3",
                "empName":"King Five",
                "empAge":22,
                "empSubject":"C++"
            }
        ],
        //Data model binds the contents of individual form items
        "employee":{
            "empId":"4",
            "empName":"Zhao Six",
            "empAge":23,
            "empSubject":"Kotlin"
        }
    },
    "methods":{
        deleteEmployee(i){
            //Delete the line where the current button is located: in fact, delete the corresponding element in the employeeList
            //Delete in employeeList array by subscript
            this.employeeList.splice(i,1)
        },
        insertEmployee(){
            //1.Add the contents of the form as a row to the table: that is, add the data of the current form to the array as the last element of the employeeList array
            this.employeeList.push(this.employee)
            //2.Empty Form Content
            this.employee = {}
        }
    }
});
12 Vue Life Cycle
concept
In the programming world of our languages,'Life Cycle'They are very common concepts. An object goes through many stages from creation, initialization, work to release, cleanup and destruction. For example, we learned the life cycle of threads in the JavaSE phase, Vue objects today, and Web components such as Servlet and Filter in the future.
Lifecycle of a Vue object
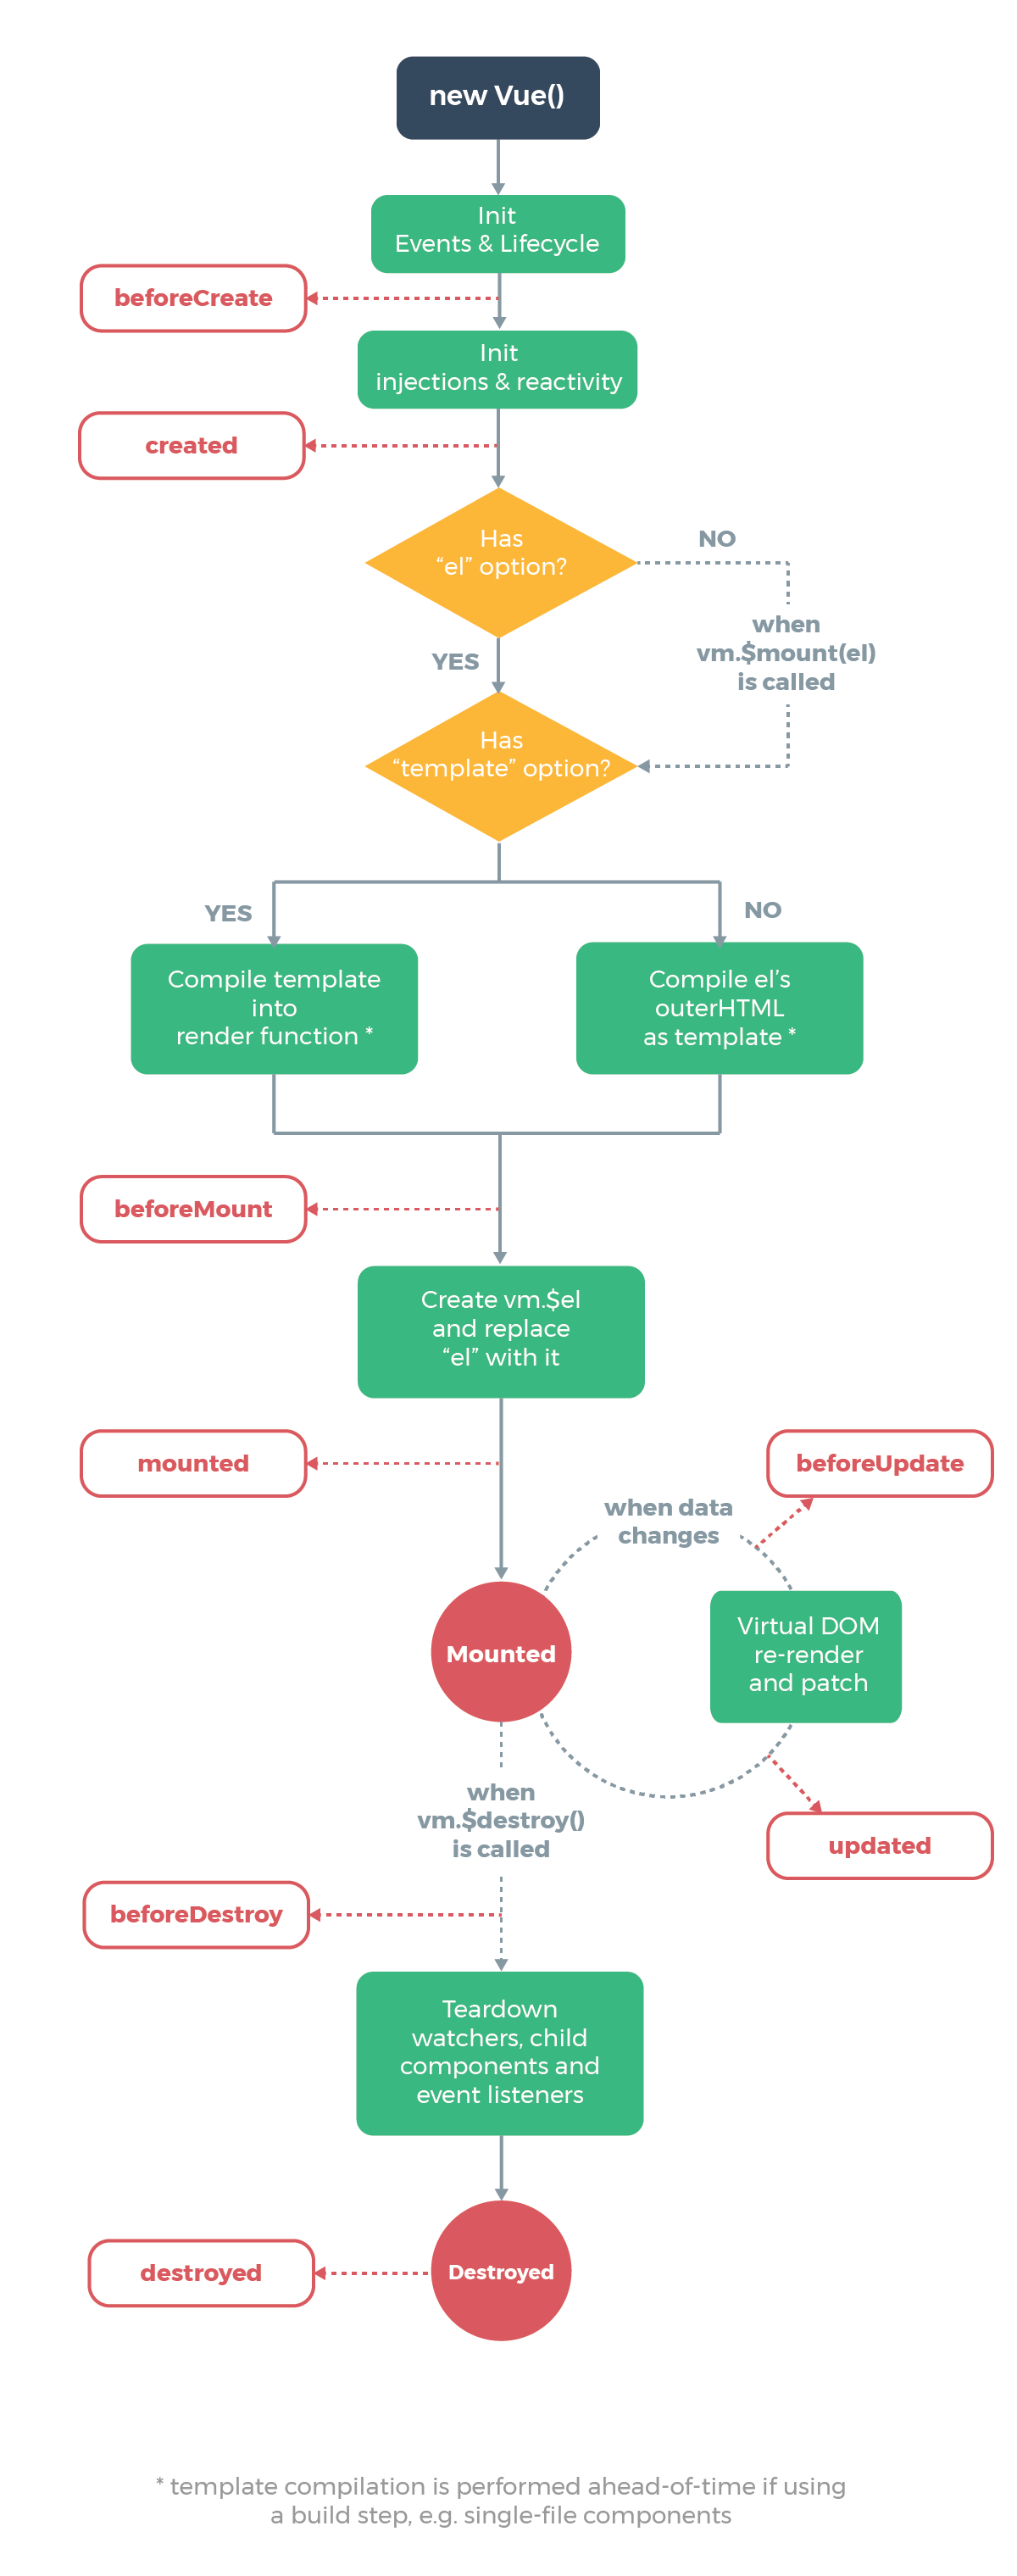
Lifecycle hook function
Vue allows us to include our code through hook functions in a specific life cycle.
<div id="app">
    <div id="d1">{{city}}</div>
</div>
var vue = new Vue({
    "el":"#app",
    "data":{
        "city":"Wuhan"
    },
    //The hook function of Vue, actually, allows us to execute some code at a specific stage of Vue's life cycle
    beforeCreate(){
        //Value of output data model city
        console.log("stay beforeCreate Get in hook function city:"+this.city)
    },
    created(){
        //Value of output data model city
        console.log("stay created Get in hook function city:"+this.city)
    },
    beforeMount(){
        //Execution does not show data from the data model in the real view until the virtual view replaces the real view
        console.log("stay beforeMount Getting the contents of the real view in the hook function:"+document.getElementById("d1").innerHTML)
    },
    mounted(){
        //After replacing the real view with the virtual view, the data from the data model is displayed in the real view
        console.log("stay mounted Getting the contents of the real view in the hook function:"+document.getElementById("d1").innerHTML)
    }
})