LNMP is another very popular web framework after LAMP, namely Linux+Nginx+Mysql+PHP. Nginx is lighter than apache, especially for static pages. Operations and maintenance friends should all know a popular vocabulary - dynamic and static separation, one of the more common is to use nginx to process static pages, while dynamic pages are handled by Apache or tomcat in the back end. This article is about building LNMP environment mirror through Dockerfile, deploying nginx, mysql and PHP in docker container respectively, and realizing LNMP website architecture.
Introduction to Project Environment
1. System Environment
Operating System Version: Centos 7.5 64 bits
Docker Version: 18.06.1-ce (Community Version)
Nginx version: 1.15.5
PHP Version: 7.2.11
Mysql version: 8.0.12
ip address: 192.168.2.236
lnmp network ip address: 172.18.0.1
2. Source Package Download Address
nginx download address: http://nginx.org/download/nginx-1.15.5.tar.gz
php download address: http://cn2.php.net/get/php-7.2.11.tar.gz/from/this/mirror
mysql uses the official 8.0.12 mirror
3. Directory structure
[root@andyxu ~]# tree dockerfile/
dockerfile/
├── nginx
│   ├── Dockerfile
│   ├── nginx-1.15.5.tar.gz
│   └── nginx.conf
└── php
    ├── Dockerfile
    └── php-7.2.11.tar.gz
Installation and deployment of docker environment
Installation and deployment of docker environment can refer to another blog post of mine, "Centos 7 Deployment of docker environment, basic command usage and simple actual combat". http://blog.51cto.com/andyxu/2174652 All the operations in this article are based on this environment.
3. Constructing php Mirror
(1) Dockerfile file content
FROM centos:latest
MAINTAINER http://blog.51cto.com/andyxu
ENV TIME_ZOME Asia/Shanghai
ARG PV="php-7.2.11"

ADD $PV.tar.gz /tmp
RUN yum -y install gcc gcc-c++ make gd-devel libxml2-devel libcurl-devel libjpeg-devel libpng-devel openssl-devel bison \
    && mkdir /data \
    && cd /tmp/$PV \
    && ./configure --prefix=/data/php \
        --with-config-file-path=/data/php/etc \
        --with-gd --with-mysqli \
        --with-openssl --with-zlib --with-curl \
        --with-jpeg-dir --with-png-dir --with-iconv \
        --enable-fpm --enable-zip --enable-mbstring \
    && make -j 4 \
    && make install \
    && cp /data/php/etc/php-fpm.conf.default /data/php/etc/php-fpm.conf \
    && cp /data/php/etc/php-fpm.d/www.conf.default /data/php/etc/php-fpm.d/www.conf \
    && sed -i '/;daemonize/a\daemonize = no' /data/php/etc/php-fpm.conf \
    && sed -i 's/127.0.0.1/0.0.0.0/g' /data/php/etc/php-fpm.d/www.conf \
    && echo "${TIME_ZOME}" > /etc/timezone \
    && ln -sf /usr/share/zoneinfo/${TIME_ZOME} /etc/localtime \
    && rm -rf /tmp/php* \
    && yum clean all \
    && yum -y remove gcc gcc-c++ make

WORKDIR /data/php/
EXPOSE 9000
CMD ["sbin/php-fpm","-c","etc/php-fpm.conf"]
Note: daemonize = no indicates that fpm is running in the foreground
(2) Constructing php Mirror
[root@andyxu ~]# cd dockerfile/php/
[root@andyxu php]# docker build -t php:7.2.11 .
At this point, the centos image will be downloaded first, and then a new image will be built. It will take a long time, so you can have a cup of tea and wait patiently.
(3) Solution to Error Reporting Problem
If the yum statement cannot be executed, the following warning is given:
[Warning] IPv4 forwarding is disabled. Networking will not work.
The problem is that IPv4 forwarding is disabled, which makes it impossible to access the Internet. IPv4 forwarding needs to be turned on.
Solution:
vim /usr/lib/sysctl.d/00-system.conf
Add the following
net.ipv4.ip_forward=1
Restart network Services
systemctl restart network
IV. Constructing nginx Mirror
(1) Dockerfile file content
FROM centos:latest
MAINTAINER http://blog.51cto.com/andyxu
ENV TIME_ZOME Asia/Shanghai
ARG NV="nginx-1.15.5"

COPY nginx.conf /data/nginx/conf/
ADD $NV.tar.gz /tmp
RUN yum -y install gcc gcc-c++ make openssl-devel pcre-devel \
        && mkdir -p /data \
        && cd /tmp/$NV \
        && ./configure --prefix=/data/nginx \
        && make -j 2 \
        && make install \
        && echo "${TIME_ZOME}" > /etc/timezone \
        && ln -sf /usr/share/zoneinfo/${TIME_ZOME} /etc/localtime \
        && rm -rf /tmp/nginx* \
        && yum clean all \
        && yum -y remove gcc gcc-c++ make

WORKDIR /data/nginx/
EXPOSE 80
CMD ["./sbin/nginx","-g","daemon off;"]
(2) Prepare nginx configuration file
Modify the server section of the nginx.conf file as follows. I've removed the comment line #.
    server {
        listen       80;
        server_name  localhost;

        location / {
            root   html;
            Index index. HTML index. HTM index.php; # Add index.php
        }

        error_page   500 502 503 504  /50x.html;
        location = /50x.html {
            root   html;
        }

        location ~ \.php$ {
            root           html;
            Fastcgi_pass php: 9000;  PHP container name and port number
            fastcgi_index  index.php;
            Fastcgi_param SCRIPT_FILENAME $document_root $fastcgi_script_name;  Use the path specified by root
            include        fastcgi_params;
        }

    }
(3) Constructing nginx image
[root@andyxu php]# cd ../nginx/
[root@andyxu nginx]# docker build -t nginx:1.15.5 .
5. Download mysql image
It is recommended to use mysql official image directly. I have tested the source code compilation and installation. The final size of the image generated is more than 3G, while the official image is only more than 400 M, and the operation steps of source code installation are more complex. So I abandon the source code installation here and choose to use the official image directly.
[root@andyxu nginx]# docker pull mysql:8.0.12
8.0.12: Pulling from library/mysql
802b00ed6f79: Pull complete
30f19a05b898: Pull complete
3e43303be5e9: Pull complete
94b281824ae2: Pull complete
51eb397095b1: Pull complete
54567da6fdf0: Pull complete
bc57ddb85cce: Pull complete
d6cd3c7302aa: Pull complete
d8263dad8dbb: Pull complete
780f2f86056d: Pull complete
8e0761cb58cd: Pull complete
7588cfc269e5: Pull complete
Digest: sha256:038f5f6ea8c8f63cfce1bce9c057ab3691cad867e18da8ad4ba6c90874d0537a
Status: Downloaded newer image for mysql:8.0.12
View the completed image that has been built
[root@andyxu nginx]# docker images
REPOSITORY          TAG                 IMAGE ID            CREATED             SIZE
nginx               1.15.5              2ecb7008e436        6 minutes ago       266MB
php                 7.2.11              5be80a8d0f1f        35 minutes ago      580MB
centos              latest              75835a67d134        2 days ago          200MB
mysql               8.0.12              6a834f03bd02        5 weeks ago         484MB
6. Create and start containers
(1) Create a custom network lnmp
[root@andyxu nginx]# docker network create lnmp
d56d132338f8e63537dac55d481053d56a5c5faf3ab3bd3a04ac2bc460b54b3f
[root@andyxu nginx]# docker network ls
NETWORK ID          NAME                DRIVER              SCOPE
b0fa374c72f1        bridge              bridge              local
e6930ef7e774        host                host                local
d56d132338f8        lnmp                bridge              local
d7beee548faa        none                null                local
(2) Create scripts to generate mysql, php, nginx containers
The docker_lnmp.sh script reads as follows
#!/bin/bash
function mysql()
{
    docker run --name mysql --restart=always --net lnmp -p 3306:3306 \
    -v /data/mysql/data:/var/lib/mysql \
    -v /data/mysql/conf:/etc/mysql/conf.d \
    -v /data/mysql/logs:/logs \
    -e MYSQL_ROOT_PASSWORD=test123456 \
    -d mysql:8.0.12 --character-set-server=utf8
}

function php()
{
    docker run --name php --restart=always --net lnmp \
    -v /data/nginx/html:/data/nginx/html \
    -v /data/php/log:/data/php/var/log \
    -d php:7.2.11
}

function nginx()
{
    docker run --name nginx --restart=always --net lnmp -p 80:80 \
    -v /data/nginx/html:/data/nginx/html \
    -v /data/nginx/logs:/data/nginx/logs \
    -d nginx:1.15.5
}
$1
Note: php and nginx must be mounted in the website directory
(3) Start mysql, php, nginx containers
[root@andyxu ~]# sh docker_lnmp.sh mysql
[root@andyxu ~]# sh docker_lnmp.sh php
[root@andyxu ~]# sh docker_lnmp.sh nginx
(4) Check if all containers have been successfully started
[root@andyxu ~]# docker ps
CONTAINER ID        IMAGE               COMMAND                  CREATED              STATUS              PORTS                               NAMES
a1f9c0dea6df        nginx:1.15.5        "./sbin/nginx -g 'da…"   About a minute ago   Up About a minute   0.0.0.0:80->80/tcp                  nginx
8dfe39adbc60        php:7.2.11          "sbin/php-fpm -c etc…"   5 minutes ago        Up 5 minutes        9000/tcp                            php
475b41187391        mysql:8.0.12        "docker-entrypoint.s…"   6 minutes ago        Up 6 minutes        0.0.0.0:3306->3306/tcp, 33060/tcp   mysql
(5) Modify mysql's password encryption mode to mysql_native_password
[root@andyxu ~]# vim /data/mysql/conf/docker_mysql.cnf
[mysqld]
default-authentication-plugin=mysql_native_password
If you don't change the encryption mode, the lower version of mysql client will report an error when it logs in
Restart mysql container
[root@andyxu ~]# docker restart mysql
Seven, test
(1) Create mysql test account
[root@andyxu html]# docker exec -it mysql /bin/bash
root@475b41187391:/# mysql -uroot -ptest123456
mysql> create database test;
mysql> create user test@php.lnmp identified by '123456';
mysql> grant all privileges on test.* to test@php.lnmp;
mysql> exit
root@475b41187391:/# exit
Note: There is a need to authorize access to PHP containers using php.lnmp
(2) Write a php file to test the connection to mysql
[root@andyxu ~]# vim /data/nginx/html/test.php
<?php
    echo "Hello PHP<br/>";
    $conn = mysqli_connect("mysql","test","123456");
    if(!$conn){
        echo "failed to connect database";
    }else{
        echo "Connect database successfully";
    }
    phpinfo();
?>
Browsers access http://192.168.2.236/test.php
8. upload the finished image to the private warehouse
(1) Building Private Mirror Warehouse
I won't talk about the construction of private mirror warehouse, but I can refer to another blog post, Centos 7 Building Doker Private Mirror Warehouse. http://blog.51cto.com/andyxu/2175081
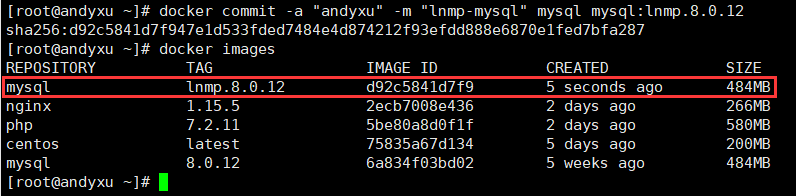
(2) Making mysql container into a new image
[root@andyxu ~]# docker commit -a "andyxu" -m "lnmp-mysql" mysql mysql:lnmp.8.0.12
[root@andyxu ~]# docker images
(3) Label nginx, mysql and php images
[root@andyxu ~]# docker tag mysql:lnmp.8.0.12 192.168.2.225:5000/mysql:lnmp.v1
[root@andyxu ~]# docker tag php:7.2.11 192.168.2.225:5000/php:lnmp.v1
[root@andyxu ~]# docker tag nginx:1.15.5 192.168.2.225:5000/nginx:lnmp.v1
(4) upload the mirror to the private warehouse
[root@andyxu ~]# docker push 192.168.2.225:5000/mysql:lnmp.v1
[root@andyxu ~]# docker push 192.168.2.225:5000/php:lnmp.v1
[root@andyxu ~]# docker push 192.168.2.225:5000/nginx:lnmp.v1
(5) View uploaded images
[root@andyxu ~]# curl http://192.168.2.225:5000/v2/_catalog
{"repositories":["httpd-test","mysql","nginx","php"]}
[root@andyxu ~]# curl http://192.168.2.225:5000/v2/mysql/tags/list
{"name":"mysql","tags":["lnmp.v1"]}
[root@andyxu ~]# curl http://192.168.2.225:5000/v2/php/tags/list
{"name":"php","tags":["7.2-apache","lnmp.v1"]}
[root@andyxu ~]# curl http://192.168.2.225:5000/v2/nginx/tags/list
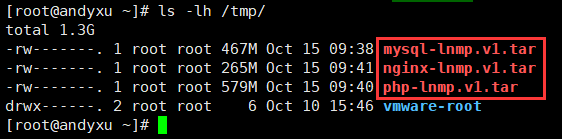
{"name":"nginx","tags":["lnmp.v1"]}(6) Pack the image into a tar file and save it in the / tmp directory
[root@andyxu ~]# docker save -o /tmp/mysql-lnmp.v1.tar 192.168.2.225:5000/mysql
[root@andyxu ~]# docker save -o /tmp/php-lnmp.v1.tar php:7.2.11
[root@andyxu ~]# docker save -o /tmp/nginx-lnmp.v1.tar nginx:1.15.5