-
Spring Boot Actuator provides the monitoring of a single Spring Boot application. The information includes application status, memory, threads, stacks, etc. It comprehensively monitors the whole life cycle of Spring Boot application.
-
But there are also some problems in such monitoring: first, all monitoring needs to call a fixed interface to view, if the application state is fully viewed, many interfaces need to be invoked, and the JSON information returned by the interface is inconvenient for operators to understand; second, if the Spring Book application cluster is very large, every application needs it. Calling different interfaces to view monitoring information is very tedious and inefficient. In this context, another open source software came into being: Spring Boot Admin.
I. What is Spring Boot Admin
Spring Boot Admin is an open source software that manages and monitors Spring Boot applications. Each application is considered as a client. It is displayed through HTTP or registered in admin server using Eureka. The Spring Boot Admin UI uses Vue.js to display data in the front end.
Spring Boot Admin is a monitoring tool for UI beautification and encapsulation of Spring Boot's Actuator interface. It can browse basic information, detailed Health information, memory information, JVM information, garbage collection information and various configuration information (such as data sources, data sources, etc.) of all monitored spring-boot projects in the list. The level of logger can also be modified directly.
-
It is noteworthy that Spring Boot Admin is not the official open source software produced by Spring Boot, but its software quality and usage are very high, and Spring Boot Admin will be updated in time with the update of Spring Boot, Spring Boot Admin also updated in time when Spring Boot launched version 2.X. .
-
Spring Boot Admin 2.x not only supports Spring Boot 2.x, but also makes a lot of updates and optimizations on the basis of 1.x:
- Re-planning project dependency packages to facilitate integration of Spring Boot Admin in projects
- 1.x front-end uses Angular.js,2.x uses Vue to rewrite the interface, and the interface aesthetics is greatly improved.
- Components supporting Spring Cloud are provided
- Other updates, for specific reference: Changes with 2.x
Spring Boot Admin is divided into server and client. The server is actually a monitoring background to gather and display all monitoring information. The client is our application. When using Spring Boot Admin, we need to start the server first. When starting the client, we need to open the interface of Actuator and point to the address of the server. The relevant information will be read regularly to achieve the purpose of monitoring.
II. Monitoring Unit Application
- Let's first show you how to use Spring Boot Admin to monitor individual Spring Boot applications.
1. Admin Server End
- (1) Project dependency
<dependency>
  <groupId>de.codecentric</groupId>
  <artifactId>spring-boot-admin-starter-server</artifactId>
  <version>2.1.0</version>
</dependency>
<dependency>
  <groupId>org.springframework.boot</groupId>
  <artifactId>spring-boot-starter-web</artifactId>
</dependency>
-
Under 2.x, only one package needs to be added, and other components will automatically depend on the addition.
-
(2) Configuration files
//The server port is set to 8000.
server.port=8000
- (3) boot class
@EnableAdminServer
@SpringBootApplication
public class AdminServerApplication {

  public static void main(String[] args) {
    SpringApplication.run(AdminServerApplication.class, args);
  }
}
-
After completing the above three steps, start the server and visit the website http://localhost:8000 to see the following interface:
-

-
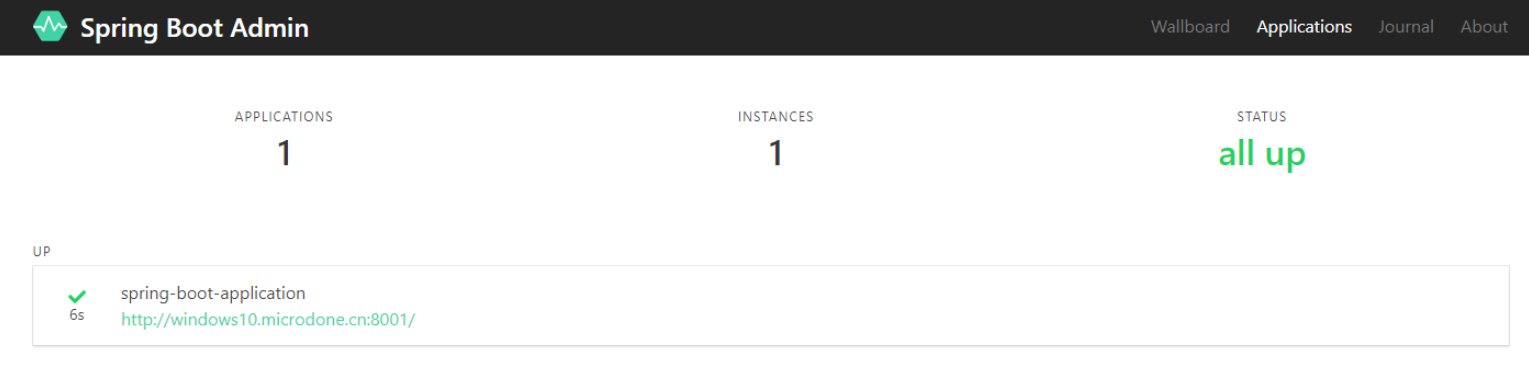
Because there is no application registered in the first boot, it shows: No applications registered. At the same time, according to the figure above, you can see that the application page will show the number of applications, the number of instances and the status of the project.
-
Next we build a client and register it with the server.
2. Admin Client End
- (1) Project dependency
<dependencies>
  <dependency>
    <groupId>de.codecentric</groupId>
    <artifactId>spring-boot-admin-starter-client</artifactId>
    <version>2.1.0</version>
  </dependency>
  <dependency>
    <groupId>org.springframework.boot</groupId>
    <artifactId>spring-boot-starter-web</artifactId>
  </dependency>
</dependencies>
-
spring-boot-starter-web is added to make the application start up. spring-boot-admin-starter-client automatically adds Actuator-related dependencies.
-
(2) Configuration files
- spring.boot.admin.client.url configures Admin Server's address
- management.endpoints.web.exposure.include=* Open client Actuator monitoring
server.port=8001
spring.application.name=Admin Client
spring.boot.admin.client.url=http://localhost:8000
management.endpoints.web.exposure.include=*
- (3) boot class
@SpringBootApplication
public class AdminClientApplication {
  public static void main(String[] args) {
    SpringApplication.run(AdminClientApplication.class, args);
  }
}
-
After the configuration is completed, the Client side is started, and the Admin server automatically checks the changes of the client side and shows its application:
-
-
The page displays a list of monitored services. Clicking on the project name will give you detailed monitoring information for this application:
-
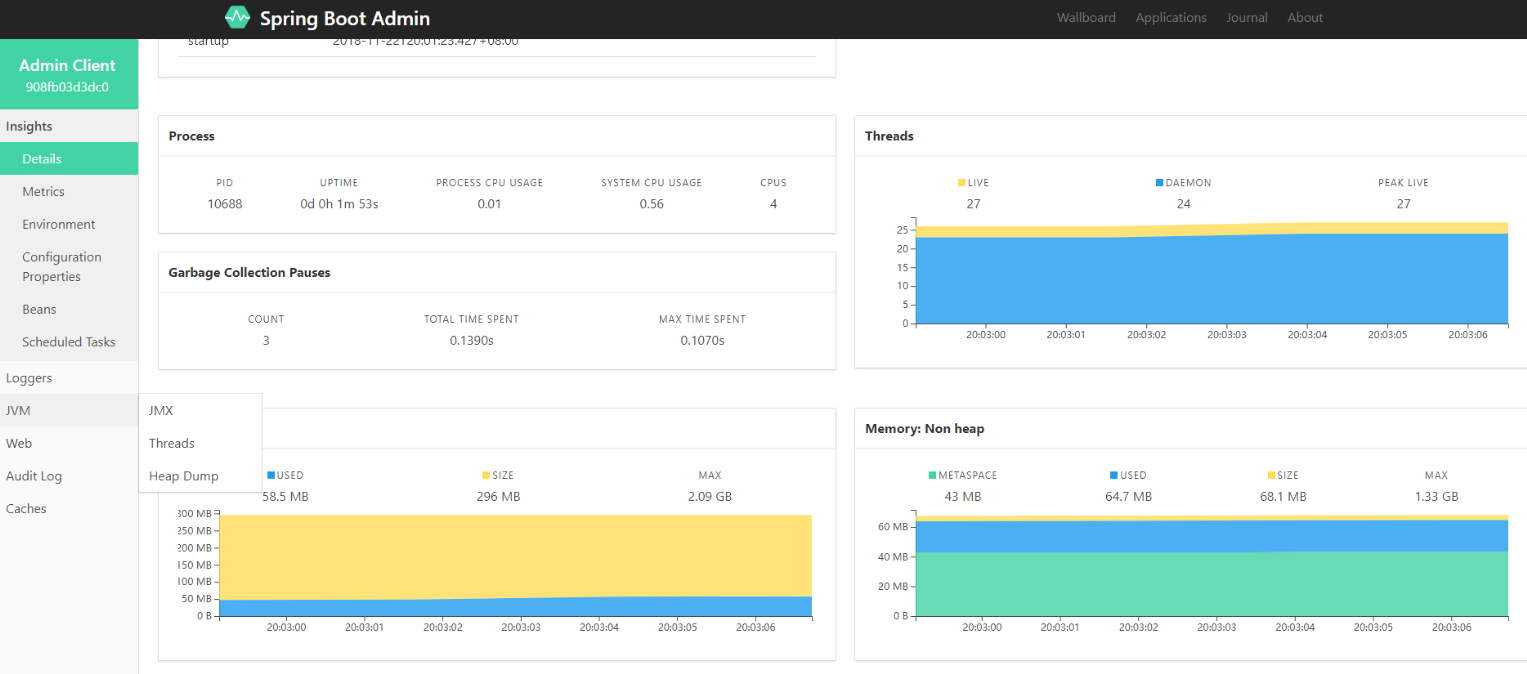
As can be seen from the figure above, Spring Boot Admin graphically displays the information of the application, most of which comes from the interface provided by Spring Boot Actuator. It is easy to see the changes of application parameters in the form of graphics, and even some pages can be operated, such as changing the level of printing log.
-
Click on the journal page to see the history of application state changes:
-

-
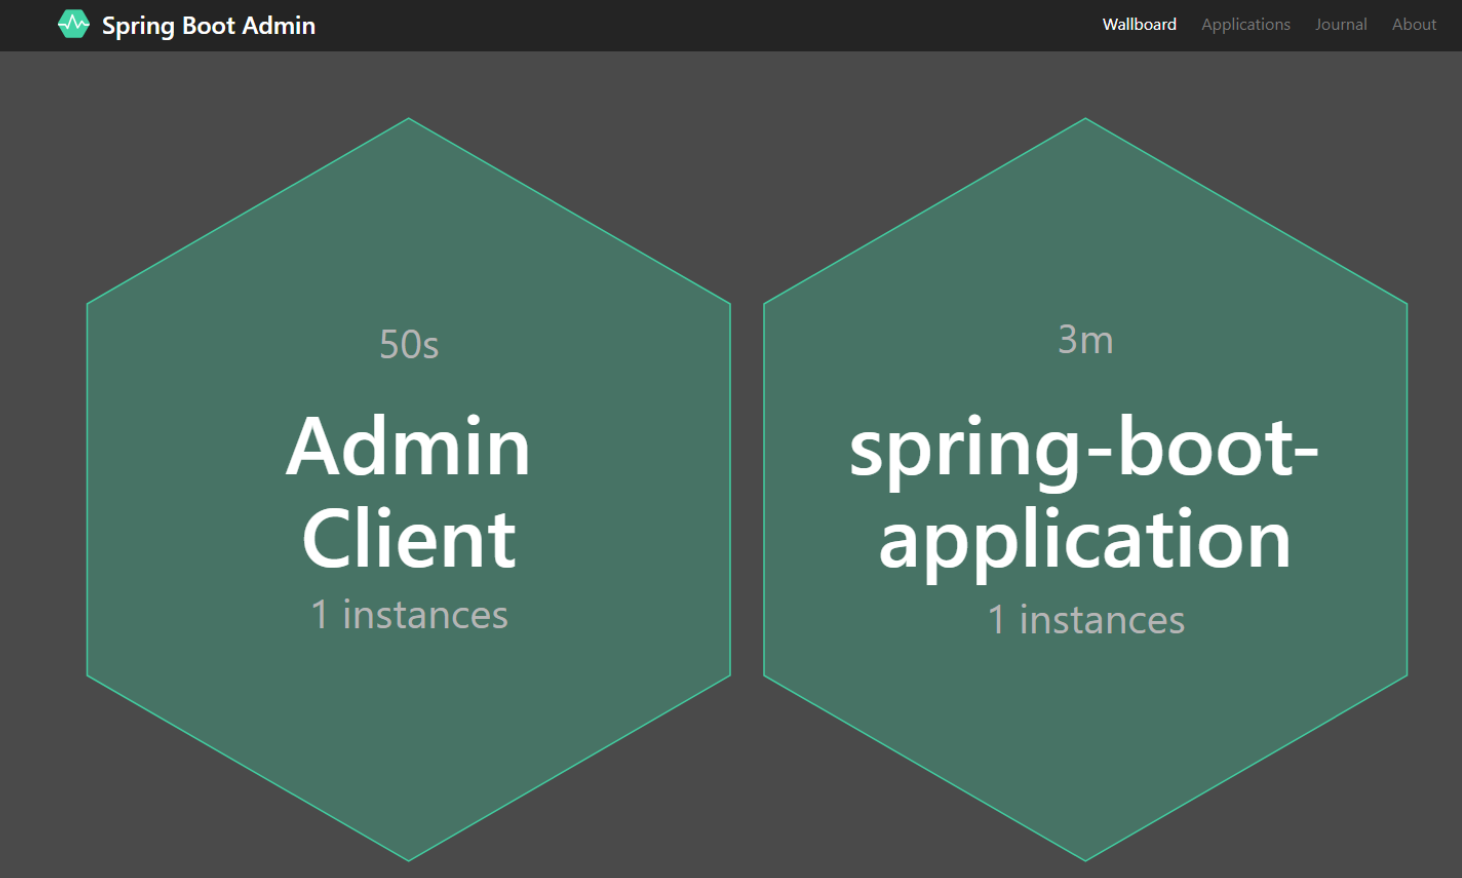
Clicking on the first menu, wallboard, allows you to view the number of applications in a more visualized way, such as the start time.
-
3. Monitoring Micro Services
If we use a single Spring Boot application, we need to configure Admin Server's address information in each monitored application; if the application is registered in Eureka, we don't need to configure each application any more, Spring Boot Admin will automatically grab relevant information from the registry.
If you use Spring Cloud's service discovery function, you don't need to add Admin Client client alone, just Spring Boot Server, and other content will be automatically configured.
- (1) Add spring-cloud-starter-eureka to package dependencies on the server and client
<dependency>
    <groupId>org.springframework.cloud</groupId>
    <artifactId>spring-cloud-starter-netflix-eureka-client</artifactId>
</dependency>
- (2) Startup class add annotations
@Configuration
@EnableAutoConfiguration
@EnableDiscoveryClient
@EnableAdminServer
public class SpringBootAdminApplication {
    public static void main(String[] args) {
        SpringApplication.run(SpringBootAdminApplication.class, args);
    }

    @Configuration
    public static class SecurityPermitAllConfig extends WebSecurityConfigurerAdapter {
        @Override
        protected void configure(HttpSecurity http) throws Exception {
            http.authorizeRequests().anyRequest().permitAll()
                .and().csrf().disable();
        }
    }
}
-
Security validation is turned off using the class SecurityPermitAllConfig.
-
(3) Configure the address of service discovery in the client
eureka:
  instance:
    leaseRenewalIntervalInSeconds: 10
    health-check-url-path: /actuator/health
    metadata-map:
      startup: ${random.int}    #needed to trigger info and endpoint update after restart
  client:
    registryFetchIntervalSeconds: 5
    serviceUrl:
      defaultZone: ${EUREKA_SERVICE_URL:http://localhost:8761}/eureka/

management:
  endpoints:
    web:
      exposure:
        include: "*"
  endpoint:
    health:
      show-details: ALWAYS
- Spring Cloud provides sample code for reference here: spring-boot-admin-sample-eureka.
- After restarting the server and client, you can see the monitoring page by visiting the relevant address of the server.
4. Safety Control
-
Spring Boot Admin backstage has a lot of sensitive information and operations, if the company does not do permission control may affect the security of the company's system. Spring Boot Admin also takes this factor into account. It can use Spring Security to do secure access control and transform it on spring-boot-admin-server.
-
(1) Add Spring Boot Security dependency packages
<dependency>
    <groupId>org.springframework.boot</groupId>
    <artifactId>spring-boot-starter-security</artifactId>
</dependency>
-
(2) Adding secure access control
- As with the previous Security configuration, add access control to the project. Ant Matchers (adminContextPath + "/ assets /**"). permitAll () all static content does not do security validation
- anyRequest().authenticated() Other requests need to be validated
- formLogin() Configuration Logon
- logout() configuration logout
- httpBasic() supports HTTP and boots Spring Boot Admin client registration
- csrfTokenRepository(CookieCsrfTokenRepository.withHttpOnlyFalse()) opens a cross-site request to protect Cookies
- Admin ContextPath + "/ instances" cancels cross-site request protection "/ instances" to facilitate Admin client registration
- Admin ContextPath + "/ actuator /**" cancels cross-site request protection "/ actuator /**", allowing Admin to monitor the Actuator's interface
@Configuration
public  class SecuritySecureConfig extends WebSecurityConfigurerAdapter {
    private final String adminContextPath;

    public SecuritySecureConfig(AdminServerProperties adminServerProperties) {
        this.adminContextPath = adminServerProperties.getContextPath();
    }

    @Override
    protected void configure(HttpSecurity http) throws Exception {
        // @formatter:off
        SavedRequestAwareAuthenticationSuccessHandler successHandler = new SavedRequestAwareAuthenticationSuccessHandler();
        successHandler.setTargetUrlParameter("redirectTo");
        successHandler.setDefaultTargetUrl(adminContextPath + "/");

        http.authorizeRequests()
            .antMatchers(adminContextPath + "/assets/**").permitAll()
            .antMatchers(adminContextPath + "/login").permitAll()
            .anyRequest().authenticated()
            .and()
        .formLogin().loginPage(adminContextPath + "/login").successHandler(successHandler).and()
        .logout().logoutUrl(adminContextPath + "/logout").and()
        .httpBasic().and()
        .csrf()
            .csrfTokenRepository(CookieCsrfTokenRepository.withHttpOnlyFalse())
            .ignoringAntMatchers(
                adminContextPath + "/instances",
                adminContextPath + "/actuator/**"
            );
    }
}
- Then you can set a username and password for security:
spring.security.user.name=admin
spring.security.user.password=admin
-
When the configuration is complete, restart the Admin Server and visit the address http://localhost:8000, you will find that you need a login username and password.
-

-
(3) Other ways
-
If the port of the Actuator is protected by HTTP authentication, then the Spring Boot Admin Server needs credential information when accessing it, and the account and password can be configured by metadata.
-
Direct use of client registration:
spring.boot.admin.client:
    url: http://localhost:8080
    instance:
      metadata:
        user.name: ${spring.security.user.name}
        user.password: ${spring.security.user.password}
- Use Eureka for registration:
eureka:
  instance:
    metadata-map:
      user.name: ${spring.security.user.name}
      user.password: ${spring.security.user.password}
- The metadata map in Eureka is designed to store some custom data, which can be retrieved from the metadata map when the registry or other services need some configuration of the service. In fact, each instance has its own metadata map, where the properties needed are stored. For example, when the service is successfully registered on Eureka, Spring Boot Admin gets the instance, then gets the attributes in the metadata map, and then puts them into the request header, sends a request to the service, and accesses the Actuator open endpoint of the service.
5. Mail Alarm
-
Spring Boot Admin displays all the application information in the micro-service in the background, which is very convenient for us to monitor and manage the micro-service as a whole. But our operators can't stare at the monitoring background 24 hours a day, so it's good to have corresponding email alerts when the service is abnormal. In fact, Spring Boot Admin also gives support.
-
We revamped the example project spring-boot-admin-server above.
-
(1) Adding dependencies
<dependency>
  <groupId>org.springframework.boot</groupId>
  <artifactId>spring-boot-starter-mail</artifactId>
</dependency>
- (2) Configuration files
spring.mail.host=smtp.qq.com
spring.mail.username=xxx@qq.com
spring.mail.password=xxx
spring.mail.properties.mail.smtp.auth=true
spring.mail.properties.mail.smtp.starttls.enable=true
spring.mail.properties.mail.smtp.starttls.required=true
spring.boot.admin.notify.mail.from=yyyy@qq.com
spring.boot.admin.notify.mail.to=zzz@qq.com
-
In the configuration file, add mail sending related information: sender, receiver, protocol, mobile authorization code and so on.
-
After the configuration is completed, restart the project spring-boot-admin-server, so that Admin Server has the function of mail alarm. By default, Admin Server monitors the service in Eureka. When the service goes online, we will receive the following mail:
-

-

-
Of course, this is only the most basic mail monitoring. In the actual use process, we need to customize the content of mail alert according to the situation, such as monitoring the use of heap memory, alarming when reaching a certain proportion, and so on.
Three, summary
Spring Boot Admin solves our need for monitoring large-scale Spring Boot applications. Spring Boot Admin makes full use of Actuator's open interface and uses excellent graphical interface to display these information, so that we can more intuitively view the status of cluster applications. Spring Boot Admin can not only monitor a single Spring Boot application, but also monitor all the application states registered in the service center with Spring Cloud. Combined with the use of the alarm system, the state changes of the application can be perceived at any time. In practice, Spring Boot Admin is a component that we frequently use in our later operation, which should be the focus of attention.