Instantly feel that H5 is very powerful can draw a lot of very beautiful, very dazzling effects. In fact, onDraw can also achieve a lot of dazzling effects in android, such as Path class; in fact, the programming languages are interlinked, if you can use the API of View under android, you can learn from H5, because they are all operated in canvas, the following is the basic usage of the first element canvas (canvas).
1. Add canvas elements to the page
<!DOCTYPE html>
<html lang="en">
<head>
    <meta charset="UTF-8">
    <title>canvas Use of elements</title>
</head>
<body>
        <canvas id="myCanvas" style="border: 1px solid"  height="300" width="500"></canvas>
</body>
</html>- 1
- 2
- 3
- 4
- 5
- 6
- 7
- 8
- 9
- 10
Here I define a canvas 300 XP high and 500 PX wide with a border.
2. Detecting the browser's support for canvas tags (there are two ways)
Method 1: Insert the relevant prompt in the canvas tag. If the browser does not support the canvas tag, the following prompt will be displayed.
<canvas id="myCanvas" width="500" height="300" style="border: 2px solid">
    Your browser does not support canvas tags, please update or replace the browser!
</canvas>- 1
- 2
- 3
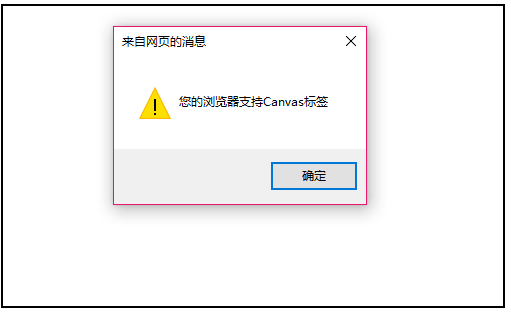
Method 2: Determine whether context exists or not. canvas is supported when context exists, but not when context does not exist, because all rendering methods are context-based.
<canvas id="myCanvas" width="500" height="300" style="border: 2px solid">
    Your browser does not support canvas tags, please update or replace the browser!
</canvas>
<script type="text/javascript">
    var mCanvas=document.getElementById("myCanvas");
    if(mCanvas.getContext){
        alert("Your browser supports Canvas tags");
    }else{
        alert("Your browser does not support Canvas tags");
    }
</script>- 1
- 2
- 3
- 4
- 5
- 6
- 7
- 8
- 9
- 10
- 11
3. canvas Drawing Commonly Used Graphics
First of all, we need to know the difference between solid and hollow is to call different methods, fill the method or attributes related to fillXXX, and draw hollow method or attributes related to stroke.
(1) Drawing straight lines
There are two main methods for drawing straight lines: moveTo(x,y) and lineTo(x,y).
<!--draw a straight line-->
<canvas id="myCanvas" width="500" height="300" style="border: 2px solid #ff53f1" ></canvas>
<script type="text/javascript">
    var mContext = document.getElementById("myCanvas").getContext("2d");
    mContext.strokeStyle="#ff53f1";
    //From (0,0) to (500,300) point
    mContext.moveTo(0,0);
    mContext.lineTo(500,300);
    mContext.stroke();
</script>- 1
- 2
- 3
- 4
- 5
- 6
- 7
- 8
- 9
- 10

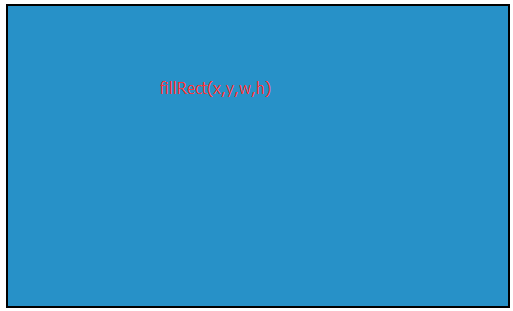
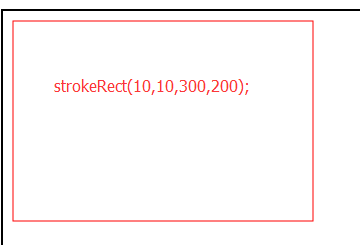
(2) Drawing rectangles
strokeRect(x,y,w,h) and fillRect(x,y,w,h); are used to draw rectangles, where lower X and Y represent the coordinates of the upper left corner of the rectangle, and W and H represent the width and height of the drawn rectangle, respectively.
<!--draw rectangle-->
<canvas id="myCanvas" width="500" height="300" style="border: 2px solid"></canvas>
<script type="text/javascript" >
    var mContext=document.getElementById("myCanvas").getContext("2d");
    /*  mContext.fillStyle="rgb(39,145,200)";
    mContext.fillRect(0,0,500,300);*/
    mContext.strokeStyle="#ff0000"
    mContext.strokeRect(10,10,300,200);
</script>- 1
- 2
- 3
- 4
- 5
- 6
- 7
- 8
- 9
Colors in H5 are worth different representations: hexadecimal, rgb (0-255), English words, percentages
<!--Drawing rectangular colors deserves different representations-->
<!--<canvas id="myCanvas" width="500" height="300" style="border: 2px solid #ff53f1"></canvas>
<script type="text/javascript">
    var mContext = document.getElementById("myCanvas").getContext("2d");
    mContext.fillStyle = "#ff53f1";
    mContext.fillRect(0, 0, 400, 250);
    mContext.fillStyle = "red"
    mContext.fillRect(10, 10, 410, 260);
    mContext.fillStyle = "rgb(200,152,99)";
    mContext.fillRect(20, 20, 420, 270);
    mContext.fillStyle = "rgb(10%,35%,60%)";
    mContext.fillRect(30, 30, 430, 280);
</script>-->- 1
- 2
- 3
- 4
- 5
- 6
- 7
- 8
- 9
- 10
- 11
- 12
- 13

(3) Draw a circle or arc.
beginPath();
arc(x,y,radius,startAngle,endAngle,b)
closePath();
The combination of beginPath and closePath implements closed paths. If closePath() is not called when drawing is completed, then the graphics will not form closed paths (which can only be reflected when drawing hollow graphics).
   mContext.beginPath();
    mContext.arc(250, 150, 150, 0, Math.PI * 2/3, true);
mContext.stroke();- 1
- 2
- 3
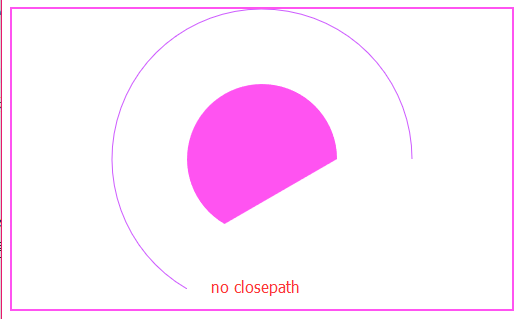
arc is used to draw radians, x and y are used to determine the center of a circle, startAngle and endAngle are used to represent the starting angle values, and b is a boolean value to indicate whether the drawing is clockwise or not.
<!--Draw circles-->
<canvas id="myCanvas" width="500" height="300" style="border: 2px solid #ff53f1"></canvas>
<script type="text/javascript">
    var mContext = document.getElementById("myCanvas").getContext("2d");
    /*disc*/
    mContext.fillStyle = "#ff53f1";
    mContext.beginPath();
    mContext.arc(250, 150, 75, 0, Math.PI * 2, true);
    mContext.closePath();
    mContext.fill();
    /*Open minded circle*/
    mContext.strokeStyle="rgb(205,90,255)";
    mContext.beginPath();
    mContext.arc(250, 150, 150, 0, Math.PI * 2, true);
    mContext.closePath();
    mContext.stroke();
</script>- 1
- 2
- 3
- 4
- 5
- 6
- 7
- 8
- 9
- 10
- 11
- 12
- 13
- 14
- 15
- 16
- 17
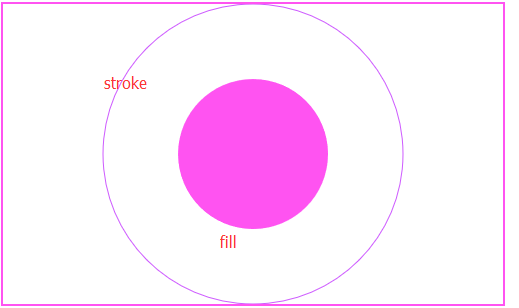
The arc is part of the circle, so we can control the shape of the figure by changing the angle of end Angle.
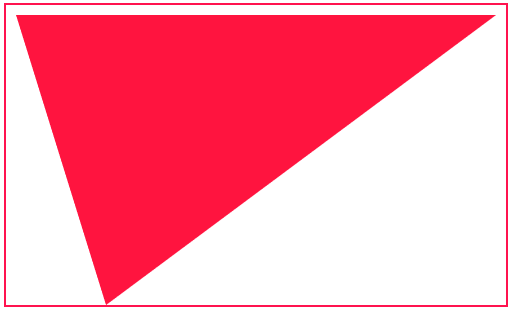
(4) Drawing triangles
The principle of triangle drawing is to achieve path closure by beginPath() and closePath(), while moveTo and lineTo achieve three-sided drawing.
<!--Draw a triangle-->
<canvas id="myCanvas" width="500" height="300" style="border: 2px solid #ff134f"></canvas>
<script type="text/javascript">
    var mContext = document.getElementById("myCanvas").getContext("2d");
    mContext.fillStyle="#ff143f";
    mContext.beginPath();
    mContext.moveTo(10,10);
    mContext.lineTo(490,10);
    mContext.lineTo(100,300);
    mContext.closePath();
    mContext.fill();
</script>- 1
- 2
- 3
- 4
- 5
- 6
- 7
- 8
- 9
- 10
- 11
- 12
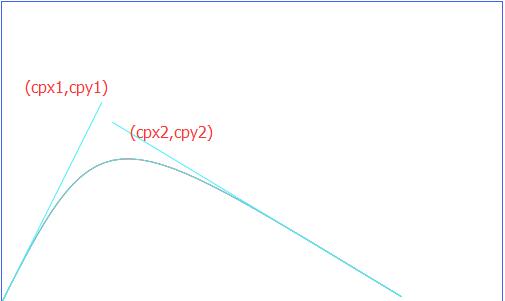
(5) Drawing Bessel Curve
Second-order Bessel curves are drawn with moveTo(x0,y0) and quadratic CurveTo (cpx, cpy, x, y).
(x0,y0) denotes the starting point, (cpx,cpy) denotes the supporting point, (x,y) denotes the end point.
<!--Drawing quadratic Bessel curve-->
<canvas id="myCanvas" style="border: 1px solid #4260ff"  height="300" width="500"></canvas>
 <script type="text/javascript">
     var mContext=document.getElementById("myCanvas").getContext("2d");
     mContext.strokeStyle="#42f0fe";
     mContext.moveTo(0,300);
     mContext.quadraticCurveTo(100,100,400,275);
     mContext.stroke();
     mContext.globalCompositeOperation='source-over'
     /*Drawing Lines to Represent Control Points and Lines of Quadratic Bessel Curves*/
     mContext.strokeStyle="#42f0fe";
     mContext.moveTo(0,300);
     mContext.lineTo(100,100);
     mContext.moveTo(100,100);
     mContext.lineTo(400,275);
     mContext.stroke();
</script>- 1
- 2
- 3
- 4
- 5
- 6
- 7
- 8
- 9
- 10
- 11
- 12
- 13
- 14
- 15
- 16
- 17

The cubic Bezier Curve To (cpx1, cpy1, cpx2,cpy2,x,y) is a support point of many (cpx2,cpy2).
<!--Drawing cubic Bessel curve-->
<canvas id="myCanvas" style="border: 1px solid #4260ff"  height="300" width="500"></canvas>
<script type="text/javascript">
    var mContext=document.getElementById("myCanvas").getContext("2d");
    mContext.strokeStyle="#ff0f00";
    mContext.moveTo(0,300);
    mContext.bezierCurveTo(100,100,110,120,400,295);
    mContext.stroke();
    mContext.globalCompositeOperation='source-over'
    /*Drawing Lines to Represent Control Points and Control Lines of Cubic Bessel Curves*/
    mContext.strokeStyle="#42f0fe";
    mContext.moveTo(100,100);
    mContext.lineTo(0,300);
    mContext.moveTo(110,120);
    mContext.lineTo(400,295);
    mContext.stroke();
</script>- 1
- 2
- 3
- 4
- 5
- 6
- 7
- 8
- 9
- 10
- 11
- 12
- 13
- 14
- 15
- 16
- 17
(6) Drawing text and spiral patterns
fillText(text,x,y,maxWidth) and strokeText(text,x,y,maxWidth) are used to draw text.
- Text: Drawn text
- (x,y) Drawn coordinates
- Maximum width drawn by maxWidth
<!DOCTYPE html>
<html lang="en">
<head>
    <meta charset="UTF-8">
    <title>Realize spiral pattern</title>
    <script language="javascript">
        function  draw(){
            mContext.translate(200,20);
            for(var i=0;i<80;i++){
                mContext.save();//Save the drawing state
                mContext.translate(30,30);
                mContext.scale(0.95,0.95);
                mContext.rotate(Math.PI/12);
                mContext.beginPath();
                switch (i%3){
                    case 0:
                        mContext.fillStyle="red";
                        break;
                    case 1:
                        mContext.fillStyle="blue";
                        break;
                    case 2:
                        mContext.fillStyle="green";
                        break;
                }
                mContext.globalAlpha="0.4";
                mContext.arc(0,0,50,0,Math.PI*2,true);
                mContext.closePath();
                mContext.fill();
            }
        }
        window.onload=function(){
            draw();
        }
    </script>
</head>
<body>
<canvas id="myCanvas" width="350" height="300" style="background:#e41aff ;border: 2px solid #2922ff " ></canvas>
<script type="text/javascript">
    var mContext=document.getElementById("myCanvas").getContext("2d");
    mContext.font="italic 25px Microsoft YaHei";
    mContext.fillStyle="yellow";
    mContext.fillText("HTML5 The effect is good.",0,25);
    mContext.font="italic 25px Microsoft YaHei";
    mContext.strokeStyle="#000000";
    mContext.strokeText("HTML5 The effect is good.",5,70);
</script>
</body>
</html>- 1
- 2
- 3
- 4
- 5
- 6
- 7
- 8
- 9
- 10
- 11
- 12
- 13
- 14
- 15
- 16
- 17
- 18
- 19
- 20
- 21
- 22
- 23
- 24
- 25
- 26
- 27
- 28
- 29
- 30
- 31
- 32
- 33
- 34
- 35
- 36
- 37
- 38
- 39
- 40
- 41
- 42
- 43
- 44
- 45
- 46
- 47
- 48
- 49
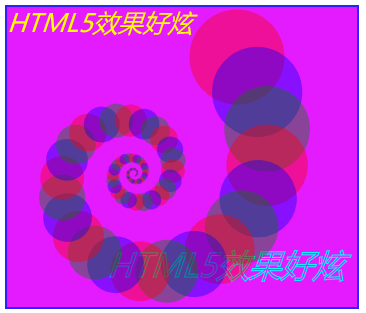
When we see translate, scale, rotate, we think of the patch animation in android.
(7) Empty the canvas
Finally, let's empty the canvas and call clearRect, which is actually to clear a rectangle.
<!DOCTYPE html>
<html lang="en">
<head>
    <meta charset="UTF-8">
    <title>Empty canvas</title>
    <script type="text/javascript">
        function clearMap(){
            mContext.clearRect(0,0,500,300);
        }
    </script>
</head>
<body>
<canvas id="myCanvas" width="500" height="300" style="border: 2px solid #ff134f"></canvas>
<script type="text/javascript">
    var mContext = document.getElementById("myCanvas").getContext("2d");
    mContext.strokeStyle="#f6143f";
    mContext.beginPath();
    mContext.moveTo(10,10);
    mContext.lineTo(250,300);
    mContext.lineTo(490,10);
    mContext.closePath();
    mContext.stroke();
</script>
<input type="button" value="Empty canvas" onclick="clearMap()">
</body>
</html>