Unity calls the Gaud Map API to get location information (Android)
First in Android The terminal realizes the positioning function, and then packages it into JAR files to provide interface methods for Unity calls.
Unity3D (5.3.4)
Eclipse: Neon(4.6.0)
Unity provides an interface to interact with Android for reference Loose rain Blog.
1. First, build a new Android project. Choose more than 4.0 in the smallest SDK version. Otherwise, there will be an error when Unity is packaged.
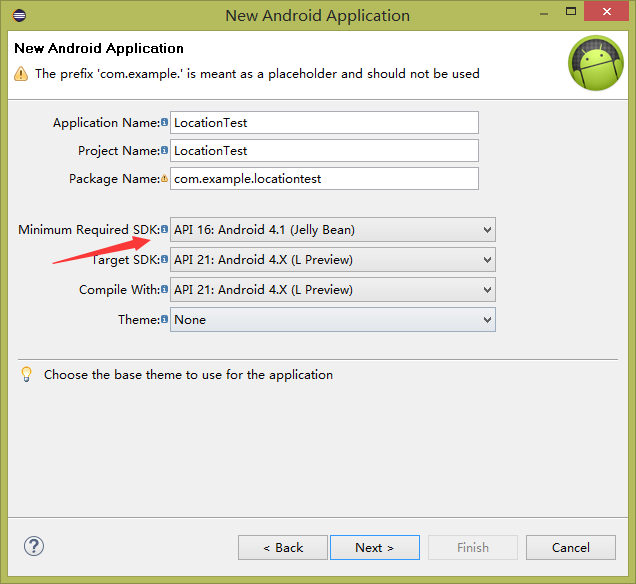
2. The catalogue of the projects created is as follows:
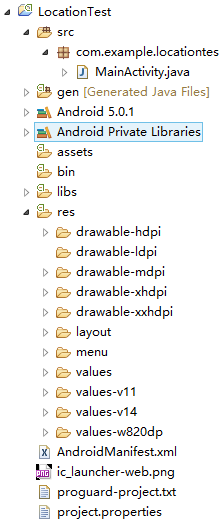
3. You can delete unnecessary code in MainActivity, and the layout of references should also be deleted:
package com.example.locationtest;

import android.app.Activity;
import android.os.Bundle;

public class MainActivity extends Activity {

    @Override
    protected void onCreate(Bundle savedInstanceState) {
        super.onCreate(savedInstanceState);
    }

}- 1
- 2
- 3
- 4
- 5
- 6
- 7
- 8
- 9
- 10
- 11
- 12
- 13
- 1
- 2
- 3
- 4
- 5
- 6
- 7
- 8
- 9
- 10
- 11
- 12
- 13
4. To invoke the interface provided by Unity, we need to import the JAR library classes.jar file provided by Unity into our Android In engineering. My Unity version is 5.3.4. Here are the files:

5. Drag the library file under the libs folder of the Android project and right-click Build Path - > Add to Build Path to import the package.

6. If the method in Activity wants to be called by Unity, the Activity needs to inherit UnityPlayerActivity, which is the interface class in the package provided by Unity. In the code, a GetInfo() method is written to Unity to call in the code to get the location information LocationInfo.
package com.example.locationtest;

import android.os.Bundle;
import com.unity3d.player.UnityPlayerActivity;

public class MainActivity extends UnityPlayerActivity {

    private String LocationInfo;
    @Override
    protected void onCreate(Bundle savedInstanceState) {
        super.onCreate(savedInstanceState);
    }

    public String GetInfo(){
        return LocationInfo;
    }
}- 1
- 2
- 3
- 4
- 5
- 6
- 7
- 8
- 9
- 10
- 11
- 12
- 13
- 14
- 15
- 16
- 17
- 1
- 2
- 3
- 4
- 5
- 6
- 7
- 8
- 9
- 10
- 11
- 12
- 13
- 14
- 15
- 16
- 17
7. The next step is to realize the positioning function in Golden Map, which can be referred to. Documents on the official website It's still easy to implement. I won't elaborate on it here. My code is as follows:
AndroidManifest.xml:
<?xml version="1.0" encoding="utf-8"?>
<manifest xmlns:android="http://schemas.android.com/apk/res/android"
    package="com.example.locationtest"
    android:versionCode="1"
    android:versionName="1.0" >
    <uses-sdk
        android:minSdkVersion="16"
        android:targetSdkVersion="21" />
    <uses-permission android:name="android.permission.ACCESS_COARSE_LOCATION"></uses-permission>
    <uses-permission android:name="android.permission.ACCESS_FINE_LOCATION"></uses-permission>
    <uses-permission android:name="android.permission.ACCESS_NETWORK_STATE"></uses-permission>
    <uses-permission android:name="android.permission.ACCESS_WIFI_STATE"></uses-permission>
    <uses-permission android:name="android.permission.CHANGE_WIFI_STATE"></uses-permission>
    <uses-permission android:name="android.permission.INTERNET"></uses-permission>
    <uses-permission android:name="android.permission.READ_PHONE_STATE"></uses-permission>
    <uses-permission android:name="android.permission.WRITE_EXTERNAL_STORAGE"></uses-permission>
    <application
        android:allowBackup="true"
        android:icon="@drawable/ic_launcher"
        android:label="@string/app_name"
        android:theme="@style/AppTheme" >
        <service android:name="com.amap.api.location.APSService"></service>
        <activity
            android:name=".MainActivity"
            android:label="@string/app_name" >
            <intent-filter>
                <action android:name="android.intent.action.MAIN" />
                <category android:name="android.intent.category.LAUNCHER" />
            </intent-filter>
        </activity>
        <meta-data android:name="com.amap.api.v2.apikey" android:value="ac239bfa4a6067c16fe5d1bc32347f83">
        </meta-data>
    </application>
</manifest>- 1
- 2
- 3
- 4
- 5
- 6
- 7
- 8
- 9
- 10
- 11
- 12
- 13
- 14
- 15
- 16
- 17
- 18
- 19
- 20
- 21
- 22
- 23
- 24
- 25
- 26
- 27
- 28
- 29
- 30
- 31
- 32
- 33
- 34
- 1
- 2
- 3
- 4
- 5
- 6
- 7
- 8
- 9
- 10
- 11
- 12
- 13
- 14
- 15
- 16
- 17
- 18
- 19
- 20
- 21
- 22
- 23
- 24
- 25
- 26
- 27
- 28
- 29
- 30
- 31
- 32
- 33
- 34
MainActivity.Java:
package com.example.gdloctest;

import android.os.Bundle;
import android.util.Log;

import com.amap.api.location.AMapLocation;
import com.amap.api.location.AMapLocationClient;
import com.amap.api.location.AMapLocationClientOption;
import com.amap.api.location.AMapLocationClientOption.AMapLocationMode;
import com.amap.api.location.AMapLocationListener;
import com.unity3d.player.UnityPlayerActivity;;

public class MainActivity extends UnityPlayerActivity {
    //Declare AMapLocationClient class objects
    public AMapLocationClient mLocationClient = null;
    //Declare the AMapLocationClientOption object
    public AMapLocationClientOption mLocationOption = null;
    //Locate callback string
    private String LocationInfo;

    @Override
    protected void onCreate(Bundle savedInstanceState) {
        super.onCreate(savedInstanceState);
    }

    public String GetInfo(){
        startLocation();
        return LocationInfo;
    }

    @Override
    protected void onStart() {
        // TODO Auto-generated method stub
        super.onStart();
    }

    private void startLocation(){
        //Initial positioning
        mLocationClient = new AMapLocationClient(getApplicationContext());
        //Setting Location Callback Monitor
        mLocationClient.setLocationListener(mLocationListener);
        //Initialize the AMapLocation ClientOption object
        mLocationOption = new AMapLocationClientOption();
        //Set the location mode to AMapLocation Mode. Hight_Accuracy, high-precision mode.
        mLocationOption.setLocationMode(AMapLocationMode.Hight_Accuracy);
        //Set the location interval, unit milliseconds, default to 2000 ms, minimum 1000ms.
        mLocationOption.setInterval(2000);
        //Setting Location Parameters for a Located Client Object
        mLocationClient.setLocationOption(mLocationOption);
        //Start location
        mLocationClient.startLocation();
    }

    public AMapLocationListener mLocationListener = new AMapLocationListener() {

        @Override
        public void onLocationChanged(AMapLocation location) {
            // TODO Auto-generated method stub
            if (location != null) {
                if (location.getErrorCode() == 0) {
                    StringBuffer sb = new StringBuffer(256);
                    sb.append("time: ");
                    sb.append(location.getTime());
                    sb.append("\n Latitude:");
                    sb.append(location.getLatitude());
                    sb.append("\n Latitude:");
                    sb.append(location.getLongitude());
                    sb.append("\n Accuracy:");
                    sb.append(location.getAccuracy());
                    sb.append("\n Address:");
                    sb.append(location.getAddress());
                    sb.append("\n National information:");
                    sb.append(location.getCountry());
                    sb.append("\n Provincial Information:");
                    sb.append(location.getProvince());
                    sb.append("\n Urban Information:");
                    sb.append(location.getCity());
                    sb.append("\n Urban Information:");
                    sb.append(location.getDistrict());
                    sb.append("\n Street Information:");
                    sb.append(location.getStreet());
                    sb.append("\n Street number information:");
                    sb.append(location.getStreetNum());
                    sb.append("\n City Code:");
                    sb.append(location.getCityCode());
                    sb.append("\n Area coding:");
                    sb.append(location.getAdCode());
                    sb.append("\n Location point AOI Message:");
                    sb.append(location.getAoiName());
                    LocationInfo = sb.toString();
                }else {
                //ErrCode (error code) information can be used to determine the cause of the failure when locating the failure. ErInfo is the error information. See the error code table for details.
                Log.e("AmapError","location Error, ErrCode:"
                    + location.getErrorCode() + ", errInfo:"
                    + location.getErrorInfo());
                }
            }
        }
    };
}- 1
- 2
- 3
- 4
- 5
- 6
- 7
- 8
- 9
- 10
- 11
- 12
- 13
- 14
- 15
- 16
- 17
- 18
- 19
- 20
- 21
- 22
- 23
- 24
- 25
- 26
- 27
- 28
- 29
- 30
- 31
- 32
- 33
- 34
- 35
- 36
- 37
- 38
- 39
- 40
- 41
- 42
- 43
- 44
- 45
- 46
- 47
- 48
- 49
- 50
- 51
- 52
- 53
- 54
- 55
- 56
- 57
- 58
- 59
- 60
- 61
- 62
- 63
- 64
- 65
- 66
- 67
- 68
- 69
- 70
- 71
- 72
- 73
- 74
- 75
- 76
- 77
- 78
- 79
- 80
- 81
- 82
- 83
- 84
- 85
- 86
- 87
- 88
- 89
- 90
- 91
- 92
- 93
- 94
- 95
- 96
- 97
- 98
- 99
- 100
- 1
- 2
- 3
- 4
- 5
- 6
- 7
- 8
- 9
- 10
- 11
- 12
- 13
- 14
- 15
- 16
- 17
- 18
- 19
- 20
- 21
- 22
- 23
- 24
- 25
- 26
- 27
- 28
- 29
- 30
- 31
- 32
- 33
- 34
- 35
- 36
- 37
- 38
- 39
- 40
- 41
- 42
- 43
- 44
- 45
- 46
- 47
- 48
- 49
- 50
- 51
- 52
- 53
- 54
- 55
- 56
- 57
- 58
- 59
- 60
- 61
- 62
- 63
- 64
- 65
- 66
- 67
- 68
- 69
- 70
- 71
- 72
- 73
- 74
- 75
- 76
- 77
- 78
- 79
- 80
- 81
- 82
- 83
- 84
- 85
- 86
- 87
- 88
- 89
- 90
- 91
- 92
- 93
- 94
- 95
- 96
- 97
- 98
- 99
- 100
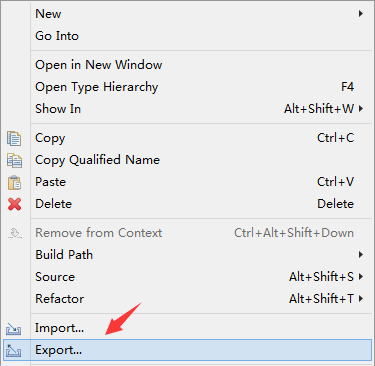
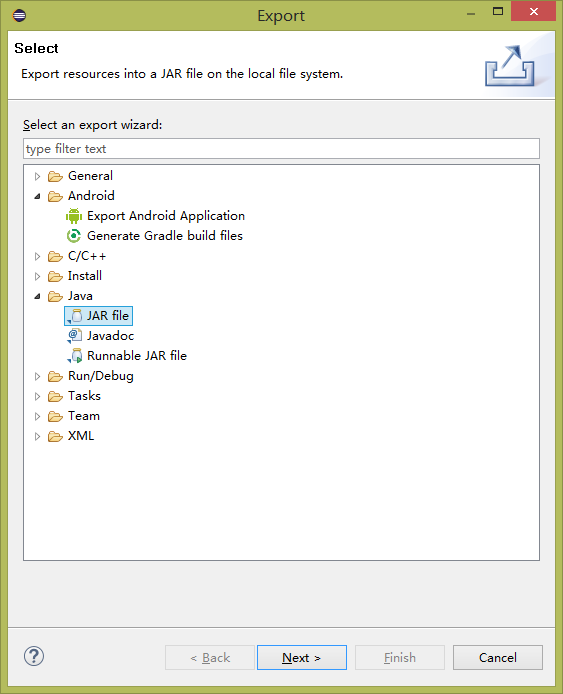
8. Next you can package it into a JAR file and call Unity. To select our project folder, you can first click on Project - > clean in the toolbar, and then Project - > Build Project. Then right-click Export, select Export as JAR file, click Next, expand the project directory in the next window, just export the src folder. Click Finish to export the JAR file.
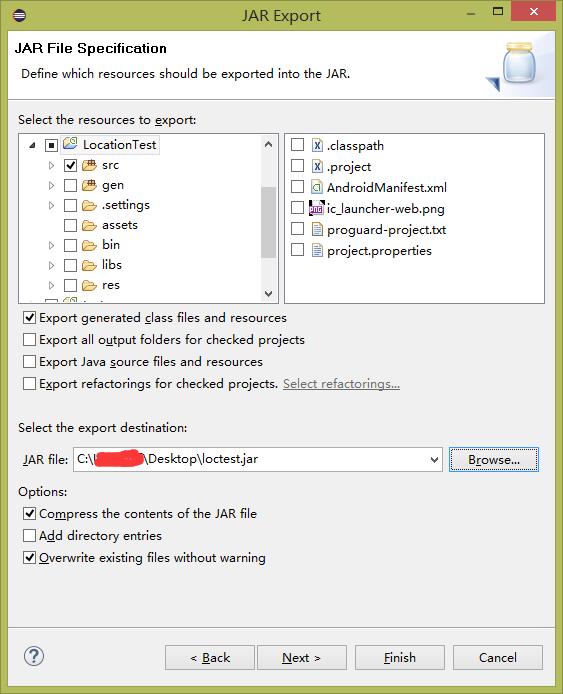
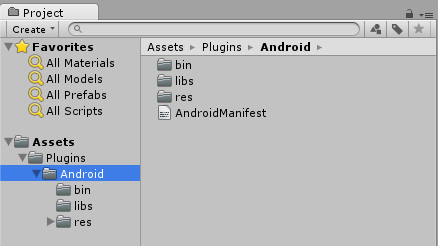
9. Copy Android files to the Plugins - > Android folder of Unity Project. Without this directory, you need to create it yourself. Folder directory is as follows. Put the JAR file we just exported into bin folder. In addition, we need to copy the libs folder, res folder and Android Manifest file into our Android Engineering directory. Take care to delete the classes.jar file in libs folder after copying, otherwise the file will conflict.
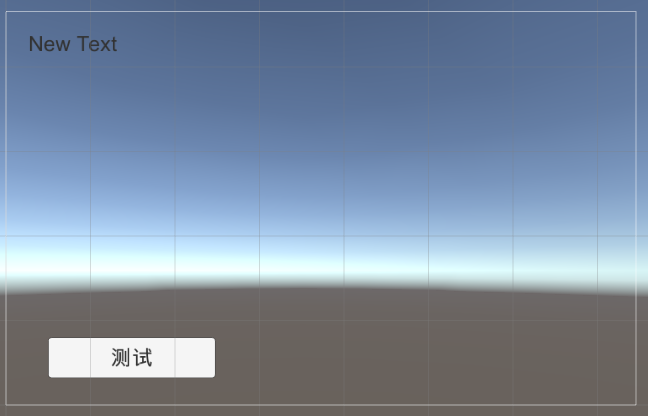
10. Then you can call it in Unity. Note that the package name in Unity should be consistent with that in the Android project, otherwise it will not be invoked. We create a simple scenario, add a Text and Button control, when we click on Button, Text will display the location information we get.
11. Create a new script and mount it on the camera:
using UnityEngine;
using System.Collections;
using UnityEngine.UI;

public class GetLocationInfo : MonoBehaviour {

    public Text text;
    // Use this for initialization
    void Start () {
    }

    // Update is called once per frame
    void Update () {
    }

    public void StartLocation() {
        AndroidJavaClass jc = new   AndroidJavaClass("com.unity3d.player.UnityPlayer");
        AndroidJavaObject jo = jc.GetStatic<AndroidJavaObject>("currentActivity");
        text.text = jo.Call<string>("GetInfo");
    }
}- 1
- 2
- 3
- 4
- 5
- 6
- 7
- 8
- 9
- 10
- 11
- 12
- 13
- 14
- 15
- 16
- 17
- 18
- 19
- 20
- 21
- 1
- 2
- 3
- 4
- 5
- 6
- 7
- 8
- 9
- 10
- 11
- 12
- 13
- 14
- 15
- 16
- 17
- 18
- 19
- 20
- 21
In the StartLocation() method, we invoked the GetInfo method we provided in the Android project by jo. Call < Return Value Type > ("Method Name"). Let Button's click event execute the StartLocation() method to obtain location information. 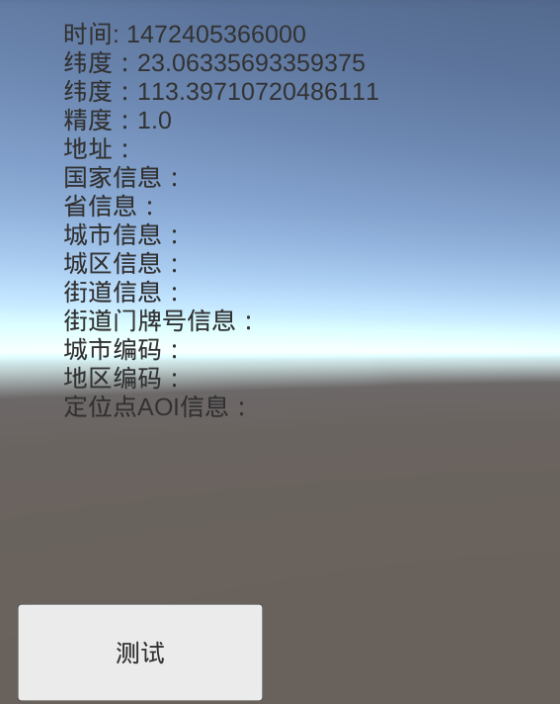
Simulator test Some information seems to be unavailable, but real-time testing is no problem.