Tomcat introduction
1. Free and open source Web application server
2. A core project in the Jakarta project of the Apache Software Foundation
3. Jointly developed by Apache, Sun and some companies and individuals
4. Loved by Java enthusiasts and recognized by some software developers
5. Currently popular Web application server
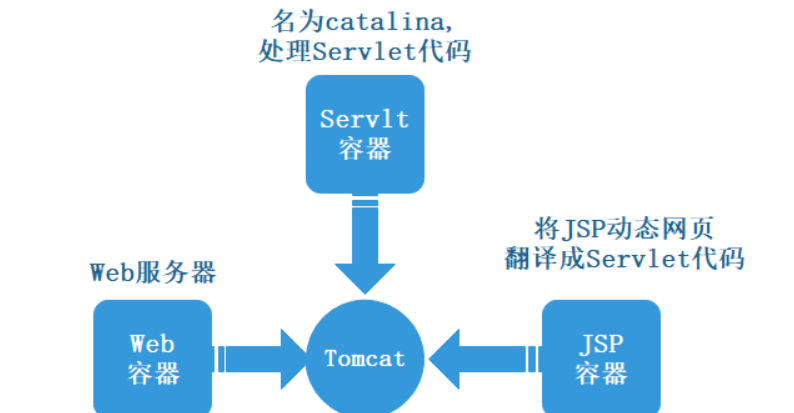
Tomcat core components
Tomcat process request
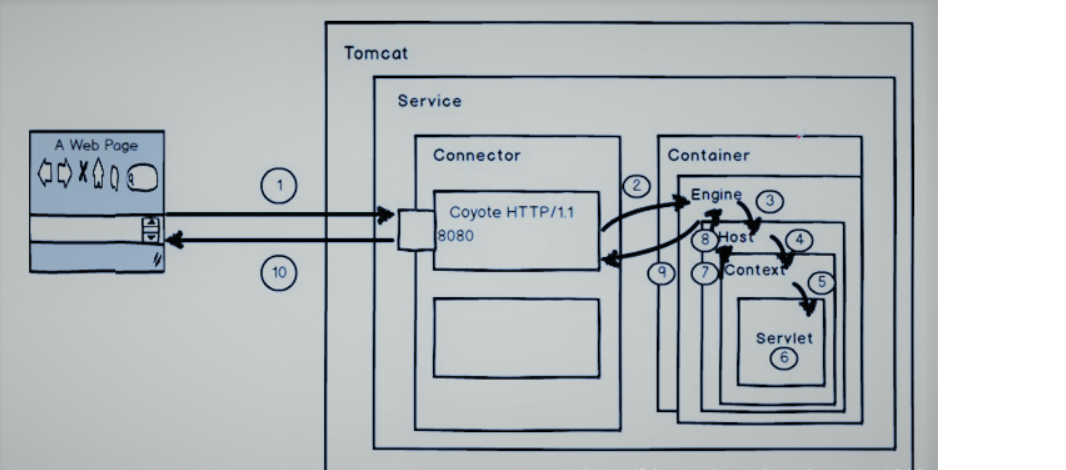
1. The user enters the web address localhost:8080/test/index.jsp in the browser, and the request is sent to the local port 8080, which is obtained by the Coyote HTTP/1.1 Connector listening there;
2. The connector submits the request to the Engine (Container) of its Service to process and waits for the Engine's response;
3.Engine gets the request localhost/test/index.jsp, which matches all virtual hosts;
4. The Engine matches to the Host named localhost (even if it does not match, the request will be handed over to the Host for processing, because the Host is defined as the default Host of the Engine). The Host named localhost gets the request / test/index.jsp, which matches all the contexts it owns. The Host matches the Context with the path / test (if not, the request will be handed over to the Context with the path name "");
5. The context of path = "/ test" gets the request / index.jsp, and finds the corresponding Servlet in its mapping table. Context matches the Servlet whose URL Pattern is *. JSP, corresponding to the JspServlet class;
6. Construct HttpServletRequest object and HttpServletResponse object, call doGet() or doPost() of JspServlet as parameters to execute business logic, data storage, etc;
7.Context returns the HttpServletResponse object to the Host after execution;
8. The host returns the HttpServletResponse object to the Engine;
9.Engine returns HttpServletResponse object to Connector;
10.Connector returns the HttpServletResponse object to the customer Browser.
Tomcat directory structure
[root@localhost ~]# ll /usr/local/tomcat/
Total consumption 124
 Drwxr-x --- 2 root 4096 March 7 22:34 bin
 -Rw-r ----- 1 root 19203 February 5 00:32 BUILDING.txt
 Drwx ------ 3 root 254 March 7 22:36 conf
 -Rw-r ----- 1 root 6095 February 5 00:32 restricting.md
 Drwxr-x --- 2 root 4096 March 7 22:34 lib
 -Rw-r ----- 1 root 57092 February 5 00:32 LICENSE
 Drwxr-x --- 2 root 197 March 7 22:36 logs
 -Rw-r ----- 1 root 2333 February 5 00:32 NOTICE
 -Rw-r ----- 1 root 3255 February 5 00:32 README.md
 -Rw-r ------ 1 root 6854 February 5 00:32 release notes
 -Rw-r ----- 1 root 16262 February 5 00:32 RUNNING.txt
 Drwxr-x --- 2 root 30 March 7 22:34 temp
 Drwxr-x --- 7 root 81 February 5 00:31 webapps
 Drwxr-x --- 3 root 22 March 7 22:36 work

----------------------------------------------------------
●bin
 It is used to store the script files for starting and closing Tomcat, such as catalina.sh, startup.sh
 shutdown.sh three files

●conf
 It is used to store various configuration files of Tomcat server, such as server.xml, context.xml
 Tomcat users.xml and web.xml.

●lib
 Generally, the jar package of Tomcat server will not be changed unless a third-party service, such as redis, is connected,
You need to add the corresponding jar package

●logs
 Store Tomcat logs

●temp
 Store files generated by Tomcat runtime

●webapps
 Directory of project resources

●work
 Tomcat working directory is usually used when clearing Tomcat cache
Tomcat deployment steps
Step 1: Download and share JDK through Windows
jdk must be installed before deploying tomcat, because jdk is the necessary environment for Tomcat to run.
[root@localhost ~]# smbclient -L //192.168.235.1
#Remote sharing
    Sharename       Type      Comment
    ---------       ----      -------
    ADMIN$          Disk      Remote management
    tomcat          Disk

[root@localhost ~]# mkdir /abc
[root@localhost ~]# mount.cifs //192.168.235.1/tomcat /abc
#Mount tomcat shared file to Linux local directory

[root@localhost ~]# cd /abc     #Enter the local directory to view
[root@localhost abc]# ls
12D18CFCD6599AFF0445766ACC4CA231C5025773.torrent
apache-jmeter-5.1
apache-jmeter-5.1.zip
apache-tomcat-9.0.16.tar.gz
jdk-11.0.5_windows-x64_bin.exe
jdk-8u152-windows-x64.exe
jdk-8u201-linux-x64.rpm
tomcat Optimal pressure measurement.jmx

[root@localhost abc]# rpm -ivh jdk-8u201-linux-x64.rpm
#Install JDK
Step 2: confirm the directory path of JDK installation
[root@localhost ~]# cd /usr
[root@localhost usr]# ls
bin  games    java  lib64    local  share  tmp
etc  include  lib   libexec  sbin   src
#For the / usr directory, see the java directory

[root@localhost usr]# cd java/
[root@localhost java]# ls
default  jdk1.8.0_201-amd64  latest
#In java directory, you can see jdk1.8.0-amd64 file

[root@localhost java]# cd jdk1.8.0_201-amd64/
[root@localhost jdk1.8.0_201-amd64]# pwd
/usr/java/jdk1.8.0_201-amd64
#Confirm installation path
Step 3: set the environment variable / etc/profile file
[root@localhost java]# vim /etc/profile
#Add three statements at the end of the document
export JAVA_HOME=/usr/java/jdk1.8.0_201-amd64
#Declare the working directory of java

export CLASSPATH=$JAVA_HOME/lib/tools.jar:$JAVA_HOME/lib/dt.jar
#Declare the location of java class files

export PATH=$JAVA_HOME/bin:$PATH
#Declare java environment variables

[root@localhost java]# source /etc/profile
#Effective environment variable
Step 4: install and start Tomcat service
[root@localhost java]# cd /abc
[root@localhost abc]# tar zxvf apache-tomcat-9.0.16.tar.gz -C /usr/local/
#Extract the tomcat package to the / usr/local / directory

[root@localhost abc]# cd /usr/local/        #You can see apache-tomcat-9.0.16 in the directory / usr/local /
[root@localhost local]# ls
apache-tomcat-9.0.16  etc    include  lib64    sbin   src
bin                   games  lib      libexec  share

[root@localhost local]# mv apache-tomcat-9.0.16/ tomcat     #Rename apache-tomcat-9.0.16 file to Tomcat
[root@localhost local]# ls
bin  games    lib    libexec  share  tomcat
etc  include  lib64  sbin     src

[root@localhost local]# cd tomcat/bin/      #Cut into the bin directory under the tomcat directory. Here is the script to control the tomcat service
[root@localhost bin]# ls
bootstrap.jar                 configtest.sh     shutdown.sh
catalina.bat                  daemon.sh         startup.bat
catalina.sh                   digest.bat        startup.sh
catalina-tasks.xml            digest.sh         tomcat-juli.jar
ciphers.bat                   makebase.bat      tomcat-native.tar.gz
ciphers.sh                    makebase.sh       tool-wrapper.bat
commons-daemon.jar            setclasspath.bat  tool-wrapper.sh
commons-daemon-native.tar.gz  setclasspath.sh   version.bat
configtest.bat                shutdown.bat      version.sh

[root@localhost bin]# ln -s /usr/local/tomcat/bin/startup.sh /usr/bin/
#Create a soft link of tomcat startup script to the system directory for system identification
[root@localhost bin]# ln -s /usr/local/tomcat/bin/shutdown.up.sh /usr/bin/
#Create tomcat close script soft link to system directory for system identification

[root@localhost bin]# startup.sh        #Start tomcat service
Using CATALINA_BASE:   /usr/local/tomcat
Using CATALINA_HOME:   /usr/local/tomcat
Using CATALINA_TMPDIR: /usr/local/tomcat/temp
Using JRE_HOME:        /usr/java/jdk1.8.0_201-amd64
Using CLASSPATH:       /usr/local/tomcat/bin/bootstrap.jar:/usr/local/tomcat/bin/tomcat-juli.jar
Tomcat started.

[root@localhost bin]# systemctl stop firewalld.service
[root@localhost bin]# setenforce 0
#Turn off firewall and enhanced security

[root@localhost bin]# netstat -ntap | grep 8080 view port 8080 status of tomcat service
tcp6       0      0 :::8080                 :::*                    LISTEN      39596/java
Step 5: browse Tomcat's default home page
Enter http://192.168.235.158: 8080 in the browser to access the web page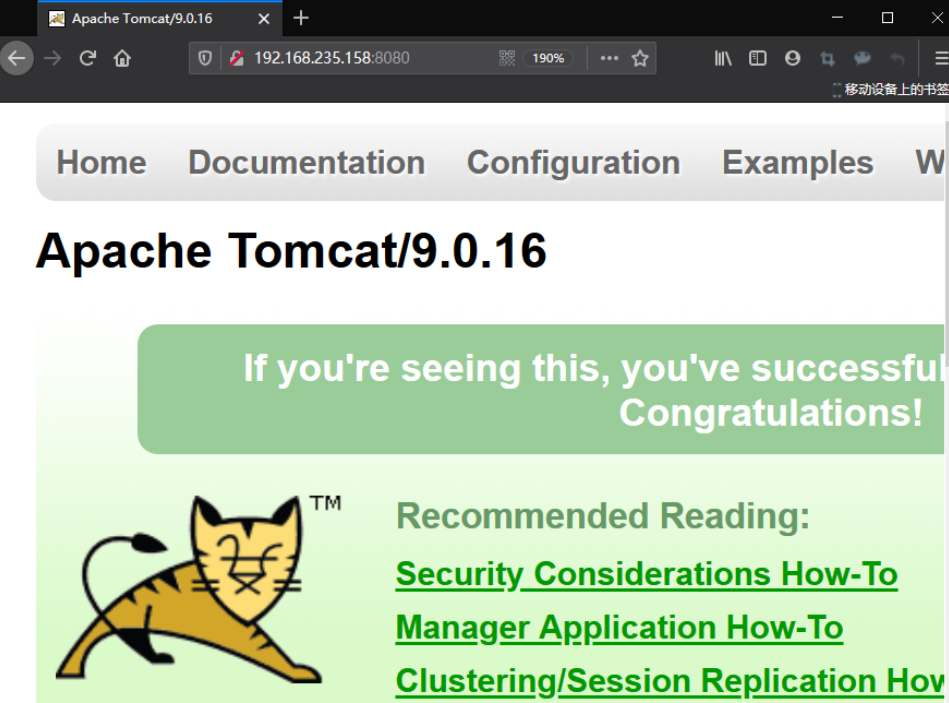
Step 6: optimize Tomcat startup time
[root@localhost bin]# vim /usr/java/jdk1.8.0_201-amd64/jre/lib/security/java.security
#Modify the java.security parameter

securerandom.source=file:/dev/urandom
#Retrieve the random parameter entry and change random to random to shorten the startup time

[root@localhost bin]# startup.sh        #Start service in seconds
Using CATALINA_BASE:   /usr/local/tomcat
Using CATALINA_HOME:   /usr/local/tomcat
Using CATALINA_TMPDIR: /usr/local/tomcat/temp
Using JRE_HOME:        /usr/java/jdk1.8.0_201-amd64
Using CLASSPATH:       /usr/local/tomcat/bin/bootstrap.jar:/usr/local/tomcat/bin/tomcat-juli.jar
Tomcat started.