Tomcat introduction
-
The development language of LNMP framework is PHP language. PHP is a very popular language for developing web programs. In the early years, asp was popular. It is a programming language running on Windows platform. However, because of its poor security, website developers began to switch to php, and PHP is relatively safe.
-
java is a relatively large development language. It can not only develop and build stations, but also develop large-scale software tools and games.
-
Tomcat introduction
- Tomcat is a core project of Apache Software Foundation's Jakarta project, developed by Apache, Sun and other companies and individuals.
- The website written by java program is parsed and run by tomcat+jdk
- tomcat is a middleware that runs websites written in java language. What really works is jdk, which parses java scripts.
- jdk (java development kit) is the core of the whole java, which includes the Java running environment, a bunch of java-related tools and the Java base library.
- The most mainstream JDK is the JDK released by sun. In addition, IBM has also released JDK. openjdk can also be installed on CentOS using yum.
- Web pages written in java are jsp suffixes, and parsing requires jdk
Install jdk directory profile
- jdk version 1.6, 1.7, 1.8
- Download Address on Official Website
- Download jdk8 and place it in / usr/local/src / directory
- tar zxvf jdk-8u144-linux-x64.tar.gz
- mv jdk1.8.0_144 /usr/local/jdk1.8
- Vi/etc/profile// last increase
JAVA_HOME=/usr/local/jdk1.8/
JAVA_BIN=/usr/local/jdk1.8/bin
JRE_HOME=/usr/local/jdk1.8/jre
PATH=$PATH:/usr/local/jdk1.8/bin:/usr/local/jdk1.8/jre/bin
CLASSPATH=/usr/local/jdk1.8/jre/lib:/usr/local/jdk1.8/lib:/usr/local/jdk1.8/jre/lib/charsets.jar
- source /etc/profile
- java -version
Install jdk
-
To install tomcat and jdk, you first need to install jdk, because tomcat depends on JDK environment variables to start
-
jdk version currently has 1.6, 1.7, 1.8, abbreviated as 6, 7, 8
-
The 1.8 version of JDK is used here. Official website address
-
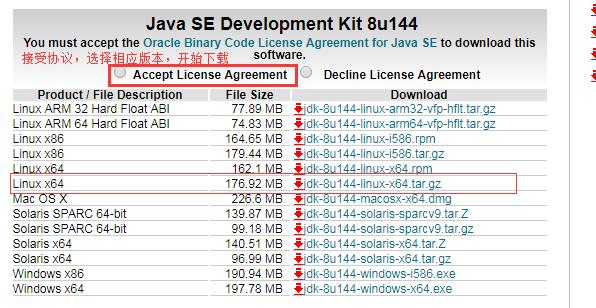
Open the official website of jdk with browser, then download jdk manually to windows. After opening the official website, first point to agree with Accept License Agreement, and then select a corresponding version, tar.gz. (When selecting, you should see how many bits your system is. Before centos6, you can distinguish 32 bits or 64 bits, but it is not distinguished in centos7, although 32 bits version, But it's compiled on the basis of 64-bit version, so it's still a 64-bit version in the end. So using centos7 system, the downloaded jdk version must be x86.
-
Select the following version and click Download

-
After downloading jdk, switch to / usr/local/src directory in linux system
[root@hf-01 ~]# cd /usr/local/src/
[root@hf-01 src]# ls
apr-1.6.3                                     nginx-1.12.1
apr-1.6.3.tar.gz                              nginx-1.12.1.tar.gz
apr-util-1.6.1                                php-5.6.30
apr-util-1.6.1.tar.bz2                        php-5.6.30.tar.gz
httpd-2.4.29                                  php-7.1.6
httpd-2.4.29.tar.gz                           php-7.1.6.tar.bz2
mariadb-10.2.6-linux-glibc_214-x86_64.tar.gz  phpredis-develop
mysql-5.6.35-linux-glibc2.5-x86_64.tar.gz     phpredis-develop.zip
[root@hf-01 src]#
- Transfer jdk to / usr/local/src directory, input ctrl+alt+f shortcut key directly, transfer with xftp, it is more convenient and very safe, it is based on ssh transmission, do not need to open the port of ftp
[root@hf-01 src]# ls
apr-1.6.3                                     nginx-1.12.1
apr-1.6.3.tar.gz                              nginx-1.12.1.tar.gz
apr-util-1.6.1                                php-5.6.30
apr-util-1.6.1.tar.bz2                        php-5.6.30.tar.gz
httpd-2.4.29                                  php-7.1.6
httpd-2.4.29.tar.gz                           php-7.1.6.tar.bz2
jdk-8u161-linux-x64.tar.gz                    phpredis-develop
mariadb-10.2.6-linux-glibc_214-x86_64.tar.gz  phpredis-develop.zip
mysql-5.6.35-linux-glibc2.5-x86_64.tar.gz
[root@hf-01 src]#
- Unzip jdk installation package
[root@hf-01 src]# tar zxf jdk-8u161-linux-x64.tar.gz//decompression package
[root@hf-01 src]# Du-sh jdk1.8.0_161/ / / View Size
371M	jdk1.8.0_161/
[root@hf-01 src]#
- Put the unzipped package in / usr/local / directory and change its name to jdk1.8
- mv jdk1.8.0_161 /usr/local/jdk1.8
[root@hf-01 src]# mv jdk1.8.0_161/ /usr/local/jdk1.8
[root@hf-01 src]#
- Edit the / etc/profile file, which is the editing environment variable
[root@hf-01 src]# vim /etc/profile

Add the following configuration at the bottom of the file for defining environment variables
JAVA_HOME=/usr/local/jdk1.8/
JAVA_BIN=/usr/local/jdk1.8/bin
JRE_HOME=/usr/local/jdk1.8/jre
PATH=$PATH:/usr/local/jdk1.8/bin:/usr/local/jdk1.8/jre/bin
CLASSPATH=/usr/local/jdk1.8/jre/lib:/usr/local/jdk1.8/lib:/usr/local/jdk1.8/jre/lib/charsets.jar

Save exit
- After editing the configuration file, use the source command to make the file effective
[root@hf-01 src]# source /etc/profile
[root@hf-01 src]#
- Verify that jdk is installed successfully. Use the command java-version to see if the version is installed 1.8.0_161. After running the command, the following configuration appears to indicate that jdk is installed successfully.
[root@hf-01 src]# java -version
java version "1.8.0_161"
Java(TM) SE Runtime Environment (build 1.8.0_161-b12)
Java HotSpot(TM) 64-Bit Server VM (build 25.161-b12, mixed mode)
[root@hf-01 src]#
- If you run the command java-version, the result is different from the version we downloaded, or openjdk, then think about whether openjdk has been installed. If openjdk exists, you can uninstall openjdk. Unload the package casually, because a program in the system may use the openjdk.
[root@hf-01 src]# rpm -qa |grep openjdk
[root@hf-01 src]#


[root@hf-01 src]# yum list |grep openjdk
Installation of Tomcat Directory Profile
- cd /usr/local/src
- wget https://mirrors.tuna.tsinghua.edu.cn/apache/tomcat/tomcat-8/v8.5.24/bin/apache-tomcat-8.5.24.tar.gz
- tar zxvf apache-tomcat-8.5.20.tar.gz
- mv apache-tomcat-8.5.20 /usr/local/tomcat
- /usr/local/tomcat/bin/startup.sh
- ps aux|grep tomcat
- netstat -lntp |grep java
- Three ports 8080 are for web services, 8005 is for management, and 8009 is for third-party services, such as httpd and Tomcat.
Install Tomcat
- tomcat is jdk and Java middleware, but without it, you can not listen to port 8080 or port 80, nor can you let the client or browser access the site directly. tomcat is a java web server
- tomcat relies on jdk, so you need to install JDK first
- Switch to / ues/local/src / directory
[root@hf-01 ~]# cd /usr/local/src
[root@hf-01 src]#
- Download tomcat installation package (binary compiler-free package), command wget https://mirrors.tuna.tsinghua.edu.cn/apache/tomcat/tomcat-8/v8.5.24/bin/apache-tomcat-8.5.24.tar.gz
[root@hf-01 src]# wget https://mirrors.tuna.tsinghua.edu.cn/apache/tomcat/tomcat-8/v8.5.24/bin/apache-tomcat-8.5.24.tar.gz
- Decompression package
[root@hf-01 src]# tar zxf apache-tomcat-8.5.24.tar.gz
[root@hf-01 src]#
- After decompression, move to / usr/local / directory and change the name to tomcat
- mv apache-tomcat-8.5.24 /usr/local/tomcat
[root@hf-01 src]# mv apache-tomcat-8.5.24 /usr/local/tomcat
[root@hf-01 src]#
- Start tomcat, because the Tomcat package downloads binary compiler-free packages without compiling them
- /usr/local/tomcat/bin/startup.sh
[root@hf-01 src]# / usr/local/tomcat/bin/startup.sh // / so that tomcat can be started
Using CATALINA_BASE:   /usr/local/tomcat
Using CATALINA_HOME:   /usr/local/tomcat
Using CATALINA_TMPDIR: /usr/local/tomcat/temp
Using JRE_HOME:        /usr/local/jdk1.8
Using CLASSPATH:       /usr/local/tomcat/bin/bootstrap.jar:/usr/local/tomcat/bin/tomcat-juli.jar
Tomcat started.
[root@hf-01 src]#
- At this point, you can grep to see if there is a java process. If there is a java process, tomcat started normally.
[root@hf-01 src]# ps aux |grep java
root      2800  2.5  8.6 2296760 87456 pts/0   Sl   13:02   0:04 /usr/local/jdk1.8/bin/java -Djava.util.logging.config.file=/usr/local/tomcat/conf/logging.properties -Djava.util.logging.manager=org.apache.juli.ClassLoaderLogManager -Djdk.tls.ephemeralDHKeySize=2048 -Djava.protocol.handler.pkgs=org.apache.catalina.webresources -Dignore.endorsed.dirs= -classpath /usr/local/tomcat/bin/bootstrap.jar:/usr/local/tomcat/bin/tomcat-juli.jar -Dcatalina.base=/usr/local/tomcat -Dcatalina.home=/usr/local/tomcat -Djava.io.tmpdir=/usr/local/tomcat/temp org.apache.catalina.startup.Bootstrap start
root      2844  0.0  0.0 112680   976 pts/0    R+   13:05   0:00 grep --color=auto java
[root@hf-01 src]#
- The command to close tomcat is / usr/local/romcat/bin/shutdown.sh. tomcat does not support restart. If you change the configuration file, you need to restart. stop first and start later.
- /usr/local/tomcat/bin/shutdown.sh
- Close tomcat and look at the process again. You will see that tomcat is closed.
[root@hf-01 src]# /usr/local/tomcat/bin/shutdown.sh
Using CATALINA_BASE:   /usr/local/tomcat
Using CATALINA_HOME:   /usr/local/tomcat
Using CATALINA_TMPDIR: /usr/local/tomcat/temp
Using JRE_HOME:        /usr/local/jdk1.8
Using CLASSPATH:       /usr/local/tomcat/bin/bootstrap.jar:/usr/local/tomcat/bin/tomcat-juli.jar
[root@hf-01 src]# ps aux |grep java
root      2875  0.0  0.0 112680   972 pts/0    R+   13:09   0:00 grep --color=auto java
[root@hf-01 src]#
- Then start tomcat again
[root@hf-01 src]# /usr/local/tomcat/bin/startup.sh
Using CATALINA_BASE:   /usr/local/tomcat
Using CATALINA_HOME:   /usr/local/tomcat
Using CATALINA_TMPDIR: /usr/local/tomcat/temp
Using JRE_HOME:        /usr/local/jdk1.8
Using CLASSPATH:       /usr/local/tomcat/bin/bootstrap.jar:/usr/local/tomcat/bin/tomcat-juli.jar
Tomcat started.
[root@hf-01 src]#
- Looking at tomcat's listening ports, you can see that the listening ports are 8080 and 809, and there is an 8005 port.
- 8080 is the port to provide web services, 8005 is the management port, and 8009 is the port to invoke third-party services, such as httpd and Tomcat.
- Usually 8080 port is used.
[root@hf-01 src]# netstat -lntp |grep java
tcp6       0      0 :::8080                 :::*                    LISTEN      2893/java
tcp6       0      0 127.0.0.1:8005          :::*                    LISTEN      2893/java
tcp6       0      0 :::8009                 :::*                    LISTEN      2893/java
[root@hf-01 src]#
- Test tomcat access page
- Close the firewall
- Close firlewalld
- systemctl stop firewalld
- systemctl disable firewalld
Close the firewall
[root@hf-01 src]# systemctl stop firewalld
[root@hf-01 src]# systemctl disable firewalld
Removed symlink /etc/systemd/system/dbus-org.fedoraproject.FirewallD1.service.
Removed symlink /etc/systemd/system/basic.target.wants/firewalld.service.
[root@hf-01 src]# iptables -nvL
Chain INPUT (policy ACCEPT 0 packets, 0 bytes)
 pkts bytes target     prot opt in     out     source               destination

Chain FORWARD (policy ACCEPT 0 packets, 0 bytes)
 pkts bytes target     prot opt in     out     source               destination

Chain OUTPUT (policy ACCEPT 0 packets, 0 bytes)
 pkts bytes target     prot opt in     out     source               destination
[root@hf-01 src]#
- After closing the firewall, open the browser to access the virtual machine's IP plus 8080 ports, such as 192.168.202.131:8080
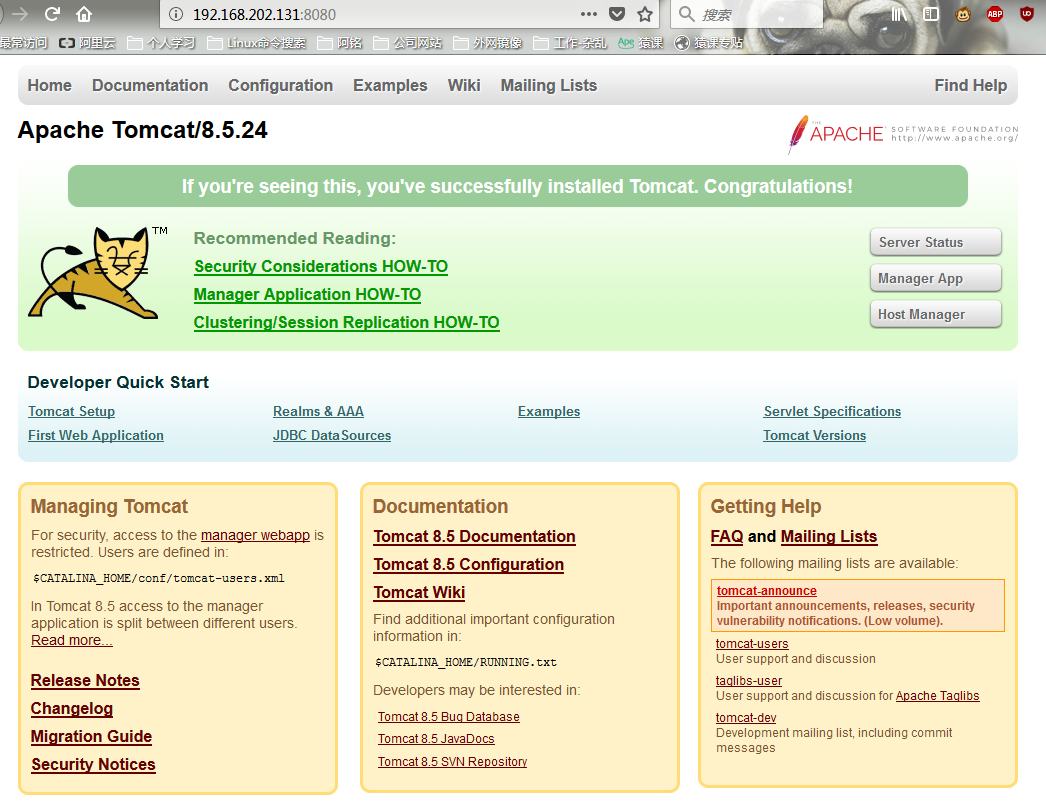
- Opening the following interface is successful.