For more articles, visit my blog- Code is endless.
Nowadays, most Internet companies will adopt micro-service architecture, but there are different ways to implement micro-service architecture. There are two main ways: one is remote call based on Http protocol, the other is RPC-based call. Both approaches have their own representative frameworks, the former is the famous Spring Cloud, and the latter is the open source Dubbo of Alibaba, both of which are widely adopted. In today's article, we'll take a look at RPC and work with you to implement a simple RPC framework Demo.
What is RPC
RPC is a remote invocation process and a protocol for remote invocation of other services over the network. Generally speaking, A asks B to help with one thing by telephone, and B informs A of the result after doing it. Let's take a look at the roles that exist in a complete RPC framework and the whole process of remote invocation.
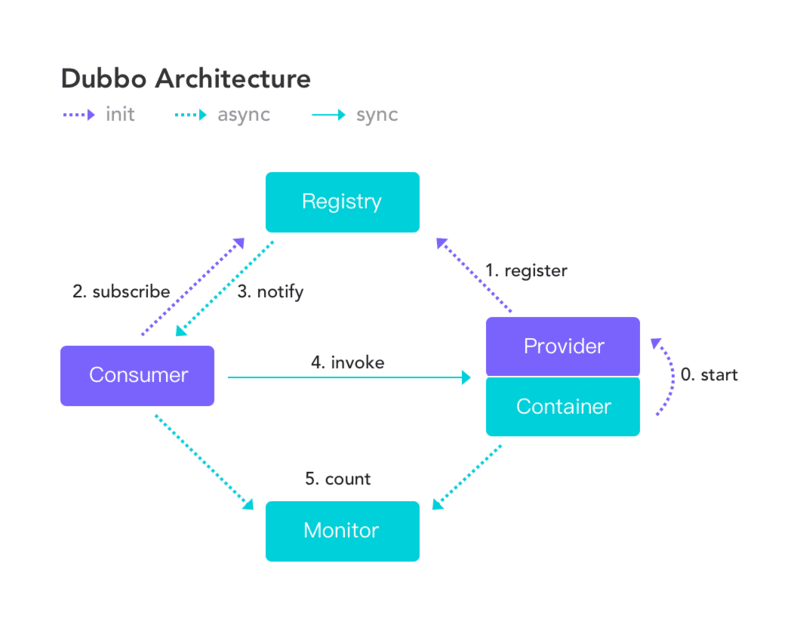
As can be seen from the figure above, there are four main roles in the RPC framework:
- Registry - The registry registry registers with the registry when the service provider starts, and then the registry informs all consumers that there are new service providers.
- provider - Service provider, the consumer in the process of remote invocation.
- Consumer - Service consumer, consumer in the process of remote invocation.
- monitor - monitor, which is mainly responsible for the consumption and invocation of statistical services.
After starting the service provider, the service provider registers with the registry in an asynchronous manner. Then start the service consumer, which subscribes to the list of service providers in the registry. When the information of the service provider changes, the registry notifies all consumers. When a consumer initiates a remote call, information such as the required parameters and method signatures will be sent to the service provider through Netty through the dynamic proxy. After receiving the call information, the service provider calls the corresponding method and returns the result to the consumer, thus completing a complete remote call. Of course, this process may also asynchronously send the call information to monitor for monitoring and statistics.
After reading the above, you should have a general understanding of the RPC framework. In order to better understand the principle of RPC framework, let's work together to implement a simple RPC framework.
Framework Core
First of all, we want to achieve the core part of the RPC framework, which mainly includes the following contents:
- Implementation of annotations for RPC services.
- Implementation of service provider initialization, registration, and response to remote calls.
- Service consumers subscribe to the registry and monitor the changes of service providers.
- The realization of dynamic agent.
The whole core part will be implemented in the form of a Spring Boot Starter, so that we can easily use it in Spring Boot projects.
annotation
We need to use a comment to identify the implementation classes of services provided by service providers so that they can be managed by Spring at initialization, and only then can we find them when remote calls occur.
@Target({ElementType.TYPE})
@Retention(RetentionPolicy.RUNTIME)
@Component
public @interface RpcService {

    Class<?> value();

}
The value attribute is used to mark the interface corresponding to the implementation class of the service. In the RPC framework, service providers and consumers will refer to a package of service interfaces together. When we need remote invocation, we only need to invoke the method defined in the interface.
In addition to an annotation for the identification service implementation class, we also need a @RpcConsumer annotation for the identification service consumer injection service implementation. The attributes modified by the @RpcConsumer annotation will be dynamically proxyed when initialized. This will be discussed in detail later. Let's first look at its implementation.
@Target({ElementType.FIELD})
@Retention(RetentionPolicy.RUNTIME)
@Component
public @interface RpcConsumer {

    /**
     * Service Name
     * @return
     */
    String providerName();

}
Service Provider
When the service provider starts up, our RPC framework needs to do the following things:
- Scan all the classes that provide services in the service provider (classes modified by @RpcService) and hand them over to BeanFactory.
- Start the Netty server to receive the call message from the consumer and return the result of the call.
- Register with the registry. The registry used in this example is Zookeeper.
In this section, we define a ProviderAutoConfiguration class to implement these steps.
@PostConstruct
public void  init() {
    logger.info("rpc server start scanning provider service...");
    Map<String, Object> beanMap = this.applicationContext.getBeansWithAnnotation(RpcService.class);
    if (null != beanMap && !beanMap.isEmpty()) {
        beanMap.entrySet().forEach(one -> {
            initProviderBean(one.getKey(), one.getValue());
        });
    }
    logger.info("rpc server scan over...");
    // Start netty server only if there is a service
    if (!beanMap.isEmpty()) {
        startNetty(rpcProperties.getPort());
    }
}
Looking at the code above, first we get all the entities modified by the @RpcService annotation, and call the initProviderBean method to process them one by one, then we start Netty. So what do we need to do in the initProviderBean method? In fact, it's very simple. It's managed by BeanFactory one by one.
private void initProviderBean(String beanName, Object bean) {
    RpcService rpcService = this.applicationContext
                .findAnnotationOnBean(beanName, RpcService.class);
    BeanFactory.addBean(rpcService.value(), bean);
}
After handing over the service implementation classes to Spring, we also need to start Netty to receive remote call information. The code to start Netty is not all glued out here. You can Source code In view. After Netty started successfully, we actually executed the following code to register with ZK.
new RegistryServer(rpcProperties.getRegisterAddress(),
                    rpcProperties.getTimeout(), rpcProperties.getServerName(),
                    rpcProperties.getHost(), port)
                    .register();
The whole registration process is also very easy to understand. First, create a ZK connection, then judge whether there is a root node / rpc, if not, create a root node, and finally create an EPHEMERAL_SEQUENTIAL type node under the root node, which will be automatically cleared after ZK restart. It can ensure that the registry automatically clears the information of the service provider after restarting. The node stores the name, IP address and port number of the service provider, so that the RPC framework can locate the service provider smoothly.
public void register() throws ZkConnectException {
    try {
        // Get zk connection
        ZooKeeper zooKeeper = new ZooKeeper(addr, timeout, event -> {
            logger.info("registry zk connect success...");
        });
        if (zooKeeper.exists(Constants.ZK_ROOT_DIR, false) == null) {
            zooKeeper.create(Constants.ZK_ROOT_DIR, Constants.ZK_ROOT_DIR.getBytes(),ZooDefs.Ids.OPEN_ACL_UNSAFE,
                    CreateMode.PERSISTENT);
        }
        zooKeeper.create(Constants.ZK_ROOT_DIR + "/" + serverName,
                (serverName + ","+ host + ":" + port).getBytes(),
                ZooDefs.Ids.OPEN_ACL_UNSAFE, CreateMode.EPHEMERAL_SEQUENTIAL);
        logger.info("provider register success {}", serverName);
    } catch (Exception e) {
        throw new ZkConnectException("register to zk exception," + e.getMessage(), e.getCaus());
    }
}
In this way, we have finished the content of RPC framework related to service providers, and the next thing to be done is the service consumer part.
Service consumers
For service consumers, our framework needs to deal with it by setting up dynamic proxies for all RPC services (attributes modified by @RpcConsumer). The specific setup code is as follows (PS: This code is written in the ConsumerAutoConfiguration class):
@Bean
public BeanPostProcessor beanPostProcessor() {
    return new BeanPostProcessor() {
        @Override
        public Object postProcessBeforeInitialization(Object bean, String beanName)
                throws BeansException {
            Class<?> objClz = bean.getClass();
            for (Field field : objClz.getDeclaredFields()) {
                RpcConsumer rpcConsumer = field.getAnnotation(RpcConsumer.class);
                if (null != rpcConsumer) {
                    Class<?> type = field.getType();
                    field.setAccessible(true);
                    try {
                        field.set(bean, rpcProxy.create(type, rpcConsumer.providerName()));
                    } catch (IllegalAccessException e) {
                        e.printStackTrace();
                    } finally {
                        field.setAccessible(false);
                    }
                }
            }
            return bean;
        }
    };
}
BeanPostProcessor, also known as Bean PostProcessor, is an interface defined in Spring. During the creation of Spring containers (specifically before and after Bean initialization), two methods defined in BeanPostProcessor are called back. The postProcessBeforeInitialization implemented above is called before the bean is initialized, and a postProcessAfterInitialization method is called after the bean is initialized.
As shown in the above code, we will use reflection mechanism to set up a RpcProxy agent for each instance with @RpcConsumer before initialization. We can see that we also need the name of the service provider when we create this dynamic agent, because we need to use service providers in the implementation of the dynamic agent. The name of the provider is used to query the address information of the service provider. So what about the implementation of this dynamic agent? That's what we need to do next.
Dynamic Agent
In this RPC framework, the main content of dynamic proxy is that when the service consumer invokes the interface provided by the service provider, the invocation information is sent to the corresponding service caller through Netty, and then the service provider completes the relevant processing and returns the processing results to the service consumer. Let's take a look at how RpcProxy implements this part of the functionality.
@Component
public class RpcProxy {

    @Autowired
    private ServiceDiscovery serviceDiscovery;

    public <T> T create(Class<?> interfaceClass, String providerName) {
        return (T) Proxy.newProxyInstance(interfaceClass.getClassLoader(), new Class<?>[]{interfaceClass},
                (proxy, method, args) -> {
            // Send requests to Rpc services through netty.
            // Build a request.
            RpcRequest request = new RpcRequest();
            request.setRequestId(UUID.randomUUID().toString())
                    .setClassName(method.getDeclaringClass().getName())
                    .setMethodName(method.getName())
                    .setParamTypes(method.getParameterTypes())
                    .setParams(args);
            // Get a service provider.
            ProviderInfo providerInfo = serviceDiscovery.discover(providerName);
            // The address information of the service provider is parsed. The first element of the array is the ip address, and the second element is the port number.
           String[] addrInfo = providerInfo.getAddr().split(":");
            String host = addrInfo[0];
            int port = Integer.parseInt(addrInfo[1]);
            RpcClient rpcClient = new RpcClient(host, port);
            // Use Netty to send the call message to the service provider and receive the result of the request.
            RpcResponse response = rpcClient.send(request);
            if (response.isError()) {
                throw response.getError();
            } else {
                return response.getResult();
            }
        });
    }
}
In fact, in the proxy, we first construct the request information entity, then get the address of a service provider according to the name of the service provider, and finally send the request information to the service provider and receive the result of the call. The method of obtaining service providers will be explained in the general configuration of consumers and providers later. Here we focus on the implementation of sending call information and receiving call results.
public class RpcClient extends SimpleChannelInboundHandler<RpcResponse> {

    ... Object attribute information is omitted here to view the source code.

    public RpcResponse send(RpcRequest request){
        EventLoopGroup workerGroup = new NioEventLoopGroup();
        try {
            ... This is omitted. Netty Related configuration, you can see the source code.
            // Connecting servers
            ChannelFuture channelFuture = bootstrap.connect(host, port).sync();
            channelFuture.channel().writeAndFlush(request).sync();
            future = new CompletableFuture<>();
            future.get();
            if (response != null) {
                // Close the netty connection.
                channelFuture.channel().closeFuture().sync();
            }
            return response;
        } catch (Exception e) {
            logger.error("client send msg error,", e);
            return null;
        } finally {
            workerGroup.shutdownGracefully();
        }
    }

    @Override
    protected void channelRead0(ChannelHandlerContext channelHandlerContext,
                                RpcResponse rpcResponse) throws Exception {
        logger.info("client get request result,{}", rpcResponse);
        this.response = rpcResponse;
        future.complete("");
    }
}
From the above code, we can see that sending messages to service providers is asynchronous. We block the current thread through the get() method of CompletableFuture until we receive the call result (PS: We set the return result to completion after we receive it in the channelRead0 method). Seeing this, you may ask the service provider how to handle the call request information when it receives it. Specific processing logic is written in the ServerHandler class. It can be seen that after the channelRead0 method receives a call information, the handle method is called to process the specific calling process. In the handle method, the reflection mechanism is used to find the specific implementation of the invoked method, and then the invocation process is executed and the result is obtained. Finally, Netty is used to return the results to the consumer service.
public class ServerHandler extends SimpleChannelInboundHandler<RpcRequest> {

    @Override
    protected void channelRead0(ChannelHandlerContext channelHandlerContext,
                                RpcRequest request) throws Exception {
        logger.info("provider accept request,{}", request);
        // Object returned.
        RpcResponse rpcResponse = new RpcResponse();
        // Bring the request id back to its original path
        rpcResponse.setRequestId(request.getRequestId());
        try {
            Object result = handle(request);
            rpcResponse.setResult(result);
        } catch (Exception e) {
            rpcResponse.setError(e);
        }
        channelHandlerContext.writeAndFlush(rpcResponse).addListener(ChannelFutureListener.CLOSE);
    }

    private Object handle(RpcRequest request) throws Exception {
        String className = request.getClassName();
        Class<?> objClz = Class.forName(className);
        Object o = BeanFactory.getBean(objClz);
        // Gets the method name of the call.
        String methodName = request.getMethodName();
        // Parameter type
        Class<?>[] paramsTypes = request.getParamTypes();
        // Specific parameters.
        Object[] params = request.getParams();
        // Calls the specified method of the implementation class and returns the result.
        Method method = objClz.getMethod(methodName, paramsTypes);
        Object res = method.invoke(o, params);
        return res;
    }
}
General Configuration of Consumers and Providers
In addition to ProviderAutoConfiguration and ConstumerAutoConfiguration, we also define a RpcAutoConfiguration class to configure something else, as shown below.
public class RpcAutoConfiguration {
    ...

    @Bean
    @ConditionalOnMissingBean
    public ServiceDiscovery serviceDiscovery() {
        ServiceDiscovery serviceDiscovery =
                null;
        try {
            serviceDiscovery = new ServiceDiscovery(rpcProperties.getRegisterAddress());
        } catch (ZkConnectException e) {
            logger.error("zk connect failed:", e);
        }
        return serviceDiscovery;
    }

    @Bean
    @ConditionalOnMissingBean
    public RpcProxy rpcProxy() {
        RpcProxy rpcProxy = new RpcProxy();
        rpcProxy.setServiceDiscovery(serviceDiscovery());
        return rpcProxy;
    }
}
In this configuration class, we initialize a ServiceDiscovery object and a RpcProxy object. Among them, RpcProxy is a dynamic proxy, which we have seen in detail above. So let's focus on what Service Discovery is about.
Do you remember the picture we posted at the beginning of the article? The main function of Service Discovery is to subscribe to changes in the content of the service provider when the service consumer is initialized. The main code of Service Discovery is as follows. (If you need complete code, you can see this article.) Source code).
public class ServiceDiscovery {

    // Store the information of the service provider.
    private volatile List<ProviderInfo> dataList = new ArrayList<>();

    public ServiceDiscovery(String registoryAddress) throws ZkConnectException {
        try {
            // Get the zk connection.
            ZooKeeper zooKeeper = new ZooKeeper(registoryAddress, 2000, new Watcher() {
                @Override
                public void process(WatchedEvent event) {
                    logger.info("consumer connect zk success!");
                }
            });
            watchNode(zooKeeper);
        } catch (Exception e) {
            throw new ZkConnectException("connect to zk exception," + e.getMessage(), e.getCause());
        }
    }

    /**
     * Monitoring changes in service providers
     */
    public void watchNode(final ZooKeeper zk) {
        ...
    }

    /**
     * Get a service provider
     */
    public ProviderInfo discover(String providerName) {
        ....
    }
}
In the construction method of this class, we establish a connection with the ZK registry and monitor the changes of service provider nodes in the watchNode method. When the information of service provider changes, we modify the contents of dataList to ensure that an available service provider's letter is maintained locally in the service. Interest. When a remote call occurs, we use the discover method (PS: I've seen it before) to find a service provider available in the dataList to provide the service.
Starter configuration
We also need to create a META-INF directory under the resources directory, and then create a spring.factories file under that directory, which is shown in the following code. It is mainly used to specify other configurations that need to be loaded when the Spring Book project starts. If you don't understand, you can check Spring Book Custom Stater.
org.springframework.boot.autoconfigure.EnableAutoConfiguration=\
cn.itweknow.sbrpccorestarter.config.RpcAutoConfiguration,\
cn.itweknow.sbrpccorestarter.config.ProviderAutoConfiguration,\
cn.itweknow.sbrpccorestarter.config.ConsumerAutoConfiguration
At this point, the core part of our framework is completed. It will be available to service providers and service consumers in the form of a Spring Boot Stater. Next, we will define a service provider and a consumer to test our own RPC framework.
Create a service provider
Before creating a service provider, we need to create a new service interface shared with service consumers. As mentioned earlier, remote invocation in the eyes of service consumers is actually a call to a local interface method. In this project, we created an interface for HelloRpcService.java, as follows:
public interface HelloRpcService {
    String sayHello();
}
After the interface definition is complete, we will create our service provider and implement the HelloRpcService interface defined above. In service provider services, we also need to rely on the core Starter of RPC framework and service interface packages. We need to add the following dependencies in pom.xml.
<dependency>
    <groupId>cn.itweknow</groupId>
    <artifactId>sb-rpc-core-starter</artifactId>
    <version>0.0.1-SNAPSHOT</version>
</dependency>

<dependency>
    <groupId>cn.itweknow</groupId>
    <artifactId>sb-rpc-api</artifactId>
    <version>0.0.1-SNAPSHOT</version>
</dependency>
After adding dependencies, let's look at the implementation of HelloRpcService.
@RpcService(HelloRpcService.class)
public class HelloRpcServiceImpl implements HelloRpcService {

    @Override
    public String sayHello() {
        return "Hello RPC!";
    }
}
The implementation is simple, mainly by adding the @RpcService annotation to the implementation class, so that the RPC framework will scan it when the project starts and hand it over to BeanFactory management. Next, we need to configure some configuration items needed by RPC framework, including service name, ZK address and Netty startup port. This information is read through the configuration class RpcProperties in the framework. Interested students can Source code Find it in.
spring.rpc.host=localhost
# Port number of netty service
spring.rpc.port=21810
# zk address
spring.rpc.register-address=localhost:2181
spring.rpc.server-name=provider
# Timeout time for connection zk
spring.rpc.timeout=2000
Creating Service Consumers
Service consumers also need the Starter of the RPC core framework and the dependencies of the service interface, which are similar to some basic configurations of the RPC framework and service providers, so they don't stick out here. One thing to note here is that in order to facilitate testing, the service consumer is a Web service, so it also adds spring-boot-starter-web dependencies. Let's take a look at how service consumers invoke remote services.
@RestController
@RequestMapping("/hello-rpc")
public class HelloRpcController {


    @RpcConsumer(providerName = "provider")
    private HelloRpcService helloRpcService;

    @GetMapping("/hello")
    public String hello() {
        return helloRpcService.sayHello();
    }
}
We have written a hello interface in consumer service, which calls the sayHello() method in the Hello RpcService interface. Students who have seen the previous content should know that the Hello RpcService property modified by @RpcConsumer will set a dynamic proxy for it when initialized. When we call this interface When the method is inside, it sends the call information to the service provider through Netty, and then the service provider calls the corresponding method and returns the result.
At this point, we can say that we have completed a simple RPC framework and its use. Let's verify the results together.
test
Before testing, we need to install Zookeeper on our local computer. The specific installation method is very simple. You can refer to this article.
After installing Zookeeper, we need to complete the following steps:
- Start Zookeeper.
- Start the service provider.
- Start service consumers.
During the first start-up of the service consumer, your console may report an error that the / rpc node could not be found. The reason for this error is that we did not have the / rpc node in ZK at the first start-up, but if you study it carefully. Source code If this node does not exist, we will create one. So ignore this exception directly. After completing the above steps, we only need to visit http://127.0.0.1:8080/hello-rpc/hello in the browser. If you see the following results, congratulations, the entire RPC framework works perfectly.

Concluding remarks
The main content of this paper is to complete a Demo RPC framework with you. The main purpose of this framework is to let you have a deeper understanding of the RPC principle and its calling process. Of course, because of the length of the article, a lot of code is not directly presented in the article, you can find it on Github. Complete implementation . If you have any questions, you can submit a question on Github or send an email to my mailbox (gancy.programmer@gmail.com). If you think this article is good, I hope you can give me a Star, which is the best encouragement for me.
PS: Not only learning, but also learning! If you like my article, pay attention to me!
