catalogue
1. Function of squid proxy server
2. Working mechanism of the agency
1, Squid proxy server
1. Function of squid proxy server
It mainly provides cache acceleration and application layer filtering control functions
2. Working mechanism of the agency
• instead of the client requesting data from the website, you can hide the user's real IP address
• save the obtained web page data (static web elements) to the cache and send it to the client, so as to respond quickly the next time the same data is requested
3. Type of agent
① Traditional proxy: suitable for the internet, the address and port of the proxy server need to be specified on the client
② Transparent proxy: the client does not need to specify the address and port of the proxy server, but redirects web access to the proxy server through default routing and firewall policies
③ Reverse proxy: if the requested resource is cached in the Squid reverse proxy server, the requested resource is returned directly to the client; Otherwise, the reverse proxy server will request resources from the background web server, and then return the requested response to the client. At the same time, it will also cache (statically) the response locally for use by the next requester
4. Benefits of using agents
• improve web access speed
• hide the real IP address of the client
2, Squid agent installation
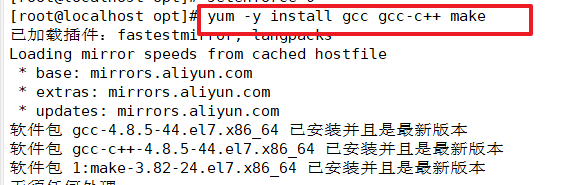
Installation dependent environment
yum -y install gcc gcc-c++ make
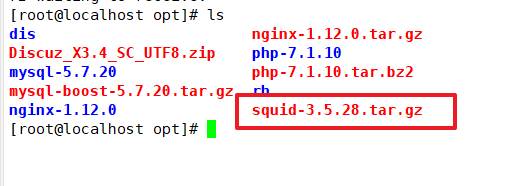
Upload squid-3.5.28. tar to / opt directory
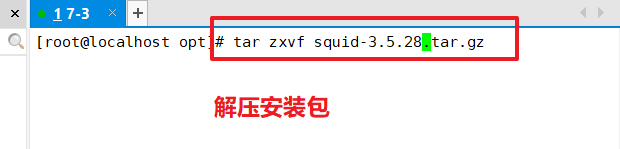
decompression
cd /opt
tar zxvf squid-3.5.27.tar.gz
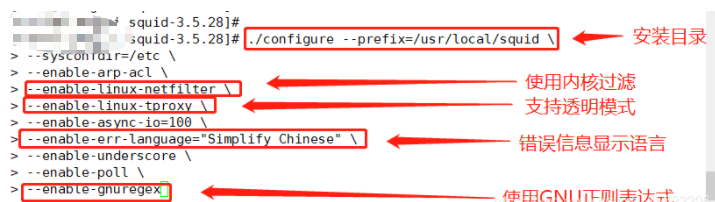
to configure
cd squid-3.5.27/
./configure --prefix=/usr/local/squid \
--sysconfdir=/etc \
--enable-arp-acl \
--enable-linux-netfilter \
--enable-linux-tproxy \
--enable-async-io=100 \
--enable-err-language="Simplify_Chinese" \
--enable-underscore \
--enable-poll \
--enable-gnuregex
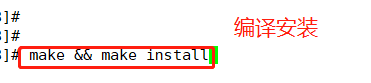
Compile and install
make && make install
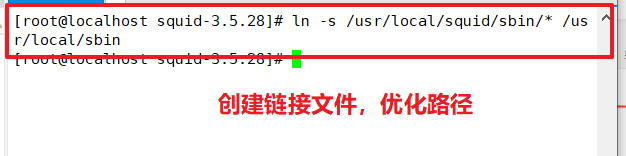
Create linked files and optimize paths
ln -s /usr/local/squid/sbin/* /usr/local/sbin
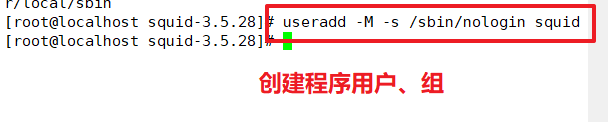
Create program users, groups
useradd -M -s /sbin/nologin squid
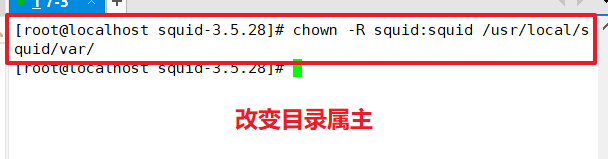
Change directory ownership
chown -R squid:squid /usr/local/squid/var/
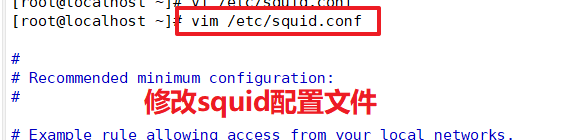
Modify Squid's configuration file
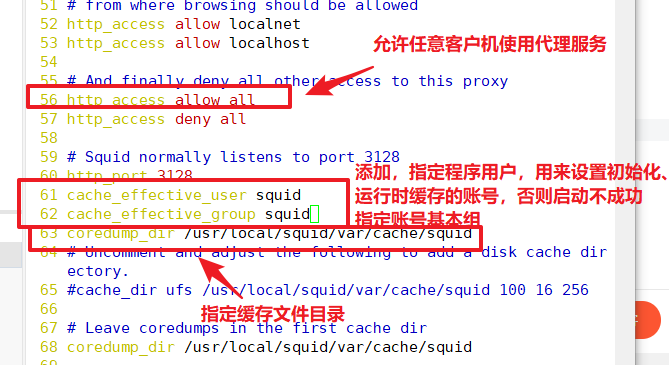
vi /etc/squid.conf
#Put in http access deny all
 Before, any client is allowed to use the proxy service, and the control rules are from.Top down matching
vim /etc/squid.conf
......
-56 that 's ok--insert--
http_access allow all
#Before http access deny all, any client is allowed to use the proxy service to control the rule matching from top to bottom
http_access deny all
http_port 3128
#Used to specify the address and port that the proxy service listens to (the default port number is 3128)
-----61 that 's ok--insert------
cache_effective_user squid
#Add, specify the program user, which is used to set the account of initialization and runtime cache. Otherwise, the startup will not succeed
cache_effective_group squid
#Add, specify account basic group
coredump_dir /usr/local/squid/var/cache/squid
#Specify cache file directory

##Above script explanation
##Configure hard disk cache, open#512M cache directories, including 16 level-1 directories and 256 level-2 directories
cache_effective_user squid
cache_effective_group squid
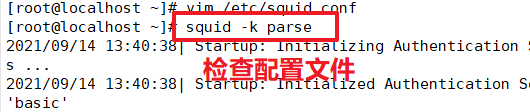
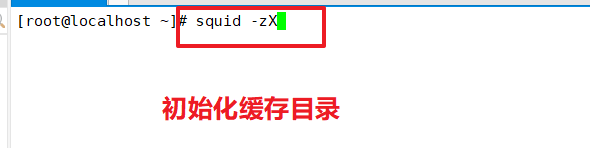
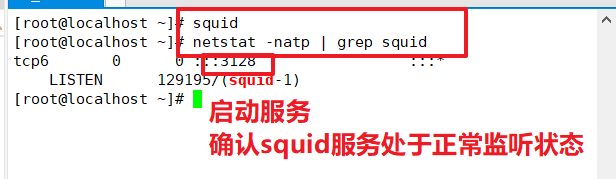
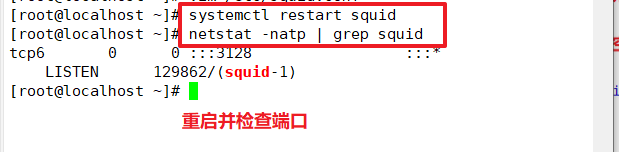
squid -k parse
##Check configuration file
squid -k rec
##Reload profile
squid -zX
##Initialize cache directory

squid
##service squid start

netstat -anpt | grep squid
##Confirm that squid service is in normal listening state
tcp6 0  0 :::3128   :::*   LISTEN
6699/ (squid-1)
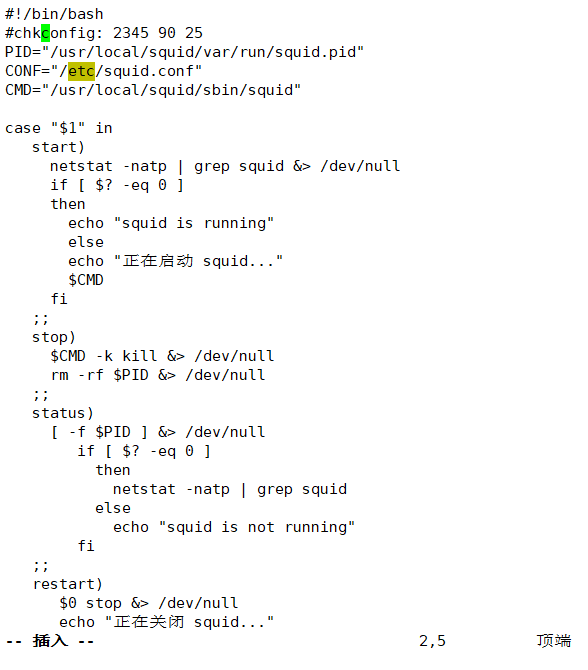
vim /etc/init.d/squid

#!/bin/bash
#chkconfig: 2345 90 25
PID="/usr/local/squid/var/run/squid.pid"
CONF="/etc/squid.conf"
CMD="/usr/local/squid/sbin/squid"

case "$1" in
   start)
     netstat -natp | grep squid &> /dev/null
     if [ $? -eq 0 ]
     then
       echo "squid is running"
       else
       echo "Starting squid..."
       $CMD
     fi
   ;;
   stop)
     $CMD -k kill &> /dev/null
     rm -rf $PID &> /dev/null
   ;;
   status)
     [ -f $PID ] &> /dev/null
        if [ $? -eq 0 ]
          then
            netstat -natp | grep squid
          else
            echo "squid is not running"
        fi
   ;;
   restart)
      $0 stop &> /dev/null
      echo "Closing squid..."
         $0 start &> /dev/null
      echo "Starting squid..."
   ;;
   reload)
      $CMD -k reconfigure
   ;;
   check)
      $CMD -k parse
   ;;
   *)
      echo "Usage: $0{start|stop|status|reload|check|restart}"
   ;;
esac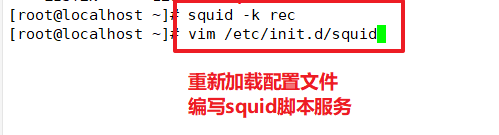
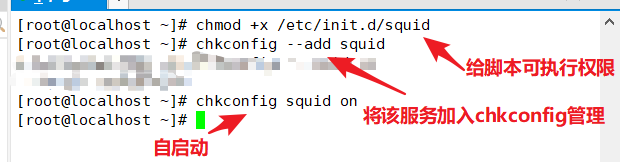
chmod +x /etc/init.d/squid
chkconfig --add squid
chkconfig --squid on
3, Build traditional agent
Case: build squid proxy server, allow the client to specify squid proxy server as the Web proxy to access the website server, but prohibit downloading files over 10MB through the proxy, and cache files over 4MB. Server:
Environmental preparation
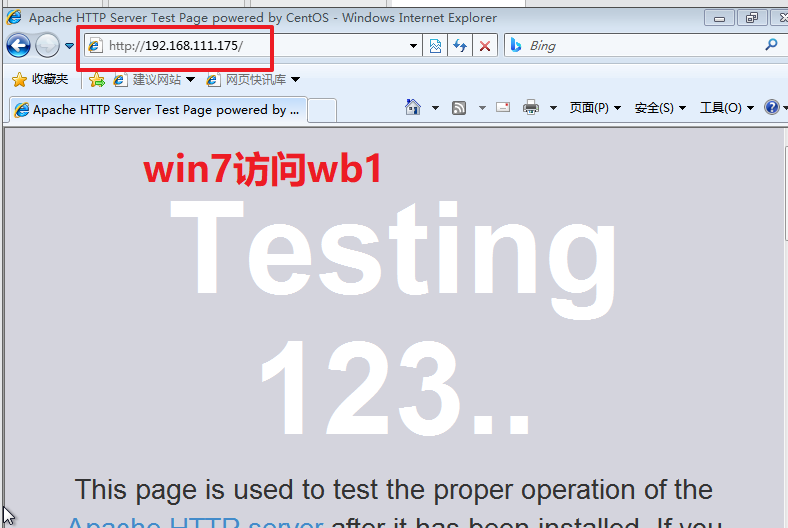
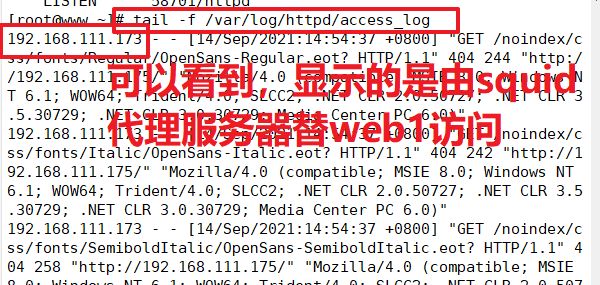
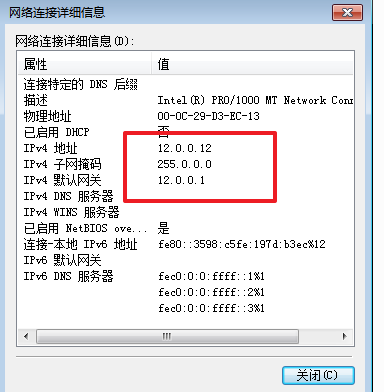
| Squid server | 192.168.111.173 |
| web1 server | 192.168.111.175 |
| win7 | 192.168.111.128 |
Configuring: squid server
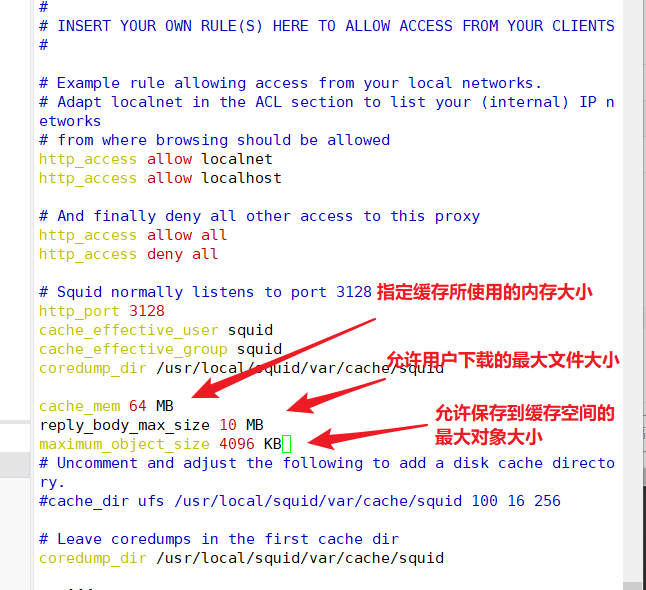
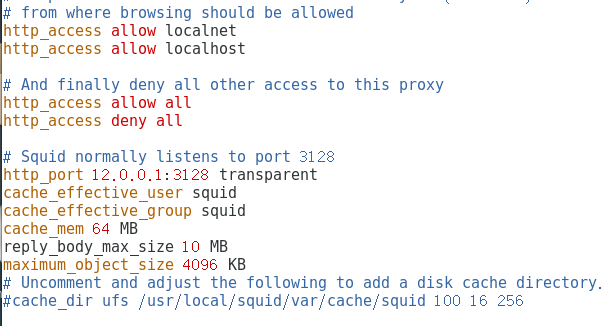
vim /etc/squid.conf
......
http_access allow all
http_access deny all
http_port 3128
cache_effective_user squid
cache_effective_group squid
---63 Rows, inserting----
cache_mem 64 MB				#Specify the memory space used by the cache function to maintain frequently accessed WEB objects. The capacity is preferably a multiple of 4, in MB. It is recommended to set it to 1 / 4 of the physical memory
reply_body_max_size 10 MB			#The maximum file size that users are allowed to download, in bytes. When downloading a Web object of more than the specified size, a prompt of "request or access too large" will appear on the error page of the browser. The default setting is 0, which means no restriction
maximum_object_size 4096 KB			#The maximum object size allowed to be saved to the cache space, in KB. Files exceeding the size limit will not be cached, but will be forwarded directly to the user
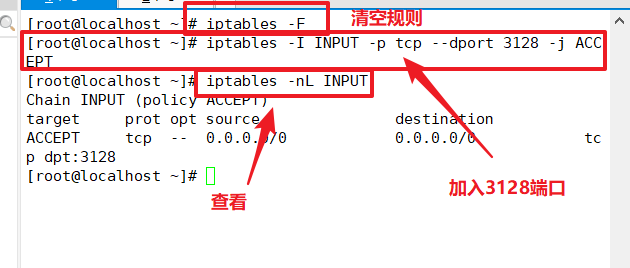
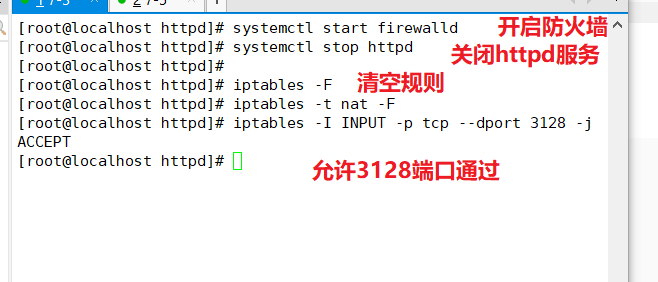
iptables -F
iptables -I INPUT -p tcp --dport 3128 -j ACCEPT
iptables -nL INPUT
Configure web1 server
Configure win7

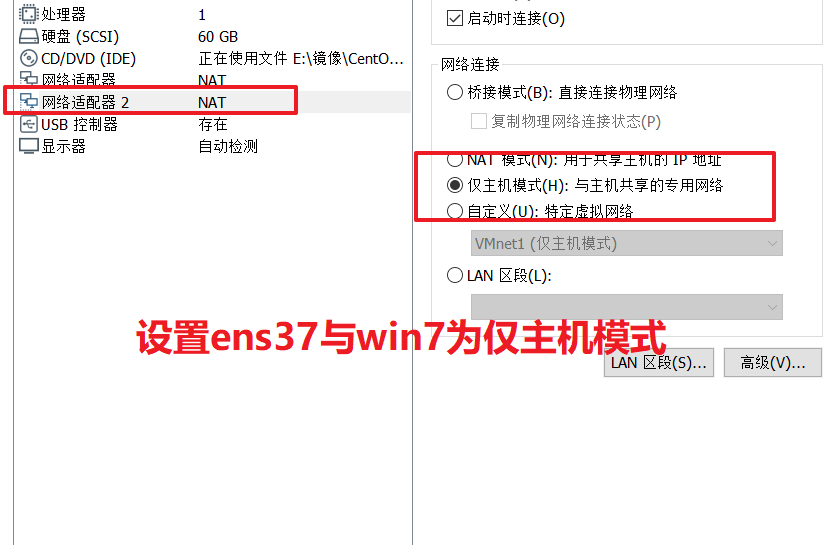
4, Build transparent proxy
Squid server configuration
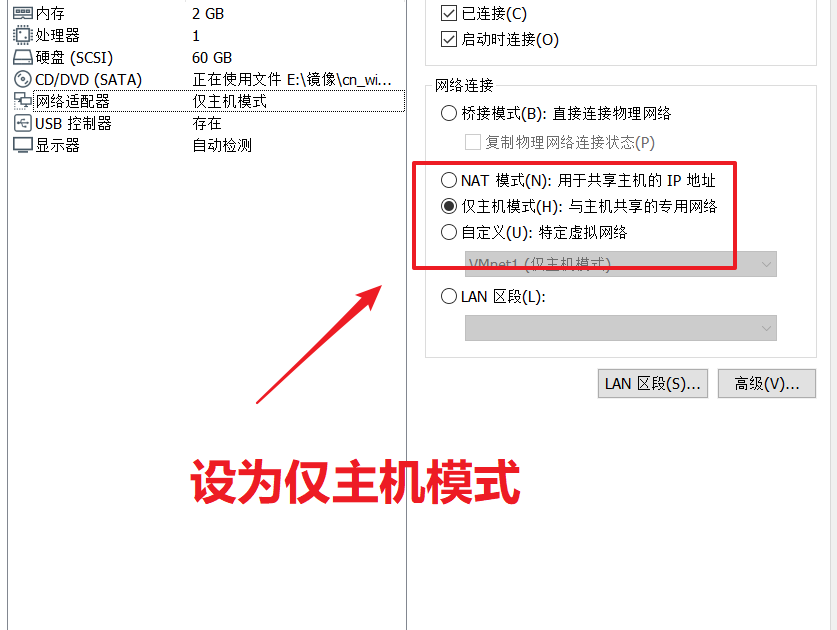
cd /etc/sysconfig/network-scripts/
cp ifcfg-ens33 ifcfg-ens37
vim ifcfg-ens37
systemctl restart network

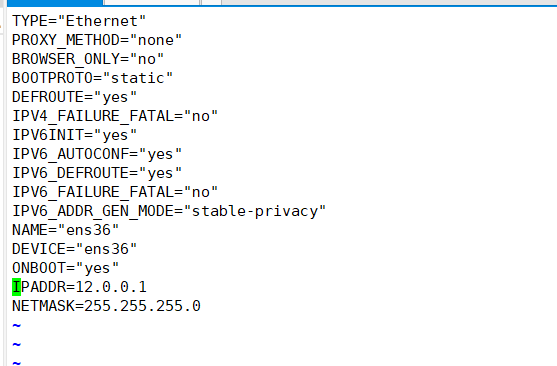

#In line 60, modify and add the IP address that provides intranet services, and support the transparent proxy option transparent
vim /etc/squid.conf
......
http_access allow all
http_access deny all
http_port 192.168.100.100:3128 transparent
systemctl restart squid

echo 'net.ipv4.ip_forward = 1' >> /etc/sysctl.conf
sysctl -p


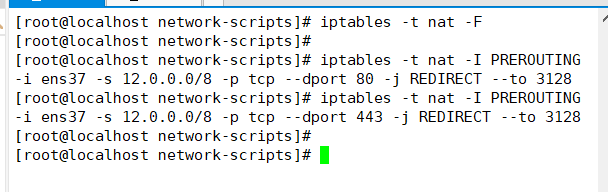
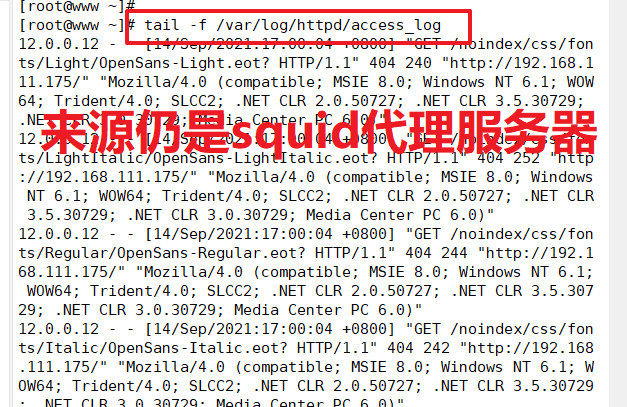
iptables -F
iptables -t nat -F
# Add firewall rules (redirect traffic from 100 network segment: port 80 / 443 to port 3128)
iptables -t nat -I PREROUTING -i ens37 -s 12.0.0.0/8 -p tcp --dport 80 -j REDIRECT --to 3128
iptables -t nat -I PREROUTING -i ens37 -s 12.0.0.0/8 -p tcp --dport 443 -j REDIRECT --to 3128
#If you want to restart, you need to configure the following rules
iptables -I INPUT -p tcp --dport 3128 -j ACCEPT
If you want to restart, you need to configure the following rules
iptables -I INPUT -p tcp --dport 3128 -j ACCEPT
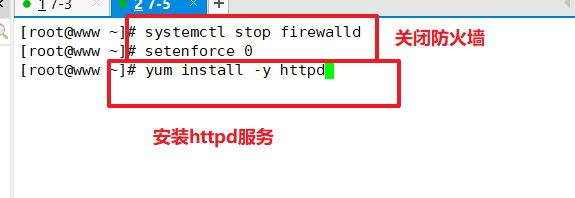
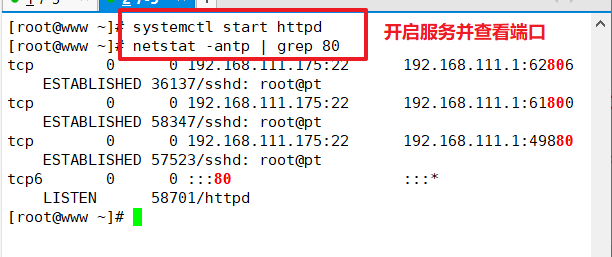
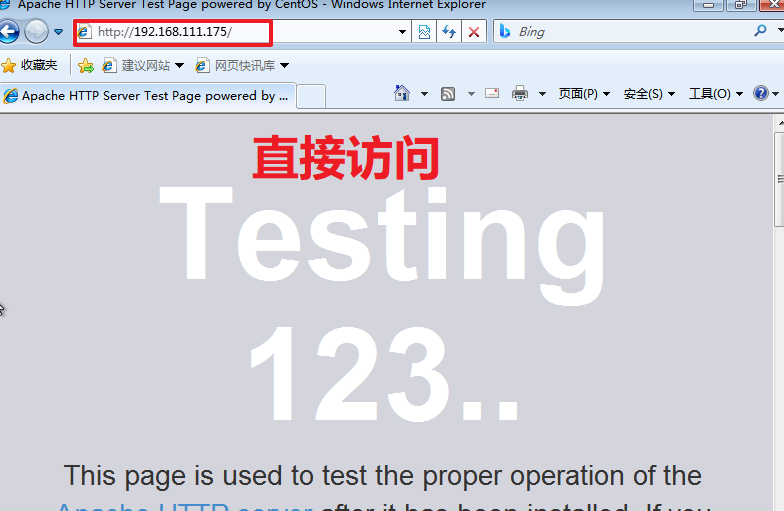
2.web1 server
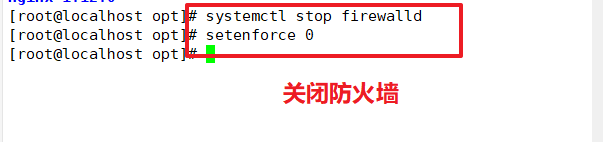
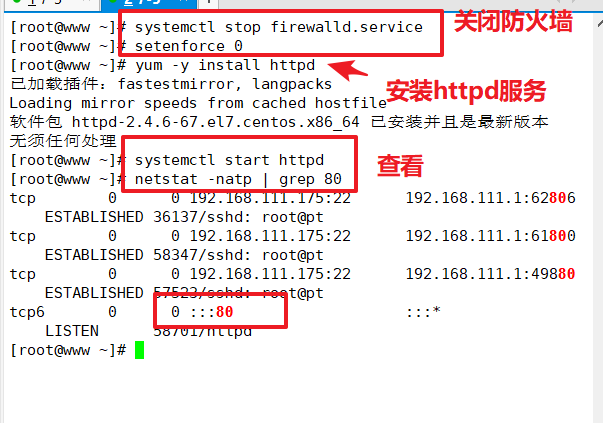
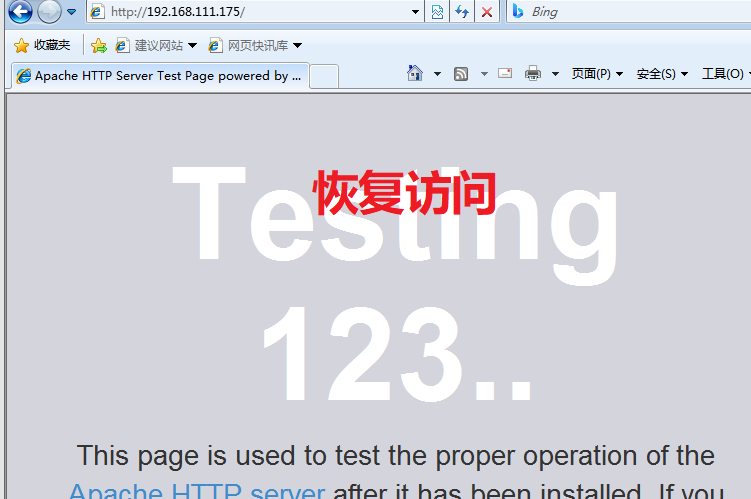
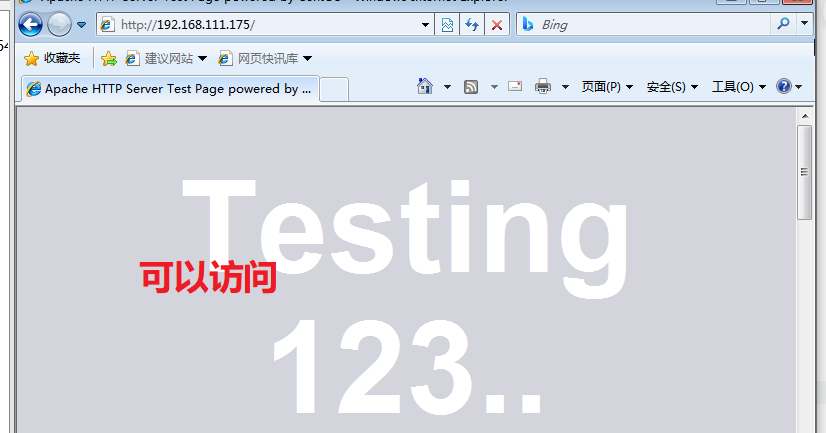
systemctl stop firewalld.service
setenforce 0
yum -y install httpd
systemctl start httpd
netstat -natp | grep 80
Add a static route
route add -net 12.0.0.0/8 gw 192.168.111.173

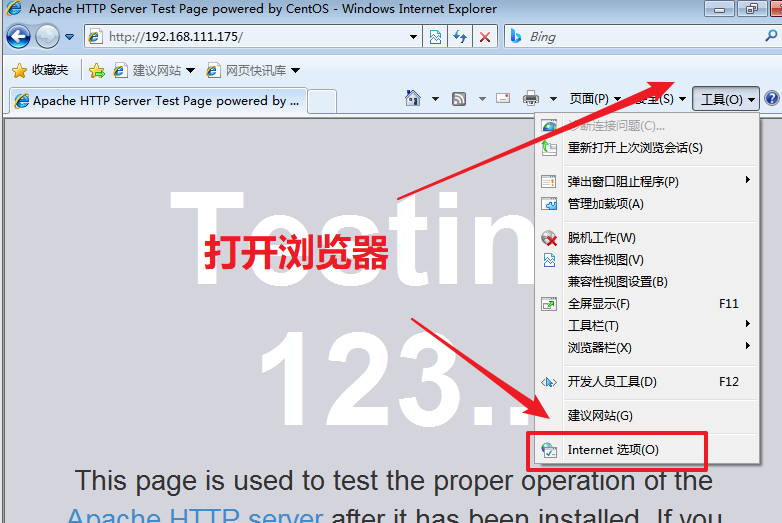
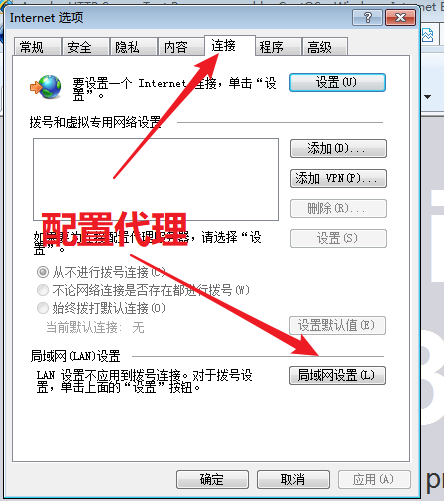
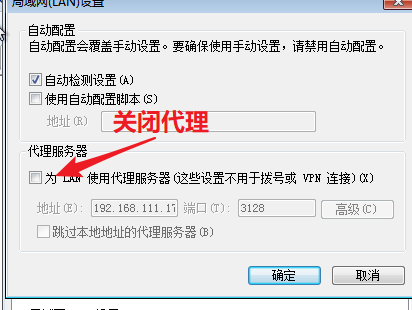
three Client configuration
5, ACL access control
In the configuration file squid.conf, ACL access control is realized through the following two steps:
Use acl configuration items to define the conditions to be controlled:
Via http_ The access configuration item controls "allow" or "deny" access to the defined list
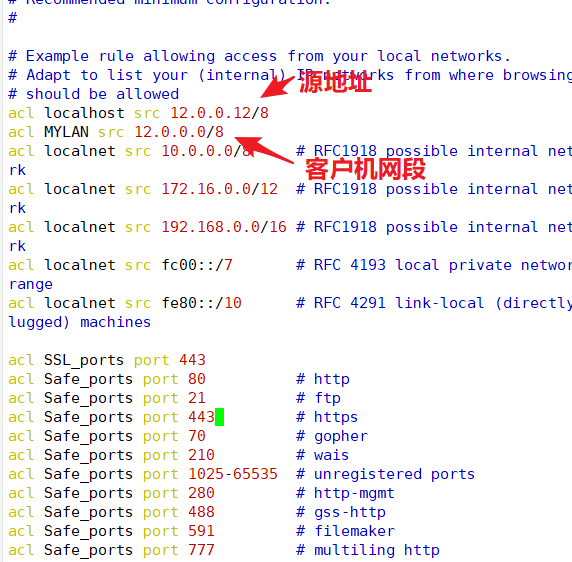
Define access control lists
• format: acl list name list type list content
• list name: custom name, which is equivalent to giving acl a name
• list type: the predefined value of squid must be used to correspond to different categories of control conditions
• list content: it is the specific object to be controlled. The corresponding contents of different types of lists are also different. There can be multiple values (divided by spaces)
(interval, relationship with "or")
Method 1:
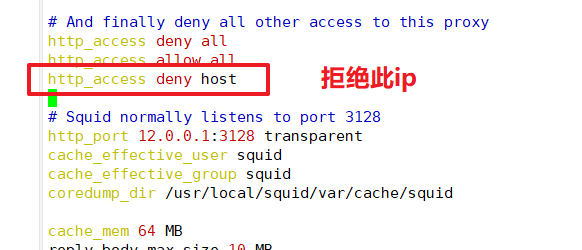
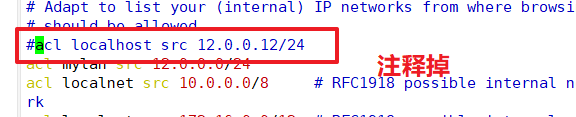
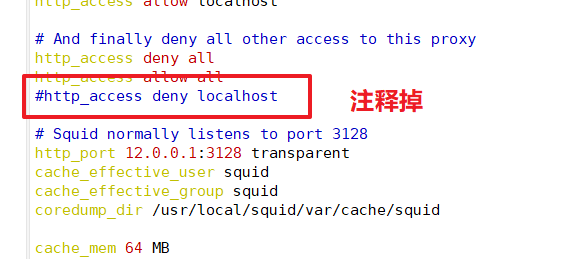
vim /etc/squid.conf
......
acl localhost src 192.168.100.10/24 					#The source address is 192.168.184.10
acl MYLAN src 192.168.100.0/24							#Client network segment
acl destinationhost dst 192.168.226.129/32				#The destination address is 192.168.184.20
acl MC20 maxconn 20										#Maximum concurrent connections 20
acl PORT port 21										#Target port 21
acl DMBLOCK dstdomain .qq.com							#Target domain, matching all sites in the domain
acl BURL url_regex -i ^rtsp:// ^emule:// 				# with rtsp://.emule:// At the beginning of the URL, - i means case is ignored
acl PURL urlpath_regex -i \.mp3$ \.mp4$ \.rmvb$			#URL path ending in. mp3,. mp4,. rmvb
acl WORKTIME time MTWHF 08:30-17:30						#The time is from 8:30 to 17:30 from Monday to Friday, "MTWHF" is the English initials of each week

Article 1 insert:
http_access deny host
Method 2
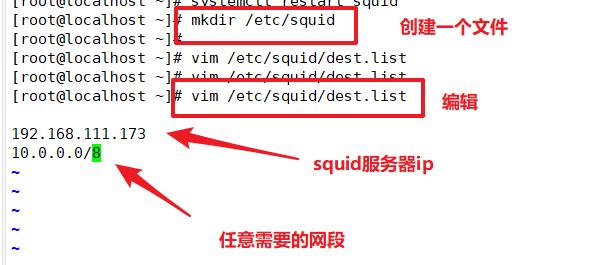
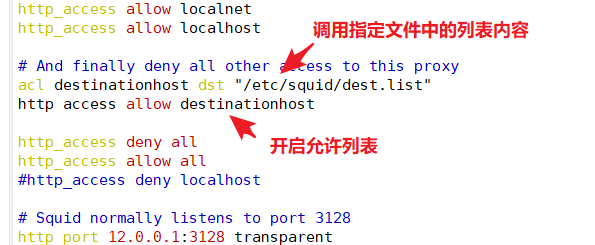
#Start object list management
mkdir /etc/squid
vim /etc/squid/dest.list
192.168.111.173										#Squid server IP
10.0.0.0/8										#Any required network segment

vim /etc/ squid.conf
.......
acl destinationhost dst "/etc/squid/dest.list"			#Call the contents of the list in the specified file
http access deny(or allow) destinationhost				#Note that if it is a reject list, it needs to be placed in front of http_access allow all

systemctl restart squid


6, Squid log analysis
Sarg (SQUID analysis report generator) is a squid log analysis tool in HTML format. See
List in detail the site information, time occupation information, ranking, connection times, traffic, etc. of each user accessing the Internet
| Squid server | 192.168.111.173 |
| web server | 192.168.111.175 |
| Client | 192.168.111.128 |
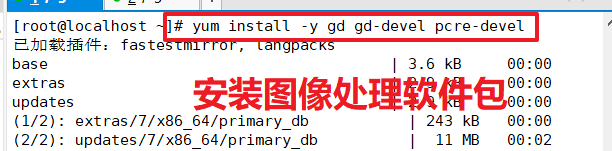
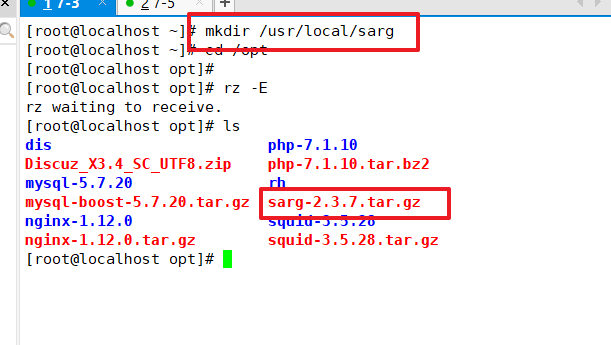
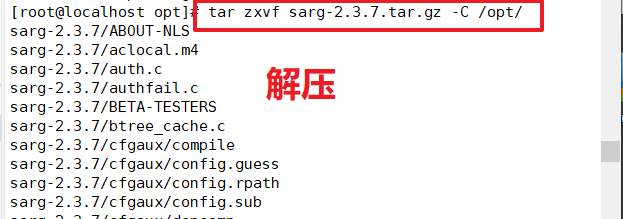
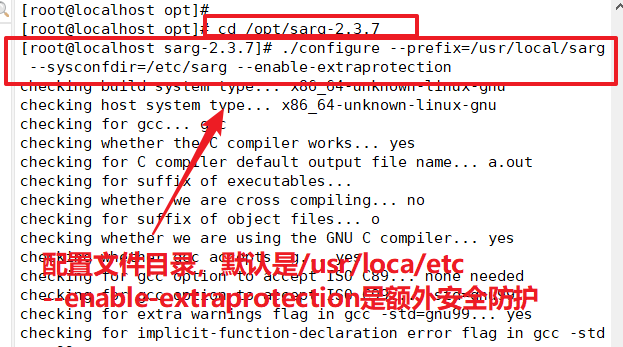
#Install image processing package
yum install -y gd gd-devel pcre-devel
mkdir /usr/local/sarg

#Upload the zxvf sarg-2.3.7. tar.gz compressed package to the / opt directory
tar zxvf sarg-2.3.7.tar.gz -C /opt/

cd /opt/sarg-2.3.7
./configure --prefix=/usr/local/sarg \
--sysconfdir=/etc/sarg \					#The configuration file directory is / usr/loca/etc by default
--enable-extraprotection					#Additional safety protection

make && make install
Install image processing package

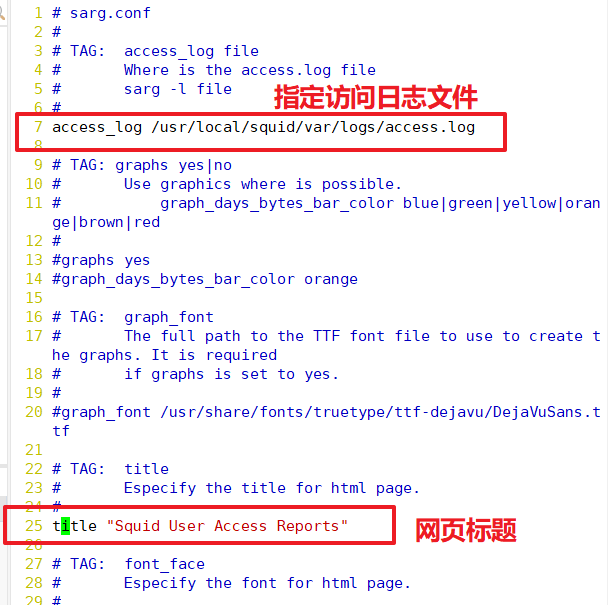
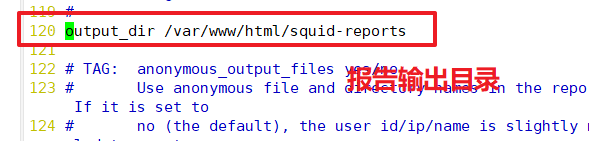
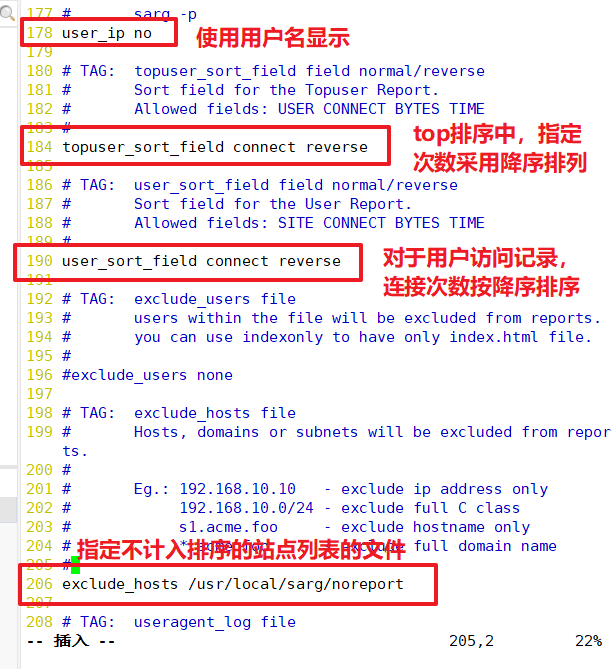
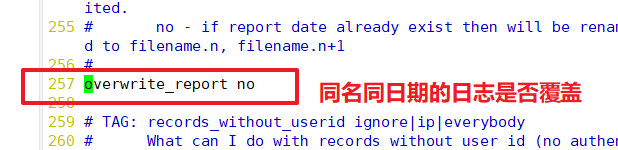
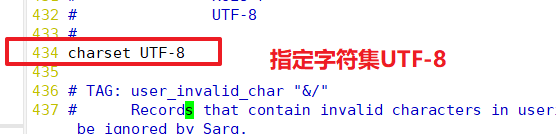
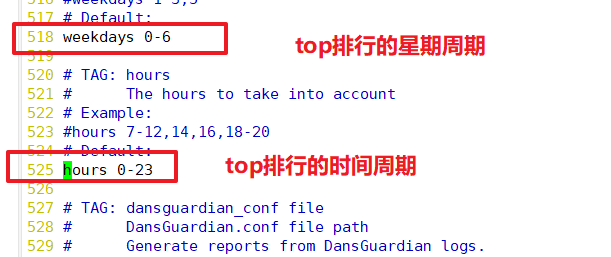
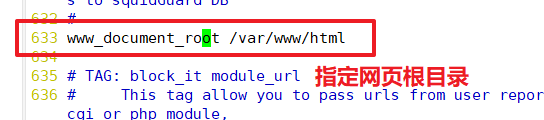
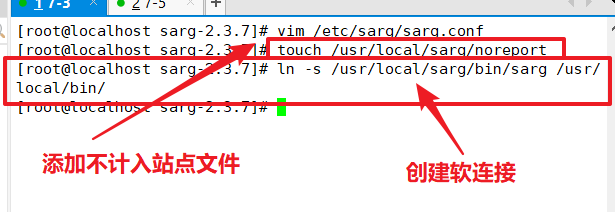
vim /etc/sarg/sarg.conf
--7 that 's ok--note off
access_log /usr/local/squid/var/logs/access.1og 				#Specify access log file
--25 that 's ok--note off
title "Squid User Access Reports"								#Page title
-- 120 that 's ok--Uncomment, modify
output_dir /var/www/html/sarg									#Report output directory
--178 that 's ok--note off
user_ip no														#Display with user name
--184 that 's ok--Uncomment, modify
topuser_sort_field connect reverse								#In top sorting, the specified connection times are arranged in descending order, and the ascending order is normal
-- 190 that 's ok--Uncomment, modify
user_sort_field connect reverse									#For user access records, the number of connections is sorted in descending order
--206 that 's ok--Uncomment, modify
exclude_hosts /usr/local/sarg/noreport							#Specifies files that are not included in the sorted site list
--257 that 's ok--note off
overwrite_report no												#Overwrite logs with the same name and date
--289 that 's ok--Uncomment, modify
mail_utility mailq.postfix										#Send mail report command
--434 that 's ok--Uncomment, modify
charset UTF-8													#Specifies the character set UTF-8
--518 that 's ok--note off
weekdavs 0-6													#Week cycle of top ranking
--525 that 's ok--note off
hours 0-23														#Time period of top ranking
--633 that 's ok--note off
www_document_root /var/www/html									#Specify page root

#Add is not included in the site file, and the added domain name will not be displayed in the sorting
touch /usr/local/sarg/noreport

ln -s /usr/local/sarg/bin/sarg /usr/local/bin/


Validate sarg
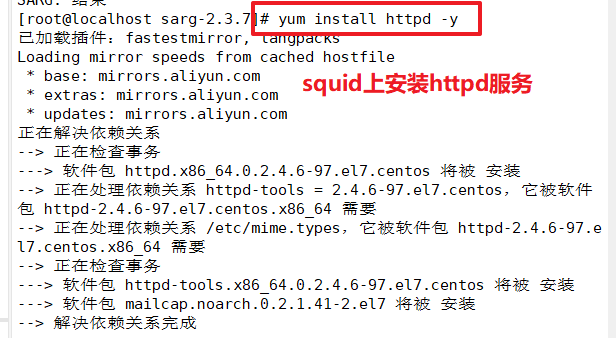
yum install httpd -y
systemctl start httpd
 stay squid Use browser access on the server http://192.168.226.129/sarg, check the Sarg report page.
date -s
#Add scheduled tasks to perform daily report generation
vim /usr/local/sarg/report.sh
#/bin/bash
#Get current date
TODAY=$(date +%d/%m/%Y)
#Get one week ago today
YESTERDAY=$(date -d "1 day ago" +%d/%m/%Y)
/usr/local/sarg/bin/sarg -l /usr/1ocal/squid/var/logs/access.log -o /var/www/html/sarg
-z -d $YESTERDAY-$TODAY &> /dev/null
exit 0
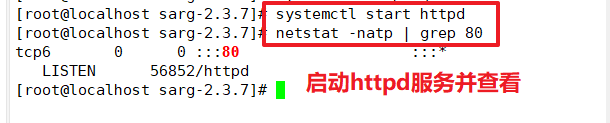
Access with browser on squid server http://192.168.111.173/sarg , view the Sarg report page

7, Reverse proxy
If the requested resource is cached in the Squid reverse proxy server, the requested resource is directly returned to the client; Otherwise reverse
The proxy server will request resources from the background Web server, then return the requested response to the client, and slow down the response
There is a local for the next requester
Working mechanism:
• cache web page objects to reduce duplicate requests
• poll or weight internet requests to intranet web servers
• proxy user requests to prevent users from directly accessing the Web server and improve security
Experimental preparation:
| squid server | 192.168.111.173 |
| web1 server | 192.168.111.175 |
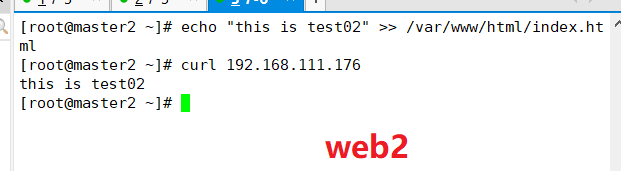
| web2 server | 192.168.111.176 |
| win 7 | 192.168.111.128 |
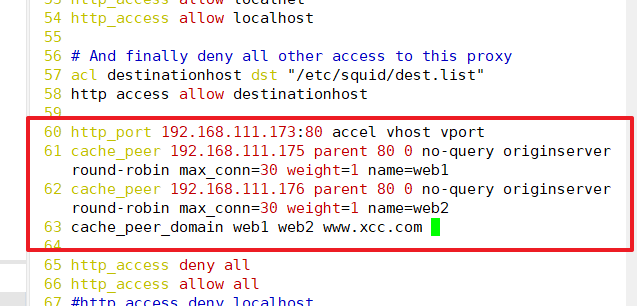
Turn on firewall and turn off local HTTPD
systemctl start firewalld
systemctl stop httpd

iptables -F
iptables -t nat -F
iptables -I INPUT -p tcp --dport 3128 -j ACCEPT

vim /etc/ squid.conf
60 that 's ok--Modify, insert-------
http_port 192.168.111.173:80 accel vhost vport
cache_peer 192.168.111.175 parent 80 0 no-query originserver round-robin max_conn=30 weight=1 name=web1
cache_peer 192.168.111.176 parent 80 0 no-query originserver round-robin max_conn=30 weight=1 name=web2
cache_peer_domain web1 web2 www.xcc.com						#Indicates a request for www.xcc.com. squid sends a request to port 80 of 192.168.111.175 and 192.168.111.176


http_port 80 accel vhost vport
#Squid has changed from a cache to a Web server reverse proxy acceleration mode. At this time, squid listens to requests on port 80 and binds to the request port (vhost vport) of webserver. When a request arrives at squid, squid does not need to forward the request, but directly takes data from the cache or directly requests data from the bound port.
accel:Reverse proxy acceleration mode
vhost:Support domain name or host name to represent proxy node
vport:support IP And port to represent the proxy node
parent:Represents the parent node, the parent node, the parent node, the parent node, the parent node, and the parent node
80:Agent internal web Port 80 of the server
0:Not used icp,It means just one squid The server
no-query:Get data directly without query
originserver:Specify source server
round-robin:appoint squid Distribute requests to one of them by polling-Table parent node
max_conn:Specify the maximum number of connections
weight:Specify weights
name:Set alias
squid server

web1/web2 server:
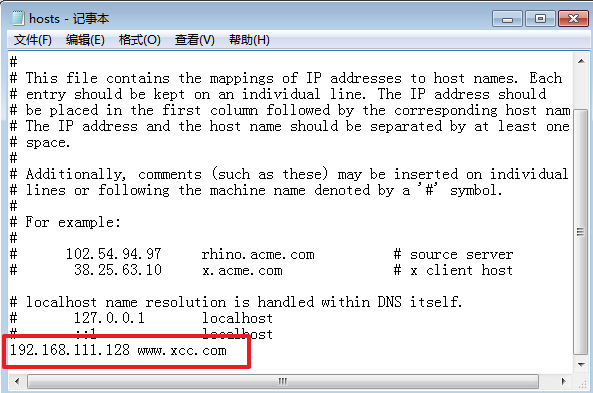
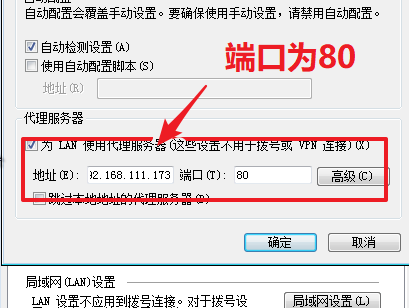
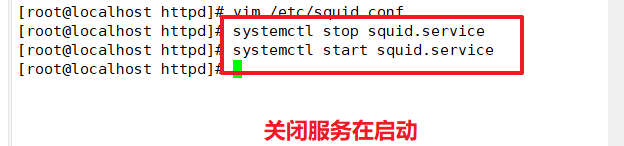
systemctl stop squid
service squid reload

#Backend web2 node server settings
yum install -y httpd
systemctl start httpd

#Node 1(web1):
echo "this is test01" >> /var/www/html/index.html
#Node 2(web2):
echo "this is test02" >> /var/www/html/index.html

#Domain name mapping configuration for client
 modify C: \Windows\System32 \drivers\etc\hosts file
192.168.111.128 www.xcc.com

#Proxy configuration for client
 Open browser, tools-->Internet option-->connect-->LAN settings-->Turn on the proxy server(address: Squid The server IP Address, port:80)

Browser access http://www.xcc.com