I. Brief Introduction
SpringBoot is designed to simplify Spring's application development. It adopts the idea that convention is greater than configuration, simplifies the complexity and integrates the Spring technology stack, so that developers can easily create an independent, product-level application, and provide a one-stop solution for J2EE development.
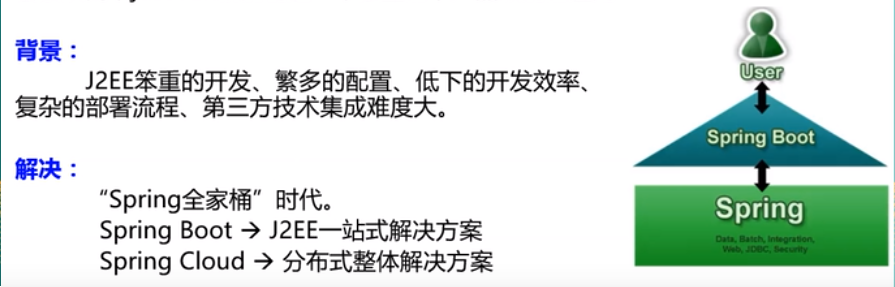
Spring Project Family Barrel:
The advantages of SpringBoot are:
- Quickly create stand-alone Spring projects and integrate with mainstream frameworks
- Using embedded Servlet containers, applications do not need to be packaged as war packages
- starters Auto-Dependence and Version Control
- A large number of automatic configurations, simplified development, and also can modify default values
- No need to configure xml files, no code generation, out of the box
- Runtime application monitoring for quasi-production environment
- Natural Integration with Cloud Computing
The disadvantages of SpringBook:
- It's easy to get started, but difficult to master.
- Familiarity with the underlying Spring framework helps to understand Spring Boot
SpringBoot and Micro Services
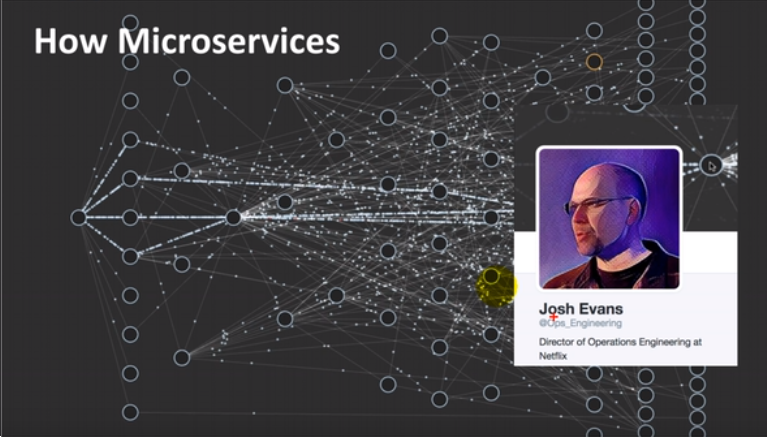
What is micro service?
Micro-service is an architecture style, which divides a large application into several small services and interacts with Http, and each small service is a unit that can be replaced and upgraded independently.
The difference between making large applications into monolithic applications and making micro services:
The testing and deployment of individual applications are simple, but the efficiency of collaborative development and iteration is not high, and the characteristics of micro services are the opposite.
The abstract description of micro services: Each origin in the diagram is a micro service, and all origins together form a large application.
How Spring achieves Distribution through Micro Services:
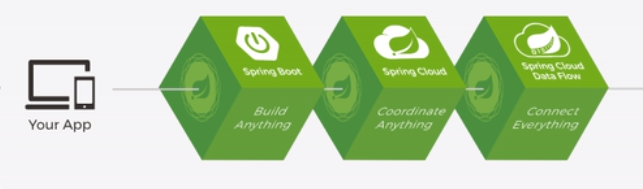
SpringBoot creates a single micro service
Spring Cloud Builds Distributed Deployment of Micro Services
Spring Cloud Data Flow Implements Data Stream Transmission, Batch Processing, etc.
SpringBoot's environmental requirements:
JDK: 1.8
Maven: 3.3. Setting JDK version in Maven's settings.xml
IDEAL: 2017
Hello World
1. Create a SpringBoot project on the SpringBoot website. The system generates the following two SpringBoot dependencies
<parent>
	<groupId>org.springframework.boot</groupId>
	<artifactId>spring-boot-starter-parent</artifactId>
	<version>2.1.7.RELEASE</version>
	<relativePath/> <!-- lookup parent from repository -->
</parent>

<dependencies>
	<dependency>
		<groupId>org.springframework.boot</groupId>
		<artifactId>spring-boot-starter-web</artifactId>
	</dependency>
</dependencies>
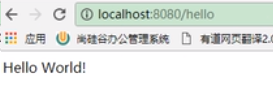
2. Write a Controller and return "Hello World" with Get request. "Return
@RestController
public class TestController {

	@GetMapping(value="/hello")
    public String test(){
        return "Hello World!";
    }
}
3. Start the Application class and test the hello request by the browser
How can SpringBoot package projects as jar s? The package property is set in the pom file. When the package is war, the war package is typed.
<packaging>jar</packaging>
III. Internal Principles
SpringBoot's default dependency version management: in the pom.xml file
<parent>
	<groupId>org.springframework.boot</groupId>
	<artifactId>spring-boot-starter-parent</artifactId>
	<version>2.1.7.RELEASE</version>
	<relativePath/> <!-- lookup parent from repository -->
</parent>
The dependent parent project is:
<parent>
    <groupId>org.springframework.boot</groupId>
    <artifactId>spring-boot-dependencies</artifactId>
    <version>2.1.7.RELEASE</version>
    <relativePath>../../spring-boot-dependencies</relativePath>
</parent>
This is where all default dependency versions of SpringBoot are managed;
Later import dependencies do not need to write version numbers (dependencies that are not managed by dependencies naturally declare version numbers)
Starter:
<dependency>
	<groupId>org.springframework.boot</groupId>
	<artifactId>spring-boot-starter-web</artifactId>
</dependency>
Spr-boot-starter-web: SpringBoot's scenario starter provides the component dependencies required for the Web to function properly.
SpringBoot extracts all the functional scenarios and makes starters one by one. It only needs to introduce these starters into the project. All the dependencies of the relevant scenarios will be imported, and the starters of any scenario will be imported with whatever function they need.
starters (Starter) Scenario List on Official Website:
https://docs.spring.io/spring-boot/docs/2.1.7.RELEASE/reference/htmlsingle/#using-boot-starter
Main Program Class, Entry Class
/**
 * SpringBoot To annotate a main program class, indicating that this is a SpringBoot application
 */
@SpringBootApplication
public class Application extends SpringBootServletInitializer {

	protected SpringApplicationBuilder configure(SpringApplicationBuilder builder){

		return builder.sources(new Class[] { Application.class });

	}
	public static void main(String[] args) {
		SpringApplication.run(Application.class, args);
	}

}
@ SpringBootApplication: SpringBoot's main configuration class
@Target(ElementType.TYPE)
@Retention(RetentionPolicy.RUNTIME)
@Documented
@Inherited
@SpringBootConfiguration
@EnableAutoConfiguration
@ComponentScan(excludeFilters = { @Filter(type = FilterType.CUSTOM, classes = TypeExcludeFilter.class),
		@Filter(type = FilterType.CUSTOM, classes = AutoConfigurationExcludeFilter.class) })
public @interface SpringBootApplication {
Annotated on a class to indicate that this is a SpringBook main configuration class and entry class
@ Configuration: Annotate this annotation on the configuration class;
The configuration class is equivalent to the configuration file in the old version of Spring; the configuration class is also a component @Component in the container.
@ Enable AutoConfiguration: Turn on AutoConfiguration
@AutoConfigurationPackage
@Import(AutoConfigurationImportSelector.class)
public @interface EnableAutoConfiguration {
Make SpringBoot's automatic configuration work
@ AutoConfiguration Package: Automatic Configuration Package
@Target(ElementType.TYPE)
@Retention(RetentionPolicy.RUNTIME)
@Documented
@Inherited
@Import(AutoConfigurationPackages.Registrar.class)
public @interface AutoConfigurationPackage {
@Import(AutoConfigurationPackages.Registrar.class)
Spring's underlying annotation @Import imports a component into the container, from which AutoConfiguration Import Selector.class is imported.
Scanning the package where the main configuration class (@SpringBootApplication annotated class) is located and all the components in all the subpackages below to the Spring container;
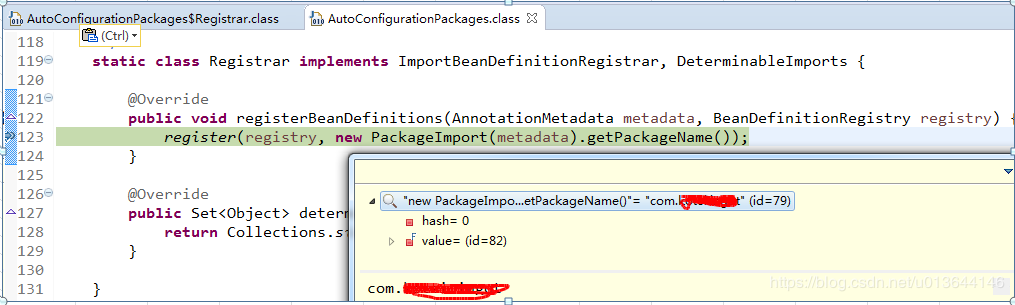
Therefore, the location of SpringBoot's main configuration class cannot be arbitrarily specified.
@Import(AutoConfigurationImportSelector.class)
Import components into containers
AutoConfiguration Import Selector: Selector for which components to import;
Return all components that need to be imported as full class names, and these components will be added to the container.
A lot of xxxAutoConfiguration will be imported into the container; that is, all the components needed for this scenario will be imported into the container and configured.
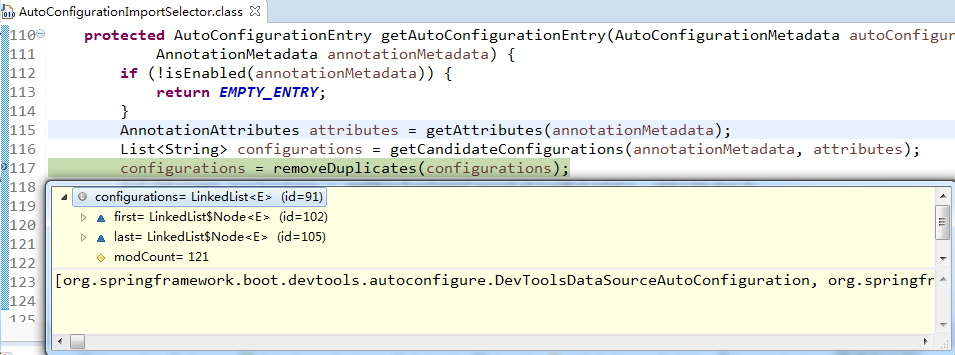
With automatic configuration classes, we do not need to write configuration injection function components manually.
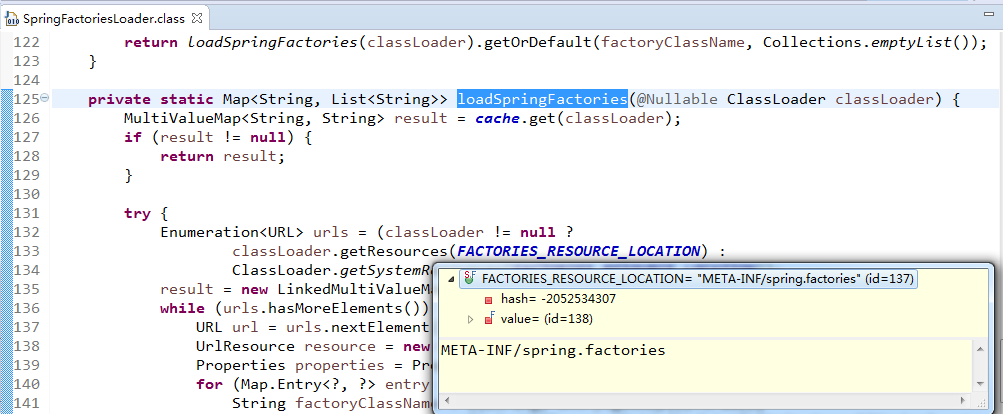
Get the values specified by EnableAutoConfiguration from META-INF/spring.factories under the class path and import these values into the container as automatic configuration classes. The automatic configuration classes will take effect and help us with automatic configuration. (For things that need to be manually configured before, automatic configuration will be automatically configured)
The integrated solution and automatic configuration of J2EE are spring-boot-autoconfigure-2.1.7.RELEASE.jar.