Article directory
stay Get to know Spring AOP In this paper, we have a preliminary understanding of the concept and implementation of Spring AOP. Then we will have a deep understanding of the principles of the underlying implementation, which requires an interpretation of the source code. In the previous spring IOC series, you can know where to start first from the definitions in the test code, such as ApplicationContext and getBean(). However, AOP is not directly presented in the test code, only defined in the XML configuration file, so we decided to start our source code interpretation journey from label parsing.
AOP implementation based on XML -- label parsing
stay Storage object BeanDefinition of Spring IoC In this paper, we have a preliminary understanding of tag parsing, including four basic Tags: import, alias, bean and beans. Among them, the parsing of bean tag is the core function. The parsing of alias, import and beans tags is based on bean tag. In addition, we also learn the analysis of custom labels. For detailed explanation, please refer to Spring IoC custom label parsing . Then we start to locate the tag parsing part and analyze the XML configuration file.
First, we will learn the AOP function based on XML implementation, and the configuration file is as follows:
<?xml version="1.0" encoding="UTF-8"?>
<beans xmlns="http://www.springframework.org/schema/beans"
       xmlns:xsi="http://www.w3.org/2001/XMLSchema-instance"
       xmlns:aop="http://www.springframework.org/schema/aop"
       xmlns:context="http://www.springframework.org/schema/context"
       xsi:schemaLocation="http://www.springframework.org/schema/beans
       http://www.springframework.org/schema/beans/spring-beans.xsd
       http://www.springframework.org/schema/context
       http://www.springframework.org/schema/context/spring-context.xsd
       http://www.springframework.org/schema/aop
       http://www.springframework.org/schema/aop/spring-aop.xsd">


    <bean id="host" class="com.msdn.bean.Host" />

    <bean id="proxy" class="com.msdn.aop.ProxyXML" />

    <!--Spring Be based on Xml Section of-->
    <aop:config>
        <!--Define tangent function-->
        <aop:pointcut id="rentPointCut" expression="execution(* com.msdn.bean.Host.rent())"/>

        <!-- Defining sections order Define priorities,Lower value, higher priority-->
        <aop:aspect ref="proxy" order="0">
            <!--Before advice-->
            <aop:before method="seeHouse" pointcut-ref="rentPointCut" />
            <!--Around Advice-->
            <aop:around method="getMoney" pointcut-ref="rentPointCut" />
            <!--Post notification-->
            <aop:after method="fare" pointcut-ref="rentPointCut" />
        </aop:aspect>
    </aop:config>

</beans>
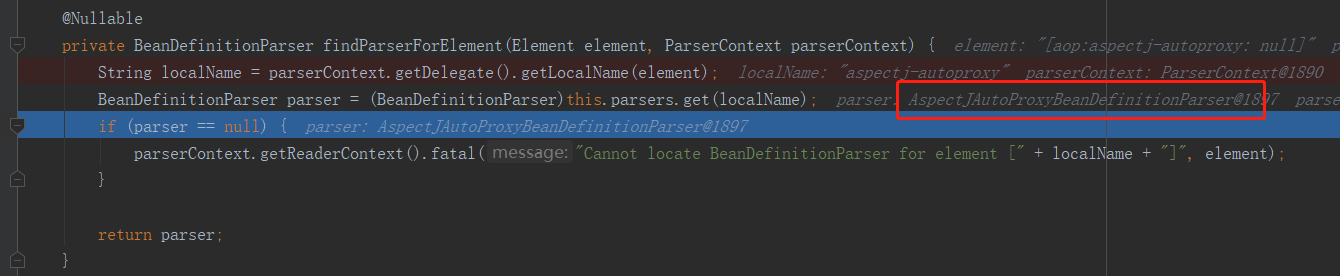
Focus on the < AOP: config > tag. Then we will jump to the place where the tag is parsed. In the parseBeanDefinitions() method of the DefaultBeanDefinitionDocumentReader class, after debugging, it is found that the < AOP: config > tag belongs to the custom tag, so the parseCustomElement() method will be executed. I won't explain it too much here. It's covered in Spring IoC custom tags. Then we need to know where to find the label processor before we jump to the label processor. We come to findParserForElement() method in NamespaceHandlerSupport class, and the debugging results are as follows:

It can be seen from the figure that the corresponding label processor is ConfigBeanDefinitionParser. Check its core methods.
    public BeanDefinition parse(Element element, ParserContext parserContext) {
        CompositeComponentDefinition compositeDef = new CompositeComponentDefinition(element.getTagName(), parserContext.extractSource(element));
        parserContext.pushContainingComponent(compositeDef);
        //Register AspectJAutoProxyCreator
        this.configureAutoProxyCreator(parserContext, element);
        List<Element> childElts = DomUtils.getChildElements(element);
        Iterator var5 = childElts.iterator();

        //Traverse the child tags under the < AOP: config > tag and register BeanDefinition
        while(var5.hasNext()) {
            Element elt = (Element)var5.next();
            String localName = parserContext.getDelegate().getLocalName(elt);
            if ("pointcut".equals(localName)) {
                this.parsePointcut(elt, parserContext);
            } else if ("advisor".equals(localName)) {
                this.parseAdvisor(elt, parserContext);
            } else if ("aspect".equals(localName)) {
                this.parseAspect(elt, parserContext);
            }
        }

        parserContext.popAndRegisterContainingComponent();
        return null;
    }
We are more concerned about the configureAutoProxyCreator() method. We can directly understand the label processing after debugging and checking by ourselves, just like we explained the implementation of the BeanDefinitionParser interface before, but there is more here. For the analysis method of custom label, if you are interested in it, you can take a look Implementation of Spring custom label.
Then we will study the configureAutoProxyCreator() method, which is implemented in the AopNamespaceUtils class.
    public static void registerAspectJAutoProxyCreatorIfNecessary(ParserContext parserContext, Element sourceElement) {
        //Register or upgrade the BeanDefinition of AutoProxyCreator definition with beanName of org.springframework.aop.config.internalAutoProxyCreator
        BeanDefinition beanDefinition = AopConfigUtils.registerAspectJAutoProxyCreatorIfNecessary(parserContext.getRegistry(), parserContext.extractSource(sourceElement));
        //Handling of proxy target class and expose proxy properties
        useClassProxyingIfNecessary(parserContext.getRegistry(), sourceElement);
        //Register components and notify for further processing by the listener
        //Where className of beanDefinition is AnnotationAutoProxyCreator
        registerComponentIfNecessary(beanDefinition, parserContext);
    }
There are three main things to do in the registerAspectJAutoProxyCreatorIfNecessary() method.
1. Register or upgrade AspectJAwareAdvisorAutoProxyCreator
For the implementation of AOP based on XML files, it is basically completed by AspectJAwareAdvisorAutoProxyCreator, which can automatically proxy matching bean s according to < AOP: pointcut > tags. For easy configuration, Spring uses a custom configuration to help us automatically register aspectjawareadviserautoproxycreator, whose registration process is still in the AopNamespaceUtils class.
    public static BeanDefinition registerAspectJAutoProxyCreatorIfNecessary(BeanDefinitionRegistry registry, @Nullable Object source) {
        return registerOrEscalateApcAsRequired(AspectJAwareAdvisorAutoProxyCreator.class, registry, source);
    }

    private static BeanDefinition registerOrEscalateApcAsRequired(Class<?> cls, BeanDefinitionRegistry registry, @Nullable Object source) {
        Assert.notNull(registry, "BeanDefinitionRegistry must not be null");
        //If there is already an automatic agent creator and the existing one is inconsistent with the current one, it is necessary to determine which one to use according to the priority
        if (registry.containsBeanDefinition("org.springframework.aop.config.internalAutoProxyCreator")) {
            BeanDefinition apcDefinition = registry.getBeanDefinition("org.springframework.aop.config.internalAutoProxyCreator");
            if (!cls.getName().equals(apcDefinition.getBeanClassName())) {
                int currentPriority = findPriorityForClass(apcDefinition.getBeanClassName());
                int requiredPriority = findPriorityForClass(cls);
                if (currentPriority < requiredPriority) {
                    //The most important thing to change a bean is to change its className property
                    apcDefinition.setBeanClassName(cls.getName());
                }
            }
			//If an automatic agent creator already exists and is the same as the one to be created, there is no need to create it again
            return null;
        } else {
            RootBeanDefinition beanDefinition = new RootBeanDefinition(cls);
            beanDefinition.setSource(source);
            beanDefinition.getPropertyValues().add("order", -2147483648);
            beanDefinition.setRole(2);
            registry.registerBeanDefinition("org.springframework.aop.config.internalAutoProxyCreator", beanDefinition);
            return beanDefinition;
        }
    }
In the above code, the function of automatic registration of AspectJAwareAdvisorAutoProxyCreator class is implemented. At the same time, there is also a priority problem. If there is already an automatic agent creator, and the existing automatic agent creator is inconsistent with the current one, then it is necessary to determine which one to use according to the priority.
2. Handling proxy target class and expose proxy properties
The useClassProxyingIfNecessary() method implements the processing of proxy target class and expose proxy properties. Its code is defined as follows:
    private static void useClassProxyingIfNecessary(BeanDefinitionRegistry registry, @Nullable Element sourceElement) {
        if (sourceElement != null) {
            boolean proxyTargetClass = Boolean.parseBoolean(sourceElement.getAttribute("proxy-target-class"));
            if (proxyTargetClass) {
                AopConfigUtils.forceAutoProxyCreatorToUseClassProxying(registry);
            }

            boolean exposeProxy = Boolean.parseBoolean(sourceElement.getAttribute("expose-proxy"));
            if (exposeProxy) {
                AopConfigUtils.forceAutoProxyCreatorToExposeProxy(registry);
            }
        }

    }
However, due to the AOP implementation based on XML file that we currently analyze, we do not use these two attributes. However, it should be noted that the proxy target class attribute is mentioned in the previous article. I believe that at this stage, everyone has found that this method is for the resolution of < AOP: AspectJ AutoProxy proxy target class = "true" / /, which is exactly Spring's resolution of annotation implementation. We will analyze this later.
3. Register components and notify
The registerComponentIfNecessary() method is used to register the component and notify it for further processing by the listener.
    private static void registerComponentIfNecessary(@Nullable BeanDefinition beanDefinition, ParserContext parserContext) {
        if (beanDefinition != null) {
            parserContext.registerComponent(new BeanComponentDefinition(beanDefinition, "org.springframework.aop.config.internalAutoProxyCreator"));
        }

    }
When parsing other labels in the parse() method, in addition to registering the relevant BeanDefinition, components are also registered. However, when the parse() method is to end, the popAndRegisterContainingComponent() method is called to remove the components existing in the parserContext.
Annotation based AOP implementation -- label parsing
In the above parsing process, we found a similar set of code in the source code. Because we implement AOP in two ways, we guess that part of the code is for annotation based tag processing. Needless to say, we go directly to the parse() method in the NamespaceHandlerSupport class. The commissioning results are as follows:
When the < AOP: AspectJ AutoProxy proxy target class = "true" / > tag is encountered, the aspectjautoproxybean definitionparser will be used for parsing, so we will enter this class to explore.
Start with the parse method.
public BeanDefinition parse(Element element, ParserContext parserContext) {
    // Register AnnotationAwareAspectJAutoProxyCreator
    AopNamespaceUtils.registerAspectJAnnotationAutoProxyCreatorIfNecessary(parserContext, element);
    // Treatment of annotation subclasses
    this.extendBeanDefinition(element, parserContext);
    return null;
}
Compared with the above analysis of < AOP: config > tag, it can be found that this is more concise, and it will be very similar after looking at the code.
public static void registerAspectJAnnotationAutoProxyCreatorIfNecessary(ParserContext parserContext, Element sourceElement) {
    // Register or upgrade the BeanDefinition of AutoProxyCreator definition with beanName of org.springframework.aop.config.internalAutoProxyCreator
    BeanDefinition beanDefinition = AopConfigUtils.registerAspectJAnnotationAutoProxyCreatorIfNecessary(parserContext.getRegistry(), parserContext.extractSource(sourceElement));
    useClassProxyingIfNecessary(parserContext.getRegistry(), sourceElement);
    registerComponentIfNecessary(beanDefinition, parserContext);
}
I'm familiar with this method. Yes, it's very similar to what we read above. There are three things to do here, but the specific details are different. The difference is that the annotation awareaspect jauto proxy creator is registered here.
1. Register or upgrade AnnotationAwareAspectJAutoProxyCreator
The implementation of AOP is basically accomplished by annotation aware aspectjautoproxycreator, which can automatically proxy matching bean s according to the pointcuts defined by @ Point annotation. However, for the convenience of configuration, Spring uses a custom configuration to help us automatically register AnnotationAwareAspectJAutoProxyCreator. The registration process is implemented here. We continue to follow up into the methodology:
    private static BeanDefinition registerOrEscalateApcAsRequired(Class<?> cls, BeanDefinitionRegistry registry, @Nullable Object source) {
        Assert.notNull(registry, "BeanDefinitionRegistry must not be null");
        if (registry.containsBeanDefinition("org.springframework.aop.config.internalAutoProxyCreator")) {
            BeanDefinition apcDefinition = registry.getBeanDefinition("org.springframework.aop.config.internalAutoProxyCreator");
            if (!cls.getName().equals(apcDefinition.getBeanClassName())) {
                int currentPriority = findPriorityForClass(apcDefinition.getBeanClassName());
                int requiredPriority = findPriorityForClass(cls);
                if (currentPriority < requiredPriority) {
                    apcDefinition.setBeanClassName(cls.getName());
                }
            }

            return null;
        } else {
            RootBeanDefinition beanDefinition = new RootBeanDefinition(cls);
            beanDefinition.setSource(source);
            beanDefinition.getPropertyValues().add("order", -2147483648);
            beanDefinition.setRole(2);
            registry.registerBeanDefinition("org.springframework.aop.config.internalAutoProxyCreator", beanDefinition);
            return beanDefinition;
        }
    }
This method will not be introduced. It is the same method called above.
2. Handling proxy target class and expose proxy properties
useClassProxyingIfNecessary implements the processing of the proxy target class attribute and the expose proxy attribute, and enters the method interior:
    private static void useClassProxyingIfNecessary(BeanDefinitionRegistry registry, @Nullable Element sourceElement) {
        if (sourceElement != null) {
            boolean proxyTargetClass = Boolean.parseBoolean(sourceElement.getAttribute("proxy-target-class"));
            if (proxyTargetClass) {
                AopConfigUtils.forceAutoProxyCreatorToUseClassProxying(registry);
            }

            boolean exposeProxy = Boolean.parseBoolean(sourceElement.getAttribute("expose-proxy"));
            if (exposeProxy) {
                AopConfigUtils.forceAutoProxyCreatorToExposeProxy(registry);
            }
        }

    }
In XML based analysis, we didn't parse the two attributes because we didn't use the related attributes, but at this time we used the proxy target class attribute, so let's see how to call it.
    public static void forceAutoProxyCreatorToUseClassProxying(BeanDefinitionRegistry registry) {
        if (registry.containsBeanDefinition("org.springframework.aop.config.internalAutoProxyCreator")) {
            BeanDefinition definition = registry.getBeanDefinition("org.springframework.aop.config.internalAutoProxyCreator");
            definition.getPropertyValues().add("proxyTargetClass", Boolean.TRUE);
        }

    }

    public static void forceAutoProxyCreatorToExposeProxy(BeanDefinitionRegistry registry) {
        if (registry.containsBeanDefinition("org.springframework.aop.config.internalAutoProxyCreator")) {
            BeanDefinition definition = registry.getBeanDefinition("org.springframework.aop.config.internalAutoProxyCreator");
            definition.getPropertyValues().add("exposeProxy", Boolean.TRUE);
        }

    }
<aop:aspectj-autoproxy proxy-target-class="true"/>
The value of the proxy target class attribute determines whether an interface based or class based proxy is created. The default value is false. If the value of the proxy target class property is set to true, then the class based proxy will be valid (Cglib library is required). On the contrary, it is an interface based agent (dynamic agent of JDK). It is recommended to use JDK dynamic agent as much as possible.
If the target object being proxied implements at least one interface, JDK dynamic proxy will be used, and all interfaces implemented by the target type will be proxied. If the target object does not have any interface implementation, create a Cglib proxy. If you want to enforce the Cglib proxy (for example, you want to proxy all the methods of the target object, not only the methods that implement the sub interface), you can also. However, the following two issues need to be considered:
- The (Advice) Final methods cannot be notified because they cannot be overridden.
- You need to put Cglib binary distribution package under classpath.
expose-proxy: sometimes the self calling within the target object will fail to implement the enhancement in the aspect, as shown in the following example:
public interface AService {
    public void a();
    public void b();
}

@Service()
public class AServicelmpll implements AService {
    @Transactional(propagation = Propagation.REQUIRED)
    public void a() {
        this.b{);
    }

    @Transactional(propagation = Propagation.REQUIRES_NEW)
    public void b() {
    }
}
This here points to the target object, so the call to this.b() will not execute the b transaction facet, that is, the transaction enhancement will not be executed, so the transaction definition @ transactional (promotion = promotion.requests_new) of the b method will not be implemented. To solve this problem, we can do this:
<aop:aspectj-autoproxy expose-proxy = "true"/>
Then change this.b() in the above code to ((AService) AopContext.currentProxy()).b(). Through the above modifications, we can enhance the a and b methods at the same time.
3. Register components and notify
The registerComponentIfNecessary() method is used to register the component and notify it for further processing by the listener.
The extendBeanDefinition() method is used to resolve the child tags under < AOP: AspectJ AutoProxy >, but it is not used yet.
summary
The length of this article is not long. I am learning from the experience of Spring IoC tag parsing, tracing back to the source, and trying to make the AOP tag parsing clear from the beginning to the end. The reference books only explain the AOP label analysis based on annotation. In order to solve the doubts in my heart, this paper explains the AOP label analysis based on two ways. Although the differences are very small, my heart is more stable. In the process of reading, if you find any mistakes or irregularities in the article, please indicate them here and give more advice. Let's learn together and make progress together.

