Unity's URP gives us the RenderFeature interface to extend the rendering of Pass, which we mentioned earlier when we talked about URP-ForwardRenderer, which can be used to extend Pass.RenderFeature is dependent on ForwardRenderer, as shown in the following figure:
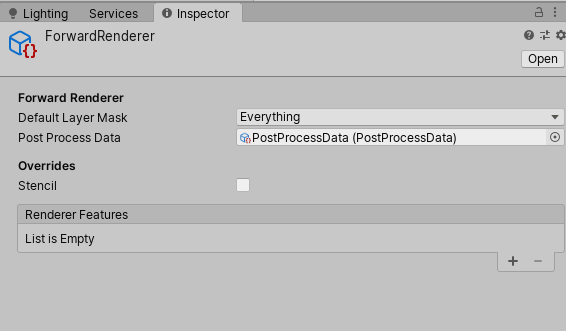
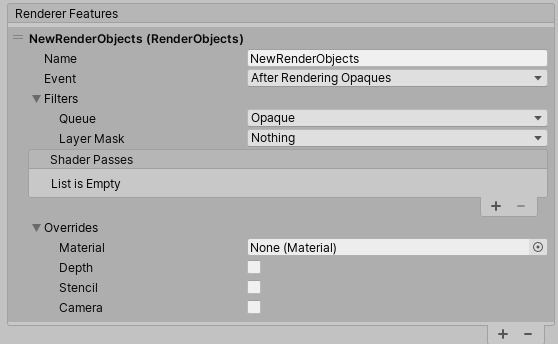
Now that we see that the list of RendererFeatures is empty, let's add one, click the plus sign, and we'll see that there's only one RenderObjects to choose from. Let's first familiarize ourselves with how a Feature works using the RenderObjects'RendererFeatures.When you click on the item you added, the following parameters will appear:
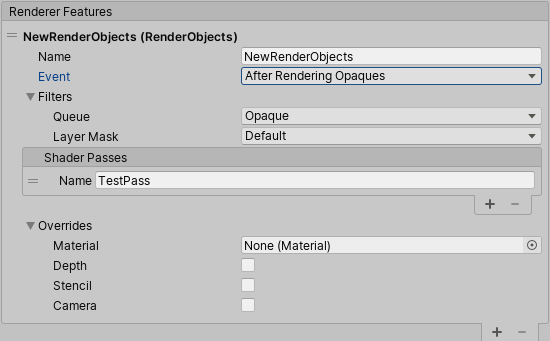
Let's start by creating an Unlit material, modifying Pass's Name to "TestPass", and then setting PassName in ShaderPasses to "TestPass", as shown below:
In this way, we can render this object correctly with other Pass, which can achieve various effects through our own customization in Shader. For example, we implement a multi-Pass stroke. Continue with our example, because we changed the original PassName to PasName ("TestPass") of Feature, so URP will not call UniversalForwardPass.If we add back the Universal ForwardPass with both the Universal ForwardPass and the TestPass, that means the object will be rendered in both Pass, the multi-Pass rendering of our previous built-in pipelines, in which way we can make many functions in the URP.For example, lift a chestnut, multi-Pass stroke effect:
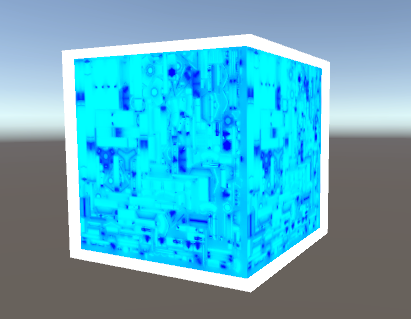
One PASS's RederMode is UniversalForward, the other is TestPass, the first Pass is directly Unlit for demonstration purposes, and the second Pass is edged, which gives this effect.In addition to this, this RenderObjects feature can also achieve a lot of effects, specifically by the imagination of your little friends!Now that we know how to use a Feature with RenderObjects, let's see how it's written.Because one Feature doesn't meet all of our needs, we need to learn to extend our own Features.
Find the RenderObjects code as follows:
[MovedFrom("UnityEngine.Experimental.Rendering.LWRP")]public class RenderObjects : ScriptableRendererFeature
We can see that all Features inherit the ScriptableRendererFeature class.Next we can see that several classes are defined:
[System.Serializable]
        public class RenderObjectsSettings
        {
            public string passTag = "RenderObjectsFeature";
            public RenderPassEvent Event = RenderPassEvent.AfterRenderingOpaques;

            public FilterSettings filterSettings = new FilterSettings();

            public Material overrideMaterial = null;
            public int overrideMaterialPassIndex = 0;

            public bool overrideDepthState = false;
            public CompareFunction depthCompareFunction = CompareFunction.LessEqual;
            public bool enableWrite = true;

            public StencilStateData stencilSettings = new StencilStateData();

            public CustomCameraSettings cameraSettings = new CustomCameraSettings();
        }

        [System.Serializable]
        public class FilterSettings
        {
            // TODO: expose opaque, transparent, all ranges as drop down
            public RenderQueueType RenderQueueType;
            public LayerMask LayerMask;
            public string[] PassNames;

            public FilterSettings()
            {
                RenderQueueType = RenderQueueType.Opaque;
                LayerMask = 0;
            }
        }

        [System.Serializable]
        public class CustomCameraSettings
        {
            public bool overrideCamera = false;
            public bool restoreCamera = true;
            public Vector4 offset;
            public float cameraFieldOfView = 60.0f;
        }
These structures are the parametric interfaces we see for Features in the enderer, which means that the parameters for Features are defined here.Then you need to implement two methods of the base class:
public override void Create()
        {
            FilterSettings filter = settings.filterSettings;
            renderObjectsPass = new RenderObjectsPass(settings.passTag, settings.Event, filter.PassNames,
                filter.RenderQueueType, filter.LayerMask, settings.cameraSettings);

            renderObjectsPass.overrideMaterial = settings.overrideMaterial;
            renderObjectsPass.overrideMaterialPassIndex = settings.overrideMaterialPassIndex;

            if (settings.overrideDepthState)
                renderObjectsPass.SetDetphState(settings.enableWrite, settings.depthCompareFunction);

            if (settings.stencilSettings.overrideStencilState)
                renderObjectsPass.SetStencilState(settings.stencilSettings.stencilReference,
                    settings.stencilSettings.stencilCompareFunction, settings.stencilSettings.passOperation,
                    settings.stencilSettings.failOperation, settings.stencilSettings.zFailOperation);
        }

        public override void AddRenderPasses(ScriptableRenderer renderer, ref RenderingData renderingData)
        {
            renderer.EnqueuePass(renderObjectsPass);
        }
From the code we can see that this Feature actually executes RenderObjectsPass again, but the timing of execution can be defined by itself.We need to find out where these two methods are called to know the whole process.
for (int i = 0; i < rendererFeatures.Count; ++i)
                    rendererFeatures[i].AddRenderPasses(this, ref renderingData);
AddRenderPass is executed in the SetUp method of ForwardRenderer, as shown in the code above.
public ScriptableRenderer(ScriptableRendererData data)
        {
            foreach (var feature in data.rendererFeatures)
            {
                if (feature == null)
                    continue;

                feature.Create();
                m_RendererFeatures.Add(feature);
            }
            Clear();
        }
The Create method is in the constructor of ScripbleRenderer, as shown in the code above.
In this way, we can summarize how to do our own RenderFeature:
1. Create your own Feature class
2. Find Pass and timing for the Feature class to execute
3. If Feature needs to customize Pass, it needs to extend the URP itself.
There are three steps to extending Feature, and of course, the Feature Editor interface, which ignores (aha-ha-ha), and this section focuses on how to create your own Features, where small and medium-sized partners need to see if they need to expand Feature and Pass according to timing.
Bloggers can leave a message if they have any comments or suggestions.