Sending and receiving of C# Serialport
preface:
Last time, the blogger explained the configuration of serial port control for you. In this issue, we will explain the sending and receiving of serial port. This serial port communication control provides a lot of methods for the communication between host computer and single chip microcomputer. It is convenient for you to use and easy to use.
Once a day to prevent puppy love:

1.SerialPort serial port control sending configuration
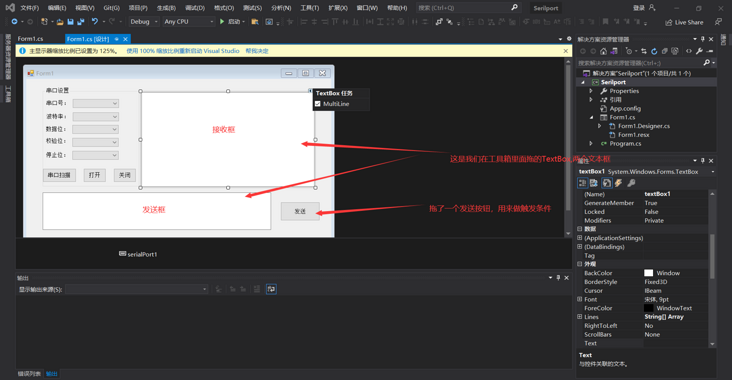
1.1 take the item of the previous article. I set it based on that item. If I can't, I can see the previous article of the blogger and put a link( https://juejin.cn/post/702183... )First, we need to set the interface, including send box, receive box and send button
1.2 let's first learn about the sending of serialPort, which provides several interfaces:
public void Write(byte[] buffer, int offset, int count);
    Writes the specified number of bytes to the serial port using the data in the buffer.
        // buffer: an array of bytes containing the data to be written to the port.
        //   Offset: the byte offset from zero in the buffer parameter, from which bytes are copied to the port.
        //   count: number of bytes to write.
public void Write(string text);
    Writes the specified string to the serial port.
      text:  Output string.
public void Write(char[] buffer, int offset, int count);
    Writes the specified number of characters to the serial port using the data in the buffer.
        //   buffer: character array containing the data to be written to the port.
        //   Offset: the byte offset from zero in the buffer parameter, from which bytes are copied to the port.
        //   count: the number of characters to write.
public void WriteLine(string text);
        //     Writes the specified string and System.IO.Ports.SerialPort.NewLine value to the output buffer.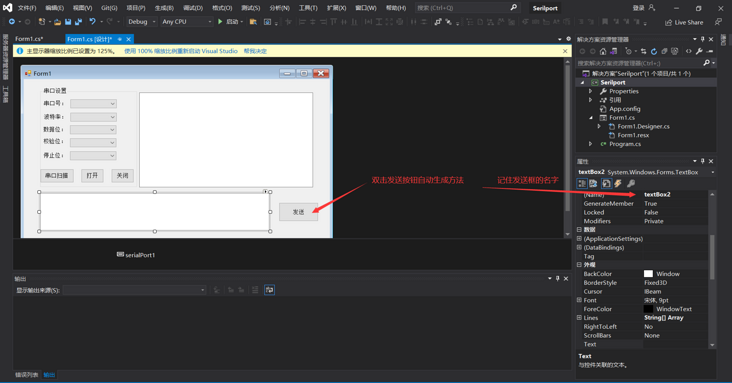
// text: the string to write to the output buffer.- 3. Double click the send button to automatically generate the method function and write the method we sent:
1.4 the code is as follows: it can be used directly, provided that your interface is the same as that of the blogger. Pay attention to whether the controls of the interface correspond to the function trigger of the blogger, not to change the trigger of the interface. For details, refer to the previous article.
using System;
using System.Collections.Generic;
using System.ComponentModel;
using System.Data;
using System.Drawing;
using System.IO.Ports;
using System.Linq;
using System.Text;
using System.Threading.Tasks;
using System.Windows.Forms;
namespace Serilport
{
public partial class Form1 : Form
{
public Form1()
{
InitializeComponent();
System.Windows.Forms.Control.CheckForIllegalCrossThreadCalls = false;
}
private void SearchAndAddSerialToComboBox(object sender, EventArgs e)
{
string Buffer;
comboBox1.Items.Clear(); //Records scanned before the beginning of the Qing Dynasty
for (int i = 0; i < 20; i++)
{
try
{
Buffer = "COM" + i.ToString(); //Obtain COM1-20
serialPort1.PortName = Buffer; //Get COM information
serialPort1.Open(); //Open serial port
comboBox1.Items.Add(Buffer);
comboBox1.Text = Buffer; //Add serial port to get Recordset
serialPort1.Close(); //Close the serial port
}
catch { }
}
}
private void button4_Click(object sender, EventArgs e)
{
try
{
serialPort1.PortName = comboBox1.Text;
serialPort1.BaudRate = Convert.ToInt32(comboBox2.Text, 10);
serialPort1.DataBits = Convert.ToInt32(comboBox3.Text, 10);
if (comboBox4.Text == "None") { serialPort1.Parity = Parity.None; }
else if (comboBox4.Text == "Odd check") { serialPort1.Parity = Parity.Odd; }
else if (comboBox4.Text == "Parity check") { serialPort1.Parity = Parity.Even; }
else if (comboBox4.Text == "Mark") { serialPort1.Parity = Parity.Mark; }
else if (comboBox4.Text == "Space check") { serialPort1.Parity = Parity.Space; }
if (comboBox5.Text == "1")
{
serialPort1.StopBits = StopBits.One;
}
else if (comboBox5.Text == "1.5")
{
serialPort1.StopBits = StopBits.OnePointFive;
}
else if (comboBox5.Text == "1.5")
{
serialPort1.StopBits = StopBits.Two;
}
//serialPort1.ReadTimeout(2000);
serialPort1.Open();
button2.Enabled = false;//The open serial port button is not available
//button3.Enabled = true;// Close the serial port
}
catch
{
MessageBox.Show("Port error,Please check the serial port", "error");
}
}
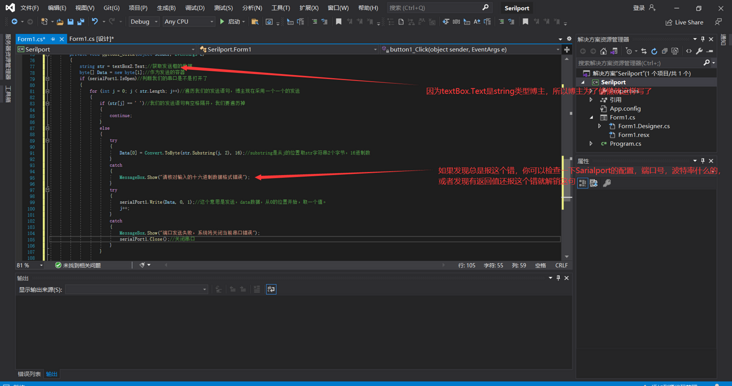
private void button1_Click(object sender, EventArgs e)
{
string str = textBox2.Text;//Get the data of the send box
byte[] Data = new byte[1];//As a container for sending
if (serialPort1.IsOpen)//Judge whether our serial port is open
{
for (int j = 0; j < str.Length; j++)//Traversing our sending statements, bloggers now send one by one
{
if (str[j] == ' ')//Our sending statements are separated by spaces. We have to traverse them
{
continue;
}
else
{
try
{
Data[0] = Convert.ToByte(str.Substring(j, 2), 16);//substring is a hexadecimal number that takes 2 bytes of str string from the position of j
}
catch
{
MessageBox.Show("Please check the hexadecimal data format error");
}
try
{
serialPort1.Write(Data, 0, 1);//This means sending data, starting from the position of 0, and taking a value.
j++;
}
catch
{
MessageBox.Show("Port sending failed. The system will close the current serial port error");
serialPort1.Close();//Close the serial port
}
}
}
}
}
}
}
2.SarilPort serial port control receiving configuration
2.1 understanding the interface of SerialPort receiving method
public int Read(char[] buffer, int offset, int count);
from System.IO.Ports.SerialPort Reads some characters from the input buffer and writes them to the offset specified in the character array.
// buffer: an array of bytes to which input is written.
// Offset: offset in the buffer to write bytes.
// Count: the maximum number of bytes read. If count is greater than the number of bytes in the input buffer, fewer bytes are read.
public int Read(byte[] buffer, int offset, int count);
from System.IO.Ports.SerialPort The input buffer reads some bytes and writes those bytes to the offset specified in the byte array.
// buffer: an array of bytes to which input is written.
// Offset: offset in the buffer to write bytes.
// Count: the maximum number of bytes read. If count is greater than the number of bytes in the input buffer, fewer bytes are read.
public int ReadByte();
from System.IO.Ports.SerialPort A byte is synchronously read from the input buffer.
public int ReadChar();
from System.IO.Ports.SerialPort One character is synchronously read from the input buffer.
public string ReadExisting();
On the basis of coding, read System.IO.Ports.SerialPort All immediately available bytes in the stream and input buffer of the object.
public string ReadLine();
Read all the way to the input buffer System.IO.Ports.SerialPort.NewLine Value.
public string ReadTo(string value);
Reads up to the specified in the input buffer value String of.
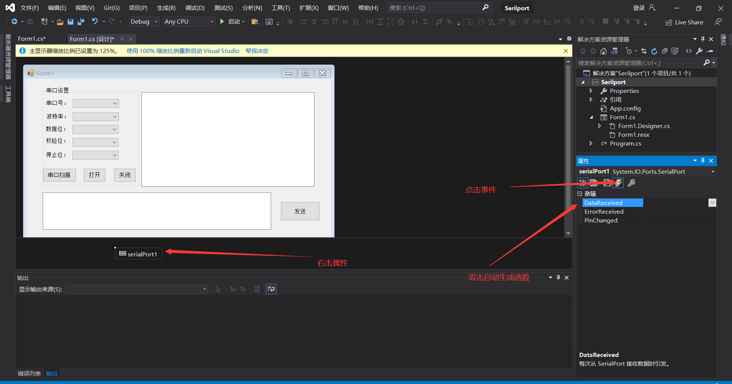
value: A value indicating where the read operation stops.2.2. Create a receiving function according to the screenshot, and SerialPort automatically receives data
2.3 if you don't want to use the loop, you can read the data at one time, so it won't be so troublesome. Read its own interface carefully and find a suitable interface. I'll send my code to you for reference:
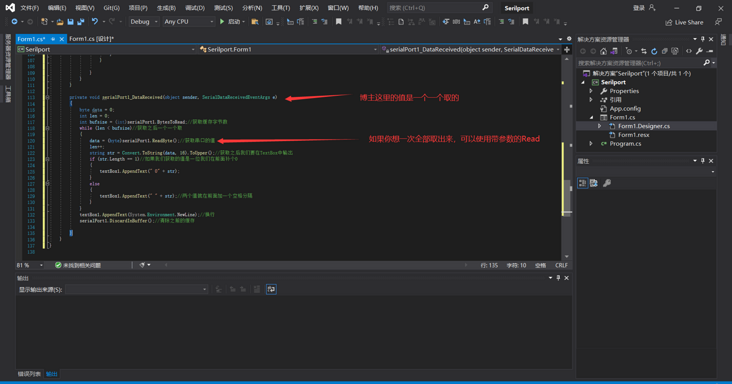
private void serialPort1_DataReceived(object sender, SerialDataReceivedEventArgs e)
{
byte data = 0;
int len = 0;
int bufsize = (int)serialPort1.BytesToRead;//Get cache bytes
while (len < bufsize)//Get one after another
{
data = (byte)serialPort1.ReadByte();//Get the value of serial port
len++;
string str = Convert.ToString(data, 16).ToUpper();//After obtaining, we will output it in TextBox
if (str.Length == 1)//If the value we get is a bit, we fill in 0 before it
{
textBox1.AppendText(" 0" + str);
}
else
{
textBox1.AppendText(" " + str);//The two values are separated by a space in front
}
}
textBox1.AppendText(System.Environment.NewLine);//Line feed
serialPort1.DiscardInBuffer();//Clear previous cache
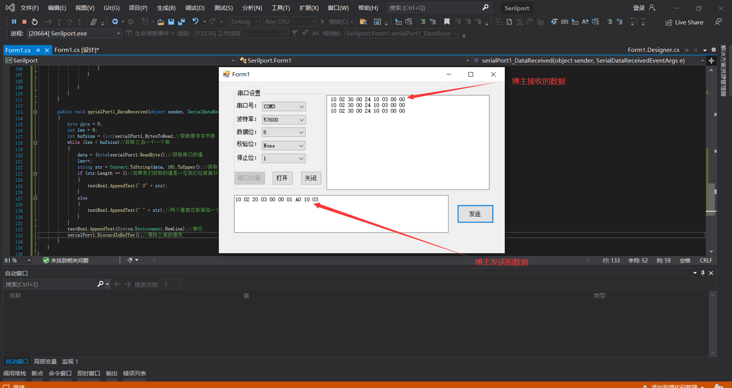
}3. Show me the sending and receiving of SerialPort. The blogger happens to have a single chip microcomputer here to show you. If you are interested in this, you can also use the virtual serial port to simulate and play.
Note: the blogger reported a thread error C# exception when running: thrown: "invalid inter thread operation: access to the control" textBox1 "from a thread that is not creating it." (System.InvalidOperationException), you need to add the code System.Windows.Forms.Control.CheckForIllegalCrossThreadCalls = false in Form1; It is forbidden to catch calls to the wrong thread.
Summary:
The blogger just briefly introduced the sending and receiving of C# SerialPort serial port control and demonstrated it. Students interested in this aspect can learn it. The blogger is only a beginner because he is working on a project recently. Few students learn C# and I hope you don't like it. It's not easy to create, praise, pay attention and comment.
