Lesson 11: role synchronization solutions
In the previous chapter, we introduced the deployment of servers. In this chapter, we use deployed servers to synchronize roles. Here we first introduce what is role real-time synchronization. Online game role real-time synchronization has always been a technology hotspot. The existing role synchronization solutions on the market are mainly divided into two types: frame synchronization and state synchronization. In fact, it is not important to use which synchronization What it can do is help us solve the problems in the project. In fact, frame synchronization has existed for a long time. It is not a new technology, but it has not been paid attention to. The technology is not as new as possible, but to choose the technical scheme according to the actual needs of the project.
First, it introduces the implementation of frame synchronization. The client sends the game actions to the server, the server broadcasts and forwards all the actions of the client (or the client sends them directly through P2P technology), and the client performs the game operation and display according to all the received game actions. Frame synchronization mainly depends on the ability of the client. The server only does a forwarding, and even the client can forward data through P2P without the server, such as the CS game we used to play. There are many articles about frame synchronization technology on the Internet, which recommend a better one for readers, See here for details..
Frame synchronization products are mainly for competitive games, or open room games.
Then it introduces the state synchronization. As the name implies, it refers to the way to synchronize the state and behavior of other players. Generally, AI logic, skill logic and battle calculation are all calculated by the server, only the results of the operation are synchronized to the client. The client only needs to accept the state changes transmitted by the server, and then update its local action state and Buff Status, location, etc. are OK, but in order to give players a good experience and reduce the amount of synchronized data, the client will also do a lot of local operations to reduce the frequency of server synchronization and the amount of data. For example, if the player's state does not change, such as running all the time, and the server does not handle it, then the distance he runs is handled by interpolation, otherwise, there will be a blink situation, and the user experience is very bad. This processing can also reduce the number of communication between the server and the client, that is, reduce the pressure on the server.
Our Photon Server uses state synchronization, so this article mainly introduces state synchronization. For frame synchronization and state synchronization, here is a brief summary:
(1) In fact, it's not particularly important to choose which way to implement the turn based combat, because the difficulty of its implementation is not very high, and using state synchronization can also achieve offline combat verification, so it's not necessary to use frame synchronization.
(2) For RTS games with more units, it must be frame synchronization. For COC, although it is an offline game, it can get the same result under the same input, so it can also be considered that it is a combat system realized by frame synchronization.
(3) For those with high operation requirements, for example, MOBA games have collision (players and monsters can jam each other), physical logic, pure physical games can play leisure games immediately, and frame synchronization is relatively smooth (open-source Dphysics 2D physical system can use it to determine).
(4) For MMORPG, there will be thousands of players in a map. It is not a small room game. You can only use state synchronization to synchronize the state of your vision. The following describes how to realize synchronization for common game servers. Later, we will explain it to the readers in combination with the implementation of the code of the Photon Server. In fact, the Photon Server has been implemented for us, and it can be used directly.
When synchronizing, first of all, you need to know how other players or monsters around the players and NPC are brushed out. In this case, the implementation of the server is involved. The server will simulate the scene of the client, that is, the game server on the server It generates a map of the same size as the client, and there will be an area when synchronizing in the server, which involves the concept of nine screens. Nine screens are nine grids generated by the server centered on the player. Each grid has a certain size, and the player is in the middle grid. All objects within the nine screens of the player will be brushed by the server Come out, as shown in the figure:

The nine screens in the server are as shown in the figure above. Each player has his own nine screens. The nine screens move with the player's movement, and will not be brushed out outside the nine screens. The player can't see them. This is also why sometimes the visual distance is set to be large or can't be seen on the client. That's why the server will send a message to the client to hide them and display the characters And hiding are based on the server. When we implement them on the client side, we mainly follow the steps below:
The first step is to brush the players themselves;
The second step is to brush the player's nine screen object;
The third step is to swipe into or away from the object of the player's nine screens at any time.
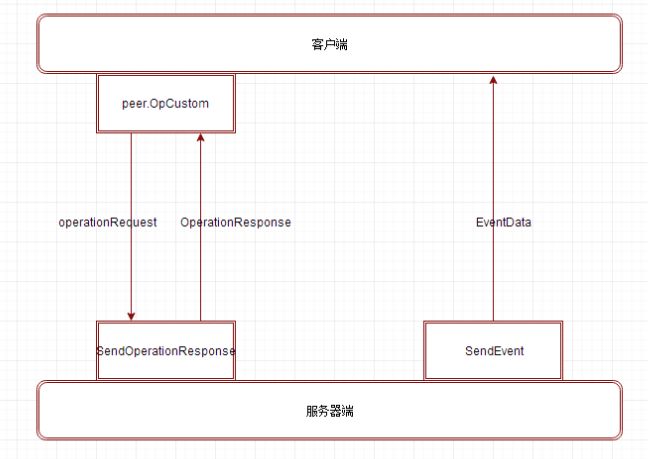
This is the realization idea of traditional server synchronization. Next, let's learn the synchronization idea of Photon Server. First, let's see how the client communicates with the server, as shown in the following figure:
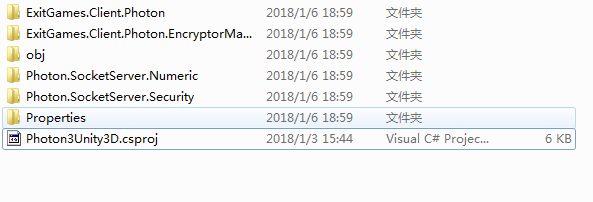
 Unity needs to be linked to the Photon Server. We also need to go to the official website of Photon to download the Unity SDK. The downloading method is the same as downloading the Photon Server. We will explain in the specific implementation case in Lesson 12. In this article, we will introduce some key functions of the client.
These functions are very important. First, we need to put the photo3Unity3d.dll Library in the Plugins folder of Unity. In fact, it is implemented in C. We can decompile it through the ILSpy tool. The decompiled code is as follows:
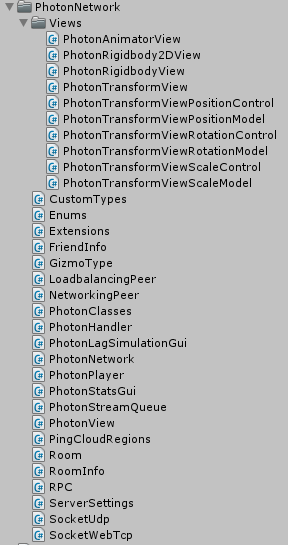
In addition to this library, photon also provides the C ා script code that has been encapsulated for us. The code provided for us is used for writing logic, that is, for network communication. Photon has done it. As shown in the figure below, it is provided by photon unit, which needs to be put into Unity, as follows:
We will gradually introduce the implementation of the underlying code to the readers, and the official also provides Demo. The logic aspect is explained in the last lesson. Here, we will introduce the core technology of the underlying layer to the readers. First, the client links the server, and the function called is Connect link server, which is provided by photon server NameServer, GameServer and MasterServer are commonly used. Master and GameServer are one-to-many relationships. Clients first log in to MasterServer through IP address and port number, because NameServer is not very useful. Here, we will skip it, and MasterServer will assign the logged in users to Game Server In fact, the purpose of this is to provide load balancing.
Let's take a look at the Connect client link server function, which is implemented in the NetWorkingPeer.cs file as follows:
 public bool Connect(string serverAddress, ServerConnection type)
{
    if (PhotonHandler.AppQuits)
    {
        Debug.LogWarning("Ignoring Connect() because app gets closed. If this is an error, check PhotonHandler.AppQuits.");
        return false;
    }

    if (this.State == ClientState.Disconnecting)
    {
        Debug.LogError("Connect() failed. Can't connect while disconnecting (still). Current state: " + PhotonNetwork.connectionStateDetailed);
        return false;
    }

    cachedProtocolType = type;
    cachedServerAddress = serverAddress;
    cachedApplicationName = string.Empty;

    this.SetupProtocol(type);

    // connect might fail, if the DNS name can't be resolved or if no network connection is available
    bool connecting = base.Connect(serverAddress, "", this.TokenForInit);

    if (connecting)
    {
        switch (type)
        {
            case ServerConnection.NameServer:
                State = ClientState.ConnectingToNameServer;
                break;
            case ServerConnection.MasterServer:
                State = ClientState.ConnectingToMasterserver;
                break;
            case ServerConnection.GameServer:
                State = ClientState.ConnectingToGameserver;
                break;
        }
    }

    return connecting;
}
This function provides server address and server connection type. Photo server provides us with three connection modes: TCP, UDP and Web. We use UDP protocol. After connecting to the server, the next step is to use OpCustom to send the request to the server. We will receive the message from the server. The module of receiving the message is put in the library photo3unity3d.dll Now that we have decompiled it, let's look at the interface class: IPhotonPeerListener.cs, which provides the interface for processing server messages. Its specific implementation is in its subclass. The client is around these functions, and then back to the OpCustom function. Its implementation is in the class photopeer.cs file. The implementation method is as follows:
        public virtual bool OpCustom(byte customOpCode, Dictionary<byte, object> customOpParameters, bool sendReliable, byte channelId)
    {
        object enqueueLock = this.EnqueueLock;
        bool result;
        lock (enqueueLock)
        {
            result = this.peerBase.EnqueueOperation(customOpParameters, customOpCode, sendReliable, channelId, false);
        }
        return result;
    }
This function is specifically implemented in our script loadbalancenpeer.cs file. This class implements a series of request functions. We take a specific case as an example to introduce to the reader. For example, first, we implement the creation of a room. In this class, we implement the following functions:
public virtual bool OpCreateRoom(EnterRoomParams opParams)
    {
        if (this.DebugOut >= DebugLevel.INFO)
        {
            this.Listener.DebugReturn(DebugLevel.INFO, "OpCreateRoom()");
        }

        Dictionary<byte, object> op = new Dictionary<byte, object>();

        if (!string.IsNullOrEmpty(opParams.RoomName))
        {
            op[ParameterCode.RoomName] = opParams.RoomName;
        }
        if (opParams.Lobby != null && !string.IsNullOrEmpty(opParams.Lobby.Name))
        {
            op[ParameterCode.LobbyName] = opParams.Lobby.Name;
            op[ParameterCode.LobbyType] = (byte)opParams.Lobby.Type;
        }

        if (opParams.ExpectedUsers != null && opParams.ExpectedUsers.Length > 0)
        {
            op[ParameterCode.Add] = opParams.ExpectedUsers;
        }
        if (opParams.OnGameServer)
        {
            if (opParams.PlayerProperties != null && opParams.PlayerProperties.Count > 0)
            {
                op[ParameterCode.PlayerProperties] = opParams.PlayerProperties;
                op[ParameterCode.Broadcast] = true; // TODO: check if this also makes sense when creating a room?! // broadcast actor properties
            }

            this.RoomOptionsToOpParameters(op, opParams.RoomOptions);
        }
        return this.OpCustom(OperationCode.CreateGame, op, true);
    }
After calling OpCustom to send the server request room, let's see where the code is and how to call the function OpCreateRoom? Continue to search and we can see that the function creation room is implemented in the photonetwork.cs script:
   public static bool CreateRoom(string roomName, RoomOptions roomOptions, TypedLobby typedLobby, string[] expectedUsers)
{
    if (offlineMode)
    {
        if (offlineModeRoom != null)
        {
            Debug.LogError("CreateRoom failed. In offline mode you still have to leave a room to enter another.");
            return false;
        }
        EnterOfflineRoom(roomName, roomOptions, true);
        return true;
    }
    if (networkingPeer.Server != ServerConnection.MasterServer || !connectedAndReady)
    {
        Debug.LogError("CreateRoom failed. Client is not on Master Server or not yet ready to call operations. Wait for callback: OnJoinedLobby or OnConnectedToMaster.");
        return false;
    }

    typedLobby = typedLobby ?? ((networkingPeer.insideLobby) ? networkingPeer.lobby : null);  // use given lobby, or active lobby (if any active) or none

    EnterRoomParams opParams = new EnterRoomParams();
    opParams.RoomName = roomName;
    opParams.RoomOptions = roomOptions;
    opParams.Lobby = typedLobby;
    opParams.ExpectedUsers = expectedUsers;

    return networkingPeer.OpCreateGame(opParams);
}
The above function finally calls the OpCreateGame function to realize the creation of the room. When writing the logic, we only need to call the function CreateRoom to create the room in GameServer, the sending request is completed, and the server will transmit the message to the client, which requires the client terminal to process the message. Next, we introduce the response function after receiving the server, which processes the response information returned by the server in the OnOperationResponse method of the interface provided in the IPhotonPeerListener class. The specific implementation of this function is also in the subclass. The reader can see it in the NetworkingPeer.cs file. Because the implementation code is relatively long, it will not be listed for the reader here. As a reminder, this function does not provide a calling function in the logic code of Photon Unity, but it is in the library of photo3unity3d.dll For those called in, let's show the process of networking to the reader, that is, help the reader sort out the ideas and facilitate the reader's learning according to the process. First, we link the network to call the functions in the class of photonetwork.cs file:
PhotonNetwork.ConnectUsingSettings("0.9");
The constructor of the photonetwork: static photonetwork() adds the photohandler component, and the code snippet is as follows:
 GameObject photonGO = new GameObject();
    photonMono = (PhotonHandler)photonGO.AddComponent<PhotonHandler>();
    photonGO.name = "PhotonMono";
    photonGO.hideFlags = HideFlags.HideInHierarchy;
The above code implements adding components and hiding them, so it is invisible in the project. The Update function in the PhotonHandler.cs file is to process the return message from the server, then move to the Update function, and call another function in the function. First, look at the code:
        bool doDispatch = true;
    while (PhotonNetwork.isMessageQueueRunning && doDispatch)
    {
        // DispatchIncomingCommands() returns true of it found any command to dispatch (event, result or state change)
        Profiler.BeginSample("DispatchIncomingCommands");
        doDispatch = PhotonNetwork.networkingPeer.DispatchIncomingCommands();
        Profiler.EndSample();
    }
The function it calls is DispatchIncomingCommands(), which literally means to distribute the input command, and then go to the library photo3unity3d.dll to find it. Because we have decompiled it, we can find it directly in the process. The function can be seen in the photopeer.cs file:
public virtual bool DispatchIncomingCommands()
    {
        bool flag = this.TrafficStatsEnabled;
        if (flag)
        {
            this.TrafficStatsGameLevel.DispatchIncomingCommandsCalled();
        }
        object dispatchLockObject = this.DispatchLockObject;
        bool result;
        lock (dispatchLockObject)
        {
            this.peerBase.ByteCountCurrentDispatch = 0;
            result = this.peerBase.DispatchIncomingCommands();
        }
        return result;
    }
Then move to the PeerBase.cs file to view the DispatchIncomingCommands function. We find the EnetPeer class, which is a subclass of PeerBase. In the DispatchIncomingCommands function, we call an important function DeserializeMessageAndCallback, continue to look in, it calls this.Listener.OnOperationResponse this.Listener.OnOperationResponse(operationResponse). In this way, we can find the implementation and complete the process.
This is an introduction to a normal process. In case of communication exceptions, because network problems are often encountered, Photon Server provides OnStatusChanged method for us to handle network status exceptions. In addition, we have multiple roles in a room. The synchronization messages between these corners are broadcast processed. OnEvent Method handles events broadcast by the server for us.
Finally, the Disconnect function is used to Disconnect the network connection between the server and the client.
In addition, the Photon Server also provides TCP and UDP protocols, which use multi-threaded processing. Interested readers can learn about it. The above is about the logical processing of the client when communicating with the server.
Next, I will introduce the logic writing of the server side of the photon server. Because the underlying layer of the photon server is written in C + +, which is a black box for us. We just need to know how to use it. In the officially provided code, our photon server uses the OnOperationRequest function to process the client's request, which is inherited from the IOperationHandler Class, we write logic as long as we rewrite this method. In addition, after processing the client, we should return the server-side processing results to the client to call the function SendOperationResponse to complete the task. The server logic of the photon server has written the code logic for us, such as the class of MmoInitialOperationHandler and the class of MmoActorOperationHandler. In addition, if we encounter how to deal with the message broadcast, the Photon Server server provides a function SendEvent to deal with the message broadcast.
The above is to explain the communication process between our client and server. Let's start with specific applications. For example, there are multiple roles that need to be synchronized in real time in a scenario. Here, I will explain to the reader that in fact, a client-side game scenario will also be simulated on the server side. In this scenario, it divides an area for synchronous use, similar to nine screens of an MMO server. We use state synchronization, which must be synchronized, such as Idle, walk, run, attack1, attack2 And so on. In addition, the character will definitely move and turn in the scene. These are needed for state synchronization. Because the player does actions or moves, these need to be synchronized. We need to write a class for synchronization by ourselves. The class we write needs to inherit from photon.monobehavior. In addition, we need to implement a function for synchronization in this class as follows:
 void OnPhotonSerializeView(PhotonStream stream, PhotonMessageInfo info)
    {
        if (stream.isWriting)
        {
            //We own this player: send the others our data
            stream.SendNext((int)controllerScript._characterState);
            stream.SendNext(transform.position);
            stream.SendNext(transform.rotation);
        }
        else
        {
            //Network player, receive data
            controllerScript._characterState = (CharacterState)(int)stream.ReceiveNext();
            correctPlayerPos = (Vector3)stream.ReceiveNext();
            correctPlayerRot = (Quaternion)stream.ReceiveNext();

            // avoids lerping the character from "center" to the "current" position when this client joins
            if (firstTake)
            {
                firstTake = false;
                this.transform.position = correctPlayerPos;
                transform.rotation = correctPlayerRot;
            }

        }
    }
This function is mainly used to serialize data. On the one hand, it sends out the role information, and on the other hand, it receives data, including status, location and direction. We introduced the OnEvent function used to process broadcast data earlier. It will send the user's information to the server in the OnEvent function, and execute it through the function SendMonoMessage encapsulated by the photo server itself, because we only send data when the status changes. Here, we should pay attention to that if the user's status remains unchanged, for example, it has been run, and then switch to idle. For the middle distance, we will use interpolation. The code is as follows:
                transform.position = Vector3.Lerp(transform.position, correctPlayerPos, Time.deltaTime * 10);
            transform.rotation = Quaternion.Lerp(transform.rotation, correctPlayerRot, Time.deltaTime * 10);
In this way, the role synchronization is completed. In fact, there is very little code written by ourselves. This chapter just introduces the process to the reader, and the next chapter starts the implementation of the case.

