1, windows installation
1.1. erlang Download
erlang download page: https://www.erlang.org/downloads
erlang download address: https://erlang.org/download/otp_win64_24.0.exe
You can install directly in the next step. When you encounter the following figure, install visual C++

Configure environment variables after installation
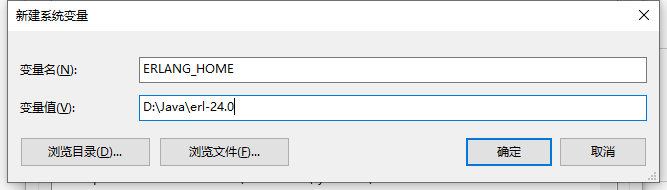
And add% Erlang to Path_ HOME%\bin

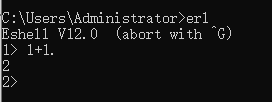
verification
After configuring the environment variables, run cmd with win + R, open the command line, enter erl, and press enter
Enter 1 + 1., add. (English period), and then enter. The result 2 appears
1.2 rabbitmq Download
rabbitmq download page: https://www.rabbitmq.com/download.html
rabbitmq download address: https://github.com/rabbitmq/rabbitmq-server/releases/download/v3.9.5/rabbitmq-server-windows-3.9.5.zip
After decompression, double-click the rabbitmq-server.bat file under sbin to start
visit: http://127.0.0.1:15672/
User guest
Password guest
2, Linux Installation
2.1 erlang installation
Rabbitmq is written in erlang language. Before installing rabbitmq, you need to install erlang. Here, use the source code of erlang for installation. The download address of erlang installation package official website is: https://github.com/erlang/otp/releases/
# Install the following dependent packages first
yum install -y make gcc gcc-c++ m4 openssl openssl-devel ncurses-devel unixODBC unixODBC-devel java java-devel

## New rabbitmq folder
mkdir /opt/home/rabbitmq

## Switch rabbitmq folder
cd /opt/home/rabbitmq/

## wget Download
wget https://github.com/erlang/otp/releases/download/OTP-24.0.5/otp_src_24.0.5.tar.gz

## decompression
tar -zxvf otp_src_24.0.5.tar.gz

## Switch to otp_src_24.0.5 folders
cd otp_src_24.0.5/

# Here, you need to create a new erlang folder, because erlang compilation and installation are installed in bin and lib under / usr/local by default. Here, we install it uniformly in / opt/home/rabbitmq/erlang for easy search and use.
mkdir /opt/home/rabbitmq/erlang

## ./configure --prefix=/opt/home/rabbitmq/erlang
## Parameter Description:

## --prefix:  			  Specify installation directory
## --with-ssl:  		 	  Using SSL package, openssl extension library
## --enable-threads:  	  Enable asynchronous thread support
## --Enable SMP support: enables symmetric multi processing support (short for symmetric multi processing architecture)
## --Enable kernel poll: enables the Linux kernel poll
## --enable-hipe:  		  Enable high performance Erlang
## --enable-sctp:  		  Enable Stream Control Transmission Protocol support

./configure --prefix=/opt/home/rabbitmq/erlang --with-ssl --enable-threads --enable-smp-support --enable-kernel-poll --enable-hipe --without-javac

# Then, directly execute make & & make install to compile and install
make && make install

# Add the environment variable and add the folder / opt/home/rabbitmq/erlang/bin to the environment variable
vi /etc/profile

# Add the following
# erlang
ERL_PATH=/opt/home/rabbitmq/erlang/bin
PATH=$ERL_PATH:$PATH

## Make configuration effective
source /etc/profile

# View erlang version
erl -version
2.2 rabbitmq installation
Official website address: https://www.rabbitmq.com/
Download address: https://www.rabbitmq.com/download.html
## wget Download
wget https://github.com/rabbitmq/rabbitmq-server/releases/download/v3.9.8/rabbitmq-server-generic-unix-3.9.8.tar.xz

# decompression
tar -xvf rabbitmq-server-generic-unix-3.9.8.tar.xz

## Add environment variable
vi /etc/profile

## Add the following
# rabbitmq
RABBIT_MQ_PATH=/opt/home/rabbitmq/rabbitmq_server-3.9.8/sbin
PATH=$RABBIT_MQ_PATH:$PATH

## Reload the environment variables
source /etc/profile

## View the list of plug-ins
# {:query, :"rabbit@CentOS8-2", {:badrpc, :timeout}} 	# If this prompt appears, modify the hostname and restart the system
rabbitmq-plugins list

## Add web Administration plug-in
rabbitmq-plugins enable rabbitmq_management

# Start rabbitmq service in the background
rabbitmq-server -detached
visit http://192.168.0.3:15672/
Default username and password guest/guest
There is a problem with the login of the guest user at the web access portal. The error is that the user can only log in through the local host
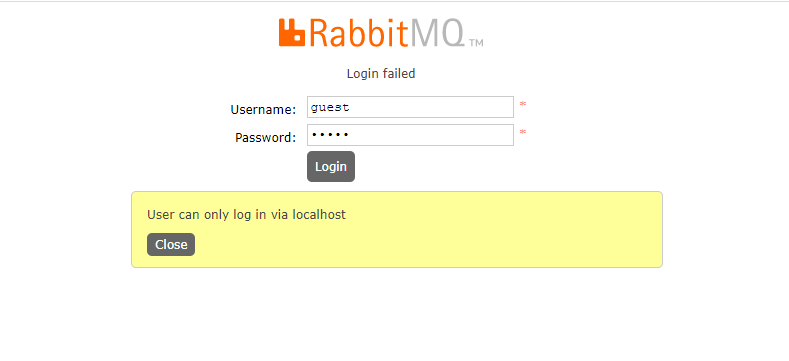
The first solution
Only the local machine can be accessed through localhost. Generally, the graphical interface is not installed, so this is basically not selected
The second solution
## Create user
rabbitmqctl add_user java521 java521

## Add permissions to give the user all the operation permissions of the default vhose:
rabbitmqctl set_permissions -p / java521 ".*" ".*" ".*"

## Modify the user role and set it as administrator
rabbitmqctl set_user_tags java521 administrator
# You can access it directly without restarting the service.
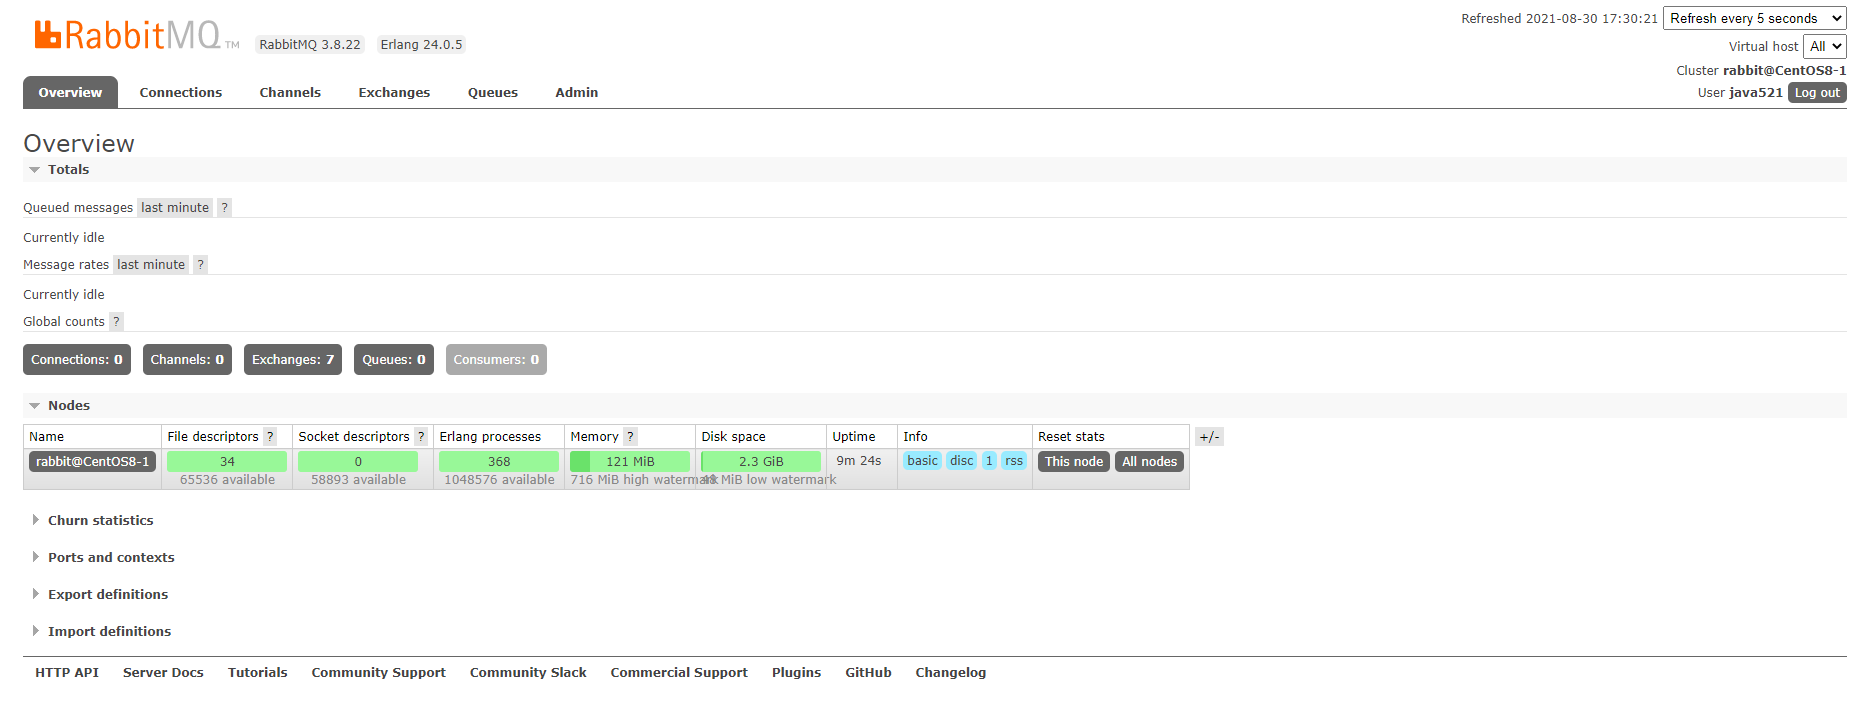
In general, it is very convenient to use the Web UI, which can realize the basic common management operations. Of course, in addition to using the Web UI, you can also use the command line
Some common command line operations:
## Service start stop:
# Service start:
rabbitmq-server -detached

#Service stop:
rabbitmqctl stop

## Plug in management:
# Plug in list:
rabbitmq-plugins list

# Launch plug-in:
rabbitmq-plugins enable XXX   #(XXX is the plug-in name)

# Deactivate plug-in:
rabbitmq-plugins disable XXX


## User management:
# Add user:
rabbitmqctl add_user username password

# Delete user:
rabbitmqctl delete_user username

# Change Password:
rabbitmqctl change_password username newpassword

# Set user roles:
rabbitmqctl set_user_tags username tag

# List users:
rabbitmqctl list_users


## Permission management:
# List all user permissions:
rabbitmqctl list_permissions

# To view user permissions:
rabbitmqctl list_user_permissions username

# Clear user permissions:
rabbitmqctl clear_permissions [-p vhostpath] username

# Set user permissions:
rabbitmqctl set_permissions [-p vhostpath] username conf write read
# conf: a regular match, which resources can be accessed by the user
# write: a regular match. Which resources can be written by the user
# Read: a regular match, which resources can be read by the user
3, Docker installation
## Online pull image
docker pull rabbitmq

## Install MQ
docker run -it --rm --name rabbitmq -p 5672:5672 -p 15672:15672 rabbitmq:3.9-management

## Specify user name and password virtual host
docker run -it --rm --name rabbitmq -e RABBITMQ_DEFAULT_USER=admin -e RABBITMQ_DEFAULT_PASS=admin --hostname mq1 -p 5672:5672 -p 15672:15672 rabbitmq:3.9-management

## If not accessible http://192.168.0.3:15672/
## Enter mq container
docker exec -it mq bash
## Execute after entering
rabbitmq-plugins enable rabbitmq_management
You can access it normally
4, Cluster deployment
Official documents: https://www.rabbitmq.com/clustering.html
Experimental environment:
| host name | operating system | IP address | purpose |
|---|---|---|---|
| CentOS8-1 | CentOS8 | 192.168.0.3 | Disk section |
| CentOS8-2 | CentOS8 | 192.168.0.4 | Memory node |
| CentOS8-3 | CentOS8 | 192.168.0.5 | Memory node |
4.1. Initialization environment
Modify the host names as CentOS8-1, CentOS8-2 and CentOS8-3 respectively
vi /etc/hostname
It is deployed in a stand-alone manner
Modify the hosts file of the three servers
vi /etc/hosts

## Remember to change your ip address and host name
cat >> /etc/hosts <<EOF
192.168.0.3 CentOS8-1
192.168.0.4 CentOS8-2
192.168.0.5 CentOS8-3
EOF
4.2. Configuring Erlang cookies
Copy the. erlang.cookie file on CentOS8-1 to the other two hosts. The cookie file is equivalent to a key token. RabbitMQ nodes in the cluster need to exchange key tokens to obtain mutual authentication. Therefore, all nodes in the same cluster need to have the same key token, otherwise an Authentication Fail error will occur in the process of building.
When RabbitMQ service is started, erlang VM will automatically create this cookie file. The default storage path is / var/lib/rabbitmq/.erlang.cookie or $HOME/.erlang.cookie. This file is a hidden file and needs to be viewed with ls -al command. (when copying. Cookies, each node must stop the MQ service)
## # Stop all services and build Erlang's cluster environment
rabbitmqctl stop

## Copy file
scp /root/.erlang.cookie root@192.168.0.4:/root
scp /root/.erlang.cookie root@192.168.0.5:/root

[root@CentOS8-1 ~]# scp /root/.erlang.cookie root@192.168.0.4:/root
The authenticity of host '192.168.0.4 (192.168.0.4)' can't be established.
ECDSA key fingerprint is SHA256:O2JGlpOuPjzaXTTknt0fySaZfBVLOv5tvpN9jxCiff4.
Are you sure you want to continue connecting (yes/no/[fingerprint])? yes
Warning: Permanently added '192.168.0.4' (ECDSA) to the list of known hosts.
root@192.168.0.4's password:
.erlang.cookie                                                                                                             100%   20     3.4KB/s   00:00
[root@CentOS8-1 ~]# scp /root/.erlang.cookie root@192.168.0.5:/root
The authenticity of host '192.168.0.5 (192.168.0.5)' can't be established.
ECDSA key fingerprint is SHA256:xx9oKlGfPwTbHLYi7Yw1VThpF2MwYsU9uzxgRXyZFlI.
Are you sure you want to continue connecting (yes/no/[fingerprint])? yes
Warning: Permanently added '192.168.0.5' (ECDSA) to the list of known hosts.
root@192.168.0.5's password:
.erlang.cookie
Since you may operate with different accounts on three hosts, in order to avoid the problem of insufficient permissions later, it is recommended to change the original 400 permissions of the cookie file to 600. The command is as follows:
chmod 600 /root/.erlang.cookie
4.3 start up service
rabbitmq-server -detached
4.4 cluster construction
To build a RabbitMQ cluster, you need to select any node as the benchmark and gradually add other nodes. Here, we use CentOS8-1 as the benchmark node to add CentOS8-2 and CentOS8-3 to the cluster. Execute the following commands on CentOS8-2 and CentOS8-3:
# 1. Stop service
rabbitmqctl stop_app

# 2. Reset status
rabbitmqctl reset

# 3. Before a node joins the cluster, the rabbitmq application of the node must be stopped, that is, stop must be executed first_ app
rabbitmqctl join_cluster rabbit@CentOS8-1

# 4. Start service
rabbitmqctl start_app
join_ The cluster command has an optional parameter ram, which means that the newly added node is a memory node, and the default is a disk node. If it is a memory node, all the metadata of queues, switches, binding relationships, users, access rights and vhost will be stored in memory. If it is a disk node, it will be stored in disk. Memory nodes can have higher performance, but all configuration information will be lost after restart. Therefore, RabbitMQ requires at least one disk node in the cluster, and other nodes can be memory nodes. When the memory node leaves the cluster, it can notify the change to at least one disk node; Then, when it is restarted, it is connected to the disk node to obtain metadata information. Unless RabbitMQ is used for RPC, which requires ultra-low latency, RabbitMQ's performance is sufficient in most cases, and the default disk node can be used.
In addition, if a node is joined as a disk node, you need to reset it with the reset command before joining the existing cluster. Resetting the node will delete all historical resources and data on the node. When adding in the form of memory nodes, you can skip the step of reset, because the data in memory itself is not persistent.
4.5. View cluster status
After the setup is successful, rabbitmqctl cluster can be used on any node_ Use the status command to view the cluster status
## Verify cluster status
rabbitmqctl cluster_status
The output is as follows:
[root@CentOS8-3 ~]# rabbitmqctl cluster_status
Cluster status of node rabbit@CentOS8-3 ...
Basics

Cluster name: rabbit@CentOS8-3

Disk Nodes

rabbit@CentOS8-1
rabbit@CentOS8-2
rabbit@CentOS8-3

Running Nodes

rabbit@CentOS8-1
rabbit@CentOS8-2
rabbit@CentOS8-3

Versions

rabbit@CentOS8-1: RabbitMQ 3.9.8 on Erlang 24.0.5
rabbit@CentOS8-2: RabbitMQ 3.9.8 on Erlang 24.0.5
rabbit@CentOS8-3: RabbitMQ 3.9.8 on Erlang 24.0.5

Maintenance status

Node: rabbit@CentOS8-1, status: not under maintenance
Node: rabbit@CentOS8-2, status: not under maintenance
Node: rabbit@CentOS8-3, status: not under maintenance

Alarms

(none)

Network Partitions

(none)

Listeners

Node: rabbit@CentOS8-1, interface: [::], port: 15672, protocol: http, purpose: HTTP API
Node: rabbit@CentOS8-1, interface: [::], port: 25672, protocol: clustering, purpose: inter-node and CLI tool communication
Node: rabbit@CentOS8-1, interface: [::], port: 5672, protocol: amqp, purpose: AMQP 0-9-1 and AMQP 1.0
Node: rabbit@CentOS8-2, interface: [::], port: 15672, protocol: http, purpose: HTTP API
Node: rabbit@CentOS8-2, interface: [::], port: 25672, protocol: clustering, purpose: inter-node and CLI tool communication
Node: rabbit@CentOS8-2, interface: [::], port: 5672, protocol: amqp, purpose: AMQP 0-9-1 and AMQP 1.0
Node: rabbit@CentOS8-3, interface: [::], port: 15672, protocol: http, purpose: HTTP API
Node: rabbit@CentOS8-3, interface: [::], port: 25672, protocol: clustering, purpose: inter-node and CLI tool communication
Node: rabbit@CentOS8-3, interface: [::], port: 5672, protocol: amqp, purpose: AMQP 0-9-1 and AMQP 1.0

Feature flags

Flag: drop_unroutable_metric, state: enabled
Flag: empty_basic_get_metric, state: enabled
Flag: implicit_default_bindings, state: enabled
Flag: maintenance_mode_status, state: enabled
Flag: quorum_queue, state: enabled
Flag: stream_queue, state: enabled
Flag: user_limits, state: enabled
Flag: virtual_host_metadata, state: enabled
You can see that the information of all nodes is displayed under Disk Nodes. All nodes are disc (Disk Nodes). At this time, it means that the cluster has been built successfully. The default name is Cluster name: rabbit@CentOS8-1. If you want to make changes, you can use the following command
rabbitmqctl set_cluster_name my_rabbitmq_cluster
4.6. UI interface viewing

4.7. Configure the image queue
4.7.1. Open the image queue
Here we enable the image configuration for all queues. The syntax is as follows:
rabbitmqctl set_policy ha-all "^" '{"ha-mode":"all"}'
4.7.2 replication factor
In the above, we specified the value of HA mode as all, which means that messages will be synchronized to the same queue of all nodes. The reason why we configure this here is that we only have three nodes, so the performance overhead of replication operation is relatively small. If your cluster has many nodes, the performance cost of replication is relatively large. At this time, you need to select an appropriate replication coefficient. Generally, the over half write principle can be followed, that is, for a cluster with n nodes, it only needs to be synchronized to n/2+1 nodes. At this time, you need to modify the mirror policy to exactly and specify the replication coefficient ha params. The example commands are as follows:
rabbitmqctl set_policy ha-two "^" '{"ha-mode":"exactly","ha-params":2,"ha-sync-mode":"automatic"}'
In addition, RabbitMQ also supports the use of regular expressions to filter queues requiring mirroring operations. Examples are as follows:
rabbitmqctl set_policy ha-all "^" '{"ha-mode":"all"}'
At this time, only the queues starting with ha will be mirrored. For more information on the configuration of the image queue, please refer to the official document: Highly Available (Mirrored) Queues
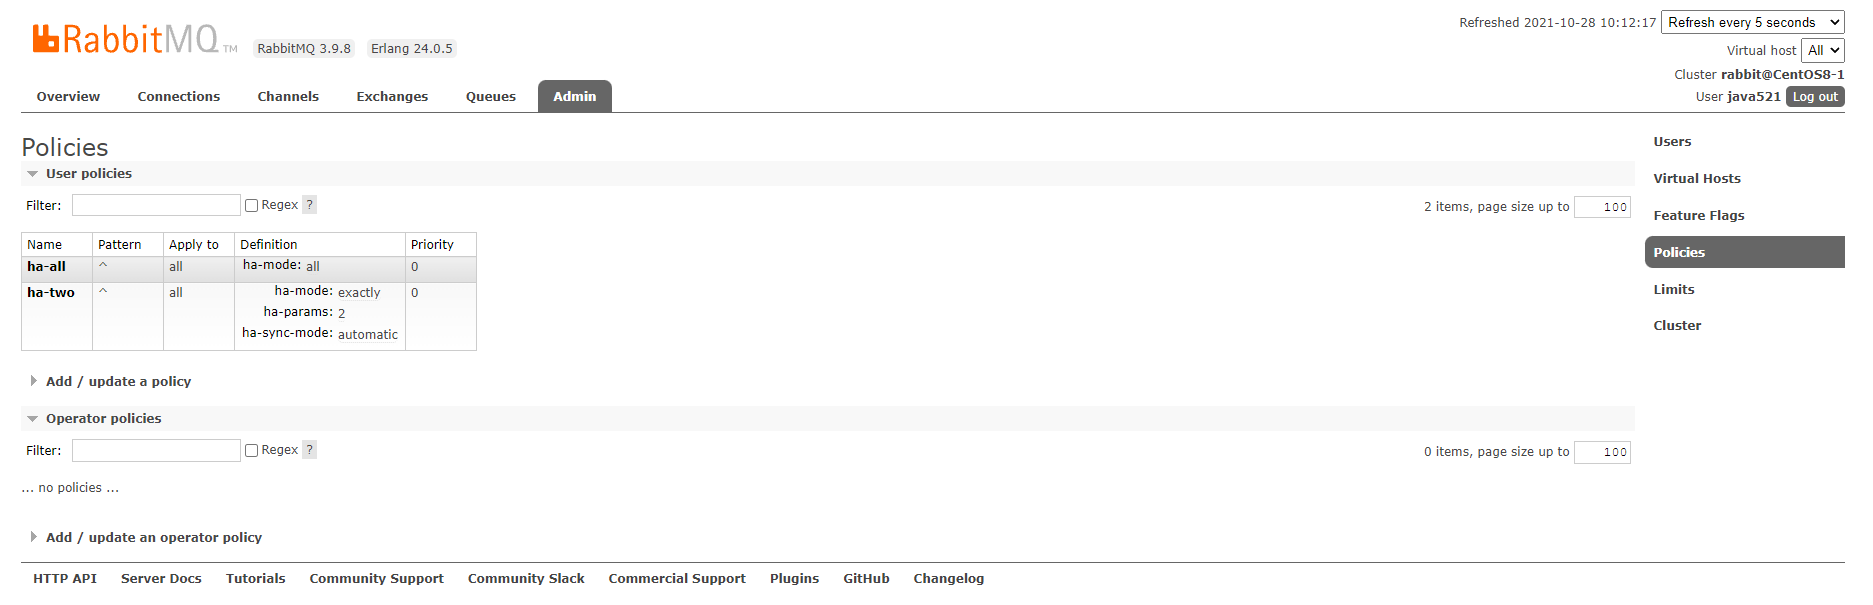
4.7.3. View image status
After configuration, you can view the image status of any queue through the Web UI interface, as shown below
4.8. Cluster shutdown and restart
There is no direct command to shut down the entire cluster, which needs to be shut down one by one. However, it is necessary to ensure that when restarting, the last closed node is started first. If the first node started is not the last node closed, the node will wait for the last node closed to start. By default, 10 connection attempts are made, with a timeout of 30 seconds. If it still does not wait, the node fails to start.
A problem with this is that in a three node cluster, the shutdown order is CentOS8-1, CentOS8-2 and CentOS8-3. If CentOS8-1 cannot be recovered due to a fault, CentOS8-2 and CentOS8-3 cannot be started at this time. To solve this problem, you can remove the CentOS8-1 node first. The command is as follows:
rabbitmqctl forget_cluster_node rabbit@CentOS8-1 --offline
At this time, you need to add the - offline parameter, which allows nodes to weed out other nodes when they are not started.
4.9. De clustering
Reset current node
# 1. Stop service
rabbitmqctl stop_app
# 2. Reset cluster status
rabbitmqctl reset
# 3. Restart the service
rabbitmqctl start_app
Rejoin the cluster
# 1. Stop service
rabbitmqctl stop_app
# 2. Reset status
rabbitmqctl reset
# 3. Node join
rabbitmqctl join_cluster rabbit@CentOS8-1
# 4. Restart the service
rabbitmqctl start_app
Recheck the RabbitMQ cluster status when finished
rabbitmqctl cluster_status
In addition to resetting the cluster at the current node, you can also kick the node out of the cluster at other normal nodes of the cluster
rabbitmqctl forget_cluster_node rabbit@CentOS8-1
4.10. Change node type
We can change the node type from RAM to Disk and vice versa. Suppose we want to reverse rabbit@CentOS8-1 and rabbit@CentOS8-2, which is converted from Disk node to ram node. To do this, we can use change_cluster_node_type command. You must first stop the node.
# 1. Stop service
rabbitmqctl stop_app
# 2. Change type ram disc
rabbitmqctl change_cluster_node_type ram
# 3. Restart the service
rabbitmqctl start_app