Previously read articles about RabbitMQ core messaging patterns are based on Java API s, and recently read the official documentation and found that these core messaging patterns can be implemented through Spring AMQP.This paper summarizes the practical techniques of RabbitMQ, including its installation on Windows and Linux, and the Spring AMQP implementation of the five core messaging modes, which are believed to be helpful for friends who want to learn and review RabbitMQ.
brief introduction
RabbitMQ is one of the most popular open source messaging middleware and is widely used worldwide.RabbitMQ is lightweight and easy to deploy and supports multiple messaging protocols.RabbitMQ can be deployed in distributed systems to meet large-scale, highly available requirements.
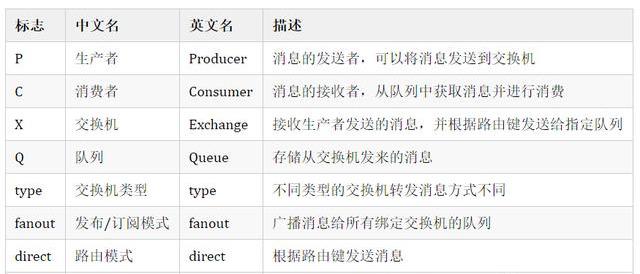
Related concepts
Let's take a look at the concepts in RabbitMQ, taking routing among the five message modes as an example.
Installation and Configuration
Next, we describe the installation and configuration of RabbitMQ, which provides both Windows and Linux installations.
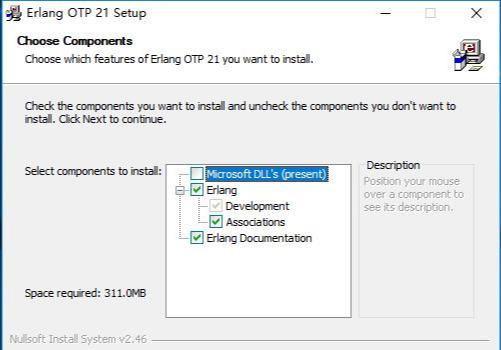
Installation under Windows
- Install Erlang, download address:http://erlang.org/download/otp_win64_21.3.exe
- Install RabbitMQ, download address:https://dl.bintray.com/rabbitmq/all/rabbitmq-server/3.7.14/rabbitmq-server-3.7.14.exe
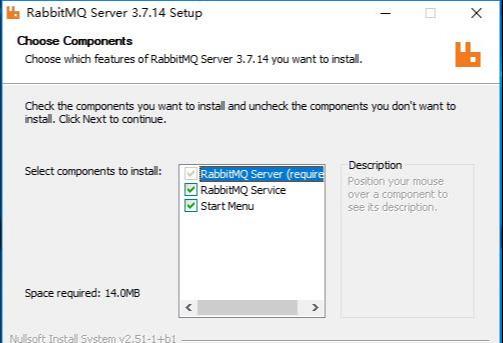
- After installation, enter the sbin directory under the RabbitMQ installation directory;
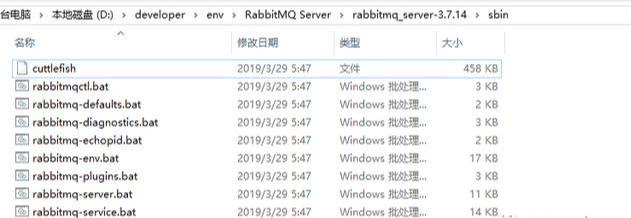
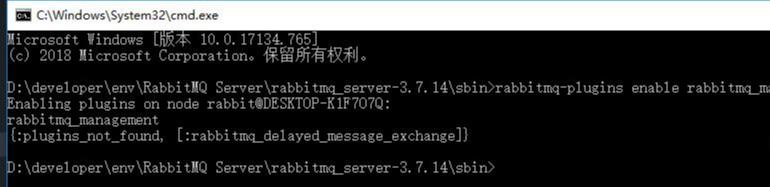
- Enter cmd in the address bar and return to start the command line, then enter the following command to start the administration function.
rabbitmq-plugins enable rabbitmq_management
Installation under Linux
- Download the Docker image of rabbitmq 3.7.15;
docker pull rabbitmq:3.7.15
- Use the Docker command to start the service;
docker run -p 5672:5672 -p 15672:15672 --name rabbitmq \
-d rabbitmq:3.7.15
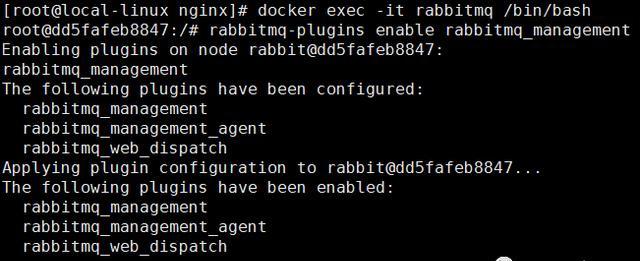
- Enter the container and turn on the management function;
docker exec -it rabbitmq /bin/bash
rabbitmq-plugins enable rabbitmq_management
- Open the firewall for easy access to the outside network.
firewall-cmd --zone=public --add-port=15672/tcp --permanent
firewall-cmd --zone=public --add-port=5672/tcp --permanent
firewall-cmd --reload
Access and Configuration
- Visit the RabbitMQ administration page address to see if the installation was successful (using server IP access under Linux):http://localhost:15672/
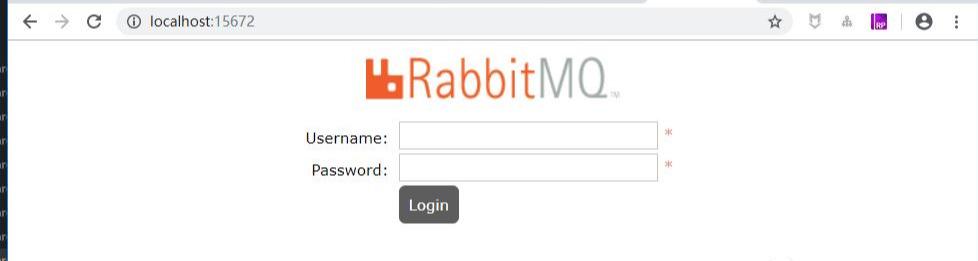
- Enter your account password and log in, using the default account password here: guest guest
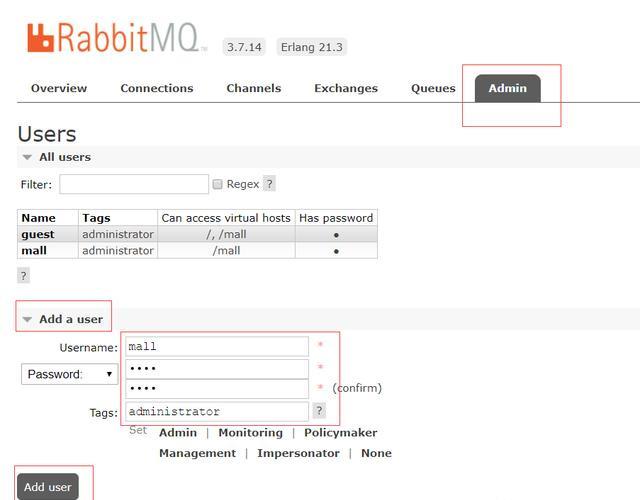
- Create an account number and set its role as administrator: mall mall
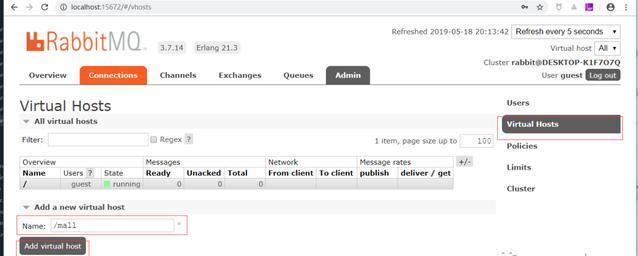
- Create a new virtual host as: /mall
- Click on the mall user to enter the user profile page;
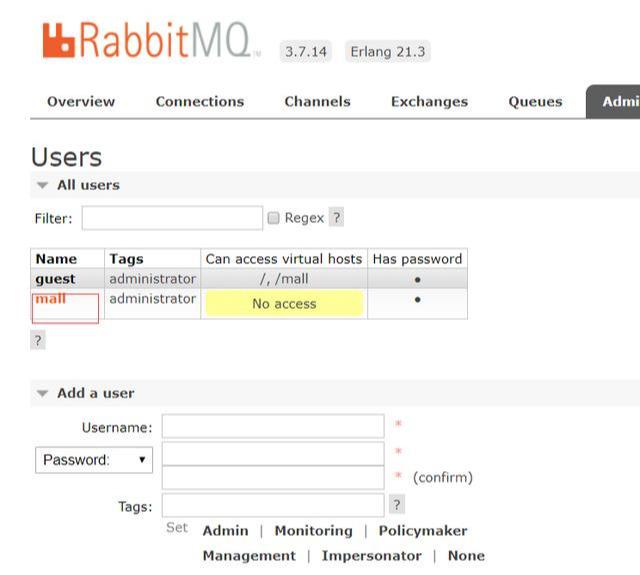
- Configure the permissions of the virtual host to the mall user;

- At this point, RabbitMQ is configured.
5 message modes
These five message modes are the basis for building RabbitMQ-based message applications, and they must be firmly understood.Friends who have studied RabbitMQ should know about the Java implementation of these messaging patterns, and here we use Spring AMQP to implement them.
Simple mode
Simple mode is the simplest messaging mode that contains a producer, a consumer, and a queue.Producers send messages to queues, consumers get messages from queues and consume them.
Schematic diagram

Spring AMQP Implementation
- First you need toPom.xmlAdd related dependencies of Spring AMQP;
<!--Spring AMQP rely on-->
<dependency>
    <groupId>org.springframework.boot</groupId>
    <artifactId>spring-boot-starter-amqp</artifactId>
</dependency>
- Then modifyApplication.yml, add the relevant configuration of RabbitMQ;
spring:
  rabbitmq:
    host: localhost
    port: 5672
    virtual-host: /mall
    username: mall
    password: mall
    publisher-confirms: true #Message sent to exchanger confirmation
    publisher-returns: true #Message sent to queue confirmation
- Add a simple mode related Java configuration and create one namedSimple.helloA queue, a producer and a consumer;
/**
 * Created by macro on 2020/5/19.
 */
@Configuration
public class SimpleRabbitConfig {

 @Bean
 public Queue hello() {
  return new Queue("simple.hello");
 }

 @Bean
 public SimpleSender simpleSender(){
  return new SimpleSender();
 }

 @Bean
 public SimpleReceiver simpleReceiver(){
  return new SimpleReceiver();
 }

}
- Producers queue via send methodSimple.helloSend messages in;
/**
 * Created by macro on 2020/5/19.
 */
public class SimpleSender {

 private static final Logger LOGGER = LoggerFactory.getLogger(SimpleSender.class);

 @Autowired
 private RabbitTemplate template;

 private static final String queueName="simple.hello";

 public void send() {
  String message = "Hello World!";
  this.template.convertAndSend(queueName, message);
  LOGGER.info(" [x] Sent '{}'", message);
 }

}
- Consumer from QueueSimple.helloGet messages in;
/**
 * Created by macro on 2020/5/19.
 */
@RabbitListener(queues = "simple.hello")
public class SimpleReceiver {

    private static final Logger LOGGER = LoggerFactory.getLogger(SimpleReceiver.class);

    @RabbitHandler
    public void receive(String in) {
        LOGGER.info(" [x] Received '{}'", in);
    }

}
- Add a test interface to the controller and call it to start sending messages.
/**
 * Created by macro on 2020/5/19.
 */
@Api(tags = "RabbitController", description = "RabbitMQ functional testing")
@Controller
@RequestMapping("/rabbit")
public class RabbitController {

    @Autowired
    private SimpleSender simpleSender;

    @ApiOperation("Simple mode")
    @RequestMapping(value = "/simple", method = RequestMethod.GET)
    @ResponseBody
    public CommonResult simpleTest() {
        for(int i=0;i<10;i++){
            simpleSender.send();
            ThreadUtil.sleep(1000);
        }
        return CommonResult.success(null);
    }
}
- The results after running are as follows, you can see that producers send messages to the queue and consumers get messages from the queue and consume them.


Working mode
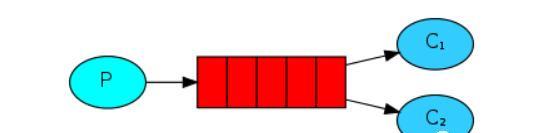
Work mode refers to the mode of sending messages to competing consumers, including one producer, two consumers and a queue.Two consumers are bound to a queue at the same time. When a consumer gets a message processing time-consuming task, the idle consumer gets and consumes the message from the queue.
Schematic diagram
Spring AMQP Implementation
- Add a Java configuration related to the working mode to create one namedWork.helloA queue of one producer and two consumers;
/**
 * Created by macro on 2020/5/19.
 */
@Configuration
public class WorkRabbitConfig {

    @Bean
    public Queue workQueue() {
        return new Queue("work.hello");
    }

    @Bean
    public WorkReceiver workReceiver1() {
        return new WorkReceiver(1);
    }

    @Bean
    public WorkReceiver workReceiver2() {
        return new WorkReceiver(2);
    }

    @Bean
    public WorkSender workSender() {
        return new WorkSender();
    }

}
- Producers queue via send methodWork.helloSends a message containing a certain number of.Signs.
/**
 * Created by macro on 2020/5/19.
 */
public class WorkSender {

    private static final Logger LOGGER = LoggerFactory.getLogger(WorkSender.class);

    @Autowired
    private RabbitTemplate template;

    private static final String queueName = "work.hello";

    public void send(int index) {
        StringBuilder builder = new StringBuilder("Hello");
        int limitIndex = index % 3+1;
        for (int i = 0; i < limitIndex; i++) {
            builder.append('.');
        }
        builder.append(index+1);
        String message = builder.toString();
        template.convertAndSend(queueName, message);
        LOGGER.info(" [x] Sent '{}'", message);
    }

}
- Two consumers from the queueWork.helloGet the message in instance 1 and instance 2, respectively. The more you include A. sign in the message, the longer it will take;
/**
 * Created by macro on 2020/5/19.
 */
@RabbitListener(queues = "work.hello")
public class WorkReceiver {

    private static final Logger LOGGER = LoggerFactory.getLogger(WorkReceiver.class);

    private final int instance;

    public WorkReceiver(int i) {
        this.instance = i;
    }

    @RabbitHandler
    public void receive(String in) {
        StopWatch watch = new StopWatch();
        watch.start();
        LOGGER.info("instance {} [x] Received '{}'", this.instance, in);
        doWork(in);
        watch.stop();
        LOGGER.info("instance {} [x] Done in {}s", this.instance, watch.getTotalTimeSeconds());
    }

    private void doWork(String in) {
        for (char ch : in.toCharArray()) {
            if (ch == '.') {
                ThreadUtil.sleep(1000);
            }
        }
    }

}
- Add a test interface to the controller and call it to start sending messages.
/**
 * Created by macro on 2020/5/19.
 */
@Api(tags = "RabbitController", description = "RabbitMQ functional testing")
@Controller
@RequestMapping("/rabbit")
public class RabbitController {

    @Autowired
    private WorkSender workSender;

    @ApiOperation("Working mode")
    @RequestMapping(value = "/work", method = RequestMethod.GET)
    @ResponseBody
    public CommonResult workTest() {
        for(int i=0;i<10;i++){
            workSender.send(i);
            ThreadUtil.sleep(1000);
        }
        return CommonResult.success(null);
    }
}
- The results are as follows, and you can see that producers send messages to the queue that contain different numbers of. numbers. Consumers of instance 1 and instance 2 compete with each other and consume part of the messages, respectively.


Publish/Subscribe Mode
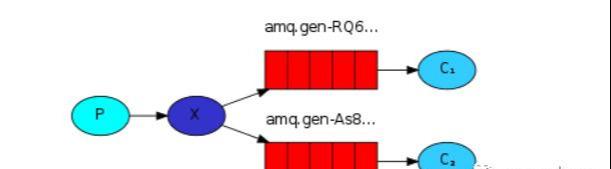
Publish/Subscribe mode refers to a mode that simultaneously sends messages to multiple consumers (similar to broadcasting), including one producer, two consumers, two queues, and one switch.Two consumers are bound to different queues at the same time, two queues are bound to switches, and producers send messages to switches, and all consumers receive and consume messages.
Schematic diagram
Spring AMQP Implementation
- Add a Java configuration related to the publish/subscribe mode to create one namedExchange.fanoutSwitches, a producer, two consumers, and two anonymous queues bind both anonymous queues to the switch;
/**
 * Created by macro on 2020/5/19.
 */
@Configuration
public class FanoutRabbitConfig {

    @Bean
    public FanoutExchange fanout() {
        return new FanoutExchange("exchange.fanout");
    }

    @Bean
    public Queue fanoutQueue1() {
        return new AnonymousQueue();
    }

    @Bean
    public Queue fanoutQueue2() {
        return new AnonymousQueue();
    }

    @Bean
    public Binding fanoutBinding1(FanoutExchange fanout, Queue fanoutQueue1) {
        return BindingBuilder.bind(fanoutQueue1).to(fanout);
    }

    @Bean
    public Binding fanoutBinding2(FanoutExchange fanout, Queue fanoutQueue2) {
        return BindingBuilder.bind(fanoutQueue2).to(fanout);
    }

    @Bean
    public FanoutReceiver fanoutReceiver() {
        return new FanoutReceiver();
    }

    @Bean
    public FanoutSender fanoutSender() {
        return new FanoutSender();
    }

}
- Producer sends switch via send methodExchange.fanoutSends a message containing a certain number of.Signs.
/**
 * Created by macro on 2020/5/19.
 */
public class FanoutSender {
    private static final Logger LOGGER = LoggerFactory.getLogger(FanoutSender.class);
    @Autowired
    private RabbitTemplate template;

    private static final String exchangeName = "exchange.fanout";

    public void send(int index) {
        StringBuilder builder = new StringBuilder("Hello");
        int limitIndex = index % 3 + 1;
        for (int i = 0; i < limitIndex; i++) {
            builder.append('.');
        }
        builder.append(index + 1);
        String message = builder.toString();
        template.convertAndSend(exchangeName, "", message);
        LOGGER.info(" [x] Sent '{}'", message);
    }

}
- A consumer gets a message from a bound anonymous queue. The more a message contains a. sign, the longer it will take. Because the consumer can get and consume messages from two queues, they can be seen as two consumers, named instance 1 and instance 2, respectively.
/**
 * Created by macro on 2020/5/19.
 */
public class FanoutReceiver {

    private static final Logger LOGGER = LoggerFactory.getLogger(FanoutReceiver.class);

    @RabbitListener(queues = "#{fanoutQueue1.name}")
    public void receive1(String in) {
        receive(in, 1);
    }

    @RabbitListener(queues = "#{fanoutQueue2.name}")
    public void receive2(String in) {
        receive(in, 2);
    }

    private void receive(String in, int receiver) {
        StopWatch watch = new StopWatch();
        watch.start();
        LOGGER.info("instance {} [x] Received '{}'", receiver, in);
        doWork(in);
        watch.stop();
        LOGGER.info("instance {} [x] Done in {}s", receiver, watch.getTotalTimeSeconds());
    }

    private void doWork(String in) {
        for (char ch : in.toCharArray()) {
            if (ch == '.') {
                ThreadUtil.sleep(1000);
            }
        }
    }

}
- Add a test interface to the controller and call it to start sending messages.
/**
 * Created by macro on 2020/5/19.
 */
@Api(tags = "RabbitController", description = "RabbitMQ functional testing")
@Controller
@RequestMapping("/rabbit")
public class RabbitController {

    @Autowired
    private FanoutSender fanoutSender;

    @ApiOperation("Release/subscription model")
    @RequestMapping(value = "/fanout", method = RequestMethod.GET)
    @ResponseBody
    public CommonResult fanoutTest() {
        for(int i=0;i<10;i++){
            fanoutSender.send(i);
            ThreadUtil.sleep(1000);
        }
        return CommonResult.success(null);
    }
}
- The results after running are as follows, you can see that producers send messages to the queue with different numbers of. numbers, instance 1 and instance 2 get and consume messages at the same time.


Routing mode
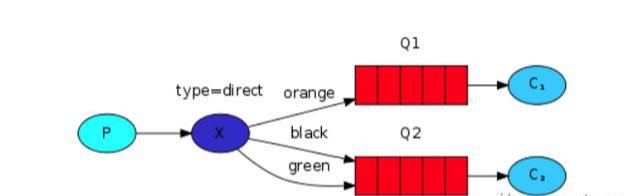
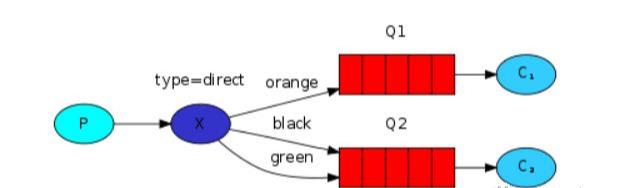
Routing mode is a mode that can selectively send messages to multiple consumers based on routing keys, including one producer, two consumers, two queues and one switch.Two consumers are bound to different queues at the same time, two queues are bound to the switch by routing keys, the producer sends messages to the switch, the switch forwards to different queues by routing keys, and the queued consumers receive and consume messages.
Schematic diagram
Spring AMQP Implementation
- Add a Java configuration related to the routing mode to create one namedExchange.directSwitches, a producer, two consumers and two anonymous queues, queues are bound to switches through routing keys, queue 1 has orange and black routing keys, and queue 2 has green and black routing keys.
/**
 * Created by macro on 2020/5/19.
 */
@Configuration
public class DirectRabbitConfig {

    @Bean
    public DirectExchange direct() {
        return new DirectExchange("exchange.direct");
    }

    @Bean
    public Queue directQueue1() {
        return new AnonymousQueue();
    }

    @Bean
    public Queue directQueue2() {
        return new AnonymousQueue();
    }

    @Bean
    public Binding directBinding1a(DirectExchange direct, Queue directQueue1) {
        return BindingBuilder.bind(directQueue1).to(direct).with("orange");
    }

    @Bean
    public Binding directBinding1b(DirectExchange direct, Queue directQueue1) {
        return BindingBuilder.bind(directQueue1).to(direct).with("black");
    }

    @Bean
    public Binding directBinding2a(DirectExchange direct, Queue directQueue2) {
        return BindingBuilder.bind(directQueue2).to(direct).with("green");
    }

    @Bean
    public Binding directBinding2b(DirectExchange direct, Queue directQueue2) {
        return BindingBuilder.bind(directQueue2).to(direct).with("black");
    }

    @Bean
    public DirectReceiver receiver() {
        return new DirectReceiver();
    }


    @Bean
    public DirectSender directSender() {
        return new DirectSender();
    }

}
- Producer sends switch via send methodExchange.directSend messages in, using different routing keys when sending, according to the routing keys will be forwarded to different queues;
/**
 * Created by macro on 2020/5/19.
 */
public class DirectSender {

 @Autowired
 private RabbitTemplate template;

 private static final String exchangeName = "exchange.direct";

 private final String[] keys = {"orange", "black", "green"};

 private static final Logger LOGGER = LoggerFactory.getLogger(DirectSender.class);

 public void send(int index) {
  StringBuilder builder = new StringBuilder("Hello to ");
  int limitIndex = index % 3;
  String key = keys[limitIndex];
  builder.append(key).append(' ');
  builder.append(index+1);
  String message = builder.toString();
  template.convertAndSend(exchangeName, key, message);
  LOGGER.info(" [x] Sent '{}'", message);
 }

}
- Consumers get messages from anonymous queues that they bind to. Since the consumer can get and consume messages from two queues, they can be seen as two consumers, named instance 1 and instance 2, respectively.
/**
 * Created by macro on 2020/5/19.
 */
public class DirectReceiver {
    private static final Logger LOGGER = LoggerFactory.getLogger(DirectReceiver.class);

    @RabbitListener(queues = "#{directQueue1.name}")
    public void receive1(String in){
        receive(in, 1);
    }

    @RabbitListener(queues = "#{directQueue2.name}")
    public void receive2(String in){
        receive(in, 2);
    }

    private void receive(String in, int receiver){
        StopWatch watch = new StopWatch();
        watch.start();
        LOGGER.info("instance {} [x] Received '{}'", receiver, in);
        doWork(in);
        watch.stop();
        LOGGER.info("instance {} [x] Done in {}s", receiver, watch.getTotalTimeSeconds());
    }

    private void doWork(String in){
        for (char ch : in.toCharArray()) {
            if (ch == '.') {
                ThreadUtil.sleep(1000);
            }
        }
    }

}
- Add a test interface to the controller and call it to start sending messages.
/**
 * Created by macro on 2020/5/19.
 */
@Api(tags = "RabbitController", description = "RabbitMQ functional testing")
@Controller
@RequestMapping("/rabbit")
public class RabbitController {

    @Autowired
    private DirectSender directSender;

    @ApiOperation("Routing mode")
    @RequestMapping(value = "/direct", method = RequestMethod.GET)
    @ResponseBody
    public CommonResult directTest() {
        for(int i=0;i<10;i++){
            directSender.send(i);
            ThreadUtil.sleep(1000);
        }
        return CommonResult.success(null);
    }
}
- The results after running are as follows, you can see that the producer sends messages to the queue that contain different routing keys, instance 1 gets orange and black messages, and instance 2 gets green and black messages.


wildcard pattern
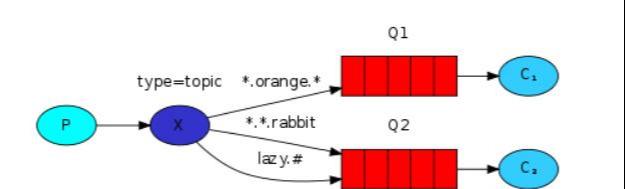
A wildcard pattern is a pattern that can selectively send messages to multiple consumers based on routing key matching rules, including one producer, two consumers, two queues, and one switch.Two consumers are bound to different queues at the same time, two queues are bound to the switch by routing key matching rules, the producer sends messages to the switch, the switch forwards to different queues by routing key matching rules, and the queued consumers receive and consume messages.
Special Matching Symbol
- *: Only one word can be matched;
- #: You can match zero or more words.
Schematic diagram
Spring AMQP Implementation
- Add a wildcard mode-related Java configuration to create one namedExchange.topicSwitch, one producer, two consumers and two anonymous queues, matching *.orange. * and *. *.rabbit sent to queue 1, matching lazy. #sent to queue 2;
/**
 * Created by macro on 2020/5/19.
 */
@Configuration
public class TopicRabbitConfig {

    @Bean
    public TopicExchange topic() {
        return new TopicExchange("exchange.topic");
    }

    @Bean
    public Queue topicQueue1() {
        return new AnonymousQueue();
    }

    @Bean
    public Queue topicQueue2() {
        return new AnonymousQueue();
    }

    @Bean
    public Binding topicBinding1a(TopicExchange topic, Queue topicQueue1) {
        return BindingBuilder.bind(topicQueue1).to(topic).with("*.orange.*");
    }

    @Bean
    public Binding topicBinding1b(TopicExchange topic, Queue topicQueue1) {
        return BindingBuilder.bind(topicQueue1).to(topic).with("*.*.rabbit");
    }

    @Bean
    public Binding topicBinding2a(TopicExchange topic, Queue topicQueue2) {
        return BindingBuilder.bind(topicQueue2).to(topic).with("lazy.#");
    }

    @Bean
    public TopicReceiver topicReceiver() {
        return new TopicReceiver();
    }

    @Bean
    public TopicSender topicSender() {
        return new TopicSender();
    }

}
- Producer sends switch via send methodExchange.topicSends a message with different routing keys.
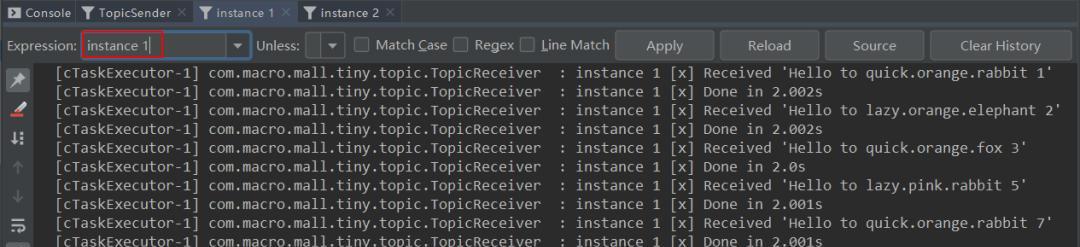
/**
 * Created by macro on 2020/5/19.
 */
public class TopicSender {

 @Autowired
 private RabbitTemplate template;

 private static final String exchangeName = "exchange.topic";

 private static final Logger LOGGER = LoggerFactory.getLogger(TopicSender.class);


 private final String[] keys = {"quick.orange.rabbit", "lazy.orange.elephant", "quick.orange.fox",
   "lazy.brown.fox", "lazy.pink.rabbit", "quick.brown.fox"};

 public void send(int index) {
  StringBuilder builder = new StringBuilder("Hello to ");
  int limitIndex = index%keys.length;
  String key = keys[limitIndex];
  builder.append(key).append(' ');
  builder.append(index+1);
  String message = builder.toString();
  template.convertAndSend(exchangeName, key, message);
  LOGGER.info(" [x] Sent '{}'",message);
  System.out.println(" [x] Sent '" + message + "'");
 }

}
- Consumers get messages from anonymous queues that they bind to. Since the consumer can get and consume messages from two queues, they can be seen as two consumers, named instance 1 and instance 2, respectively.
/**
 * Created by macro on 2020/5/19.
 */
public class TopicReceiver {

 private static final Logger LOGGER = LoggerFactory.getLogger(TopicReceiver.class);

 @RabbitListener(queues = "#{topicQueue1.name}")
 public void receive1(String in){
  receive(in, 1);
 }

 @RabbitListener(queues = "#{topicQueue2.name}")
 public void receive2(String in){
  receive(in, 2);
 }

 public void receive(String in, int receiver){
  StopWatch watch = new StopWatch();
  watch.start();
  LOGGER.info("instance {} [x] Received '{}'", receiver, in);
  doWork(in);
  watch.stop();
  LOGGER.info("instance {} [x] Done in {}s", receiver, watch.getTotalTimeSeconds());
 }

 private void doWork(String in){
  for (char ch : in.toCharArray()) {
   if (ch == '.') {
    ThreadUtil.sleep(1000);
   }
  }
 }

}
- Add a test interface to the controller and call it to start sending messages.
/**
 * Created by macro on 2020/5/19.
 */
@Api(tags = "RabbitController", description = "RabbitMQ functional testing")
@Controller
@RequestMapping("/rabbit")
public class RabbitController {

    @Autowired
    private TopicSender topicSender;

    @ApiOperation("wildcard pattern")
    @RequestMapping(value = "/topic", method = RequestMethod.GET)
    @ResponseBody
    public CommonResult topicTest() {
        for(int i=0;i<10;i++){
            topicSender.send(i);
            ThreadUtil.sleep(1000);
        }
        return CommonResult.success(null);
    }
}
- The results after running are as follows, you can see that the producer sends messages to the queue that contain different routing keys, and instance1 and instance 2 get matching messages, respectively.