Learning objectives:
(1) Will use the basic structure of the form to make the form page
(2) Will use various form elements to implement the registration page
(3) Be able to understand the difference between post and get submission methods
1.1 purpose of the form
(1) User registration
(2) Collect information
(3) Information feedback - Questionnaire
(4) Search engine
1.2 form labels
1.2.1 < form >< /form >
< form > < / form >: a form label under which all form controls must be placed
| attribute | meaning |
|---|---|
| action | Address of the remote server where the form data is submitted (URL of the server) |
| method | The submission method of form data is generally POST (relatively safe) or GET |
Features of get and post submission methods:
① get: information exposure. The length cannot exceed 255 bytes, but the speed is fast.
② post: information hiding, unlimited length, but slow.
Format:
<form action="URL" method="GET/POST"></form>
1.2.2 < input >
1.2.2.1 common type attributes
(1) type = "text", single line input text box
The format is:
<input type="text" value="Enter the default value for the element" size="Width of text area" placeholder="Prompt text when no information is entered">
When the value attribute and placeholder attribute appear at the same time, the text box displays only the value of the value attribute.
For example, when using the value attribute to define the default value, the value after the value attribute appears in the text box. This value can be modified:
<input type="text" value="Orange cat is not fat" size="30">

When using the placeholder attribute, the value after the placeholder attribute appears in the text box, but unlike the value attribute, this value cannot be modified. When entering information in the text box, this prompt disappears:
<input type="text" placeholder="Please enter your name" size="30">

If two attributes are set here at the same time, only the value of the value attribute will be displayed:
<input type="text" placeholder="Please enter your name" size="30" value="Orange cat is not fat">

(2) type = "password", password box
The format is:
<input type="password" value="Initial password value" size="Password area width">
The password in the password box will be displayed as a small dot to protect the password:
<input type="password" value="123456" size="15">

(3) type = "radio", radio button
The format is:
<input type="radio" value="Initial value" name="The name of the control" checked>
When checked appears, the button is selected by default
<input type="radio" value="male" checked>male

<input type="radio" value="male">male

Example: set male and female radio buttons:
        <input type="radio" name="sex" id="s1" checked>
        <label for="s1">male</label>
        <input type="radio" name="sex" id="s2">
        <label for="s2">female</label>

In this example, the label label is used to bind the button to "male" and "female", so as to achieve the effect of clicking "male" or "female", and the front button will also be selected. By setting the same name and different id of the two buttons, you can only choose one of the two buttons. Bind the radio button to the text: the id attribute value of radio and the for attribute value of label must be consistent.
(4) type = "checkbox", check box
The format is:
<input type="checkbox" name="Name of the check box" value="Check box value" checked>
Like radio buttons, checked indicates that it is selected by default
<input type="checkbox" name="hobby" value="swim" checked>Swimming

(5) type = "reset", reset button
The format is:
<input type="reset" name="Name of the button" value="Text displayed on the button">
If there is no value attribute, the button displays "reset" by default (only effective in < form > < / form >)
<input type="reset" name="Name of the button" value="Refill">

(6) type = "submit", submit button, submit the form data to the URL specified in the action
The format is:
<input type="submit" name="Name of the button" value="Text displayed on the button">
Unlike the reset button, when there is no value attribute, there is no default text on the button
<input type="submit" name="Name of the button" value="Submit">

(7) type = "number", number input box
The format is:
<input type="number" max="Digital maximum" min="Digital minimum">
After setting the maximum and minimum values, you cannot set values outside the range in the input box
<input type="number" max="2" min="1">

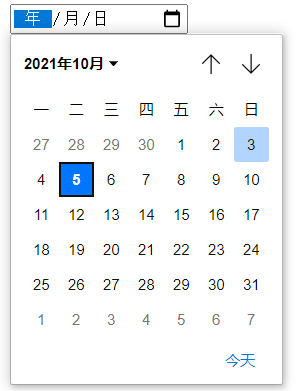
(8) type = "date", date selection box
<input type="date">
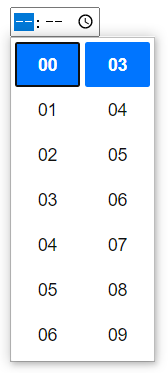
(9) type = "time", time selection box
<input type="time">
(10) type = "hidden", hide control
(11) type = "image", picture button
<input type="image" src="Picture location">

(12) type = "file", browse files
<input type="file">

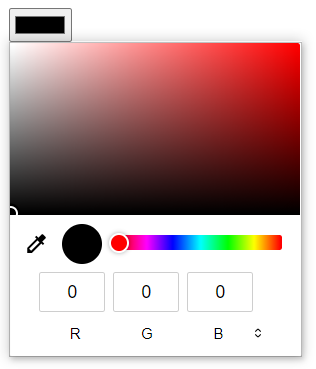
(13) type = "color", select a color
<input type="color">
1.2.2.2 other attributes
| attribute | meaning |
|---|---|
| disabled | Indicates whether input is available (grayed out) |
| readonly | Indicates that the value of input is read-only |
| required | Indicates that input is required |
| maxlength | Indicates the maximum length of input |
| tabIndex | Set tab order of form controls |
| title | Set the prompt text when the mouse passes |
1.2.3 < select >< /select >
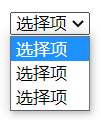
< Select > < / Select > tag: a drop-down list control, used with < option > < / option >
The format is:
    <Select>
        <option>Select item</option>
        <option>Select item</option>
        <option>Select item</option>
    </Select>
1.2.4 < textarea >
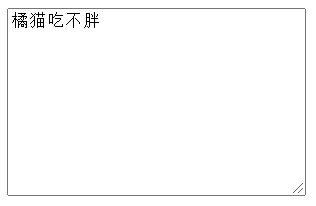
< textarea > label: a text area where you can enter multiple rows and columns of data
The format is:
<textarea cols="Number of columns" rows="Number of rows">content</textarea>
When designing a form, you can use it in the notes area
<textarea cols="30" rows="10">Orange cat is not fat</textarea>
1.2.5 < button >
< button >: button control
The format is:
<button type='Type of button'>Text on button</button>
Value of type attribute:
| Attribute value | meaning |
|---|---|
| button | Normal button, without default action |
| reset | Reset button to reset the form control |
| submit | Submit button to submit the value of the form control to the remote server |
        <button type="button">Normal button</button>
        <button type="reset">Reset</button>
        <button type="submit">Submit</button>

1.2.6 < label >< /label >
< label > < / label > tag: used to display text. This tag can be bound to a form element to expand the area where you can click and other events accordingly
1.3 emphasis
(1) All form controls (labels) can have id attribute, and the attribute value of id cannot be repeated.
(2) All form controls have a value attribute, and the value of the value attribute will be submitted to the remote server.
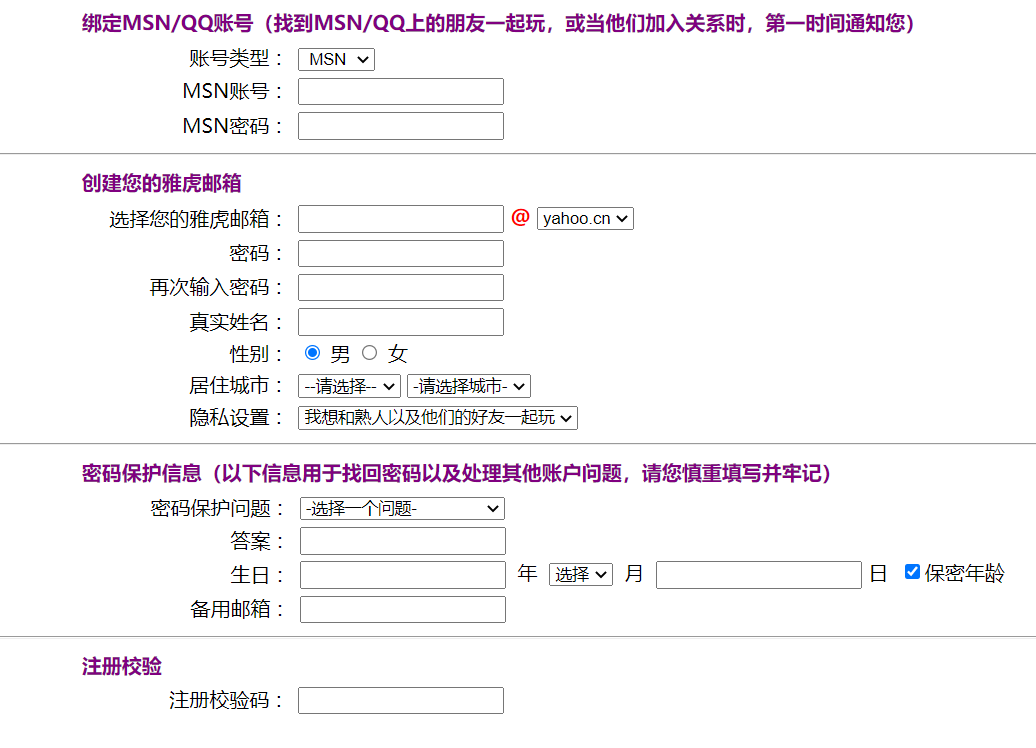
1.4 example description
Making forms with forms and form labels
<!DOCTYPE html>
<html lang="en">
<head>
<meta charset="UTF-8">
<meta http-equiv="X-UA-Compatible" content="IE=edge">
<meta name="viewport" content="width=device-width, initial-scale=1.0">
<title>Form exercise</title>
</head>
<body>
<!--Start making forms-->
<form>
<!-- Make part I -->
<table>
<!-- First line binding MSN/QQ account number -->
<tr>
<!-- Move the first line of text back a distance -->
<td width="80"></td>
<!-- Purple three point text aligns to the left of the cell -->
<th align="left">
<font color="purple" size="3">binding MSN/QQ Account number (found) MSN/QQ Play with friends on, or notify you as soon as they join the relationship)</font>
</th>
</tr>
<!-- Account type in the second line MSN account number MSN password -->
<tr>
<!-- Nesting a table layout -->
<table>
<!-- Account type in the first line -->
<tr>
<!-- Align empty cells in front -->
<td width="130"></td>
<!-- Cell width 100 text right justified -->
<td width="100" align="right">account type</td>
<!-- colon -->
<td width="1">: </td>
<td>
<label>
<!-- Select account type<select></select>label -->
<select>
<option> MSN </option>
<option> QQ </option>
</select>
</label>
</td>
</tr>
<!-- Second line MSN account number -->
<tr>
<td width="130"></td>
<td width="100" align="right">MSN account number</td>
<td width="1">: </td>
<td>
<!-- Text input box -->
<input type="text">
</td>
</tr>
<!-- Third line MSN password -->
<tr>
<td width="130"></td>
<td width="100" align="right">MSN password</td>
<td width="1">: </td>
<td>
<!-- Password input box -->
<input type="password">
</td>
</tr>
</table>
</tr>
</table>
<!-- Split line -->
<hr>
<!-- Make part II -->
<table>
<!-- The first line creates your Yahoo mailbox -->
<tr>
<td width="80"></td>
<th align="left">
<font color="purple" size="3">Create your Yahoo Mail</font>
</th>
</tr>
<!-- On the second line, select your Yahoo email, etc -->
<tr>
<!-- Layout with table -->
<table>
<!-- Select your Yahoo email in the first line -->
<tr>
<td width="90"></td>
<td width="140" align="right">Select your Yahoo Mail</td>
<td>: </td>
<td>
<input type="text">
<!-- b Label bold@number -->
<font color="red" size="3"><b>@</b></font>
<select>
<option>yahoo.cn</option>
</select>
</td>
</tr>
<!-- Second line password -->
<tr>
<td width="90"></td>
<td width="140" align="right">password</td>
<td width="1">: </td>
<td><input type="password"></td>
</tr>
<!-- On the third line, enter the password again -->
<tr>
<td width="90"></td>
<td width="140" align="right">Enter the password again</td>
<td width="1">: </td>
<td><input type="password"></td>
</tr>
<!-- Line 4 real name -->
<tr>
<td width="90"></td>
<td width="140" align="right">Real name</td>
<td width="1">: </td>
<td><input type="text"></td>
</tr>
<!-- Line 5 gender -->
<tr>
<td width="90"></td>
<td width="140" align="right">Gender</td>
<td width="1">: </td>
<td>
<input type="radio" name="sex" id="s1" checked>
<label for="s1">male</label>
<input type="radio" name="sex" id="s2">
<label for="s2">female</label>
</td>
</tr>
<!-- Line 6 city of residence -->
<tr>
<td width="90"></td>
<td width="140" align="right">Residential city</td>
<td width="1">: </td>
<td>
<select>
<option>--Please select--</option>
</select>
<select>
<option>-Please select a city-</option>
</select>
</td>
</tr>
<!-- Line 7 privacy settings -->
<tr>
<td width="90"></td>
<td width="140" align="right">Privacy settings</td>
<td width="1">: </td>
<td>
<select>
<option>I want to play with acquaintances and their friends</option>
</select>
</td>
</tr>
</table>
</tr>
</table>
<hr>
<!-- Part III password protected information -->
<table>
<!-- First line password protected message text -->
<tr>
<td width="80"></td>
<th align="left">
<font color="purple" size="3">Password protection information (the following information is used to retrieve the password and deal with other account problems. Please fill in it carefully and keep it in mind)</font>
</th>
</tr>
<!-- The second line is password protection -->
<tr>
<table>
<!-- The first line is password protection -->
<tr>
<td width="135"></td>
<td wodth="100" align="right">Password protection issues</td>
<td width="1">: </td>
<td>
<select>
<option>-Select a question- </option>
</select>
</td>
</tr>
<!-- Second line answer -->
<tr>
<td width="135"></td>
<td wodth="100" align="right">answer</td>
<td width="1">: </td>
<td>
<input type="text">
</td>
</tr>
<!-- Third line birthday -->
<tr>
<td width="135"></td>
<td wodth="100" align="right">birthday</td>
<td width="1">: </td>
<td>
<input type="text"> year
<select>
<option checked>choice</option>
</select>
month
<input type="text"> day
<input type="checkbox" checked>Confidential age
</td>
</tr>
<tr>
<td width="135"></td>
<td wodth="100" align="right">Alternate mailbox</td>
<td width="1">: </td>
<td>
<input type="text">
</td>
</tr>
</table>
</tr>
</table>
<hr>
<table>
<tr>
<td width="80"></td>
<th align="left">
<font color="purple" size="3">Registration verification</font>
</th>
</tr>
<table>
<tr>
<td width="150"></td>
<td wodth="100" align="right">Registration check code</td>
<td width="1">: </td>
<td>
<input type="text">
</td>
</tr>
</table>
</table>
</form>
</body>
</html>
