Mobile web effects
Touch Event
The mobile terminal browser has good compatibility. It does not need to consider the compatibility of previous JS. You can safely use the native JS writing effect, but the mobile terminal also has its own unique features. For example, touch (also known as touch event), Android and IOS have both.
The touch object represents a touch point. The touch point may be a finger or a stylus. Touch screen events can respond to the user's finger (or stylus) operation on the screen or touchpad.
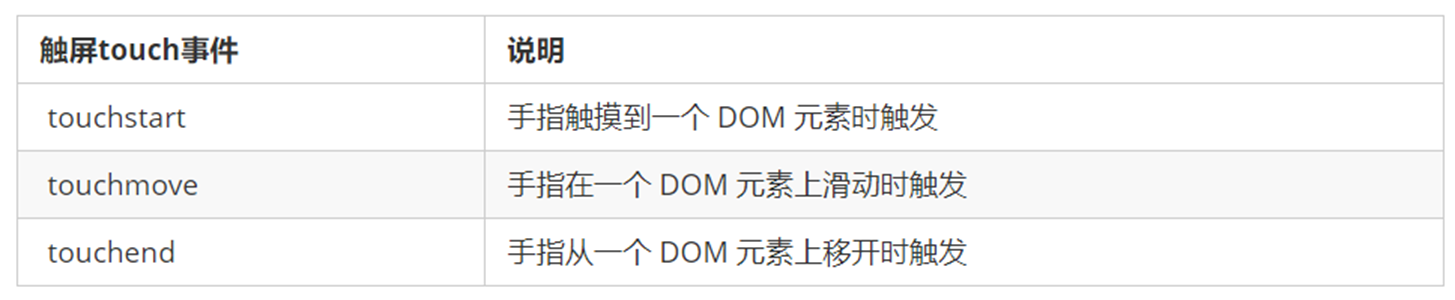
Common touch screen events:
Touch event object (TouchEvent)
TouchEvent is a kind of event that describes the state change of fingers on the touch plane (touch screen, touch pad, etc.). Such events are used to describe one or more contacts, so that developers can detect the movement of contacts, the increase and decrease of contacts, and so on
touchstart, touchmove, and touchend all have event objects.
Touch event object common object list:
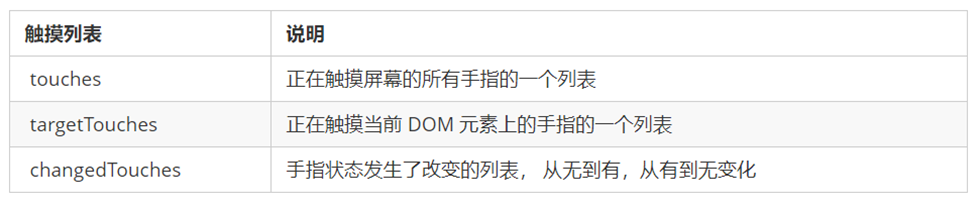
Because touch events are usually registered for elements, it is important to remember targetTocuhes
JS code implementation of drag element at mobile end:
// (1) Touch element touchstart: obtain the initial coordinates of the finger and the original position of the box at the same time
// (2) Move the finger touchmove: calculate the sliding distance of the finger and move the box
// (3) Leave finger touchend:
var div = document.querySelector('div');
var startX = 0; //Get the initial coordinates of the finger
var startY = 0;
var x = 0; //Get the original position of the box
var y = 0;
div.addEventListener('touchstart', function(e) {
    //  Get the initial coordinates of the finger
    startX = e.targetTouches[0].pageX;
    startY = e.targetTouches[0].pageY;
    x = this.offsetLeft;
    y = this.offsetTop;
});

div.addEventListener('touchmove', function(e) {
    //  Calculate the moving distance of the finger: subtract the initial coordinates of the finger from the coordinates after the finger moves
    var moveX = e.targetTouches[0].pageX - startX;
    var moveY = e.targetTouches[0].pageY - startY;
    // Move our box the original position of the box + the distance the finger moves
    this.style.left = x + moveX + 'px';
    this.style.top = y + moveY + 'px';
    e.preventDefault(); // Default behavior to prevent screen scrolling
});
classList property
The classList attribute is a new attribute in HTML5. Returns the class name of the element, which is used to add, remove and switch CSS classes in the element
<style>
        .bg {
            background-color: black;
        }
</style>

<body>
    <div class="one two"></div>
    <button> Switch light</button>
    <script>
        // classList returns the class name of the element
        var div = document.querySelector('div');
        // console.log(div.classList[1]);
        // 1. Adding a class name is to add a class name after it. It will not overwrite the previous class name. Note that it is not necessary to add a class name before it
        div.classList.add('three');
        // 2. Delete class name
        div.classList.remove('one');
        // 3. Switching class
        var btn = document.querySelector('button');
        btn.addEventListener('click', function() {
            document.body.classList.toggle('bg');
        })
    </script>
</body>
Common development plug-ins
The mobile terminal requires rapid development, so it often helps to complete the operation with the help of some plug-ins
js plug-in is a js file. It is written according to certain specifications, which is convenient for the program to show the effect, has specific functions and easy to call. Such as rotation chart and waterfall flow plug-in
Use of plug-ins:
- Import js plug-in file
- Use according to the specified syntax
Features: it generally exists specially to solve a certain problem. Its function is single and relatively small. For example, common plug-ins on the mobile end: iscoll, Swiper and SuperSlider
PC side web page effects
Offset series offset
Offset is translated as offset. The position (offset) and size of the element can be dynamically obtained by using the offset series related attributes.
- Gets the position of the element from the parent element with positioning
- Gets the size (width, height) of the element itself
- Note: all returned values do not have units
Common attributes:
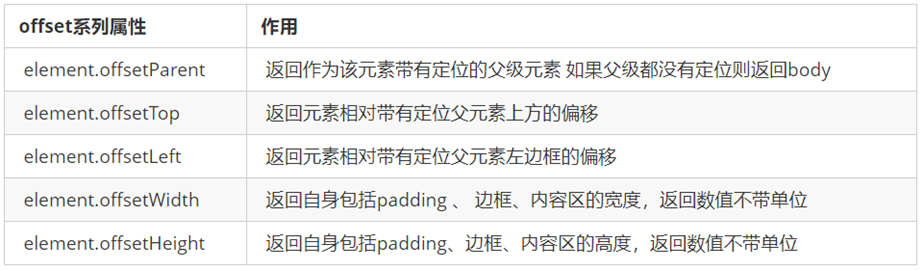
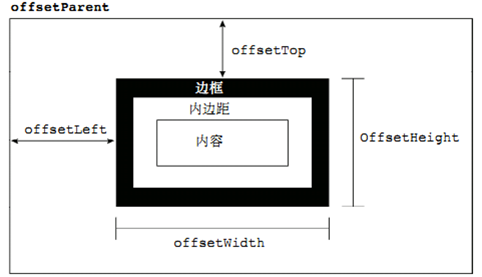
Illustration:
Difference between offset and style:
| offset | style |
|---|---|
| You can get the style values in any style sheet | Only the style values in the in row style sheet can be obtained |
| The values obtained by the offset series have no units | style.width gets a string with units |
| offsetWidth includes padding+border+width | style.width gets a value that does not contain padding and border |
| offsetWidth and other properties are read-only properties, which can only be obtained and cannot be assigned | style.width is a read-write attribute, which can be obtained or assigned |
| Get the size and position of the element. offset is more appropriate | If you want to change the value of the element, you need to change it with style |
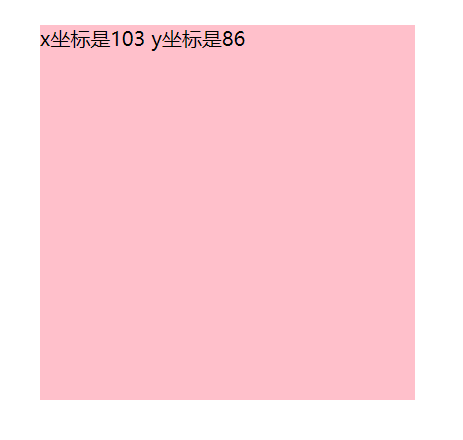
Case - obtain the coordinates of the mouse in the box:
Effect display:
Implementation code (JS):
// Click in the box to get the distance from the mouse to the left and right of the box.
// First, get the coordinates of the mouse in the page (e.pageX, e.pageY)
// Secondly, get the distance of the box in the page (box.offsetLeft, box.offsetTop)
// Subtract the distance of the box in the page from the coordinates of the mouse from the page to obtain the coordinates of the mouse in the box
var box = document.querySelector('.box');
box.addEventListener('mousemove', function(e) {
	// console.log(e.pageX);
	// console.log(e.pageY);
	// console.log(box.offsetLeft);
	var x = e.pageX - this.offsetLeft;
	var y = e.pageY - this.offsetTop;
	this.innerHTML = 'x The coordinates are' + x + ' y The coordinates are' + y;
})
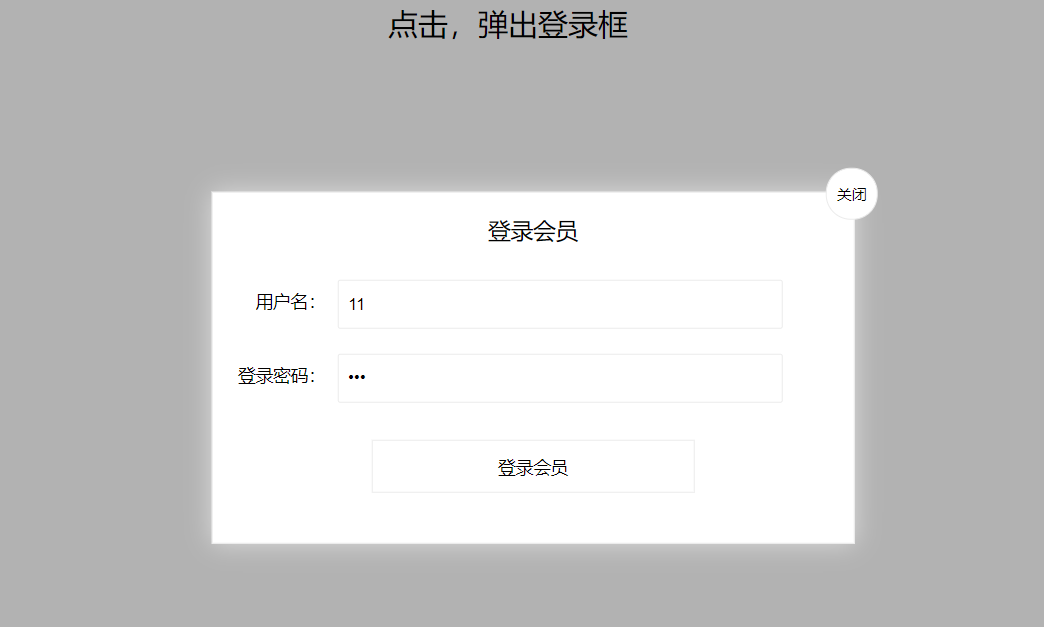
Case - modal drag box:
- Click the pop-up layer, the modal box will pop up, and the gray translucent occlusion layer will be displayed.
- Click the close button to close the modal box and close the gray translucent occlusion layer at the same time.
- Place the mouse on the top row of the modal box, and press and hold the mouse to drag the modal box to move in the page.
- Release the mouse to stop dragging the modal box.
Effect display:
Implementation code:
<head lang="en">
    <meta charset="UTF-8">
    <title></title>
    <style>
        .login-header {
            width: 100%;
            text-align: center;
            height: 30px;
            font-size: 24px;
            line-height: 30px;
        }

        ul,li,ol,dl,dt,dd,div,p,span,h1,h2,h3,h4,h5,h6,a {
            padding: 0px;
            margin: 0px;
        }

        .login {
            display: none;
            width: 512px;
            height: 280px;
            position: fixed;
            border: #ebebeb solid 1px;
            left: 50%;
            top: 50%;
            background: #ffffff;
            box-shadow: 0px 0px 20px #ddd;
            z-index: 9999;
            transform: translate(-50%, -50%);
        }

        .login-title {
            width: 100%;
            margin: 10px 0px 0px 0px;
            text-align: center;
            line-height: 40px;
            height: 40px;
            font-size: 18px;
            position: relative;
            cursor: move;
        }

        .login-input-content {
            margin-top: 20px;
        }

        .login-button {
            width: 50%;
            margin: 30px auto 0px auto;
            line-height: 40px;
            font-size: 14px;
            border: #ebebeb 1px solid;
            text-align: center;
        }

        .login-bg {
            display: none;
            width: 100%;
            height: 100%;
            position: fixed;
            top: 0px;
            left: 0px;
            background: rgba(0, 0, 0, .3);
        }

        a {
            text-decoration: none;
            color: #000000;
        }

        .login-button a {
            display: block;
        }

        .login-input input.list-input {
            float: left;
            line-height: 35px;
            height: 35px;
            width: 350px;
            border: #ebebeb 1px solid;
            text-indent: 5px;
        }

        .login-input {
            overflow: hidden;
            margin: 0px 0px 20px 0px;
        }

        .login-input label {
            float: left;
            width: 90px;
            padding-right: 10px;
            text-align: right;
            line-height: 35px;
            height: 35px;
            font-size: 14px;
        }

        .login-title span {
            position: absolute;
            font-size: 12px;
            right: -20px;
            top: -30px;
            background: #ffffff;
            border: #ebebeb solid 1px;
            width: 40px;
            height: 40px;
            border-radius: 20px;
        }
    </style>
</head>

<body>
    <div class="login-header"><a id="link" href="javascript:;">Click to pop up the login box</a></div>
    <div id="login" class="login">
        <div id="title" class="login-title">Login member
            <span><a id="closeBtn" href="javascript:void(0);" class="close-login">close</a></span>
        </div>
        <div class="login-input-content">
            <div class="login-input">
                <label>user name:</label>
                <input type="text" placeholder="enter one user name" name="info[username]" id="username" class="list-input">
            </div>
            <div class="login-input">
                <label>Login password:</label>
                <input type="password" placeholder="Please enter the login password" name="info[password]" id="password" class="list-input">
            </div>
        </div>
        <div id="loginBtn" class="login-button"><a href="javascript:void(0);" id="login-button-submit">Login member</a></div>
    </div>
    <!-- Covering layer -->
    <div id="bg" class="login-bg"></div>
    <script>
        // 1. Get element
        var login = document.querySelector('.login');
        var mask = document.querySelector('.login-bg');
        var link = document.querySelector('#link');
        var closeBtn = document.querySelector('#closeBtn');
        var title = document.querySelector('#title');
        // 2. Click the pop-up layer link to display the mask and login
        link.addEventListener('click', function() {
                mask.style.display = 'block';
                login.style.display = 'block';
            })
        // 3. Click closeBtn to hide mask and login
        closeBtn.addEventListener('click', function() {
                mask.style.display = 'none';
                login.style.display = 'none';
            })
        // 4. Start dragging
        // (1) When we press the mouse, we get the coordinates of the mouse in the box
        title.addEventListener('mousedown', function(e) {
            var x = e.pageX - login.offsetLeft;
            var y = e.pageY - login.offsetTop;
            // (2) When the mouse moves, subtract the coordinates of the mouse in the page from the coordinates of the mouse in the box to obtain the left and top values of the modal box
            document.addEventListener('mousemove', move)

            function move(e) {
                login.style.left = e.pageX - x + 'px';
                login.style.top = e.pageY - y + 'px';
            }
            // (3) When the mouse pops up, the mouse movement event is removed
            document.addEventListener('mouseup', function() {
                document.removeEventListener('mousemove', move);
            })
        })
    </script>
</body>
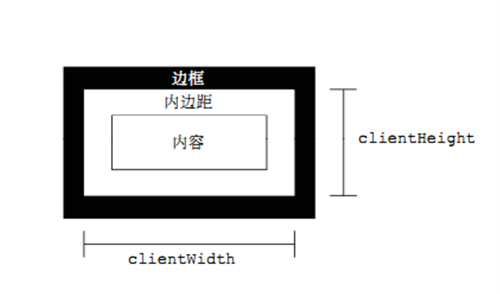
Viewable area series client
Client is translated as a client. It uses the relevant attributes of the client series to obtain the relevant information of the element visual area. The border size and element size of the element can be dynamically obtained through the relevant attributes of the client series.
Common attributes:
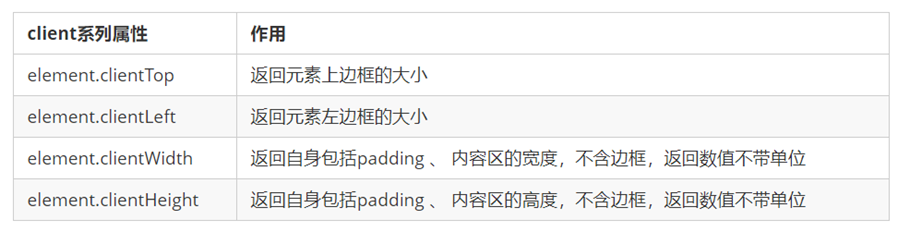
The biggest difference between client and offset is that it does not contain a border
Illustration:
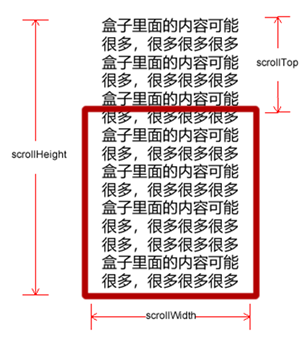
scroll series
Scroll translates to scrolling. Using the relevant attributes of the scroll series, you can dynamically get the size and scrolling distance of the element.
Common attributes:
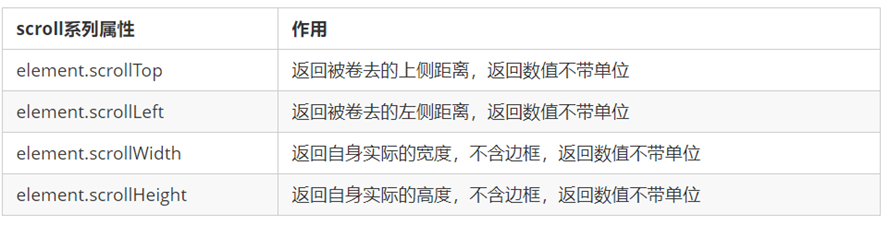
Illustration:
Scroll bar:
- If the height (or width) of the browser is not enough to display the whole page, the scroll bar will appear automatically.
- When the scroll bar scrolls down, the height hidden above the page is called the head of the page.
- The onscroll event is triggered when the scroll bar scrolls.
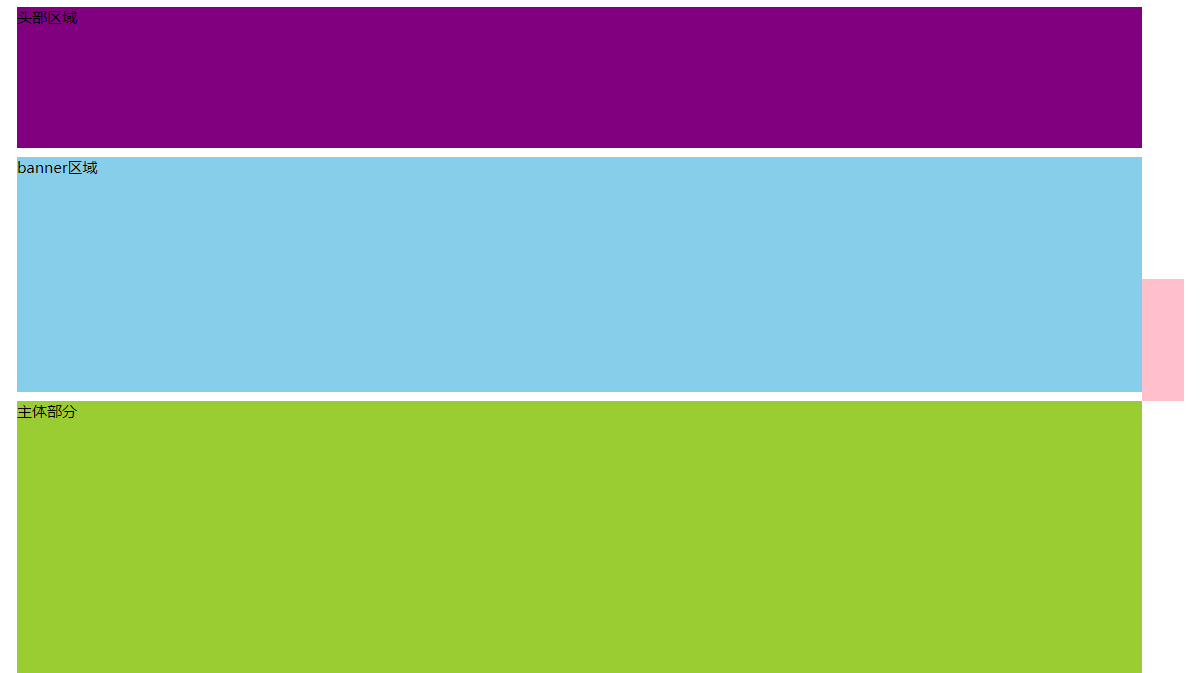
Case - fixed right sidebar:
- The original sidebar was absolute positioning
- When the page scrolls to a certain position, the sidebar changes to fixed positioning
- If the page continues to scroll, it will return to the top
Effect display:
Implementation code:
<head>
    <meta charset="UTF-8">
    <meta name="viewport" content="width=device-width, initial-scale=1.0">
    <meta http-equiv="X-UA-Compatible" content="ie=edge">
    <title>Document</title>
    <style>
        .slider-bar {
            position: absolute;
            left: 50%;
            top: 300px;
            margin-left: 600px;
            width: 45px;
            height: 130px;
            background-color: pink;
        }

        .w {
            width: 1200px;
            margin: 10px auto;
        }

        .header {
            height: 150px;
            background-color: purple;
        }

        .banner {
            height: 250px;
            background-color: skyblue;
        }

        .main {
            height: 1000px;
            background-color: yellowgreen;
        }

        span {
            display: none;
            position: absolute;
            bottom: 0;
        }
    </style>
</head>

<body>
    <div class="slider-bar">
        <span class="goBack">Back to top</span>
    </div>
    <div class="header w">Head area</div>
    <div class="banner w">banner region</div>
    <div class="main w">Main part</div>
    <script>
        //1. Get element
        var sliderbar = document.querySelector('.slider-bar');
        var banner = document.querySelector('.banner');
        // banner.offestTop is the size of the rolled head, which must be written outside the scroll
        var bannerTop = banner.offsetTop
        // The value that should change when the sidebar is fixed and positioned
        var sliderbarTop = sliderbar.offsetTop - bannerTop;
        // Get main body element
        var main = document.querySelector('.main');
        var goBack = document.querySelector('.goBack');
        var mainTop = main.offsetTop;
        // 2. Page scrolling event scroll
        document.addEventListener('scroll', function() {
            // The header of the window.pageYOffset page is rolled out
            // console.log(window.pageYOffset);
            // 3. When the header of the page is greater than or equal to 172, the sidebar should be changed to fixed positioning
            if (window.pageYOffset >= bannerTop) {
                sliderbar.style.position = 'fixed';
                sliderbar.style.top = sliderbarTop + 'px';
            } else {
                sliderbar.style.position = 'absolute';
                sliderbar.style.top = '300px';
            }
            // 4. When our page scrolls to the main box, the goback module is displayed
            if (window.pageYOffset >= mainTop) {
                goBack.style.display = 'block';
            } else {
                goBack.style.display = 'none';
            }
        })
    </script>
</body>
The three series have different functions:

Their main usage:
| series | effect | attribute |
|---|---|---|
| offset | Used to get the element position | offsetLeft offsetTop |
| client | Used to get the element size | clientWidth clientHeight |
| scroll | Used to obtain the rolling distance | scrollTop scrollLeft |
Note: the page scrolling distance is obtained through window.pageXOffset
Animation principle
Core principle: continuously move the box position through the timer setInterval()
Implementation steps:
- Get the current position of the box
- Add 1 movement distance to the current position of the box
- Repeat this operation with a timer
- Add a condition to end the timer
- Note that this element needs to add positioning to use element.style.left
Simple animation function encapsulation:
// Simple animation function encapsulates obj target object target position
function animate(obj, target) {
    var timer = setInterval(function() {
        if (obj.offsetLeft >= target) {
            // Stopping animation is essentially stopping the timer
            clearInterval(timer);
        }
        //Move 1px to the right evenly at a time
        obj.style.left = obj.offsetLeft + 1 + 'px';

    }, 30);
}
Principle of retarding effect:
Slow motion animation is to change the movement speed of elements. The most common is to stop the speed slowly
- Let the distance of each movement of the box slowly decrease, and the speed will slowly fall down.
- Core algorithm: (target value - current position) / 10 as the distance step of each movement
- The condition for stopping is to stop the timer when the current box position is equal to the target position
- Note that the step value needs to be rounded
// Jog animation function encapsulates obj target object target position
        // Idea:
        // 1. Let the distance of each movement of the box slowly decrease, and the speed will slowly fall down.
        // 2. Core algorithm: (target value - current position) / 10 as the distance step of each movement
        // 3. Stop condition: stop the timer when the current box position is equal to the target position
function animate(obj, target) {
    // First clear the previous timer and only keep the current timer for execution
    clearInterval(obj.timer);
    obj.timer = setInterval(function() {
        // The step value is written into the timer
        var step = (target - obj.offsetLeft) / 10;
        if (obj.offsetLeft == target) {
            // Stopping animation is essentially stopping the timer
            clearInterval(obj.timer);
        }
        // Change the step value of adding 1 each time to a slowly decreasing value step formula: (target value - current position) / 10
        obj.style.left = obj.offsetLeft + step + 'px';

    }, 15);
}
Move between multiple target values:
When moving, judge whether the step size is positive or negative
- If it is positive, the step size is rounded up
- If it is negative, the step size is rounded down
The animation functions are encapsulated in a separate JS file: animate.js
function animate(obj, target, callback) {
    // First clear the previous timer and only keep the current timer for execution
    clearInterval(obj.timer);
    obj.timer = setInterval(function() {
        // The step value is written into the timer
        // Change the step value to an integer without the problem of decimals
        // var step = Math.ceil((target - obj.offsetLeft) / 10);
        var step = (target - obj.offsetLeft) / 10;
        step = step > 0 ? Math.ceil(step) : Math.floor(step);
        if (obj.offsetLeft == target) {
            // Stopping animation is essentially stopping the timer
            clearInterval(obj.timer);
            // The callback function is written to the end of the timer
            // if (callback) {
            //     //Call function
            //     callback();
            // }
            callback && callback();
        }
        // Change the step value of adding 1 each time to a slowly decreasing value step formula: (target value - current position) / 10
        obj.style.left = obj.offsetLeft + step + 'px';
    }, 15);
}