Next, I will write a Dockerfile of Tomcat to build a Docker image, start a Tomcat container based on the image, and finally try to deploy a test project in the middle of the container
Idea:
- Based on centos image, configure a jdk environment and tomcat environment, and configure environment variables
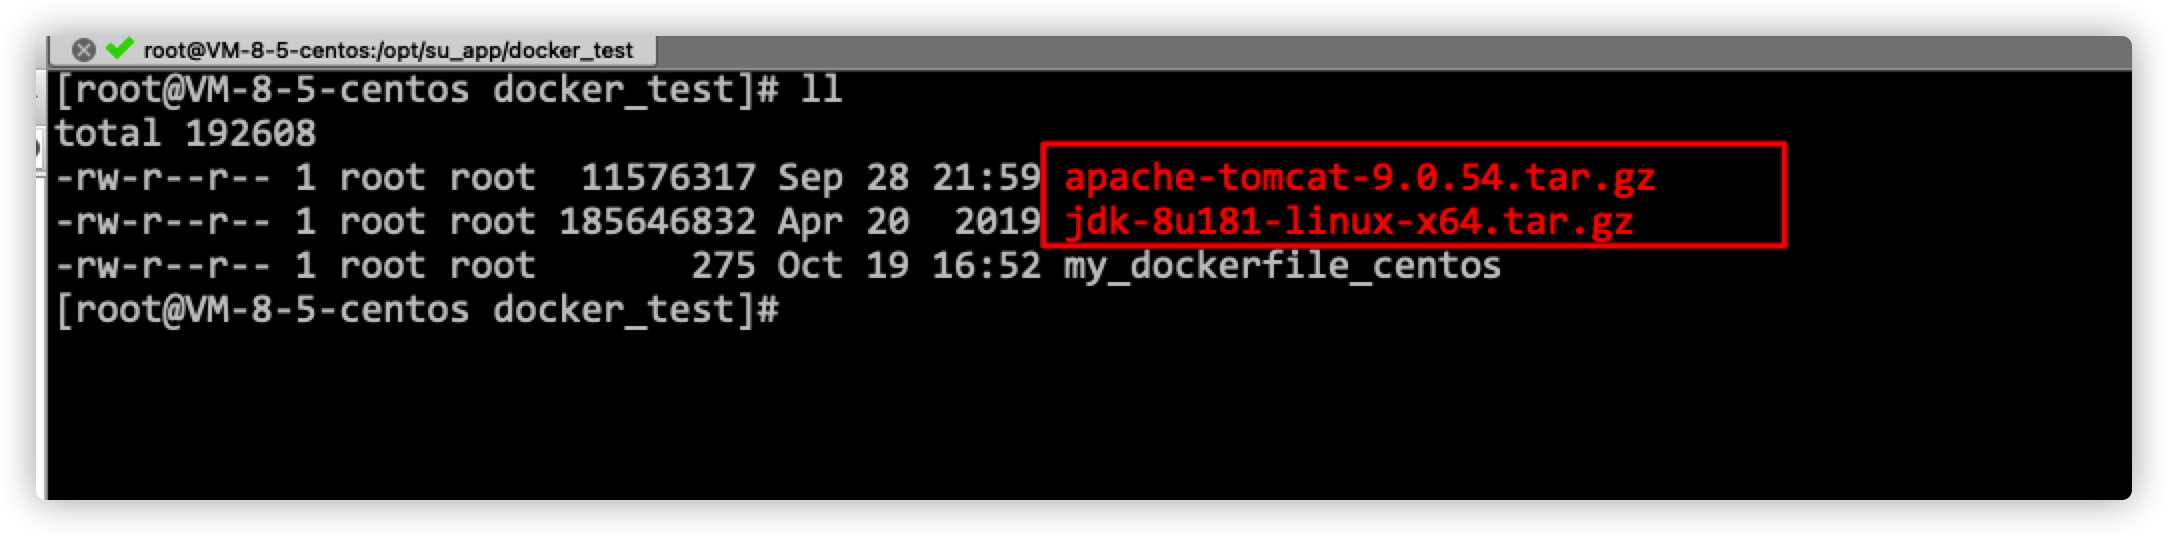
1. Download JDK and tomcat
Download the installation packages of jdk and tomcat on the Internet and upload them to any directory of your server, as shown in the figure below. I put them here in / opt/web_app/docker_test directory:
2. Write Dockerfile file
Note: the name of the Dockerfile written is preferably Dockerfile. The officially recommended naming method is Dockerfile. If you use docker build to build, you will automatically find the file without using - f to specify the file!
The contents of Dockerfile are as follows:
FROM centos

#Declare who wrote the image
MAINTAINER suhaha<suxiangya@sinoiov.com>

#Copy the compressed packages of jdk and tomcat locally to the / usr/local directory of the container, and decompress them automatically
ADD jdk-8u181-linux-x64.tar.gz /usr/local
ADD apache-tomcat-9.0.54.tar.gz /usr/local

#Declare the working directory and switch to the working directory through the WORKDIR command
ENV MYPATH /usr/local
WORKDIR $MYPATH

#Set the environment variable, and finally configure both java and tomcat into PATH
ENV JAVA_HOME /usr/local/jdk1.8.0_181
ENV CLASSPATH $JAVA_HOME/lib/dt.jar:#JAVA_HOME/lib/tools.jar
ENV CATALINA_HOME /usr/local/apache-tomcat-9.0.54
ENV CATALINA_BASE /usr/local/apache-tomcat-9.0.54
ENV PATH $PATH:$JAVA_HOME/bin:$CATALINA_HOME/lib:$CATALINA_HOME/bin

#Use the RUN command to install some common daily tools through yum or up2date
RUN yum -y install vim
RUN yum -y install net-tools

#External exposure 8080 port
EXPOSE 8080

#Execute the startup command of tomcat, and continuously track the log output through the tail -f command
CMD /usr/local/apache-tomcat-9.0.54/bin/startup.sh && tail -f /usr/local/apache-tomcat-9.0.54/bin/logs/catalina.out
3 build
Use the following command to build
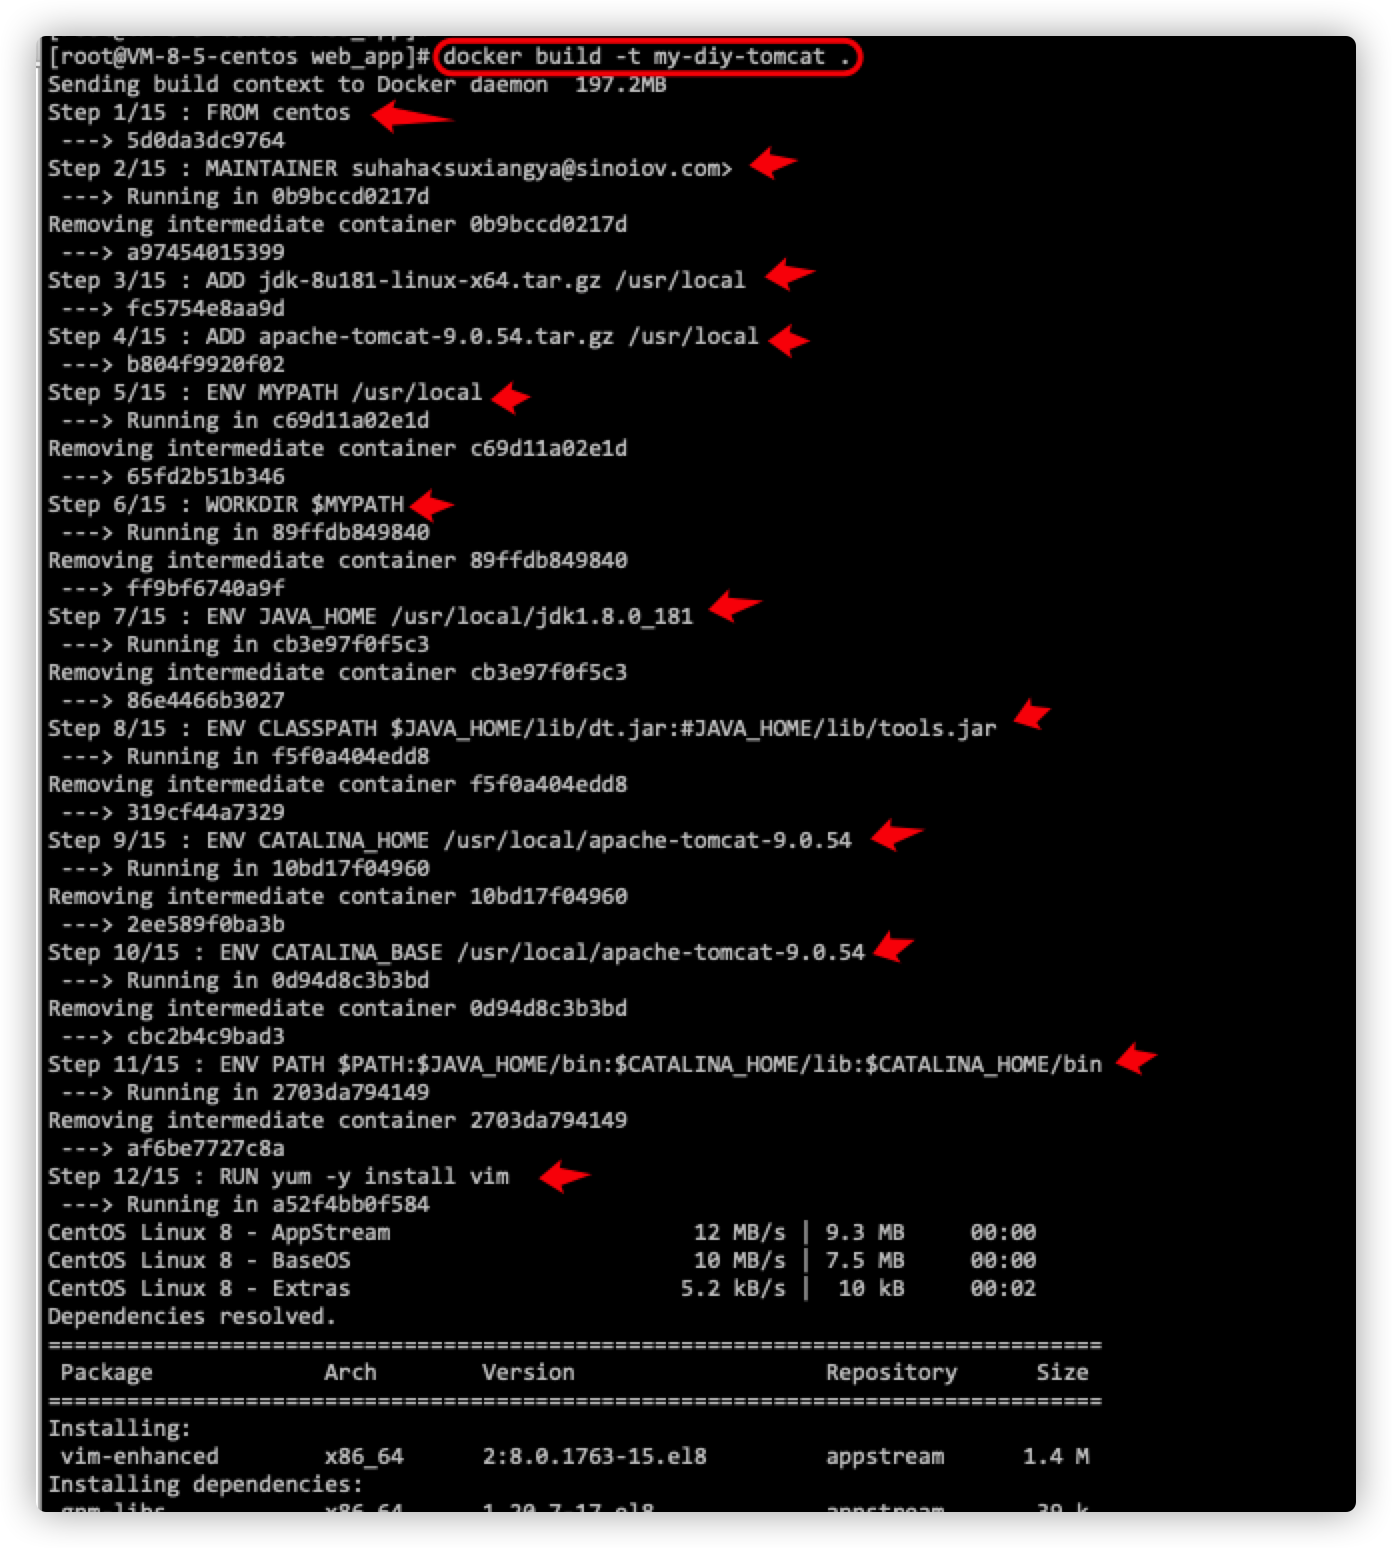
docker build -t my-diy-tomcat .
The build log is as follows:
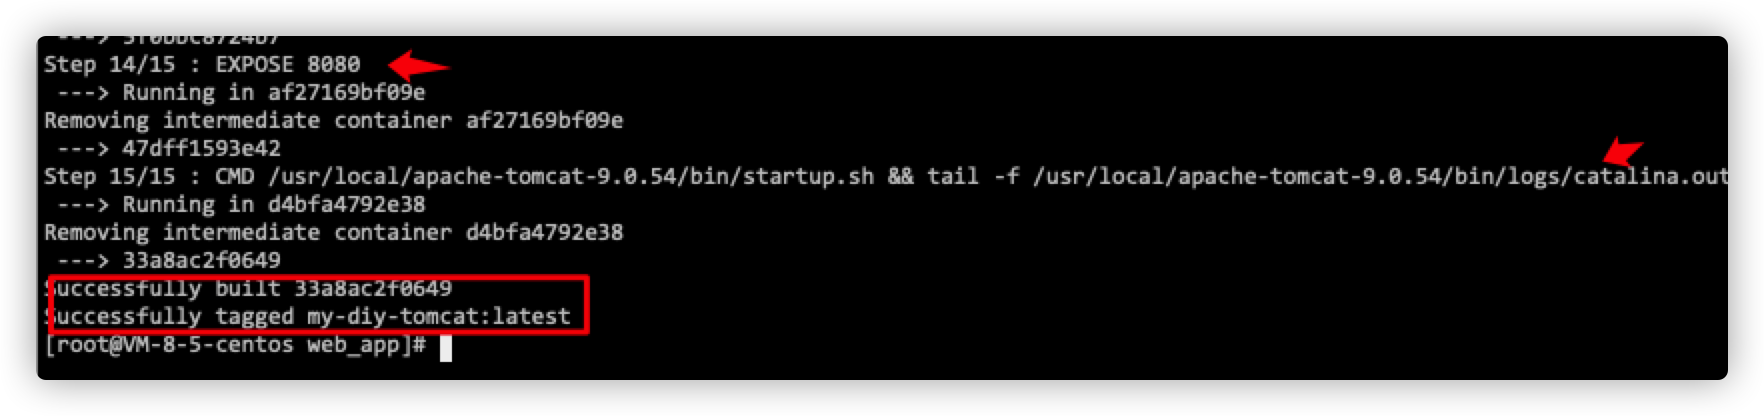
[root@VM-8-5-centos web_app]# docker build -t my-diy-tomcat .
Sending build context to Docker daemon  197.2MB
Step 1/15 : FROM centos
 ---> 5d0da3dc9764
Step 2/15 : MAINTAINER suhaha<suhaha@sinoiov.com>
 ---> Running in 0b9bccd0217d
Removing intermediate container 0b9bccd0217d
 ---> a97454015399
Step 3/15 : ADD jdk-8u181-linux-x64.tar.gz /usr/local
 ---> fc5754e8aa9d
Step 4/15 : ADD apache-tomcat-9.0.54.tar.gz /usr/local
 ---> b804f9920f02
Step 5/15 : ENV MYPATH /usr/local
 ---> Running in c69d11a02e1d
Removing intermediate container c69d11a02e1d
 ---> 65fd2b51b346
Step 6/15 : WORKDIR $MYPATH
 ---> Running in 89ffdb849840
Removing intermediate container 89ffdb849840
 ---> ff9bf6740a9f
Step 7/15 : ENV JAVA_HOME /usr/local/jdk1.8.0_181
 ---> Running in cb3e97f0f5c3
Removing intermediate container cb3e97f0f5c3
 ---> 86e4466b3027
Step 8/15 : ENV CLASSPATH $JAVA_HOME/lib/dt.jar:#JAVA_HOME/lib/tools.jar
 ---> Running in f5f0a404edd8
Removing intermediate container f5f0a404edd8
 ---> 319cf44a7329
Step 9/15 : ENV CATALINA_HOME /usr/local/apache-tomcat-9.0.54
 ---> Running in 10bd17f04960
Removing intermediate container 10bd17f04960
 ---> 2ee589f0ba3b
Step 10/15 : ENV CATALINA_BASE /usr/local/apache-tomcat-9.0.54
 ---> Running in 0d94d8c3b3bd
Removing intermediate container 0d94d8c3b3bd
 ---> cbc2b4c9bad3
Step 11/15 : ENV PATH $PATH:$JAVA_HOME/bin:$CATALINA_HOME/lib:$CATALINA_HOME/bin
 ---> Running in 2703da794149
Removing intermediate container 2703da794149
 ---> af6be7727c8a
Step 12/15 : RUN yum -y install vim
 ---> Running in a52f4bb0f584
CentOS Linux 8 - AppStream                       12 MB/s | 9.3 MB     00:00
CentOS Linux 8 - BaseOS                          10 MB/s | 7.5 MB     00:00
CentOS Linux 8 - Extras                         5.2 kB/s |  10 kB     00:02
Dependencies resolved.
================================================================================
 Package             Arch        Version                   Repository      Size
================================================================================
Installing:
 vim-enhanced        x86_64      2:8.0.1763-15.el8         appstream      1.4 M
Installing dependencies:
 gpm-libs            x86_64      1.20.7-17.el8             appstream       39 k
 vim-common          x86_64      2:8.0.1763-15.el8         appstream      6.3 M
 vim-filesystem      noarch      2:8.0.1763-15.el8         appstream       48 k
 which               x86_64      2.21-12.el8               baseos          49 k

Transaction Summary
================================================================================
Install  5 Packages

Total download size: 7.8 M
Installed size: 30 M
Downloading Packages:
(1/5): gpm-libs-1.20.7-17.el8.x86_64.rpm        2.9 MB/s |  39 kB     00:00
(2/5): vim-filesystem-8.0.1763-15.el8.noarch.rp 3.5 MB/s |  48 kB     00:00
(3/5): vim-enhanced-8.0.1763-15.el8.x86_64.rpm   15 MB/s | 1.4 MB     00:00
(4/5): vim-common-8.0.1763-15.el8.x86_64.rpm     49 MB/s | 6.3 MB     00:00
(5/5): which-2.21-12.el8.x86_64.rpm             468 kB/s |  49 kB     00:00
--------------------------------------------------------------------------------
Total                                           8.9 MB/s | 7.8 MB     00:00
warning: /var/cache/dnf/appstream-02e86d1c976ab532/packages/gpm-libs-1.20.7-17.el8.x86_64.rpm: Header V3 RSA/SHA256 Signature, key ID 8483c65d: NOKEY
CentOS Linux 8 - AppStream                      1.6 MB/s | 1.6 kB     00:00
Importing GPG key 0x8483C65D:
 Userid     : "CentOS (CentOS Official Signing Key) <security@centos.org>"
 Fingerprint: 99DB 70FA E1D7 CE22 7FB6 4882 05B5 55B3 8483 C65D
 From       : /etc/pki/rpm-gpg/RPM-GPG-KEY-centosofficial
Key imported successfully
Running transaction check
Transaction check succeeded.
Running transaction test
Transaction test succeeded.
Running transaction
  Preparing        :                                                        1/1
  Installing       : which-2.21-12.el8.x86_64                               1/5
  Installing       : vim-filesystem-2:8.0.1763-15.el8.noarch                2/5
  Installing       : vim-common-2:8.0.1763-15.el8.x86_64                    3/5
  Installing       : gpm-libs-1.20.7-17.el8.x86_64                          4/5
  Running scriptlet: gpm-libs-1.20.7-17.el8.x86_64                          4/5
  Installing       : vim-enhanced-2:8.0.1763-15.el8.x86_64                  5/5
  Running scriptlet: vim-enhanced-2:8.0.1763-15.el8.x86_64                  5/5
  Running scriptlet: vim-common-2:8.0.1763-15.el8.x86_64                    5/5
  Verifying        : gpm-libs-1.20.7-17.el8.x86_64                          1/5
  Verifying        : vim-common-2:8.0.1763-15.el8.x86_64                    2/5
  Verifying        : vim-enhanced-2:8.0.1763-15.el8.x86_64                  3/5
  Verifying        : vim-filesystem-2:8.0.1763-15.el8.noarch                4/5
  Verifying        : which-2.21-12.el8.x86_64                               5/5

Installed:
  gpm-libs-1.20.7-17.el8.x86_64         vim-common-2:8.0.1763-15.el8.x86_64
  vim-enhanced-2:8.0.1763-15.el8.x86_64 vim-filesystem-2:8.0.1763-15.el8.noarch
  which-2.21-12.el8.x86_64

Complete!
Removing intermediate container a52f4bb0f584
 ---> 789176169e0a
Step 13/15 : RUN yum -y install net-tools
 ---> Running in 1c2d4d8e49d9
Last metadata expiration check: 0:00:08 ago on Thu Oct 21 05:37:29 2021.
Dependencies resolved.
================================================================================
 Package         Architecture Version                        Repository    Size
================================================================================
Installing:
 net-tools       x86_64       2.0-0.52.20160912git.el8       baseos       322 k

Transaction Summary
================================================================================
Install  1 Package

Total download size: 322 k
Installed size: 942 k
Downloading Packages:
net-tools-2.0-0.52.20160912git.el8.x86_64.rpm   1.9 MB/s | 322 kB     00:00
--------------------------------------------------------------------------------
Total                                           600 kB/s | 322 kB     00:00
Running transaction check
Transaction check succeeded.
Running transaction test
Transaction test succeeded.
Running transaction
  Preparing        :                                                        1/1
  Installing       : net-tools-2.0-0.52.20160912git.el8.x86_64              1/1
  Running scriptlet: net-tools-2.0-0.52.20160912git.el8.x86_64              1/1
  Verifying        : net-tools-2.0-0.52.20160912git.el8.x86_64              1/1

Installed:
  net-tools-2.0-0.52.20160912git.el8.x86_64

Complete!
Removing intermediate container 1c2d4d8e49d9
 ---> 5f0bbc8724b7
Step 14/15 : EXPOSE 8080
 ---> Running in af27169bf09e
Removing intermediate container af27169bf09e
 ---> 47dff1593e42
Step 15/15 : CMD /usr/local/apache-tomcat-9.0.54/bin/startup.sh && tail -f /usr/local/apache-tomcat-9.0.54/bin/logs/catalina.out
 ---> Running in d4bfa4792e38
Removing intermediate container d4bfa4792e38
 ---> 33a8ac2f0649
Successfully built 33a8ac2f0649
Successfully tagged my-diy-tomcat:latest
The construction diagram is as follows:
After the build is completed, use the docker images command to view the image we built:
[root@VM-8-5-centos web_app]# docker images | grep diy
my-diy-tomcat         latest    4c3b2ced86e8   About a minute ago   629MB
4 start mirroring
Note: during startup, notice that we attach the webapps and logs log directories of tomcat in the container to the local host, which is convenient for deploying projects to the container and viewing logs on the local host.
The command is as follows:
docker run -it -p 8080:8080 --name zhy_tomcat -v /home/docker/my-diy-tomcat/webapps/test:/usr/local/apache-tomcat-9.0.54/webapps/test -v /home/docker/my-diy-tomcat/logs/:/usr/local/apache-tomcat-9.0.54/logs my-diy-tomcat:latest
The diagram is as follows:
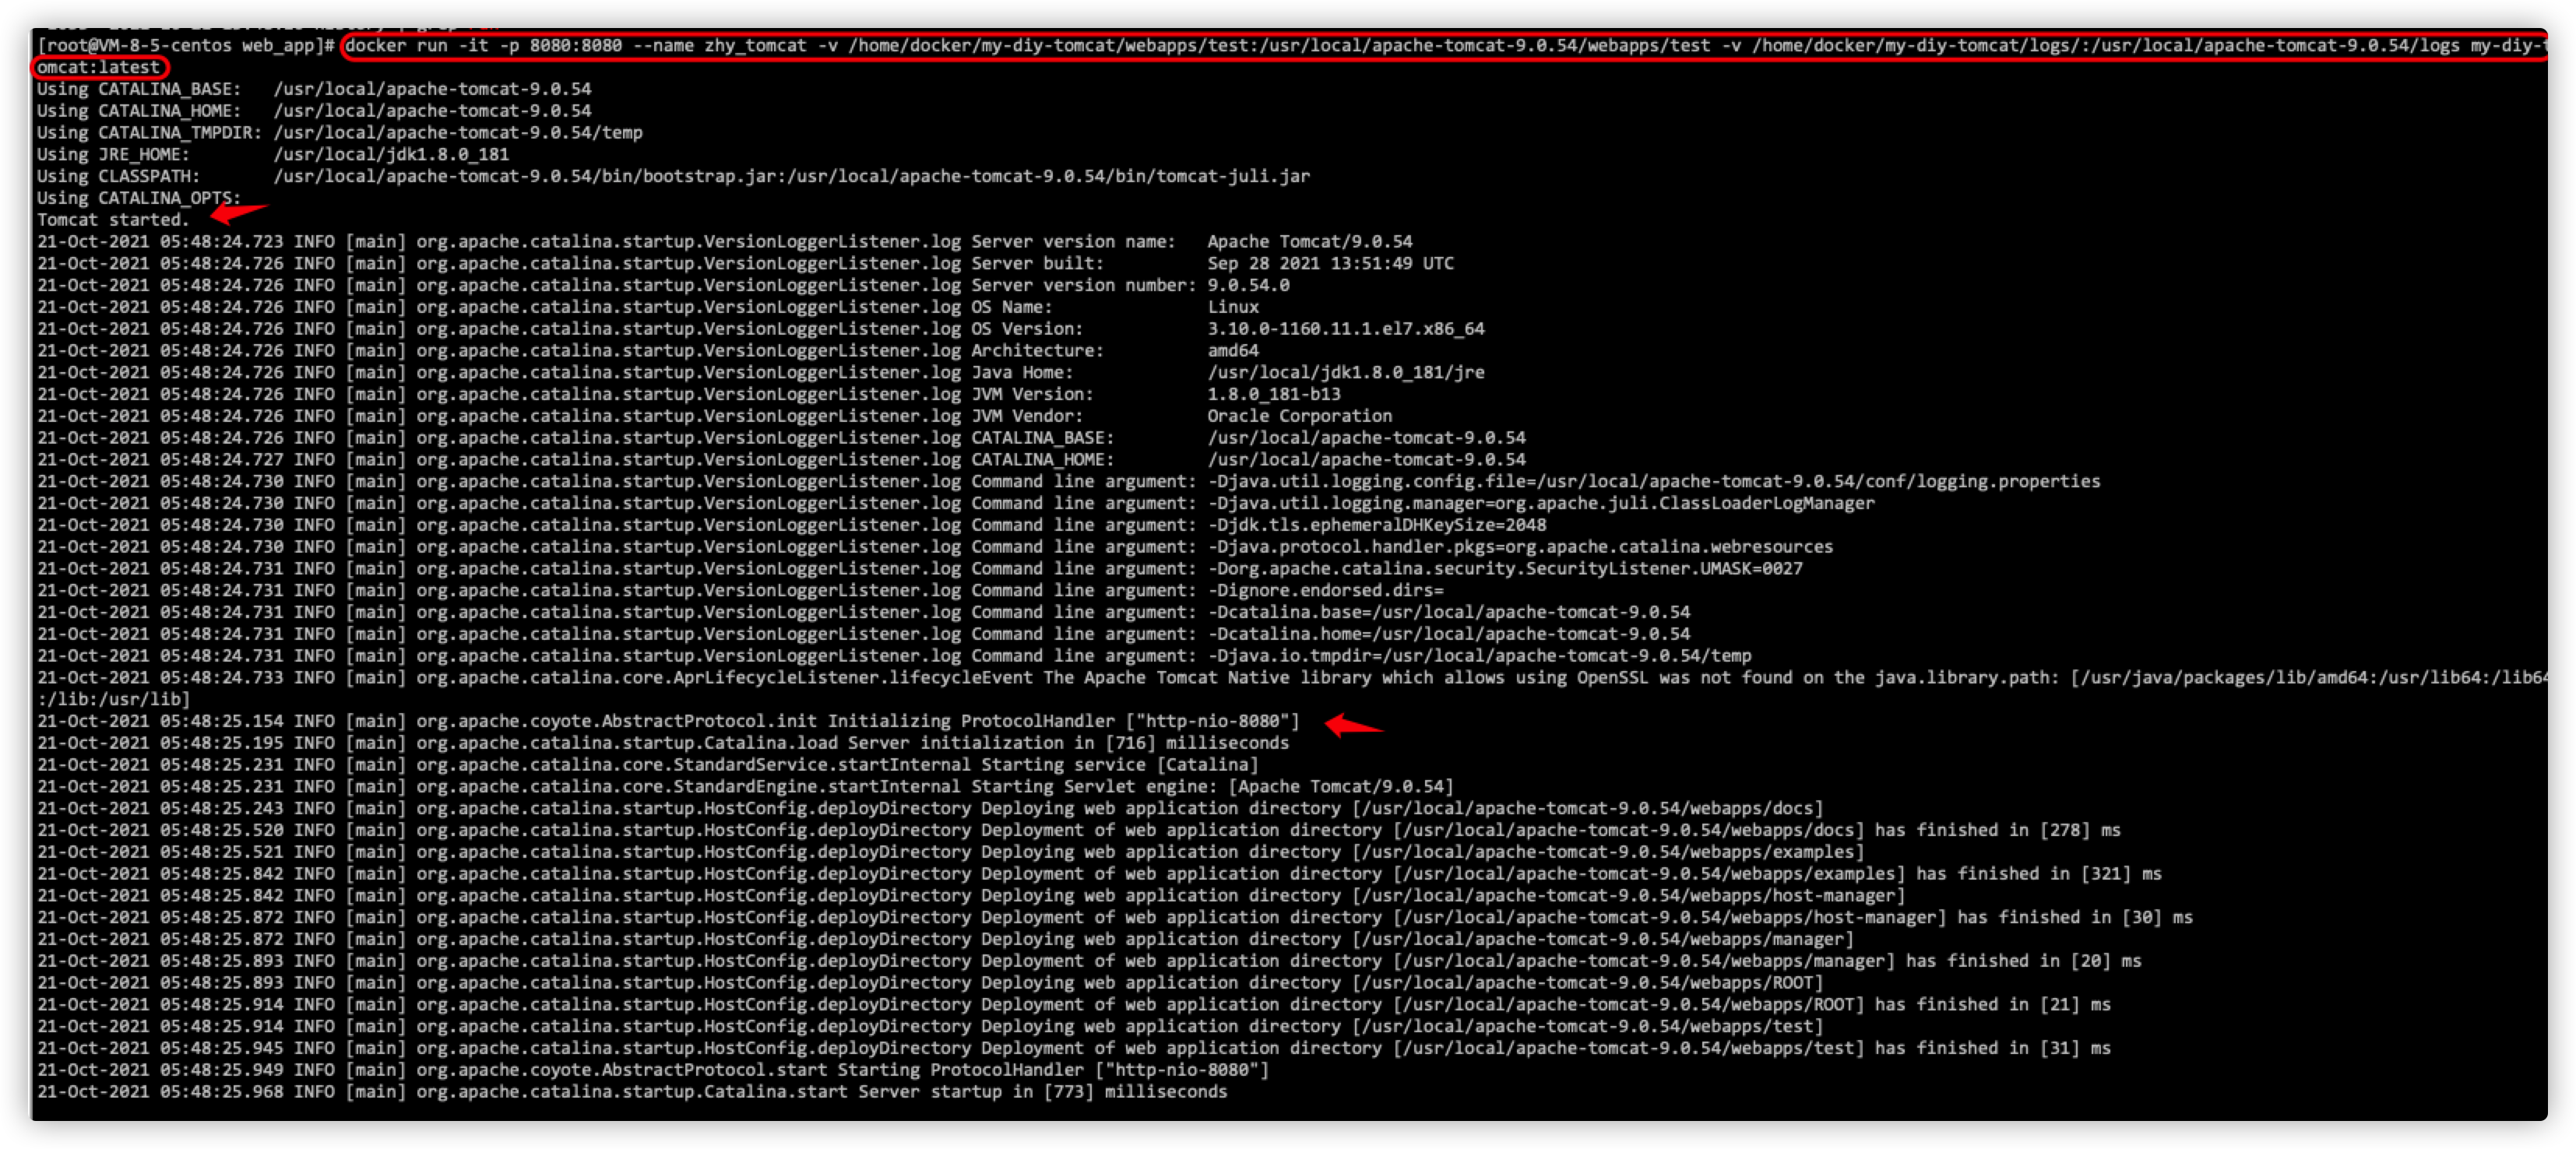
As can be seen from the figure above, tomcat is started successfully
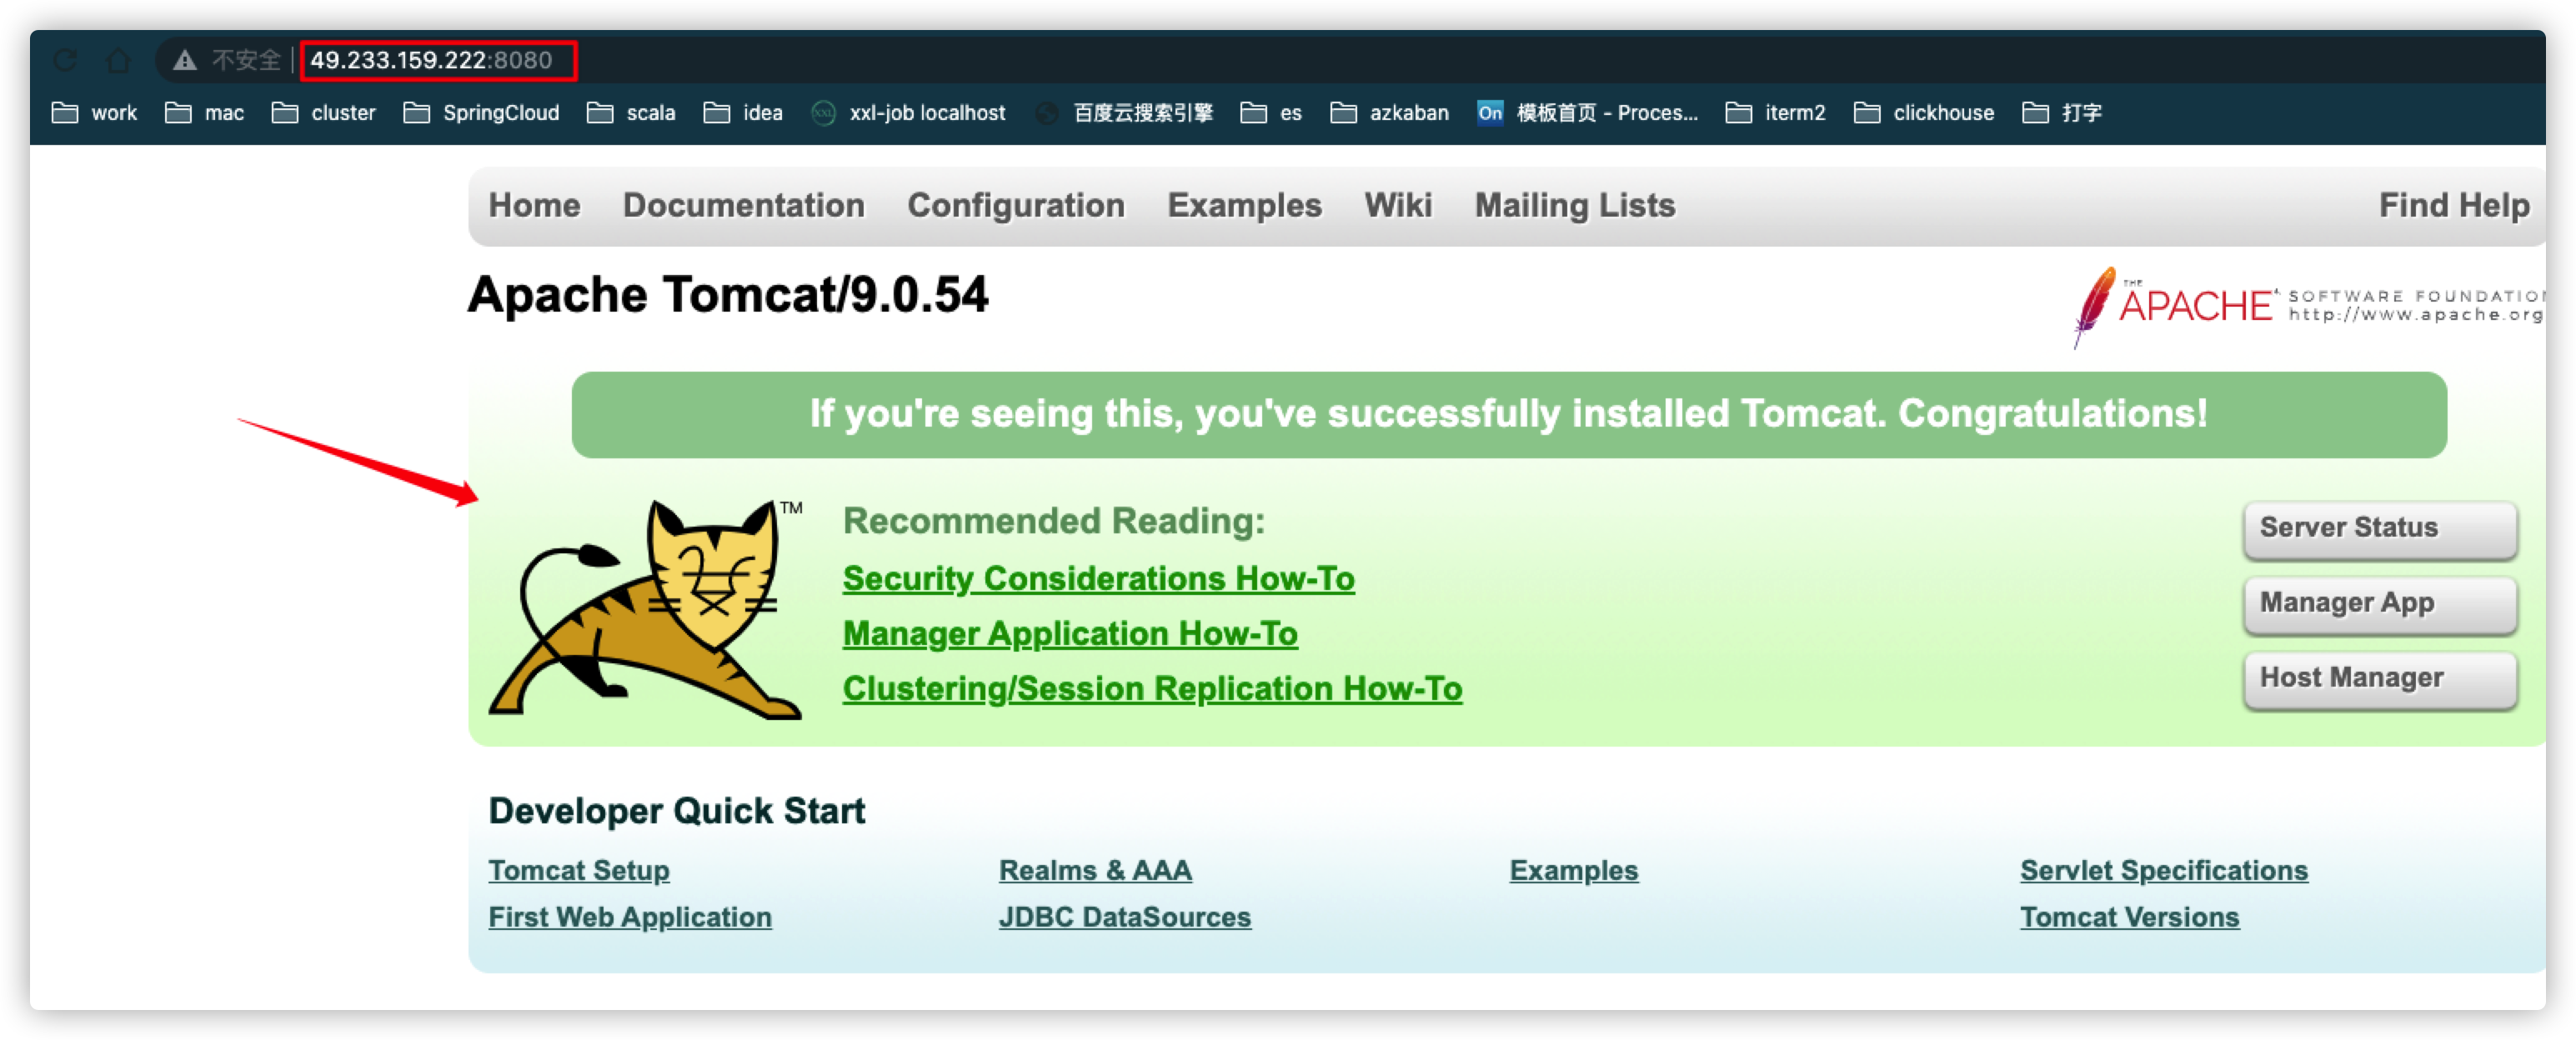
Since we made port mapping through the - p 8080:8080 command when starting (that is, the 8080 port of the local host is mapped to the 8080 port in the container), next, test to connect the tomcat we started from the web page, as shown in the following figure:
5 deployment project in tomcat
Note: when we started the image above, we mapped the data volume through the command - V / home / docker / my DIY Tomcat / webapps / test: / usr/local/apache-tomcat-9.0.54/webapps/test, and mapped the directory / home / docker / my DIY Tomcat / webapps / test of the local host to the directory / usr/local/apache-tomcat-9.0.54/webapps/test in the container. Therefore, when we test and deploy the project to tomcat, we don't need to enter the container to deploy. We just need to deploy the project to / home / docker / my DIY Tomcat / webapps / test of the local host.
Enter the directory, create a WEB-INF directory, enter the new WEB-INF directory, and create a web.xml file with the following contents:
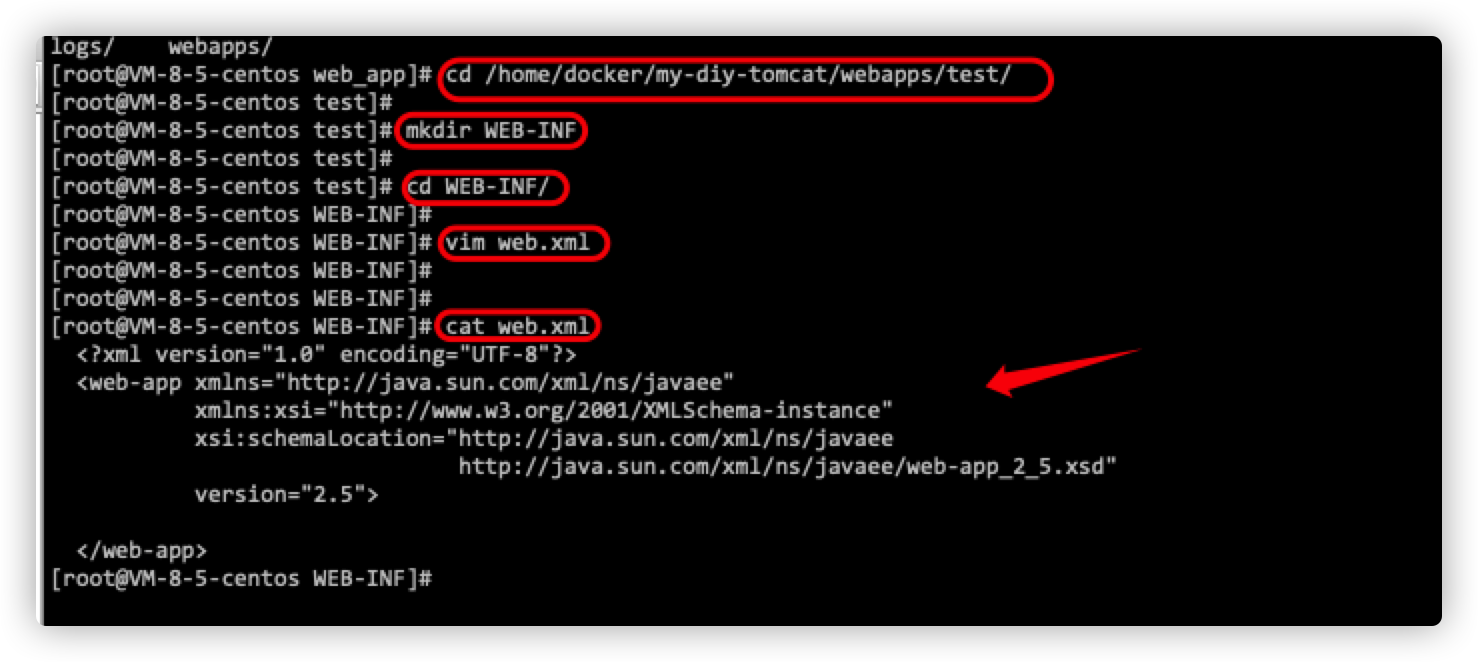
The content of web.xml is as follows:
<?xml version="1.0" encoding="UTF-8"?>
<web-app xmlns="http://xmlns.jcp.org/xml/ns/javaee"
  xmlns:xsi="http://www.w3.org/2001/XMLSchema-instance"
  xsi:schemaLocation="http://xmlns.jcp.org/xml/ns/javaee
                      http://xmlns.jcp.org/xml/ns/javaee/web-app_4_0.xsd"
  version="4.0"
  metadata-complete="true">

  <display-name>Welcome to zjxl</display-name>
  <description>
     Welcome to zjxl
  </description>

</web-app>
Then go back to the test directory, and create a new index.jsp file as follows:
<%@ page language="java" contentType="text/html; charset=UTF-8"
    pageEncoding="UTF-8"%>
<!DOCTYPE html>
<html>
<head>
<meta charset="utf-8">
<title>hello,Zhongjiaoxing Road</title>
</head>
<body>
zhanghongyan say: Hello World!<br/>
<%
System.out.println("----my test web logs----");
%>
</body>
</html>
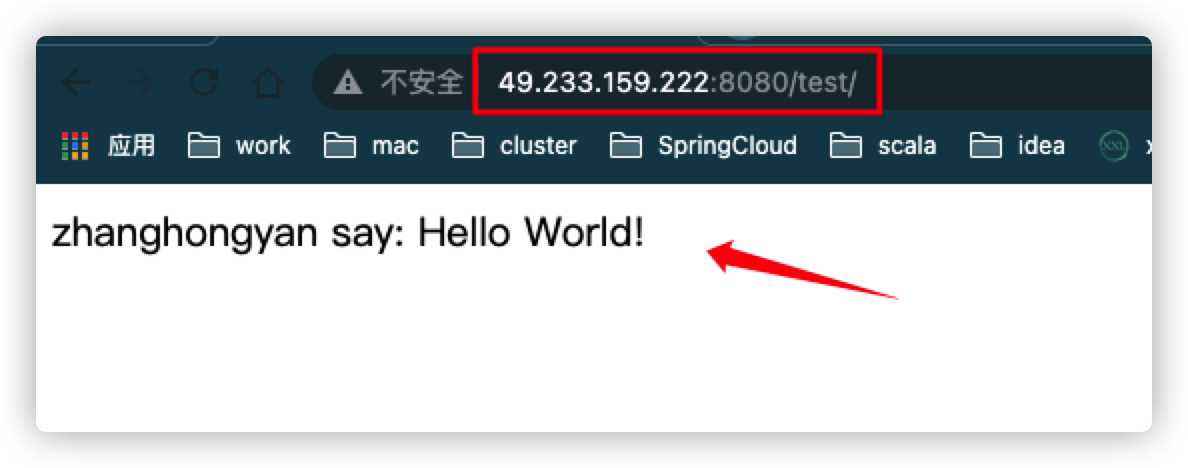
In this way, even if the deployment of the test project is completed, then try to access the test project we deployed through the web page! As shown in the following figure, the access is successful and the project deployment is ok!