In the process of using Latex, drawing a beautiful form is undoubtedly a big problem. It is often either a bug or does not meet the requirements. A pinch of hair will fall off as soon as you draw the form, so I sorted out such a Latex form strategy to save your and my hair.
At the end of the article, a powerful tool is attached, which can handle the Latex form at the speed of light.
There may be a lot of contents. First look at the directory and get what you need:
Basic drawing method
Start with a basic table
Simple table code
First, to draw a table, you need to create a table and tabular environment.
The first line of the code \ begin{table} represents the environment of the floating table, [htp] is an optional parameter or not.
| name | mean |
|---|---|
| h | (here) indicates that the floating body is placed in the current position |
| b | (bottom) means placed at the bottom of a page |
| t | (top) means placed at the top of a page |
| p | Indicates that it is placed on a floating page (a separate page) |
All three parameters are added to indicate that Latex can automatically judge and select the most appropriate situation. Generally, Latex will judge and select the most appropriate situation by itself. If you want to force it to be placed in a certain position, you can add!, For example, [! h] means that it is forced to be placed in the current position.
After the table environment, add the table title \ caption \ label as the label of the table, and then use the tabular environment. The contents of the table are in tabular.
You also need to add a macro package at the beginning of the article
\usepackage{array}
A simple table drawing code is as follows:
\begin{table}[!htp]
    \centering
    \caption{Start with a simple form} \label{one}
    \begin{tabular}{l|c|r}
        \hline
        1  & 2 & 3 \\
        \hline
        01 & 02 & 03 \\
        \hline
        001 & 002 & 003 \\
        \hline
    \end{tabular}
 \end{table}

Table properties and common commands
l|c|r in the example is called the introduction area to specify the attributes of each column of the table:
| name | mean |
|---|---|
| l | left-justified column |
| c | centered column |
| r | right-justified column |
| b | bottom |
| c | center (default) |
| t | top |
| p{'width'} | paragraph column with text vertically aligned at the top |
| m{'width'} | paragraph column with text vertically aligned in the middle (requires array package) |
| b{'width'} | paragraph column with text vertically aligned at the bottom (requires array package) |
| | | vertical line |
| || | double vertical line |
There are also some commonly used commands
| name | mean |
|---|---|
| & | column separator |
| \\ | start new row (additional space may be specified after \\ using square brackets, such as \\[6pt] |
| \hline | horizontal line |
| \newline | start a new line within a cell (in a paragraph column) |
| \tabularnewline | start a new line within a cell (in a paragraph column) instead of \\ to avoid a Misplaced \noalign error in the tabular |
| \cline{i-j} | partial horizontal line beginning in column i and ending in column j |
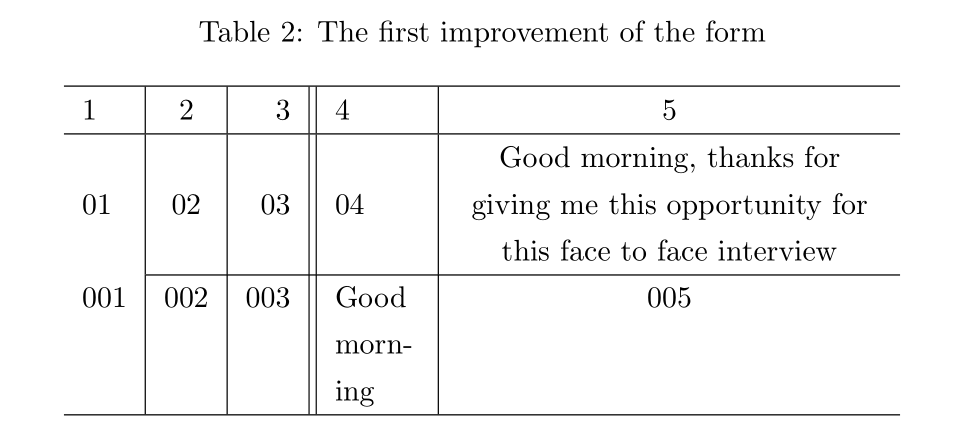
First step deformation of table
We added the attributes and common instructions mentioned above to the original table. You can compare them with the previous table. There are four changes in total
\begin{table}[!htp]
    \centering
    \caption{The first improvement of the form} \label{two}
    \begin{tabular}{l|c|r||p{1cm}|m{5cm}<{\centering}}
        \hline
        1 & 2 & 3 & 4 & 5\\
        \hline
        01 & 02 & 03 & 04 & Good morning, thanks for giving me this opportunity for this face to face interview\\
        \cline{2-5}
        001 & 002 & 003 & Good morning & 005 \\
        \hline
    \end{tabular}
 \end{table}
- With more columns, the dividing line becomes two vertical lines
- p{1cm} sets the column width of the specified column to 1cm
- M {5cm} < {\ centering} sets the column width of the specified column 5cm and centers it
- \cline{2-5} is different from \ hline, \ cline{2-5} sets the horizontal line of 2-5 columns
be careful
When using the m{'width'}b{'width'} instructions, you need to add the array macro package.
\usepackage{array}
Here we will find that when using p{'width'}, m{'width'}, b{'width'}, if the text in the table is too long, it will wrap automatically.
Adjust row spacing
Method 1:
\renewcommand{\arraystretch}{1.5} %rows, default value is 1.0
Examples are as follows:
 \begin{table}[!htp]
    \centering
    \caption{1.5 times the line spacing} \label{three}
    \renewcommand{\arraystretch}{1.5}
    \begin{tabular}{l|c|r}
        \hline
        1  & 2 & 3 \\
        \hline
        01 & 02 & 03 \\
        \hline
        001 & 002 & 003 \\
        \hline
    \end{tabular}
 \end{table}
Method 2:
Use the \ linespread command in the introduction area.
\linespread{2.0}
After using this command, the line spacing has become 2.0 times since then.
If you only want to make changes to a small part, you can enclose this paragraph in braces, such as
{
\linespread{2.0} \selectfont
% Double spaced text
}
% Double spaced text
In this way, the parts outside the brackets will not be changed. The font and font size commands can also be used, for example:
 \begin{table}[!htp]
    \centering
    \caption{2.5 times the line spacing} \label{four}
    {
    \linespread{2.5} \selectfont
    \begin{tabular}{l|c|r}
        \hline
        1  & 2 & 3 \\
        \hline
        01 & 02 & 03 \\
        \hline
        001 & 002 & 003 \\
        \hline
    \end{tabular}
    }
 \end{table}
Method 3: use the setspace macro package
\usepackage{setspace}

\begin{document}

\begin{spacing}{2.0}
% This is double the line spacing
\end{spacing}

% Here is the default line spacing

\end{document}
Examples are as follows:
  \begin{table}[!htp]
   \begin{spacing}{2.0}
    \centering
    \caption{2 times the line spacing} \label{five}
    \begin{tabular}{l|c|r}
        \hline
        1  & 2 & 3 \\
        \hline
        01 & 02 & 03 \\
        \hline
        001 & 002 & 003 \\
        \hline
    \end{tabular}
   \end{spacing}
 \end{table}

Adjust column width
Adjust table length
\begin{table}[!htp]
    \centering
    \caption{columns spacing} \label{six}
    \begin{tabularx}{10cm}{lll}
        \hline
        1  & 2 & 3 \\
        \hline
        01 & 02 & 03 \\
        \hline
        001 & 002 & 003 \\
        \hline
    \end{tabularx}
\end{table}
This method can not divide the width of each column equally, but after setting the total length of the table, the rest of the first two rows are the third row. The effect diagram is as follows:

Adjust the width of all columns
\setlength{\tabcolsep}{15pt} %columns, default value is 6pt
The default width is 6pt. Using this code, you can change the width of all columns at the same time. For example:
\begin{table}[!htp]
    \centering
    \caption{columns spacing} \label{six}
    \setlength{\tabcolsep}{15pt}
    \begin{tabular}{lll}
        \hline
        1  & 2 & 3 \\
        \hline
        01 & 02 & 03 \\
        \hline
        001 & 002 & 003 \\
        \hline
    \end{tabular}
\end{table}

Adjust the width of a middle column
Method 1:
In fact, the first method has been described earlier, that is, using p{'width'}, m{'width'}, b{'width'} can change the width of a single column. I won't repeat it here. If you forget, you can jump to the previous section "first step deformation of the table".
Method 2:
Add the macro package tabularx and change the environment to tabularx. The effect is shown in Table 9:
\usepackage{tabularx}

\begin{table}[!htp]
    \centering
    \caption{columns spacing} \label{six}
    \begin{tabularx}{10cm}{llX}
        \hline
        1  & 2 & 3 \\
        \hline
        01 & 02 & 03 \\
        \hline
        001 & 002 & 003 \\
        \hline
    \end{tabularx}
 \end{table}
Note that \ begin{tabularx}{10cm}{llX} This x must be written as a capital X. Why? Because this is the syntax of tabularx environment, and the case in LaTeX code is different, so we must pay attention to it.
If you change the X of \ begin{tabularx}{10cm}{llX} to another position, \ begin{tabularx}{10cm}{lXl}, you change the column width of the middle column, that is, X represents the column we want to change. The effect diagram is shown in table 10.
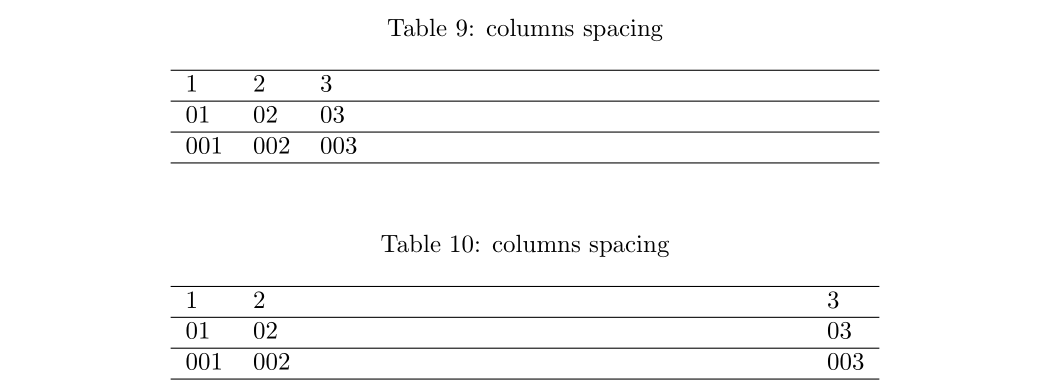
Table advanced
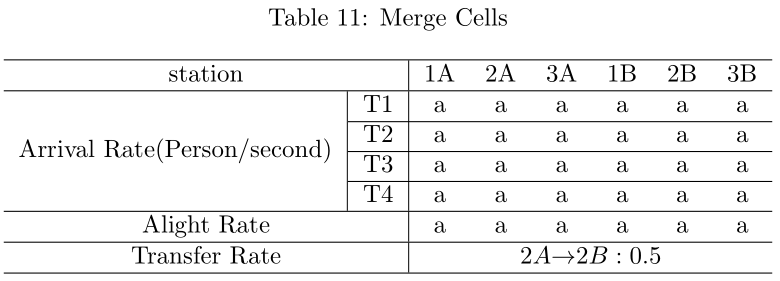
Merge rows & columns / merge cells
A table is often not as simple as the table in the above example. It is often necessary to merge cells (as shown in Table 11). In latex, merged cells are divided into merged row cells and merged column cells. Different codes are required for the two cells, namely, multirow (row) and multicolumn (column).
The macro package \ usepackage{multirow} must be introduced first
Merge row
\multirow{NUMBER_OF_ROWS}{WIDTH}{CONTENT}
NUMBER_OF_ROWS represents the number of rows occupied by the table cell, WIDTH represents the WIDTH of the table, generally * represents the automatic WIDTH, and CONTENT is the CONTENT in the table cell.
\begin{table}[!htp]
    \centering
    \caption{multirow table} \label{six}
    \begin{tabular}{lll}
        \hline
        \multirow{2}{*}{First} & 2 & 3\\
        \cline{2-3}
         & 02 & 03 \\
        \hline
        001 & 002 & 003 \\
        \hline
    \end{tabular}
\end{table}
It is mainly the code \ multirow {2} {*} {first} & 2 & 3 \ \, which makes the table cell with content 12 occupy two rows. Note that the first position of the next line has been occupied by the unit 12, so the code of the second line is & 02 & 03 \ \. There is nothing written in the first position here. If something is written, the row will exceed 3 columns and the table will be misaligned.
Another thing to note is that due to the merged rows, the split line between the two rows needs to be changed to \ cline {XX XX}, and only draw lines where necessary.

Merge column
\multicolumn{NUMBER_OF_COLUMNS}{ALIGNMENT}{CONTENT}
NUMBER_OF_COLUMNS represents the number of columns occupied by the table cell, ALIGNMENT represents the offset of the table CONTENT (fill in l,c or r), and CONTENT is the CONTENT in the table cell.
\usepackage{multirow}

\begin{table}[!htp]
    \centering
    \caption{multicolumn table} \label{six}
    \begin{tabular}{lll}
        \hline
        \multicolumn{2}{c|}{First} & 3\\
        \hline
        01 & 02 & 03 \\
        \hline
        001 & 002 & 003 \\
        \hline
    \end{tabular}
\end{table}
This is mainly the code \ multicolumn {2}{c|}{first} & 3 \ \, so that the table cell with content 12 occupies two columns. So this line can only be filled with one element 3. Note that the ALIGNMENT here says C | to mean that the table content is centered. There is a vertical line on the right side of the table and no vertical line on the left.

If there are many rows and columns that need to be merged, you need to pay more attention. The example of my table below looks complex. In fact, it is only the repeated use of the above two codes.
\begin{table}[!h]
\centering
\caption{Merge Cells} \label{mult}
\newcommand{\minitab}[2][l]{\begin{tabular}{#1}#2\end{tabular}}
\begin{tabular}{c|c|cccccc}
  \hline
    \multicolumn{2}{c|}{station} & 1A & 2A & 3A & 1B & 2B & 3B \\
  \hline
    \multirow{4}{*}{Arrival Rate(Person/second)}
    & T1 & a & a & a & a & a & a\\
      \cline{2-8}
    & T2 & a & a & a & a & a & a\\
      \cline{2-8}
    & T3 & a & a & a & a & a & a\\
      \cline{2-8}
    & T4 & a & a & a & a & a & a\\
  \hline
    \multicolumn{2}{c|}{Alight Rate} & a & a & a & a & a & a \\
  \hline
    \multicolumn{2}{c|}{Transfer Rate} & \multicolumn{6}{c}{$2A {\rightarrow} 2B:0.5$}\\
 \hline
\end{tabular}
\end{table}
Rows and columns need to be merged
Sometimes the cells of a table need to occupy two rows and two columns at the same time, which is the most complex. In fact, you only need to write the CONTENT of \ multicolumn{NUMBER_OF_COLUMNS}{ALIGNMENT}{CONTENT} as \ multirow {number of_rows} {width} {CONTENT}.
\begin{table}[!htp]
    \centering
    \caption{multirowcolumn table} \label{six}
    \begin{tabular}{lll}
        \hline
        \multicolumn{2}{c|}{\multirow{2}{*}{First}} & 3 \\
        \multicolumn{2}{c|}{} & 03 \\
        \hline
        001 & 002 & 003 \\
        \hline
    \end{tabular}
\end{table}
The main statement \ multicolumn {2} {C |} {\ multirow {2} {*} {First}} & 3 \ \ makes the table cell with the content of First occupy 2 rows and 2 columns, so at present, only one more element 3 can be written on the right of this row. Then note that the next row is \ multicolumn {2} {C |} {} & 03 \ \ use an empty multicolumn to represent the vacancy of the First two positions, and then fill in the remaining element 03.

Rotate the table 90 ° to place
Here, you need to add a macro package and change the table environment to
\begin{sidewaystable}[htp]
......
\end{sidewaystable}
An example is also given:
\usepackage[figuresright]{rotating}

\begin{sidewaystable}[htp]
	\caption{This is a caption}
	\centering  %Center the table as a whole
    \footnotesize  %Set font
	\begin{tabular}{l*{7}{L{1cm}}} %There are 7 columns in total, and the width of each column is 1 cm
		\hline %Horizontal line
		1111111 & 1222222 & 1333333 & 1444444 & 1555555 & 1666666 & 1777777\\
        \hline
        2111111 & 2222222 & 2333333 & 2444444 & 2555555 & 2666666 & 2777777\\
        3111111 & 3222222 & 3333333 & 3444444 & 3555555 & 3666666 & 3777777\\
        4111111 & 4222222 & 4333333 & 4444444 & 4555555 & 4666666 & 4777777\\
        2111111 & 2222222 & 2333333 & 2444444 & 2555555 & 2666666 & 2777777\\
        3111111 & 3222222 & 3333333 & 3444444 & 3555555 & 3666666 & 3777777\\
        4111111 & 4222222 & 4333333 & 4444444 & 4555555 & 4666666 & 4777777\\
        2111111 & 2222222 & 2333333 & 2444444 & 2555555 & 2666666 & 2777777\\
        3111111 & 3222222 & 3333333 & 3444444 & 3555555 & 3666666 & 3777777\\
        4111111 & 4222222 & 4333333 & 4444444 & 4555555 & 4666666 & 4777777\\
        2111111 & 2222222 & 2333333 & 2444444 & 2555555 & 2666666 & 2777777\\
        3111111 & 3222222 & 3333333 & 3444444 & 3555555 & 3666666 & 3777777\\
        4111111 & 4222222 & 4333333 & 4444444 & 4555555 & 4666666 & 4777777\\
       \hline
	\end{tabular}
\end{sidewaystable}

The above example is the case of rotating the table 90 ° counterclockwise. If you want to rotate the table clockwise, just change the macro package and change [figuresright] to [figuresleft]
That is \ usepackage[figuresright]{rotating}

Forced line wrapping of text in table
First, add the following sentence in the introduction area. This sentence can be added after the macro package or in the table environment. It is recommended to add it after the macro package, so that the whole article is applicable and does not need to be defined table by table.
\newcommand{\tabincell}[2]{\begin{tabular}{@{}#1@{}}#2\end{tabular}}
After that, just add \ tabincell{c} {line feed content} in front of the cell that needs to be forced to wrap, and just add \ \ directlyto the line feed content to wrap.
\newcommand{\tabincell}[2]{\begin{tabular}{@{}#1@{}}#2\end{tabular}}

 \begin{table}[!htp]
    \centering
    \caption{tabincell} \label{six}
    \begin{tabular}{lll}
        \hline
        1  & 2 & 3 \\
        \hline
        01 & 02 & 03 \\
        \hline
        \tabincell{c}{0\\0\\1} & 002 & 003 \\
        \hline
    \end{tabular}
 \end{table}

Add footnote
Adding a footnote requires adding a macro package
\usepackage{threeparttable}
 \begin{table}[!htp]
    \centering
    \caption{footnote} \label{six}
    \begin{threeparttable}
    \begin{tabular}{llllll}
        \hline
        1  & 2 & 3 & 4 & 5 & 6 \\
        \hline
        01 & 02 & 03 & 04 & 05 & 06\\
        \hline
        001 & 002 & 003 & 004 & 005 & 006\\
        \hline
        \end{tabular}
        \begin{tablenotes}
            \item[1] tablefootnote 1
            \item[2] tablefootnote 2
        \end{tablenotes}
        \end{threeparttable}
 \end{table}
Write where footnotes are needed
  \begin{tablenotes}
            \item[1] Footnote content
            \item[2] Footnote content
  \end{tablenotes}
One detail that needs attention here is to add this
\begin{threeparttable}
...
\end{threeparttable}
Otherwise, the footnote will not be aligned with the table content, but will be highlighted (as shown in table 20).

Slash meter
Slash headers are often used in daily life. At this time, we need to use the macro package diagbox
\usepackage{diagbox}
 \begin{table}[!htp]
    \centering
    \caption{diagbox} \label{six}
    \begin{tabular}{l|lll}
        \hline
        \diagbox{Second}{Minute}{Time}& 1  & 2 & 3 \\
        \hline
        00 & 01 & 02 & 03 \\
        \hline
        000 & 001 & 002 & 003 \\
        \hline
    \end{tabular}
 \end{table}
The key statement is in \ diagbox {second} {minute} {time} & 1 & 2 & 3 \ \ place \ diagbox {content} {content}} in the first row and first column.
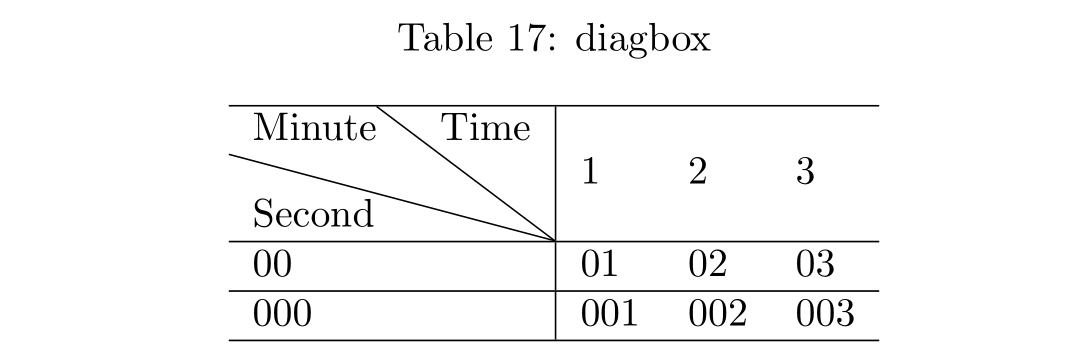
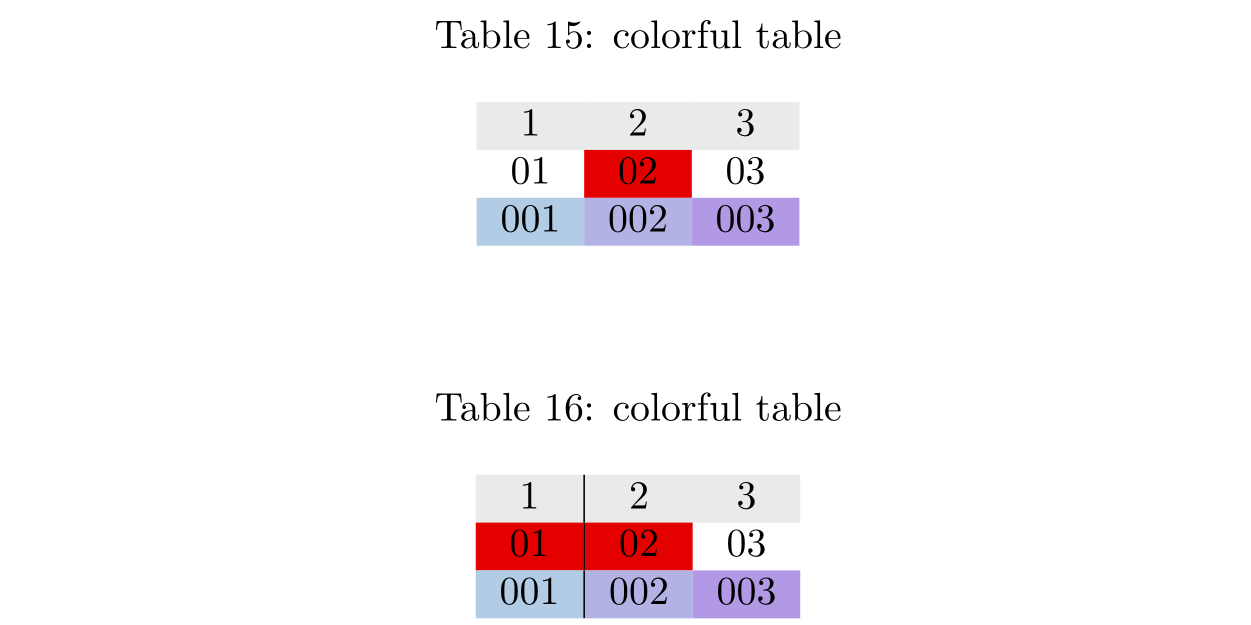
Table coloring
To color the table, first add the macro package colortbl
\usepackage{colortbl}
The \ columncolor, \ rowcolor and \ cellcolor commands can set the colors of columns, rows and cells respectively. When the three commands are used at the same time, their priority order is: cell, row and column.
 \begin{table}[!htp]
    \centering
    \caption{colorful table} \label{six}
    \begin{tabular}{c>{\columncolor[rgb]{.9,.0,.0}}cc}
        \rowcolor[gray]{.9}1 & 2 & 3\\
    	01& 02& 03\\
    	\cellcolor[rgb]{.7,.8,.9}001&
    	\cellcolor[rgb]{.7,.7,.9}002&
    	\cellcolor[rgb]{.7,.6,.9}003\\
    \end{tabular}
 \end{table}
Adding color to a column is to replace {ccc} of the original \ begin{tabular}{ccc} with {c > {\ columncolor[rgb]{.9,.0,.0}} CC}. c still means the original center. If you want to color in front of which column, put {\ columncolor[rgb]{.9,.0,.0}} in front of which column. Note that it will only color the column behind it, and will not color multiple columns. If you want to color the first two columns (as shown in table 16), It shall be written as:
 \begin{table}[!htp]
    \centering
    \caption{colorful table} \label{six}
    \begin{tabular}{>{\columncolor[rgb]{.9,.0,.0}}c|>{\columncolor[rgb]{.9,.0,.0}}cc}
        \rowcolor[gray]{.9}1 & 2 & 3\\
    	01& 02& 03\\
    	\cellcolor[rgb]{.7,.8,.9}001&
    	\cellcolor[rgb]{.7,.7,.9}002&
    	\cellcolor[rgb]{.7,.6,.9}003\\
    \end{tabular}
 \end{table}
For the same reason, if you color a row or a cell, add the corresponding statement \ rowcolor/\cellcolor to the corresponding row / cell.
[gray]{x} and [rgb]{r,g,b} are written in two different colors.
[rgb]{r,g,b}, where {r,g,b} represents the combination of red, green and blue, and the value range is [0-1], and the value range of X in [gray]{x} is also [0-1].
Super tool sharing
Generally speaking, it is not only difficult but also time-consuming to generate a latex table purely by tapping the code, but I met a website that generates latex syntax tables online, which really greatly improved my productivity.
https://www.tablesgenerator.com/
Method 1:
It can be imported from CSV file, which means you can make a table in excel, convert it to CSV format, and then import it to this website
Method 2:
This method is simpler. Just paste it directly from excel or wps. Multiple rows and multiple merges in a single table can be realized, and it will remind you to import the corresponding package when you merge rows or columns.