How to Use LaTex (Foreign Language Journals of Science and Engineering)
Preface
A while ago, I learned LaTex by myself. I feel that when I write a paper, I can really focus on the text. I don't need to work as hard on formatting as word. It's very silky. Write a document for future archives.
My learning process is to install LaTex compiler software (Texpad for macOS) according to the B-site tutorial ⇒ \Rightarrow Learn basic structure and grammar based on video ⇒ \Rightarrow Reproduce an IEEE Access paper (this is the most important step I think, simply listening to classes and taking notes can not understand the problems that may be encountered in the actual writing process)
Website Recommendation
In addition, there are some reference resources, and I will point out the instructions separately in each section.
Dead work
1. LaTex Download
- Mac User Click Download MacTex In the latest version, there are several more applications after installation, that is, the installation is successful:

- Win User Click Download TexLive The latest version is OK (I haven't installed it myself, I don't know how successful the installation is, refer to the forum tutorial)
2. LaTex Editor Download + Environment Configuration
With the popularization of LaTex, LaTex compiler software has become more and more in recent years. It is recommended to do more research on platforms such as CSDN, B station, etc. and choose the one that you think is most appropriate. I chose Texpad Win and Mac have the main advantages of clear and concise interface, real-time compilation (this is really unbeatable explosion convenience), good auto-fill function, and better support for Mac without too complex configuration. The specific configuration process can refer to the B-station video: The perfect Latex editor for MacOS! Texpad resource sharing and introduction! If there are any errors, it is recommended to go to CSDN and try not to Baidu. Many of the statements on Baidu are very unreliable.
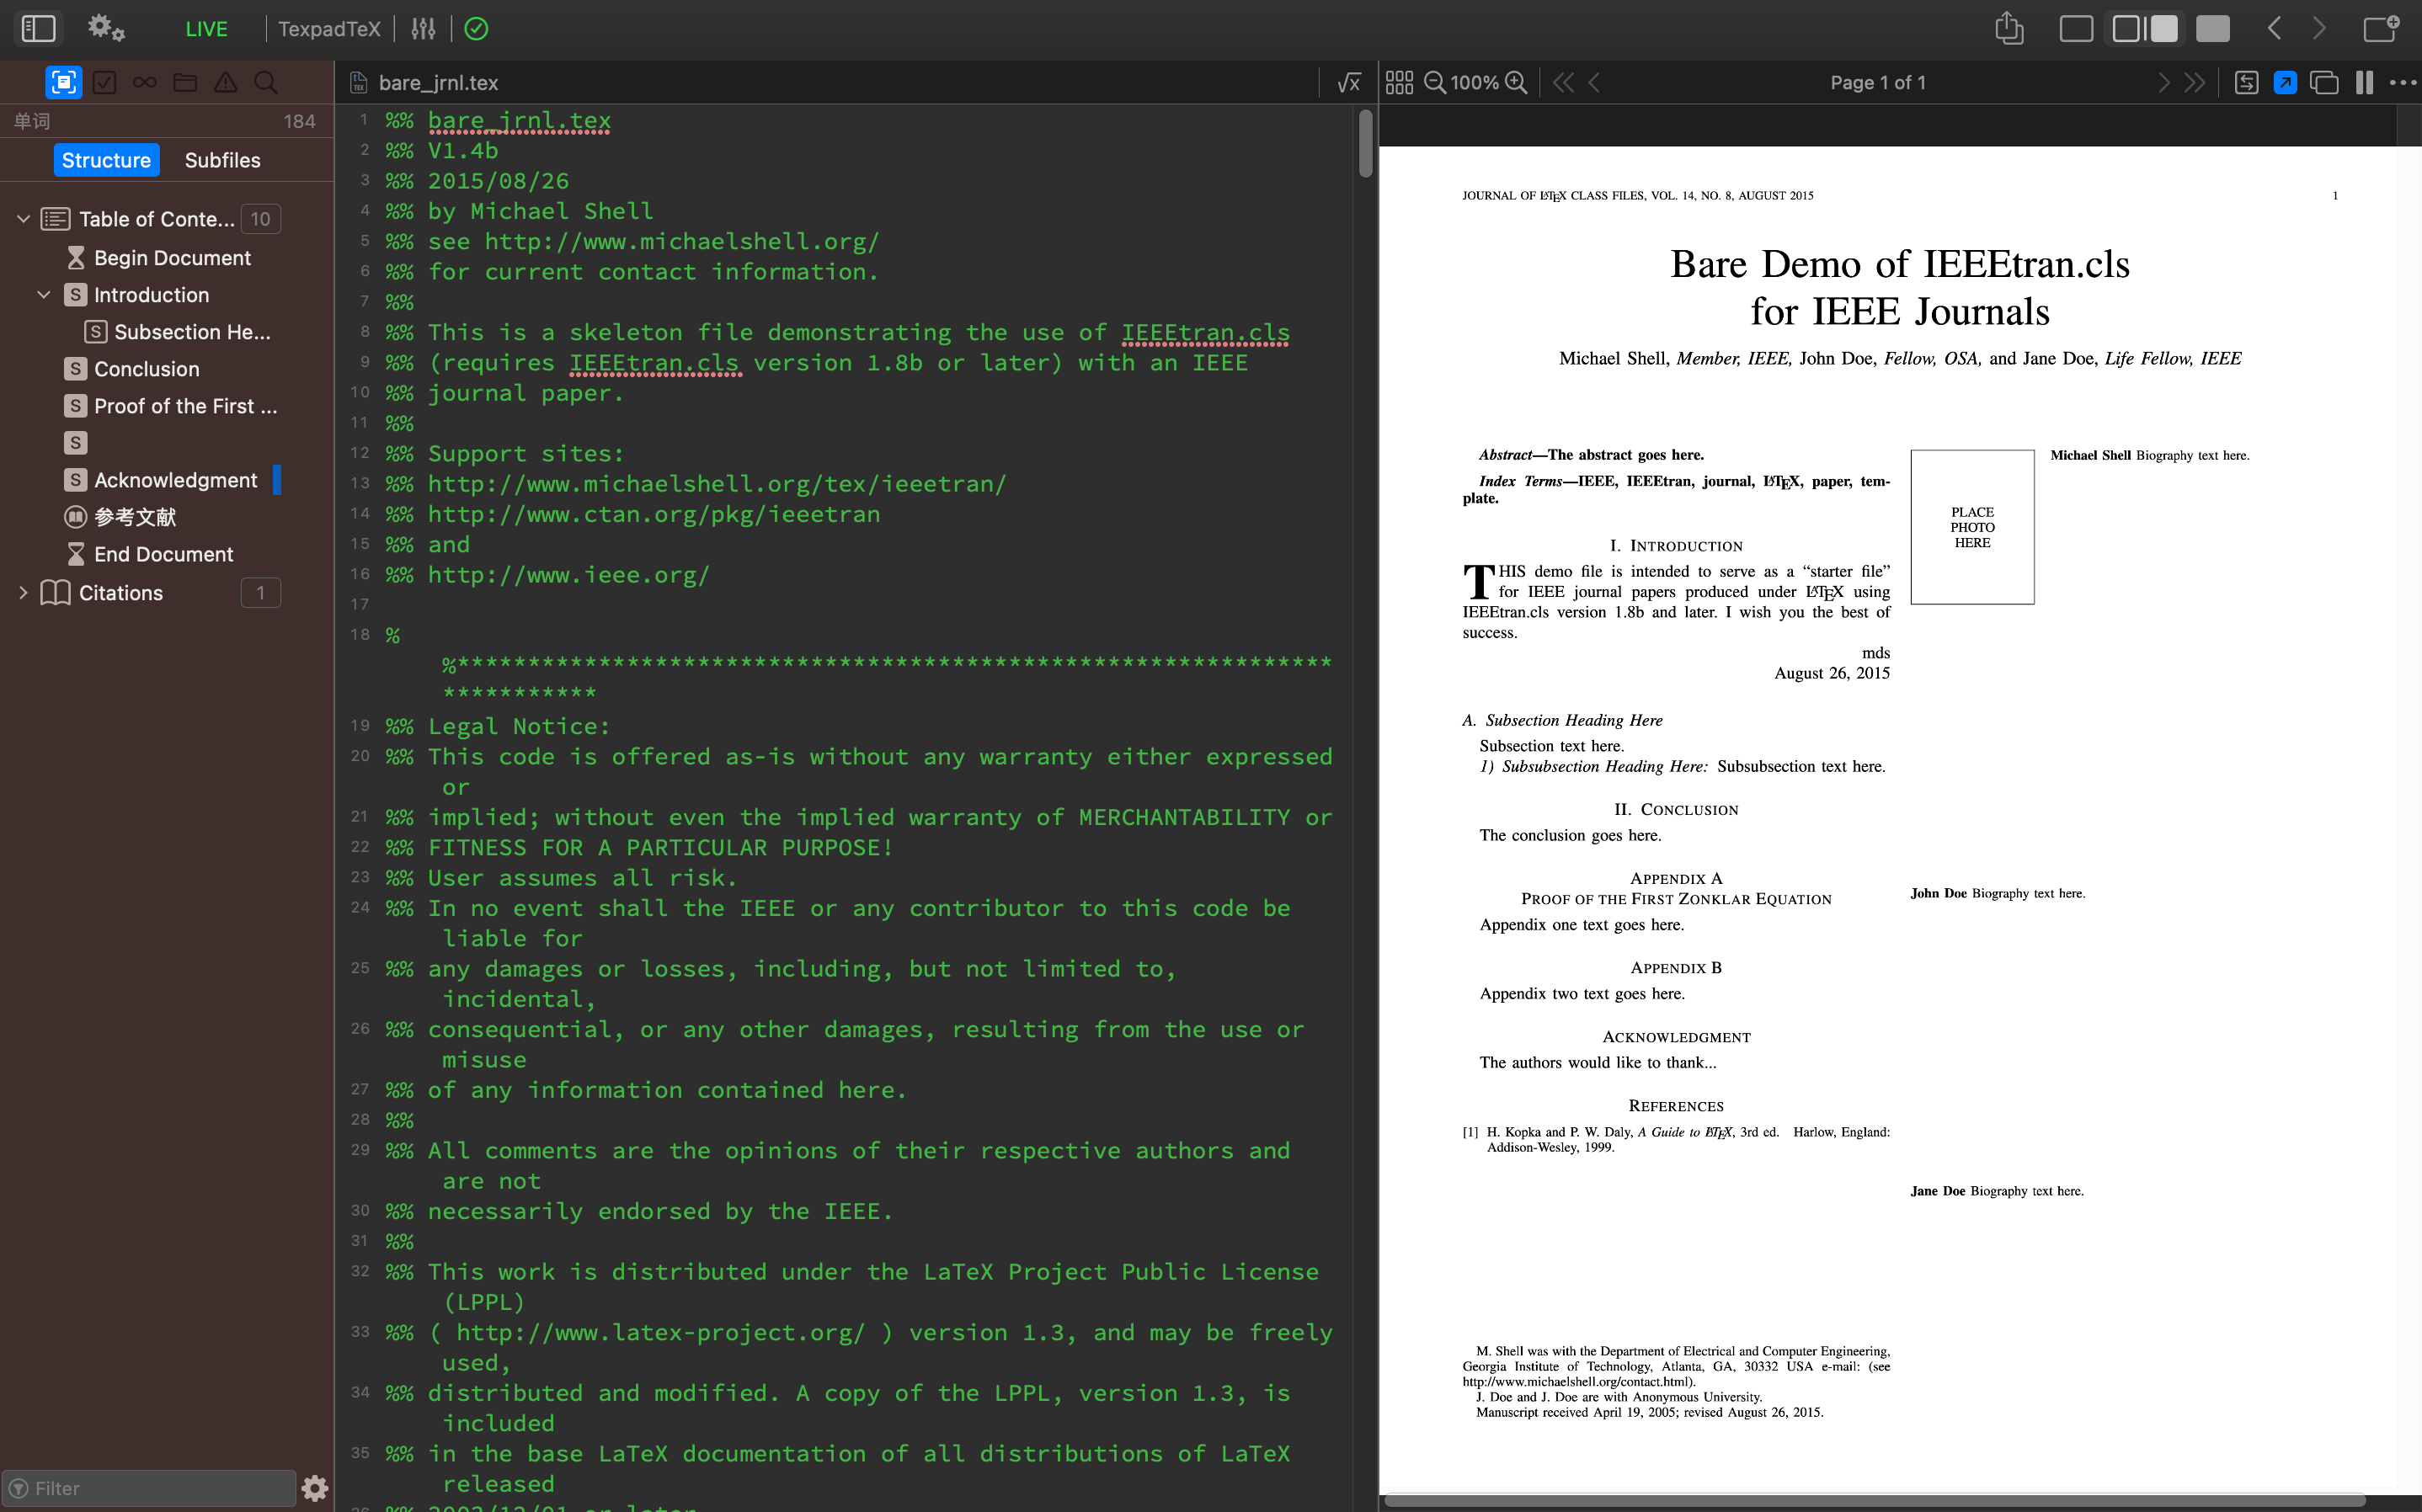
Here I have opened a template, and the upper left corner of the dialog indicates that the compilation passed. Everything is OK ~
3. Template Download
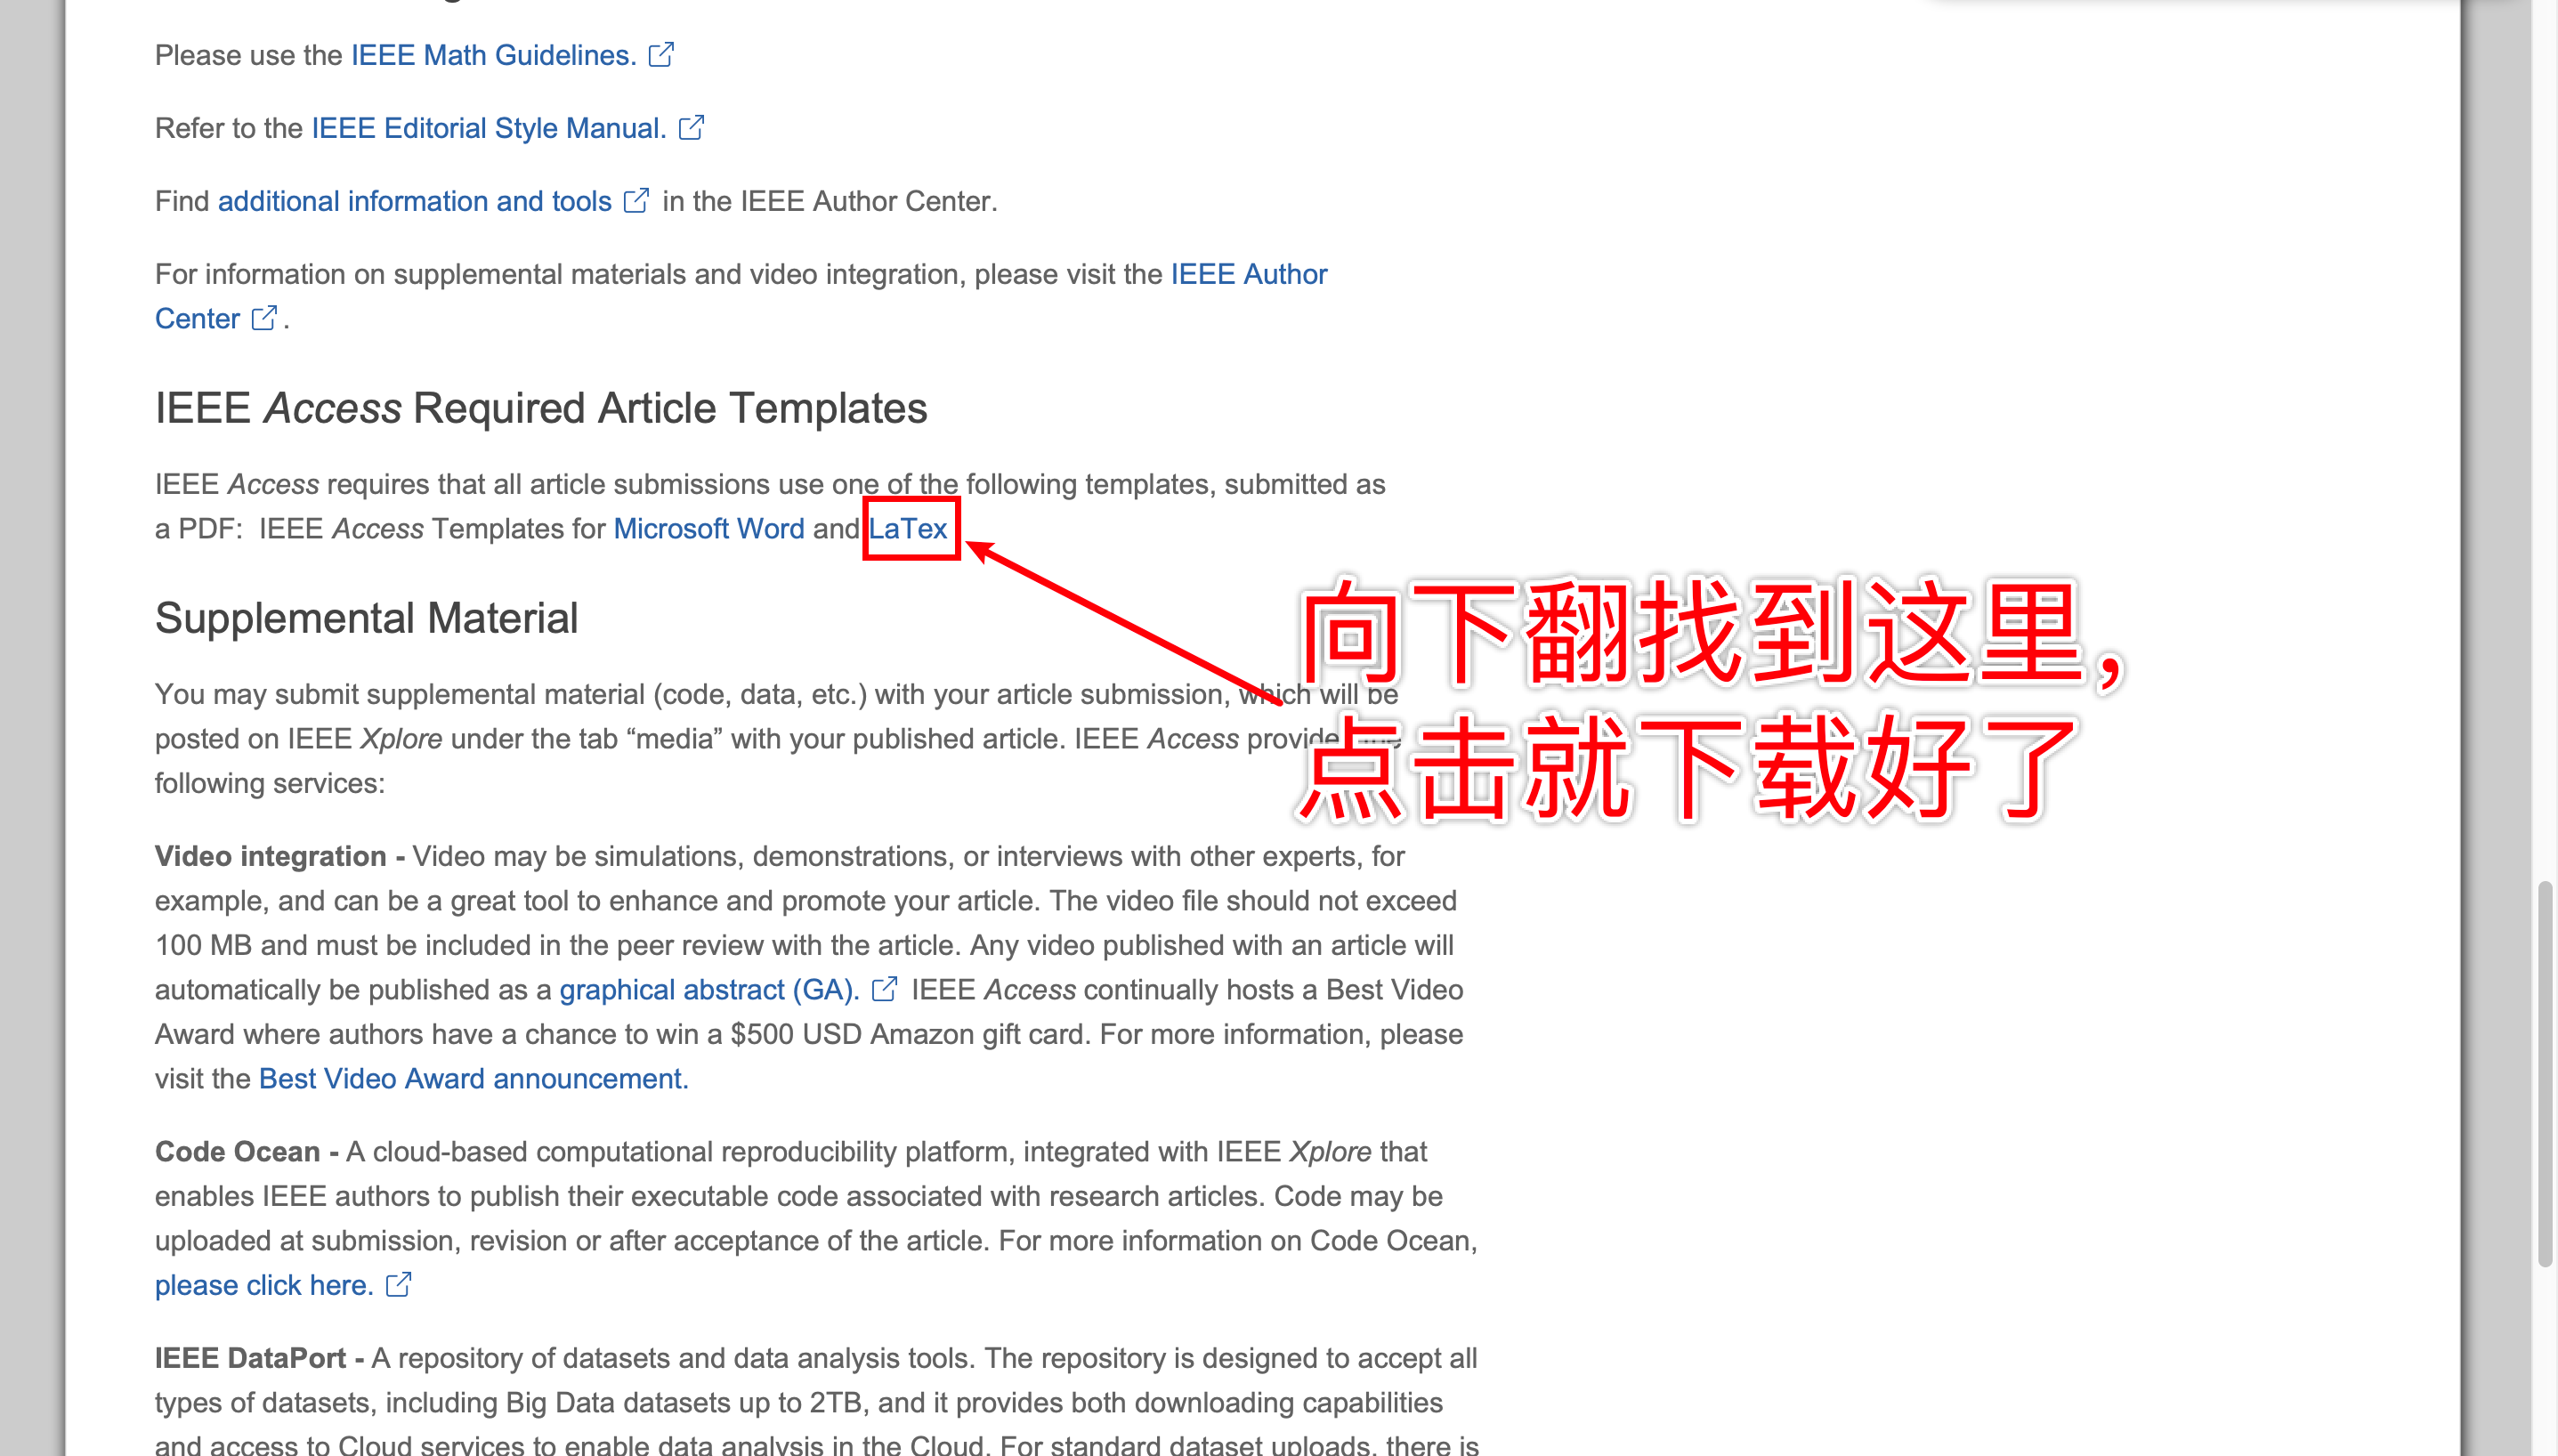
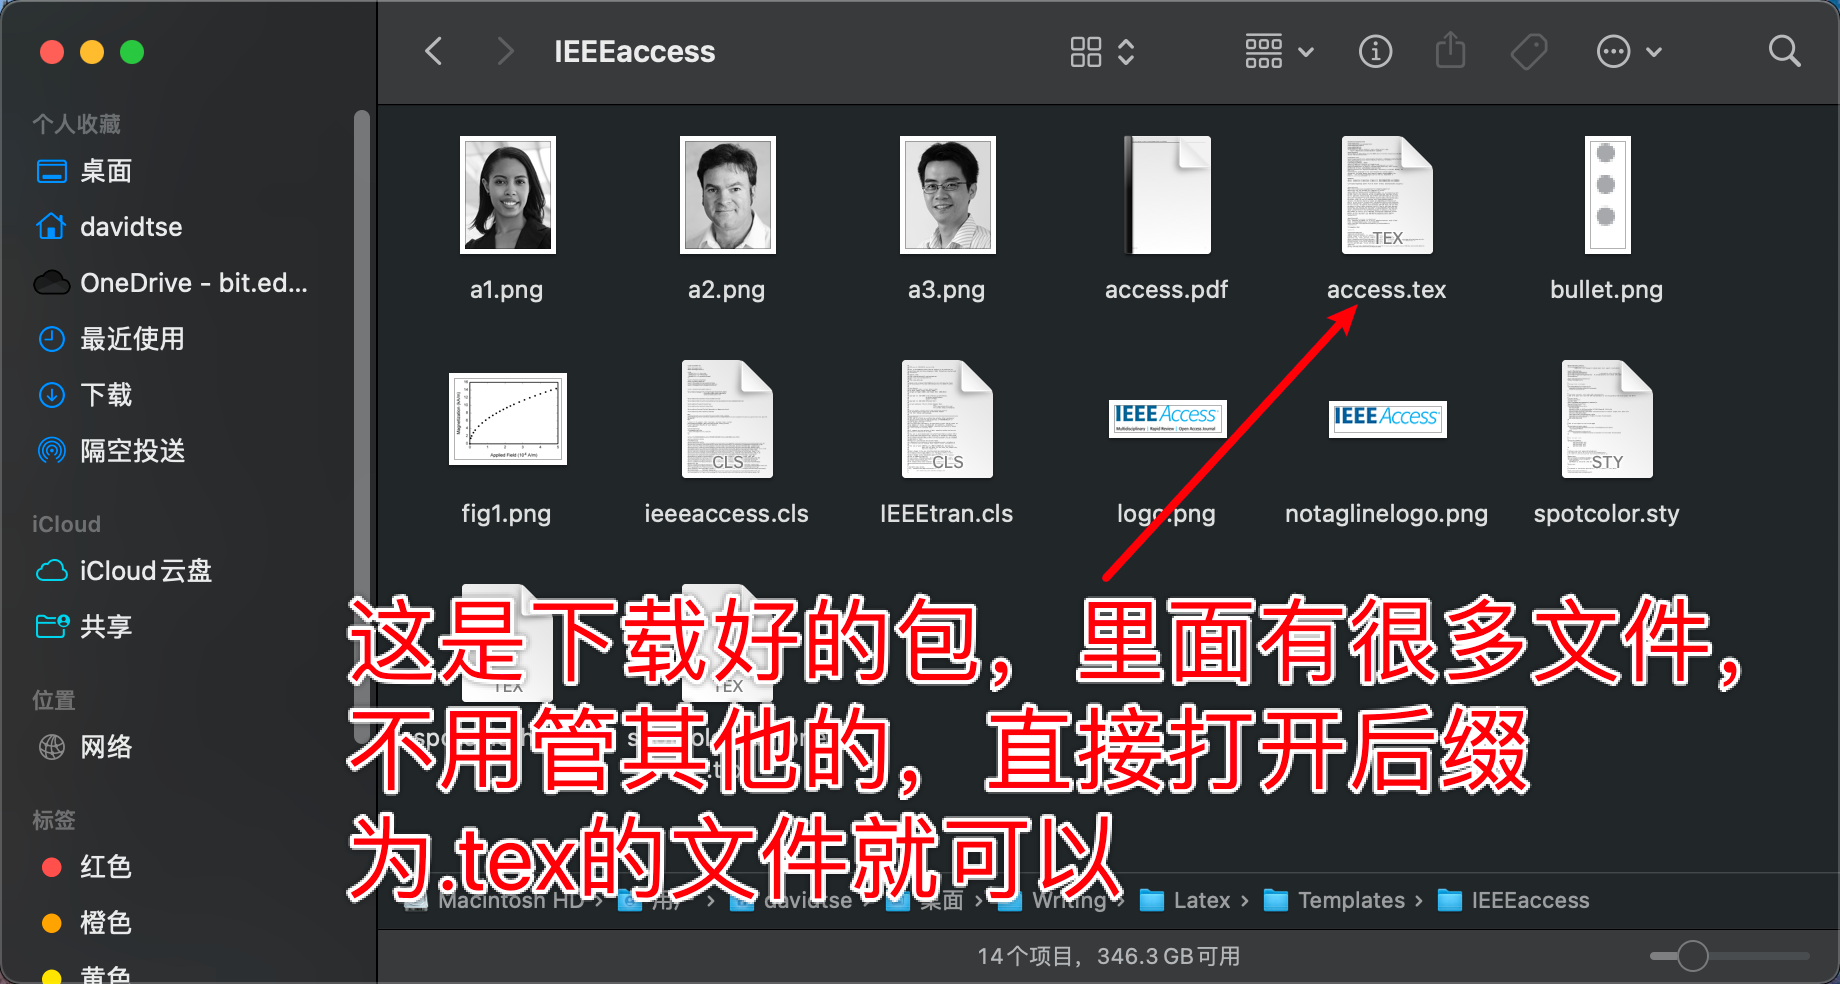
In the foreword, it is mentioned that several websites can download templates. These websites cover templates for many journals, but it is safer to download the latest official templates directly to the official website of the journal you want to contribute to, in order to *** IEEE Access *** For example, operate as follows:

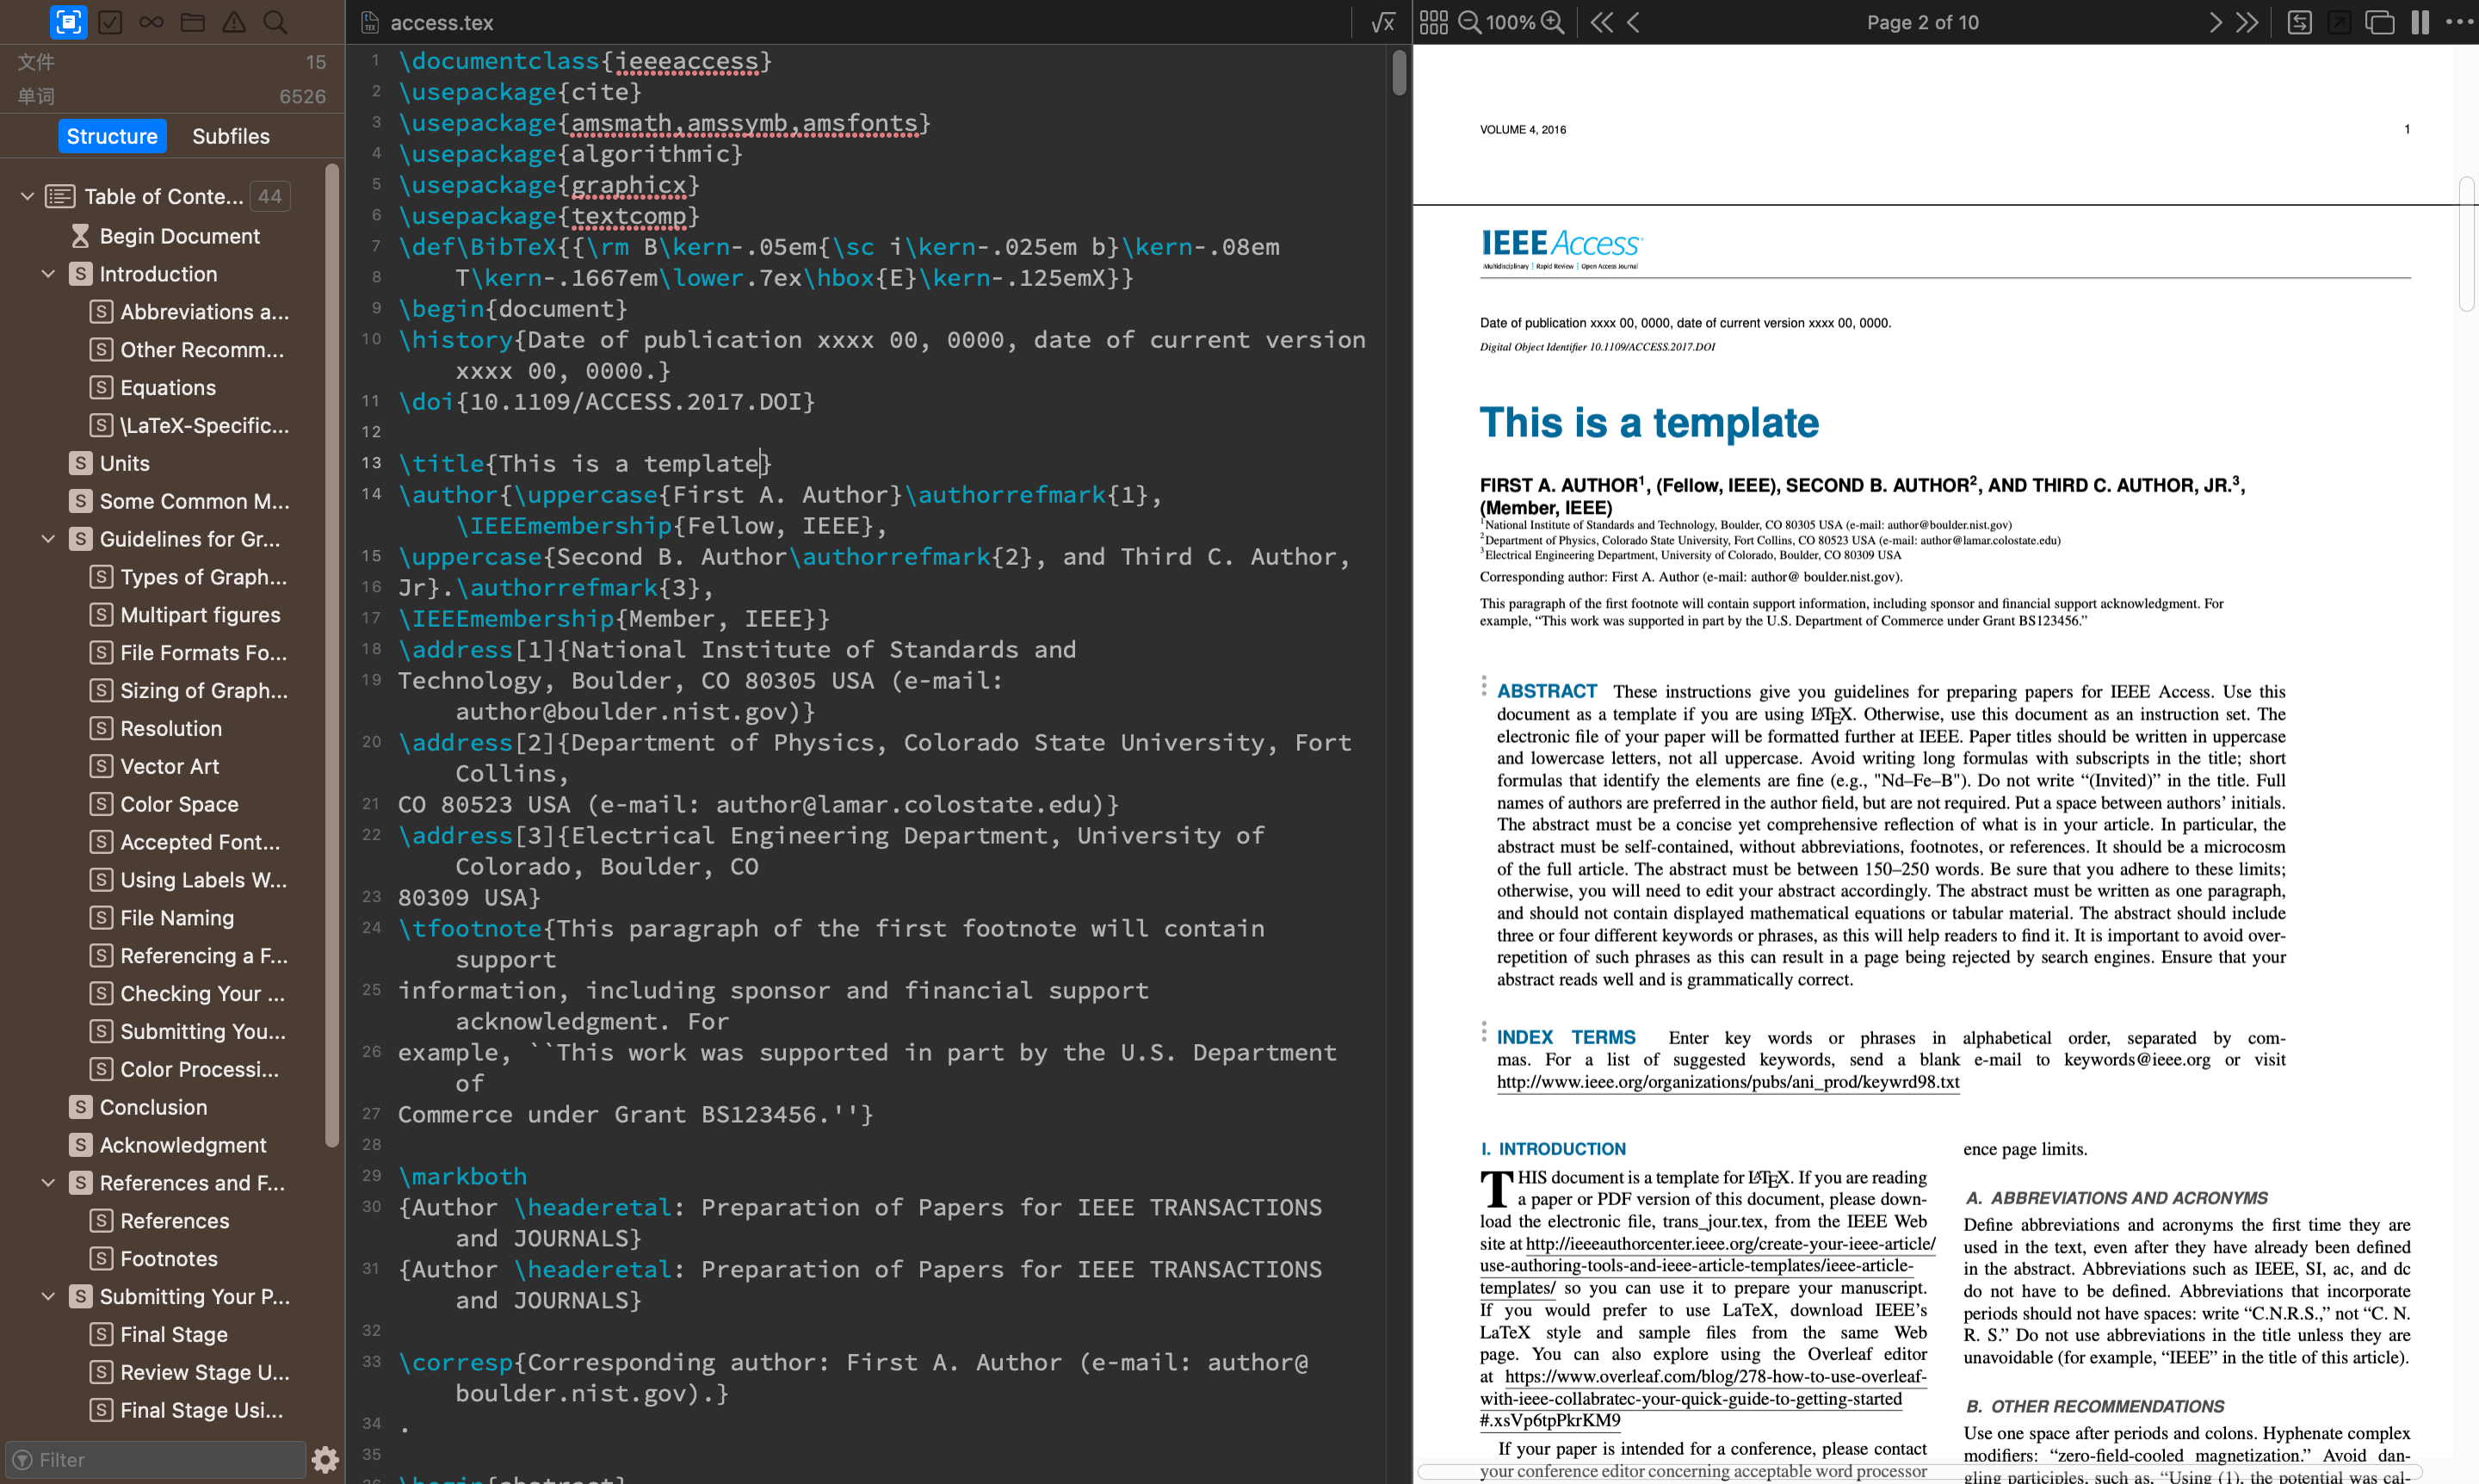
After opening the template, the software interface is as shown above, that is, the opening is successful, and the preparations for the earlier stage are finished here - the fish can be touched (bushi)
Paper Writing
1. Library
The \usepackage{} class in the template is the library you need to write this paper. It's similar to the #include<stdio.h>command in C. You don't need to do anything, just use it. Unlike their regular Latex use, periodical templates usually put the libraries that are common when writing papers in the header file. Of course, in the later writing process, you may encounter no errors when loading the library, so you need to find out which library is missing based on the reasons for the errors, and then add it yourself. The Library in the template I picked out alone, probably this sub ↓ \downarrow ↓
\usepackage{cite}
\usepackage{amsmath,amssymb,amsfonts}
\usepackage{algorithmic}
\usepackage{graphicx}
\usepackage{subfigure}%The library here was added by myself, I wanted to add several diagrams side by side, compiled it and made an error, and found that the lack of this library was the cause.
\usepackage{textcomp}
2. Article Architecture
In the case of IEEE Access, the template is divided into several parts (here it is mainly analyzed by code, not in a single text, you can see the content of the comments below)
- Start of Article
\begin{document}
- subject
\title{This is a template}
- Author's introduction
\author{\uppercase{First A. Author}%Fill in the author's name here
\authorrefmark{1}%The label here guides to the address, mailbox information below
, \IEEEmembership{Fellow, IEEE},
\address[1]{National Institute of Standards and
Technology, Boulder, CO 80305 USA (e-mail: author@boulder.nist.gov)}%Fill in address, mailbox information
%In fact, you don't need to know so much, you can deduce what's probably going on from the templates and compiled results
- abstract
\begin{abstract}
---------------------------
---------------------------
\end{abstract}
- Key word
\begin{keywords}
---------------------------
---------------------------
\end{keywords}
- text
\section{Introduction}%Title Level 1
	\subsection{ABBREVIATIONS ANDACRONYMS}%Secondary Title
- Reference
\begin{thebibliography}{00}%Start outputting bibliography list

\bibitem{b1} G. O. Young, ``Synthetic structure of industrial plastics,'' in \emph{Plastics,} 2\textsuperscript{nd} ed., vol. 3, J. Peters, Ed. New York, NY, USA: McGraw-Hill, 1964, pp. 15--64.%Reference 1, meaning is not explained in detail here, it will be given later

\bibitem{b2} W.-K. Chen, \emph{Linear Networks and Systems.} Belmont, CA, USA: Wadsworth, 1993, pp. 123--135.%Reference 2

\end{thebibliography}%End bibliography list
The method of listing references given above is too cumbersome. It is recommended that bibTex files be used for uniform management, citation and list output of references, and expanded in detail in the later section.
- Author's introduction
\begin{IEEEbiography}%Start Author Introduction
[{\includegraphics[width=1in,height=1.25in,clip,keepaspectratio]{a1.png}}]%Add Author Picture
{First A. Author} (M'76--SM'81--F'87) and all authors may include
biographies. Biographies are often not included in conference-related
papers. This author became a Member (M) of IEEE in 1976, a Senior
Member (SM) in 1981, and a Fellow (F) in 1987. The first paragraph may
contain a place and/or date of birth (list place, then date). Next,
the author's educational background is listed. The degrees should be
listed with type of degree in what field, which institution, city,
state, and country, and year the degree was earned. The author's major
field of study should be lower-cased.

This is the second paragragh.%Here's the body for the author
\end{IEEEbiography}%End Author Introduction
3. Several writing methods highlighted
LaTex is designed to make the writing process much simpler by focusing more on the text itself than on typesetting. However, there is a big difference from the commonly used graphical writing software such as Microsoft Word. Many functions need to be achieved through basic sentences. Here we focus on several writing methods that individuals think are more commonly used, including formula input, picture insertion, table making, document management, and their own citation methods.
-
Formula input
1) Examples
Here is an example of a formula:
{
d
θ
e
d
t
=
ω
r
−
ω
r
∗
d
2
θ
e
d
t
2
=
1.5
n
p
i
q
∗
cos
θ
e
ψ
f
−
T
L
J
−
K
ω
∗
\left\{ \begin{aligned} \frac{d\theta_e}{dt}&=\omega_r-\omega_r^*\\ \frac{d^2\theta_e}{dt^2}&=\frac{1.5n_pi_q^*\cos\theta_e\psi_f-T_L}{J}-K^*_{\omega} \end{aligned} \right.
⎩⎪⎪⎨⎪⎪⎧dtdθedt2d2θe=ωr−ωr∗=J1.5npiq∗cosθeψf−TL−Kω∗
The formula command is as follows:
\begin{equation}%To begin a formula, it is important to note that the formula has multiple input formats, that is{}Content in, except equation Other commonly used are align Wait, the difference can be queried by yourself. equation Compatibility is good in this template
\label{f13}%Name the formula so that it can be easily referenced in the body.{}User-defined content in
	\left\{%\ left Hinder\{Indicates that a left bracket is placed, and the bracket resizes itself with the number of lines in the formula. Other similar symbols include(,[Equal is applicable; Cannot enter directly before the formula{,such LaTex Only one line of parentheses will be output. Must have left,right command
	\begin{aligned}%Similar to the alignment directive, because this formula contains two lines and needs to be aligned at the equal sign, otherwise LaTex Will handle the formula in its own way, not beautiful
		\frac{d\theta_e}{dt}&=\omega_r-\omega_r^*\\%The first line of formulas,\\Represents a line break, within two lines=Previous&Represents in=Position alignment, you can specify any alignment position
		\frac{d^2\theta_e}{dt^2}&=\frac{1.5n_pi_q^*\cos\theta_e\psi_f-T_L}{J}-K^*_{\omega}%Second Line Formula
	\end{aligned}%End
	\right.%No symbols need to be added to the right side of the expression, as long as there are\left Directive, which must be added later\right
\end{equation}%End Formula
The corresponding relations of some basic operation symbols can be seen directly from the above examples, many of which I can't actually remember, so I can refer to this article. LaTeX Mathematical Formulas - Detailed Tutorial , basically covers all the formula input methods and rules you can use.
2) Formula Reference
In the example above, I give the formula the name f13. When a reference is needed in the body, just enter \ref{f13} to make a reference to the formula. The article will automatically display the numbers in the order of the formulas. Typically, a reference is enclosed in parentheses (\ref{f13}).
3) In-line Formula
Sometimes you need to type some symbols in the line, just use the dollar sign $and type the formula/symbol $in the body like this.
-
drawings inserting
1) Examples
Here's an example of the picture insertion I practiced myself:
\begin{figure}[h!] %Start inserting pictures;[h!]Represents a compulsory insertion of pictures here, plus t,b,p Equal position, and h Can be used in conjunction with these locations
\begin{center} %Represents picture centering
\includegraphics[width=7.7cm]{Pic/Fig 2.png} %The first parenthesis specifies the width of the picture; File path and name of picture in second bracket
\caption{Diagram of the virtual rotating frame and the real rotating frame. The two situations generate equal torque, but only the left one can achieve dynamic balance.} %Diagram Notes
\label{Fig2} %Name the picture
\end{center} %End Centering
\end{figure}%End picture
2) Picture reference
Similar formula references, use the \ref{} command.
3) Special circumstances
The above list is only the most basic insertion method which takes up a single column and has only one picture. In the process of writing an article, there will often be banner pictures and multiple subgraphs. Here is a code with three subgraphs arranged vertically:
\begin{figure}
\begin{center}
\subfigure[]{%Insert the first subgraph
\begin{minipage}[b]{0.5\textwidth}
\includegraphics[width=1\textwidth]{Pic/Fig 10(a).png}
\end{minipage}
}
\subfigure[]{%Insert the second subgraph
\begin{minipage}[b]{0.5\textwidth}
\includegraphics[width=1\textwidth]{Pic/Fig 10(b).png}
\end{minipage}
}
\subfigure[]{%Insert the third subgraph
\begin{minipage}[c]{0.5\textwidth}
\includegraphics[width=1\textwidth]{Pic/Fig 10(c).png}
\end{minipage}
}
 \caption{This is a caption} \label{Fig10}
\end{center}
\end{figure}
The code here is copied and pasted directly into the exercise paper after I find it on the CSDN. For other special cases, you can refer to it LaTex Note 1: Insertion and layout of pictures
It is important to note that among the various picture formats, LaTex is the most compatible and the clearest output format is.eps, which is also mentioned in the article above about how various formats can be converted to.eps.
-
Form making
1) Examples
I am too lazy to compile the qwq code for Whooping with Markdown again:
\begin{table}[h!]%Start Table
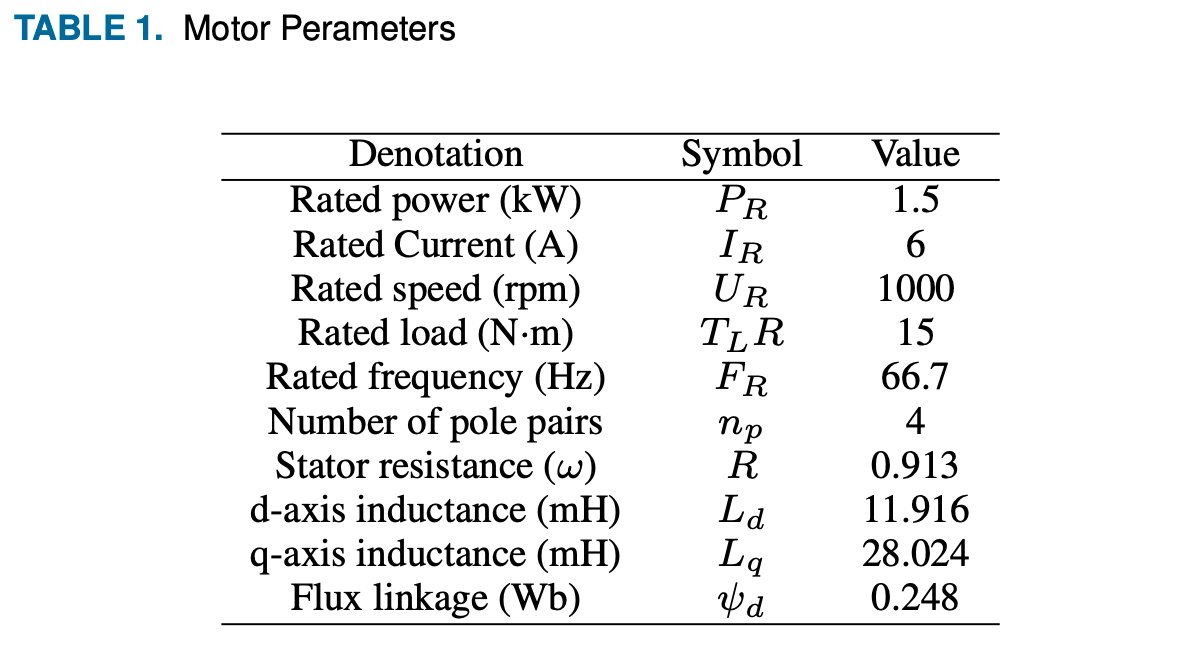
\caption{Motor Perameters}%Table Title
\label{rt1}%Name the table
\begin{center}%Represents table centering
\begin{tabular}{ccc}%Three column cells all centered
\hline%Horizontal line
Denotation & Symbol & Value \\ \hline%Horizontal line
Rated power (kW) & $P_R$ & 1.5 \\
Rated Current (A) & $I_R$ & 6 \\
Rated speed (rpm) & $U_R$ & 1000 \\
Rated load (N$\cdot$m) & $T_LR$ & 15 \\
Rated frequency (Hz) & $F_R$ & 66.7 \\
Number of pole pairs & $n_p$ & 4 \\
Stator resistance ($\omega$) & $R$ & 0.913 \\
d-axis inductance (mH) & $L_d$ & 11.916 \\
q-axis inductance (mH) & $L_q$ & 28.024 \\
Flux linkage (Wb) & $\psi_d$ & 0.248 \\ \hline%Horizontal line
\end{tabular}
\end{center}
\end{table}%End table
2) Reference Form
Similar formula references, use the \ref{} command.
3) In fact, none of the above needs to be understood, just at TablesGenerator It's awkward to have graphical input inside and then generate table code to copy and paste directly.
-
Document Management-BibTex
BibTex is a way of managing documents in LaTex. It is necessary to make separate.bib-format files for reference documents and to reference and compile them in LaTex files.
1) Create a.bib file
Use a text editor to create a new text document in the same directory as the main document of.tex (it is recommended that you store it in any folder on your computer, but later calls will be inconvenient). After naming and storing it, change the suffix name from.txt to.bib. The document can then be opened in the LaTex editor.
2) Export BibTex
In the case of Google Scholar, after querying the literature you need to refer to, click the ite button below

Click on the bottom column of BibTex in the pop-up Cite window

Paste the text from the pop-up window into the new.bib file you created in the first step and arrange the documents.
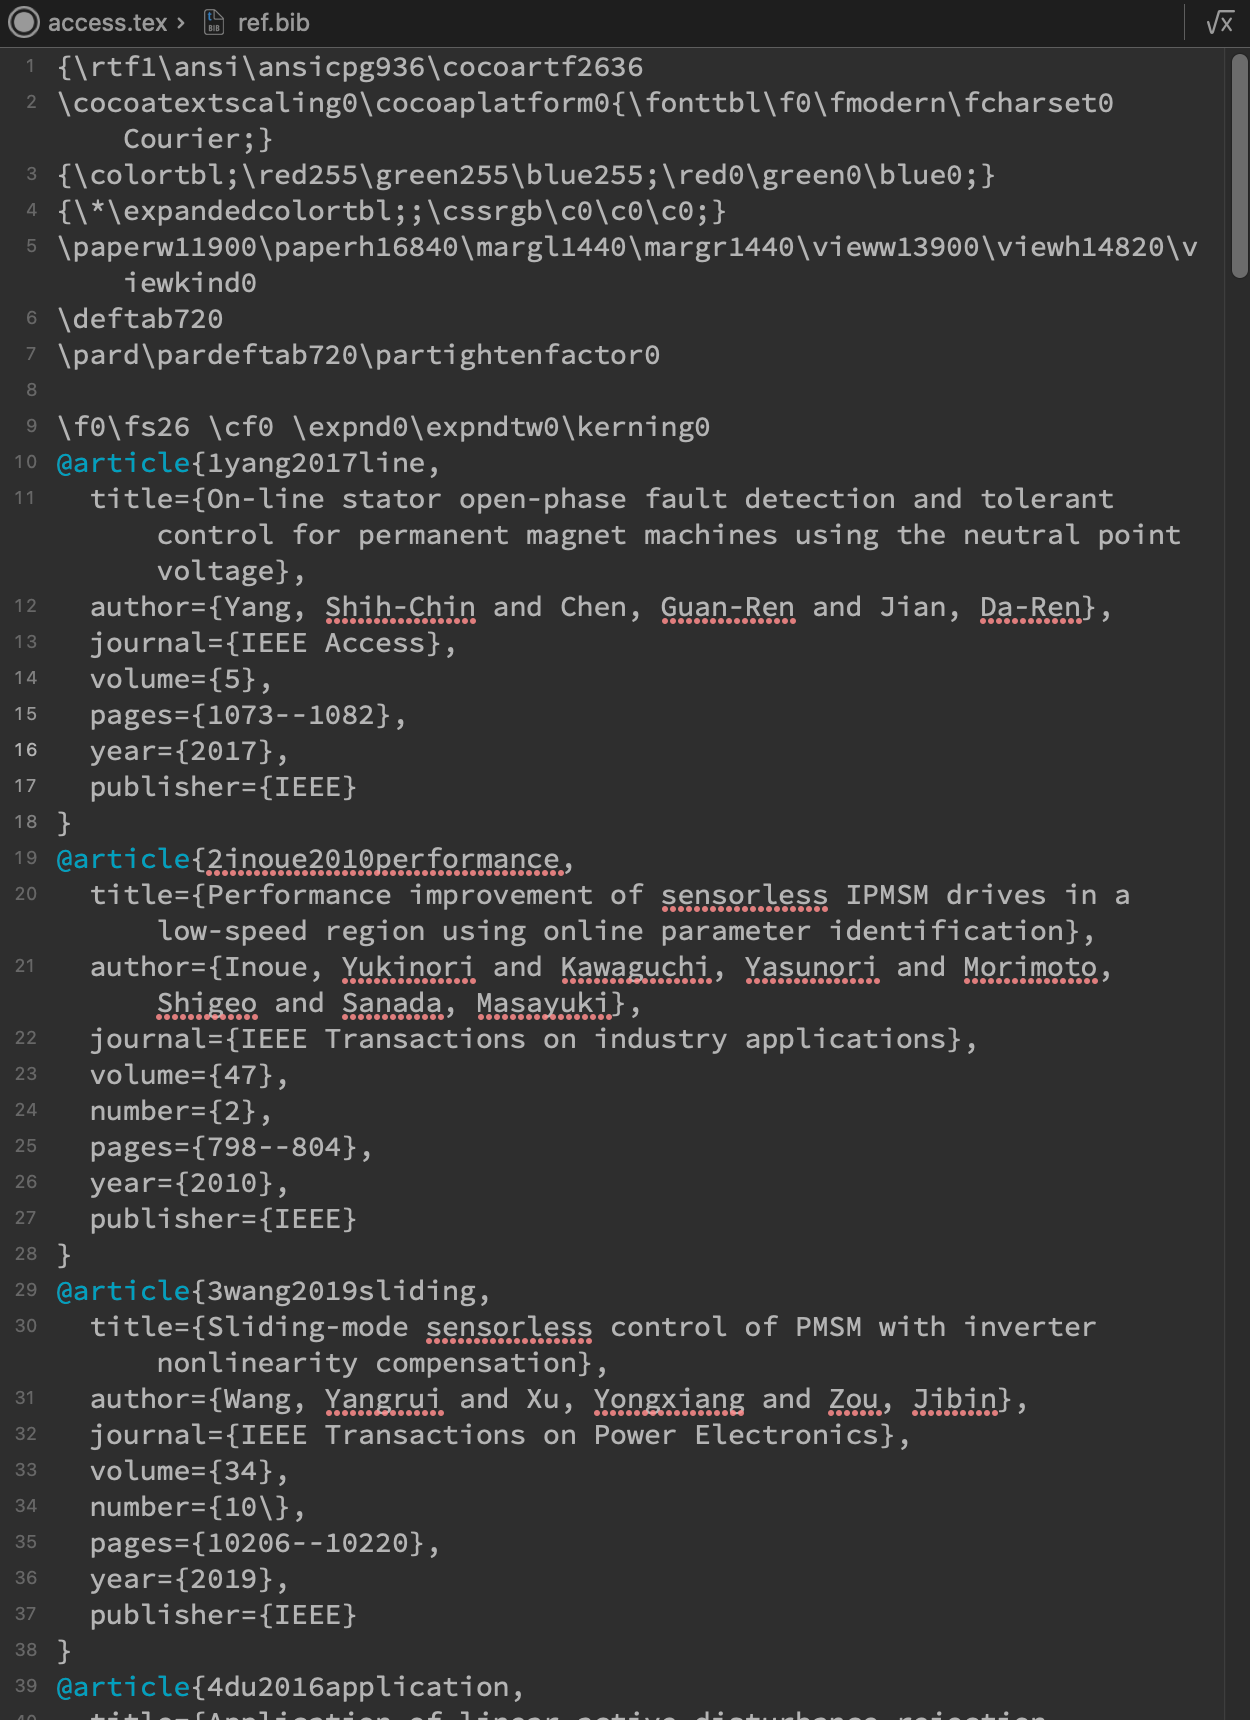
This is how my documentation looks when it's added. The code above doesn't matter. To modify the documentation, just adjust the @article entry below.
3) Edit Cited Documents
The BibTex source code for an article is introduced here as an example:
@article{25Ying2018Speed,%The only thing you need to focus on here is giving this article a name
  title={Speed Regulation System of a Flux-Modulated Permanent-Magnet In-Wheel Motor Based on Sliding Mode Control and Adaptive Notch Filter},
  author={Ying and Fan and Qiushi and Zhang and Wusen and Wang and Xiaofei and Zhou},
  journal={IEEE Transactions on Energy Conversion},
  volume={33},
  number={4},
  pages={2183-2190},
  year={2018},
}
4) Document Citation
In the body, when a reference is required, simply use the \cite{name given to the article in parentheses} command, and the article will be automatically numbered.
5) Output of Reference List
At the end of the paper, a list of references is usually attached. According to this template, the code required for the output of the list of references is:
\bibliography{IEEEabrv,ref.bib}%The format in which the reference is generated is represented before and the reference is followed by the reference.bib Path to file (no path because it's in the same directory), file name
It's really a straight line of code to solve the problem of document output!
***but***I actually encountered a bug here, that is, in the output BibTex text, all the documents with \ are displayed as empty, only the numbers can be output, and then the word will be replaced with empty uniformly to solve this problem, I don't know what is going on...
End End End End End End End End End End End End End End End End End End End End End End End End End End End End End End End End End End End End End End End End End End End End End End End