-
Introduction
Kubernetes has been operating in our production environment for nearly a year, and is now running steadily. From the construction of the system to the migration of the project, there have been many problems. The production environment uses multiple master nodes to achieve high availability of kubernetes, and uses haproxy+keepalived load balancing master. Now take time to summarize the process of building the system, to help you quickly build their own k8s system.
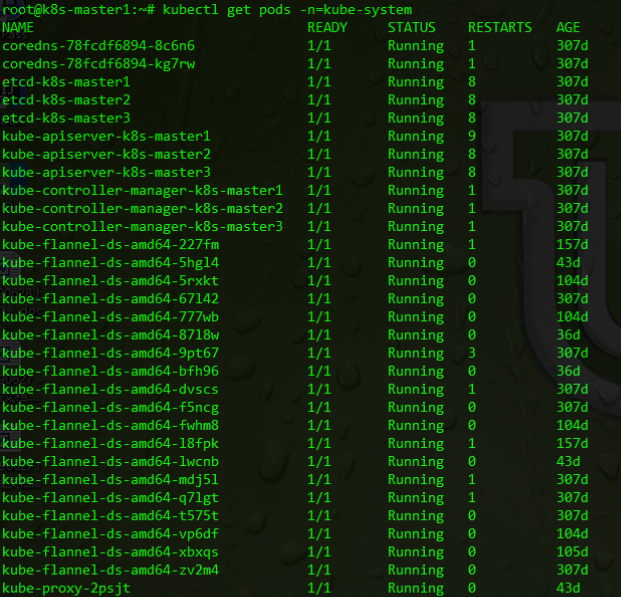
Here is a screenshot of my production environment

The update iteration of kubernente version is very fast. When I built the production environment of kubernetes, the latest official version was v1.11. Now the official version has been updated to v1.15. This article gives an overview of the latest version.
2. Introduction to kubernetes
Kubernetes is google's borg-based open source container scheduling engine, an open source platform for automatic deployment, expansion and operation of container clusters. Kubernetes has perfect cluster management capabilities, including multi-level security protection and access mechanism, multi-tenant application support capability, transparent service registration and service discovery mechanism, built-in load balancer, fault detection and self-repair capability, rolling service upgrade and online expansion, scalable resource automatic scheduling Mechanisms, multi-granularity resource quota management capabilities. Kubernetes also provides perfect management tools, covering development, deployment testing, operation and maintenance monitoring and other aspects. As one of the most important members of CNCF (Cloud Native Computing Foundation), kubernetes aims not only to be a choreography system, but also to provide a specification that allows you to describe the architecture of the cluster and define the final state of the service. Kubernetes can help you automatically achieve and maintain the state of the system.
3. kubernetes Architecture
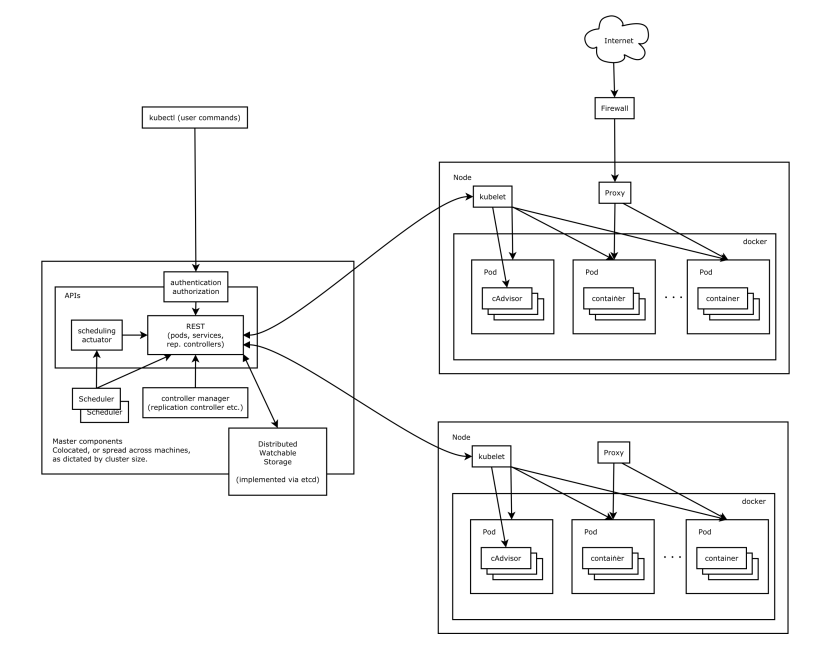
In this system architecture diagram, services can be divided into services running on worker nodes and services constituting cluster-level control nodes. kubernetes nodes have the necessary services to run application containers, which are controlled by master s. Each node runs docker, which is responsible for all specific image downloads and container runs.
kubernetes consists of the following core components:
etcd saves the state of the whole cluster.
apiserver provides the only access to resource operation, and provides authentication, authorization, access control, API registration and discovery mechanisms.
controller manager is responsible for maintaining the status of the cluster, such as fault detection, automatic expansion, rolling updates, etc.
Schduler is responsible for resource scheduling, scheduling Pod to the corresponding machine according to the scheduled scheduling strategy.
kubelet is responsible for maintaining the life cycle of containers, as well as managing Volume (CVI) and Network (CNI).
Container runtime is responsible for image management and the real operation of Pod and container (CRI);
kube-proxy is responsible for providing service discovery and load balancing within the cluster for Service.
In addition to core components, there are also some recommended components:
kube-dns is responsible for providing DNS services for the entire cluster
Ingress Controller Provides Extranet Access for Services
Heapster provides resource monitoring
Dashboard provides GUI
Federation provides clusters across available zones
-
Fluentd-elastic search provides cluster log collection, storage and query
4. Construction process
Let's start the process of building our dry goods and clusters.
4.1 Environmental preparation
| Machine name | Machine configuration |
Machine System | IP address | role |
| haproxy1 | 8C16G |
ubuntu16.04 | 192.168.10.1 | haproxy+keepalived VIP:192.168.10.10 |
| haproxy1 | 8C16G | ubuntu16.04 | 192.168.10.2 | haproxy+keepalived VIP:192.168.10.10 |
| master1 | 8C16G | ubuntu16.04 | 192.168.10.3 | Primary Node 1 |
| master2 | 8C16G | ubuntu16.04 | 192.168.10.4 | Primary Node 2 |
| master3 | 8C16G | ubuntu16.04 | 192.168.10.5 | Primary Node 3 |
| node1 | 8C16G | ubuntu16.04 | 192.168.10.6 | Work Node 1 |
| node2 | 8C16G | ubuntu16.04 | 192.168.10.7 | Work Node 2 |
| node3 | 8C16G | ubuntu16.04 | 192.168.10.8 | Work Node 3 |
4.2 Environmental Description
This paper uses three masters and three node s to build the kubernetes cluster, and two machines to build haproxy+keepalived load balancing master to ensure the high availability of the master, so as to ensure the high availability of the whole kubernetes. The official requirement is that the machine configuration must be >= 2C2G and the operating system >= 16.04.
4.3 Building Process
4.3.1 Basic Settings
Modify the hosts file and all 8 machines
root@haproxy1:~# cat /etc/hosts
192.168.10.1     haproxy1
192.168.10.2     haproxy2
192.168.10.3     master1
192.168.10.4     master2
192.168.10.5     master3
192.168.10.6     node1
192.168.10.7     node2
192.168.10.8     node3
192.168.10.10    kubernetes.haproxy.com
4.3.2 haproxy+keepalived architecture
Install haproxy
root@haproxy1:/data# wget https://github.com/haproxy/haproxy/archive/v2.0.0.tar.gz
root@haproxy1:/data# tar -xf v2.0.0.tar.gz
root@haproxy1:/data# cd haproxy-2.0.0/
root@haproxy1:/data/haproxy-2.0.0# make TARGET=linux-glibc
root@haproxy1:/data/haproxy-2.0.0# make install PREFIX=/data/haproxy
root@haproxy1:/data/haproxy# mkdir conf
root@haproxy1:/data/haproxy# vim  conf/haproxy.cfg
global
  log 127.0.0.1 local0 err
  maxconn 50000
  user haproxy
  group haproxy
  daemon
  nbproc 1
  pidfile haproxy.pid
defaults
  mode tcp
  log 127.0.0.1 local0 err
  maxconn 50000
  retries 3
  timeout connect 5s
  timeout client 30s
  timeout server 30s
  timeout check 2s
listen admin_stats
  mode http
  bind 0.0.0.0:1080
  log 127.0.0.1 local0 err
  stats refresh 30s
  stats uri     /haproxy-status
  stats realm   Haproxy\ Statistics
  stats auth    will:will
  stats hide-version
  stats admin if TRUE
frontend k8s
  bind 0.0.0.0:8443
  mode tcp
  default_backend k8s
backend k8s
  mode tcp
  balance roundrobin
  server master1 172.20.2.31:6443 weight 1 maxconn 1000 check inter 2000 rise 2 fall 3
  server master2 172.20.2.32:6443 weight 1 maxconn 1000 check inter 2000 rise 2 fall 3
  server master3 172.20.2.33:6443 weight 1 maxconn 1000 check inter 2000 rise 2 fall 3

root@haproxy1:/data/haproxy# id -u haproxy &> /dev/null || useradd -s /usr/sbin/nologin -r haproxy
root@haproxy1:/data/haproxy# mkdir /usr/share/doc/haproxy
root@haproxy1:/data/haproxy# wget -qO - https://github.com/haproxy/haproxy/blob/master/doc/configuration.txt | gzip -c > /usr/share/doc/haproxy/configuration.txt.gz
root@haproxy1:/data/haproxy# vim /etc/default/haproxy
# Defaults file for HAProxy
#
# This is sourced by both, the initscript and the systemd unit file, so do not
# treat it as a shell script fragment.

# Change the config file location if needed
#CONFIG="/etc/haproxy/haproxy.cfg"

# Add extra flags here, see haproxy(1) for a few options
#EXTRAOPTS="-de -m 16"

root@haproxy1:/data# vim /lib/systemd/system/haproxy.service
[Unit]
Description=HAProxy Load Balancer
Documentation=man:haproxy(1)
Documentation=file:/usr/share/doc/haproxy/configuration.txt.gz
After=network.target syslog.service
Wants=syslog.service

[Service]
Environment=CONFIG=/data/haproxy/conf/haproxy.cfg
EnvironmentFile=-/etc/default/haproxy
ExecStartPre=/data/haproxy/sbin/haproxy -f ${CONFIG} -c -q
ExecStart=/data/haproxy/sbin/haproxy -W  -f ${CONFIG} -p /data/haproxy/conf/haproxy.pid $EXTRAOPTS
ExecReload=/data/haproxy/sbin/haproxy -c -f ${CONFIG}
ExecReload=/bin/kill -USR2 $MAINPID
KillMode=mixed
Restart=always
Type=forking

[Install]
WantedBy=multi-user.target

root@haproxy2:/data/haproxy# systemctl daemon-reload
root@haproxy2:/data/haproxy# systemctl start haproxy
root@haproxy2:/data/haproxy# systemctl status haproxy
Install keepalived
root@haproxy1:/data# wget https://www.keepalived.org/software/keepalived-2.0.16.tar.gz
root@haproxy1:/data# tar -xf keepalived-2.0.16.tar.gz
root@haproxy1:/data# cd keepalived-2.0.16/
root@haproxy1:/data/keepalived-2.0.16# ./configure --prefix=/data/keepalived
root@haproxy1:/data/keepalived-2.0.16# ./configure --prefix=/data/keepalived
root@haproxy1:/data/keepalived-2.0.16# make && make install
root@haproxy1:/data/keepalived# mkdir conf
root@haproxy1:/data/keepalived# vim conf/keepalived.conf
! Configuration File for keepalived
global_defs {
  notification_email {
    root@localhost
  }

  notification_email_from keepalived@localhost
  smtp_server 127.0.0.1
  smtp_connect_timeout 30
  router_id haproxy1
}

vrrp_script chk_haproxy {                                   #HAproxy Service monitoring script
  script "/data/keepalived/check_haproxy.sh"
  interval 2
  weight 2
}

vrrp_instance VI_1 {
  state MASTER
  interface ens160
  virtual_router_id 1
  priority 100
  advert_int 1
  authentication {
    auth_type PASS
    auth_pass 1111
  }
  track_script {
    chk_haproxy
  }
  virtual_ipaddress {
    172.20.2.60/22
  }
}

root@haproxy1:/data/keepalived# vim /etc/default/keepalived
# Options to pass to keepalived

# DAEMON_ARGS are appended to the keepalived command-line
DAEMON_ARGS=""

root@haproxy1:/data/keepalived# vim /lib/systemd/system/keepalived.service
[Unit]
Description=Keepalive Daemon (LVS and VRRP)
After=network-online.target
Wants=network-online.target
# Only start if there is a configuration file
ConditionFileNotEmpty=/data/keepalived/conf/keepalived.conf

[Service]
Type=forking
KillMode=process
Environment=CONFIG=/data/keepalived/conf/keepalived.conf
# Read configuration variable file if it is present
EnvironmentFile=-/etc/default/keepalived
ExecStart=/data/keepalived/sbin/keepalived -f ${CONFIG} -p /data/keepalived/conf/keepalived.pid $DAEMON_ARGS
ExecReload=/bin/kill -HUP $MAINPID

[Install]
WantedBy=multi-user.target

root@haproxy1:/data/keepalived# systemctl daemon-reload
root@haproxy1:/data/keepalived# systemctl start keepalived.service
root@haproxy1:/data/keepalived# vim /data/keepalived/check_haproxy.sh
#!/bin/bash
A=`ps -C haproxy --no-header | wc -l`
if [ $A -eq 0 ];then
systemctl start haproxy.service
sleep 3
if [ `ps -C haproxy --no-header | wc -l ` -eq 0 ];then
systemctl stop keepalived.service
fi
fi
Similarly, install haproxy and keepalived on haproxy 2 machine
4.3.3 kubernetes Cluster Construction
Basic settings
Close the switch partition, all six machines in the kubernetes cluster must be shut down
root@master1:~# free -m
              total        used        free      shared  buff/cache   available
Mem:          16046         128       15727           8         190       15638
Swap:           979           0         979
root@master1:~# swapoff -a
root@master1:~# free -m
              total        used        free      shared  buff/cache   available
Mem:          16046         128       15726           8         191       15638
Swap:             0           0           0
Install docker
All 6 machines need to be installed
# send apt Ability to use https Visit
root@master1:~# apt-get install -y apt-transport-https ca-certificates curl gnupg-agent software-properties-common
root@master1:~# curl -fsSL https://download.docker.com/linux/ubuntu/gpg | sudo apt-key add -
OK
root@master1:~# apt-key fingerprint 0EBFCD88
pub   4096R/0EBFCD88 2017-02-22
      Key fingerprint = 9DC8 5822 9FC7 DD38 854A  E2D8 8D81 803C 0EBF CD88
uid                  Docker Release (CE deb) <docker@docker.com>
sub   4096R/F273FCD8 2017-02-22

# increase docker apt source
root@master1:~# add-apt-repository "deb [arch=amd64] https://download.docker.com/linux/ubuntu $(lsb_release -cs) stable"
# install docker
root@master1:~# apt-get update
root@master1:~# apt-get install -y docker-ce docker-ce-cli containerd.io
root@master1:~# docker --version
Docker version 18.09.6, build 481bc77
Install kubernetes components
# install kubeadm,kubelet,kubectl 6 All machines need to be installed.
root@master1:~# apt-get update
root@master1:~# apt-get install -y apt-transport-https curl
root@master1:~# curl -s https://packages.cloud.google.com/apt/doc/apt-key.gpg | apt-key add -
OK
root@master1:~# cat <<EOF >/etc/apt/sources.list.d/kubernetes.list
> deb https://apt.kubernetes.io/ kubernetes-xenial main
> EOF
root@master1:~# apt-get update
root@master1:~# apt-get install -y kubelet kubeadm kubectl
root@master1:~# apt-mark hold kubelet kubeadm kubectl
kubelet set on hold.
kubeadm set on hold.
kubectl set on hold.
Creating clusters
Control Node 1
root@master1:~# vim kubeadm-config.yaml
apiVersion: kubeadm.k8s.io/v1beta2
kind: ClusterConfiguration
kubernetesVersion: stable
controlPlaneEndpoint: "kubernetes.haproxy.com:8443"
networking:
    podSubnet: "10.244.0.0/16"

root@master1:~# kubeadm init --config=kubeadm-config.yaml --upload-certs
The screenshots are as follows.

root@master1:~# mkdir -p $HOME/.kube
root@master1:~# cp -i /etc/kubernetes/admin.conf $HOME/.kube/config
root@master1:~# chown $(id -u):$(id -g) $HOME/.kube/config
# Install network components, using fannel
root@master1:~# kubectl apply -f https://raw.githubusercontent.com/coreos/flannel/62e44c867a2846fefb68bd5f178daf4da3095ccb/Documentation/kube-flannel.yml
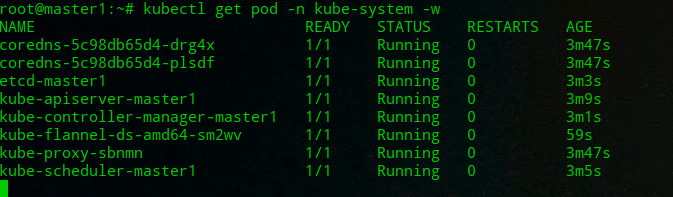
View installation results
root@master1:~# kubectl get pod -n kube-system -w
Control Node 2
root@master2:~# kubeadm join kubernetes.haproxy.com:8443 --token a3g3x0.zc6qxcdqu60jgtz1     --discovery-token-ca-cert-hash sha256:d48d8e4e7f8bc2c66a815a34b7e6a23809ad53bdae4a600e368a3ff28ad7a7d5     --experimental-control-plane --certificate-key a2a84ebc181ba34a943e5003a702b71e2a1e7e236f8d1d687d9a19d2bf803a77
root@master2:~# cp -i /etc/kubernetes/admin.conf $HOME/.kube/config
root@master2:~# chown $(id -u):$(id -g) $HOME/.kube/config
View installation results
root@master2:~# kubectl get nodes

Control Node 3
root@master3:~# kubeadm join kubernetes.haproxy.com:8443 --token a3g3x0.zc6qxcdqu60jgtz1     --discovery-token-ca-cert-hash sha256:d48d8e4e7f8bc2c66a815a34b7e6a23809ad53bdae4a600e368a3ff28ad7a7d5     --experimental-control-plane --certificate-key a2a84ebc181ba34a943e5003a702b71e2a1e7e236f8d1d687d9a19d2bf803a77
root@master3:~# mkdir -p $HOME/.kube
root@master3:~# cp -i /etc/kubernetes/admin.conf $HOME/.kube/config
root@master3:~# chown $(id -u):$(id -g) $HOME/.kube/config
View installation results
root@master3:~# kubectl get nodes

Adding Work Nodes
root@node1:~# kubeadm join kubernetes.haproxy.com:8443 --token a3g3x0.zc6qxcdqu60jgtz1     --discovery-token-ca-cert-hash sha256:d48d8e4e7f8bc2c66a815a34b7e6a23809ad53bdae4a600e368a3ff28ad7a7d5
root@node2:~# kubeadm join kubernetes.haproxy.com:8443 --token a3g3x0.zc6qxcdqu60jgtz1     --discovery-token-ca-cert-hash sha256:d48d8e4e7f8bc2c66a815a34b7e6a23809ad53bdae4a600e368a3ff28ad7a7d5
root@node3:~# kubeadm join kubernetes.haproxy.com:8443 --token a3g3x0.zc6qxcdqu60jgtz1     --discovery-token-ca-cert-hash sha256:d48d8e4e7f8bc2c66a815a34b7e6a23809ad53bdae4a600e368a3ff28ad7a7d5
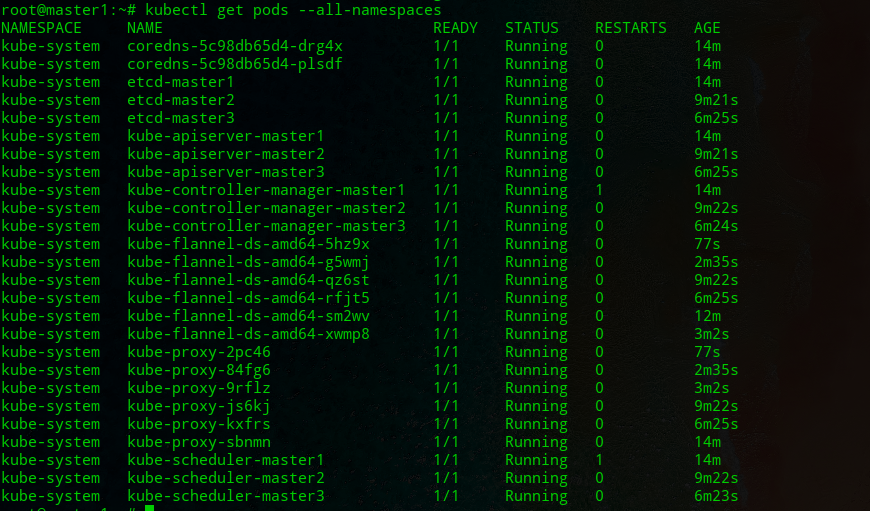
Completion of the entire cluster to view the results
Execution on any master
root@master1:~# kubectl get pods --all-namespaces
root@master1:~# kubectl get nodes
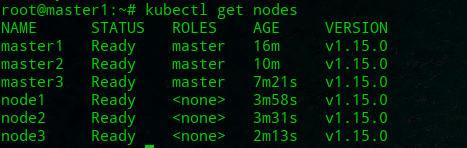
So far, the whole high-availability cluster has been built.
5. Reference Documents
https://www.kubernetes.org.cn/docs