Kubeadm Deploys High Availability Kubernetes Cluster
Directory [-]
Introduction to kuberadm
1. Kuberadm function
2. Kuberadm function
3. Functional version
II. Pre-preparation
1. Description of virtual machine allocation
2. Occupation of each node port
3. Basic environment settings
Installation of Keepalived
1. Install preserved from yum.
2. Configure Keepalived
3. Start Keepalived
4. View the network status
IV. install haproxy
1. yum installs haproxy
2. Configure haproxy
3. Start and detect haproxy
4. Detecting haproxy port
V. install Docker (all nodes)
1. Remove the previously installed Docker
2. Configure the yum source of docker
3. Install Docker
Vi. installation of kubeadm and kubelet
1. Configure available domestic yum sources for installation:
2. Install kubelet
3. Installing kubeadm
4. Restart the server
VII. Initialize the first kubernetes master node
Create yaml file for kubeadm configuration
2. Initialize the first master node
Configuration of kubectl environment variables
4. View component status
VIII. Install network plug-ins
1. Configure the yaml file of the flannel plug-in
Create flanner-related role s and pod s
9. Join the cluster
Master joins the cluster to form high availability
2. node nodes join the cluster
3. If you forget to join the token and sha256 of the cluster (skip if normal)
4. View the status of each node joining the cluster
X. delete Node from cluster
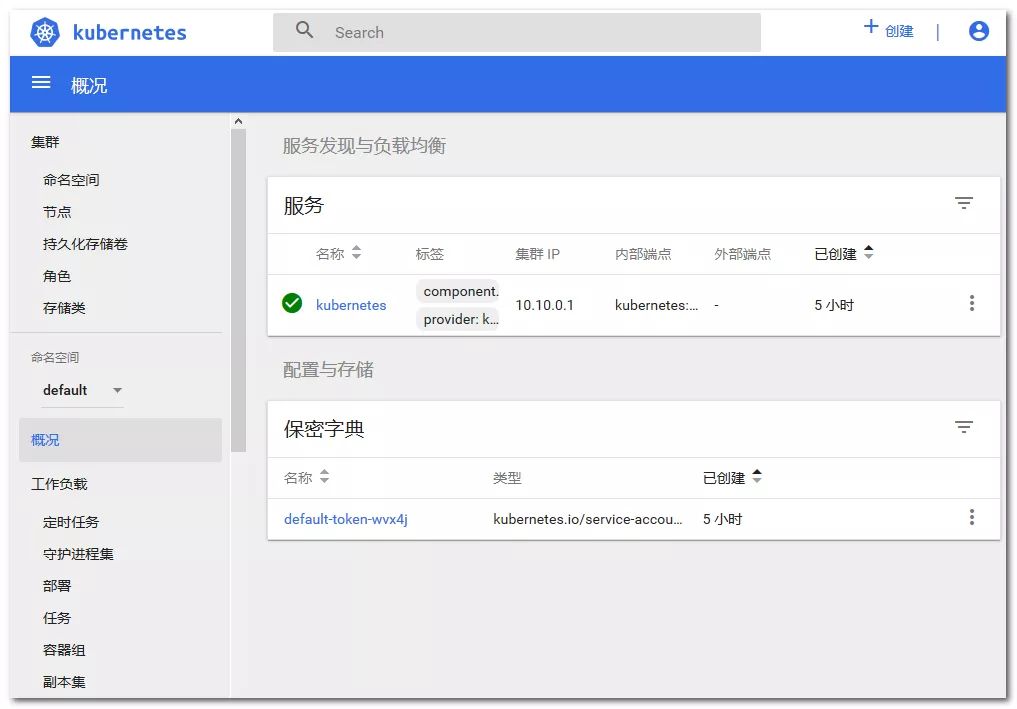
Xi. Configure dashboard
1. Create dashboard.yaml and start
2. Dashboard creates ServiceAccount and binds Admin role
3. Run dashboard and log in
problem
Master will not participate in load work
2. Rejoin the cluster
Environment introduction:
CentOS: 7.6
Docker: 18.06.1-ce
Kubernetes: 1.13.4
Kuberadm: 1.13.4
Kuberlet: 1.13.4
Kuberctl: 1.13.4
Deployment introduction:
To create high availability, first there is a Master Node, then other servers are added to form three Master nodes, and then the work Node node is added. The steps to be performed for each Node are described below:
Master01: two, three, four, five, six, seven, eight, nine, eleven
Master02, Master03: 2, 3, 5, 6, 4, 9
Noe01, Noe02: 2, 5, 6, 9
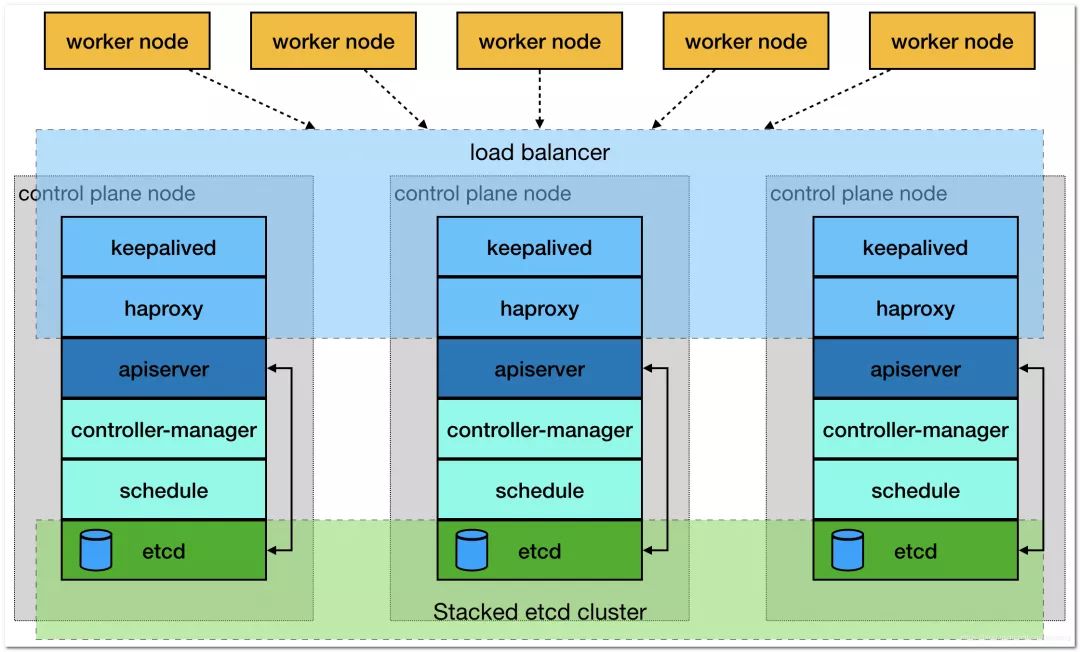
Cluster architecture:
I. Introduction to kuberadm
Kuberadm action
Kubeadm is a tool that provides two commands, kubeadm init and kubeadm join, as best practices for quickly creating kubernetes clusters.
kubeadm starts and runs a minimally available cluster by performing the necessary operations. It is deliberately designed to only focus on starting the cluster, rather than the previous node preparation. Likewise, installing various plug-ins that are worth owning, such as Kubernetes Dashboard, monitoring solutions, and plug-ins from specific cloud providers, are outside its scope of responsibility.
Instead, we expect a more appropriate tool designed from a higher level based on kubeadm to do these things; and ideally, using kubeadm as the basis for all deployments would make it easy to create a cluster that meets expectations.
Kuberadm function
kubeadm init: start a Kubernetes master node
Kubedm join: start a Kubernetes work node and join it to the cluster
kubeadm upgrade: update a Kubernetes cluster to the new version
kubeadm config: If you initialize a cluster with v1.7.x or lower versions of kubeadm, you need to configure the cluster to use the kubeadm upgrade command
kubeadm token: manages the token used by kubeadm join
kubeadm reset: restore any changes made by kubeadm init or kubeadm join to the host
Kubeadm version: print kubeadm version
kubeadm alpha: Preview a set of new features available to collect feedback from the community
Functional version
| Area | Maturity Level |
|---|---|
| Command line UX | GA |
| Implementation | GA |
| Config file API | beta |
| CoreDNS | GA |
| kubeadm alpha subcommands | alpha |
| High availability | alpha |
| DynamicKubeletConfig | alpha |
| Self-hosting | alpha |
II. Preliminary preparation
1. Virtual Machine Assignment Description
| address | host name | Memory &CPU | role |
|---|---|---|---|
| 192.168.2.10 | — | — | vip |
| 192.168.2.11 | k8s-master-01 | 2C & 2G | master |
| 192.168.2.12 | k8s-master-02 | 2C & 2G | master |
| 192.168.2.13 | k8s-master-03 | 2C & 2G | master |
| 192.168.2.21 | k8s-node-01 | 2c & 4G | node |
| 192.168.2.22 | k8s-node-02 | 2c & 4G | node |
2. Port occupation of each node
Master node
| rule | direction | Port range | Effect | User |
|---|---|---|---|---|
| TCP | Inbound | 6443* | Kubernetes API | server All |
| TCP | Inbound | 2379-2380 | etcd server | client API kube-apiserver, etcd |
| TCP | Inbound | 10250 | Kubelet API | Self, Control plane |
| TCP | Inbound | 10251 | kube-scheduler | Self |
| TCP | Inbound | 10252 | kube-controller-manager | Sel |
Node node
| rule | direction | Port range | Effect | User |
|---|---|---|---|---|
| TCP | Inbound | 10250 | Kubelet API | Self, Control plane |
| TCP | Inbound | 30000-32767 | NodePort Services** | All |
3. Basic Environment Settings
Kubernetes needs certain environment to ensure normal operation, such as time synchronization of each node, host name resolution, firewall shutdown, etc.
Host name resolution
In the distributed system environment, multi host communication is usually based on the host name, which provides a fixed access population for the host when there is the possibility of IP address change. Therefore, a special DNS service is generally needed to solve the problem of each node host. However, considering that the test cluster is deployed here, in order to reduce the complexity of the system, the files based on hosts are added here. Row host name resolution.
Modify hosts
Enter different servers, enter / etc/hosts for editing
vim /etc/hosts
Add the following:
192.168.2.10    master.k8s.io      k8s-vip
192.168.2.11    master01.k8s.io    k8s-master-01
192.168.2.12    master02.k8s.io    k8s-master-02
192.168.2.13    master03.k8s.io    k8s-master-03
192.168.2.21    node01.k8s.io      k8s-node-01
192.168.2.22    node02.k8s.io      k8s-node-02
Modify hostname
Enter different servers to modify the hostname
# Modify 192.168.2.11 Server
hostnamectl  set-hostname  k8s-master-01
#Modify 192.168.2.12 server
hostnamectl  set-hostname  k8s-master-02
# Modify 192.168.2.13 Server
hostnamectl  set-hostname  k8s-master-03

#Modify 192.168.2.21 server
hostnamectl  set-hostname  k8s-node-01
#Modify 192.168.2.22 server
hostnamectl  set-hostname  k8s-node-02
Host time synchronization
Synchronize the time of each server and set up boot-up synchronization time service
systemctl start chronyd.service
systemctl enable chronyd.service
Turn off firewall service
Stop and disable firewall
systemctl stop firewalld
systemctl disable firewalld
Turn off and disable SELinux
# If SELinux is currently enabled, you need to temporarily set its current status to permissive
setenforce 0

# Edit / etc/sysconfig selinux file to completely disable SELinux
sed -i 's/^SELINUX=enforcing$/SELINUX=disabled/' /etc/selinux/config

# View the status of selinux
getenforce
If it is permission, reboot
Disable Swap device
By default, kubeadm checks in advance whether the Swap device is disabled on the current host and forces the deployment process to stop when it is not used. Therefore, all Swap devices need to be disabled when there is a large amount of memory in the host.
# Close all Swap devices currently enabled
swapoff -a && sysctl -w vm.swappiness=0
#Edit the fstab configuration file and comment out all lines identified as Swap devices
vi /etc/fstab

Set system parameters
Set to allow routing and forwarding without processing the bridge data
Create the / etc/sysctl.d/k8s.conf file
vim /etc/sysctl.d/k8s.conf
Add the following:
net.ipv4.ip_forward = 1
net.bridge.bridge-nf-call-ip6tables = 1
net.bridge.bridge-nf-call-iptables = 1
Mount br_netfilter
modprobe br_netfilter
Effective Profile
sysctl -p /etc/sysctl.d/k8s.conf
sysctl command: used to configure kernel parameters at runtime
Check whether related files are generated
ls /proc/sys/net/bridge
Resource profile
/etc/security/limits.conf is the Linux resource use configuration file, which is used to limit the user's use of system resources.
echo "* soft nofile 65536" >> /etc/security/limits.conf
echo "* hard nofile 65536" >> /etc/security/limits.conf
echo "* soft nproc 65536"  >> /etc/security/limits.conf
echo "* hard nproc 65536"  >> /etc/security/limits.conf
echo "* soft  memlock  unlimited"  >> /etc/security/limits.conf
echo "* hard memlock  unlimited"  >> /etc/security/limits.conf
Install dependency packages and related tools
yum install -y epel-release
yum install -y yum-utils device-mapper-persistent-data lvm2 net-tools conntrack-tools wget vim ntpdate libseccomp libtool-ltdl
Installation of Keepalived
keepalived: it is a service software to ensure high availability of cluster in cluster management. Its function is similar to heartbeat, which is used to prevent single point of failure.
Keepalived function: provides vip (192.168.2.10) for haproxy to provide active and standby services between three haproxy instances, reducing the impact on services when one haproxy fails.
1. Install preserved, yum.
#Install keepalived
yum install -y keepalived
2. Configure preserved
cat <<EOF > /etc/keepalived/keepalived.conf
! Configuration File for keepalived

#It is mainly used to configure the notification object and machine identification when the fault occurs.
global_defs {
 A string identifying this node, usually hostname, but not necessarily hostname. In case of failure, email notification will be used.
   router_id LVS_k8s
}

# For health checks, the value of priority of vrrp_instance will be reduced when the checks fail.
vrrp_script check_haproxy {
 Script "kill - 0 haproxy" ා check whether the process survives according to the process name
    interval 3
    weight -2
    fall 10
    rise 2
}

#rp_instance is used to define the VIP area and its related properties of external services.
vrrp_instance VI_1 {
 state MASTER the current node is MASTER and the other two nodes are BACKUP.
 Change interface ens33 to your own network card
    virtual_router_id 51
    priority 250
    advert_int 1
    authentication {
        auth_type PASS
        auth_pass 35f18af7190d51c9f7f78f37300a0cbd
    }
    virtual_ipaddress {
 192.168.2.10 #Virtual ip, VIP
    }
    track_script {
        check_haproxy
    }

}
EOF
In the current node configuration, state is configured as MASTER and the other two nodes are set as BACKUP
Configuration Description:
virtual_ipaddress: vip
Track script: script to execute the above defined detection
interface: the network card of the node's inherent IP (non VIP) is used to send VRRP packets.
Virtual router ID: value between 0-255, used to distinguish VRRP multicast of multiple instance s
advert_int: The interval between sending VRRP packages, that is, how often do you have a master election (which can be considered as the interval between health checks).
Authentication: authentication area. The authentication types include PASS and HA (IPSEC). PASS is recommended (the password only recognizes the first 8 digits).
state: it can be MASTER or BACKUP, but when other nodes are keepalived to start, the node with larger priority will be selected as MASTER, so this item has no real purpose.
priority: used to select a master. To be a master, the value of this option should be 50 points higher than that of other machines. The value range of this option is 1-255 (the default value of 100 will be recognized outside this range).
3. Start preserved
# Set up boot start
systemctl enable keepalived
#Start keepalived
systemctl start keepalived
#View startup status
systemctl status keepalived
4. View network status
After the node whose state is MASTER in the kepplived configuration is started, check the network status, and you can see that the virtual IP has been added to the bound network card.
ip address show ens33

When the keepalived service of the current node is turned off, the virtual IP will be transferred. A node with state as BACKUP will be selected as the new MASTER. You can view the network card on that node, and the virtual IP will be viewed.
IV. install haproxy
Here, haproxy provides a reverse proxy for apiserver, and it forwards all the request polling to each master node. This method is more reasonable and robust than only using the keepalived master-backup mode to carry traffic on a single master node.
1. Install haproxy, yum.
yum install -y haproxy
2. Configure haproxy
cat > /etc/haproxy/haproxy.cfg << EOF
#---------------------------------------------------------------------
# Global settings
#---------------------------------------------------------------------
global
    # to have these messages end up in /var/log/haproxy.log you will
    # need to:
    # 1) configure syslog to accept network log events.  This is done
    #    by adding the '-r' option to the SYSLOGD_OPTIONS in
    #    /etc/sysconfig/syslog
    # 2) configure local2 events to go to the /var/log/haproxy.log
    #   file. A line like the following can be added to
    #   /etc/sysconfig/syslog
    #
    #    local2.*                       /var/log/haproxy.log
    #
    log         127.0.0.1 local2

    chroot      /var/lib/haproxy
    pidfile     /var/run/haproxy.pid
    maxconn     4000
    user        haproxy
    group       haproxy
    daemon

    # turn on stats unix socket
    stats socket /var/lib/haproxy/stats
#---------------------------------------------------------------------
# common defaults that all the 'listen' and 'backend' sections will
# use if not designated in their block
#---------------------------------------------------------------------
defaults
    mode                    http
    log                     global
    option                  httplog
    option                  dontlognull
    option http-server-close
    option forwardfor       except 127.0.0.0/8
    option                  redispatch
    retries                 3
    timeout http-request    10s
    timeout queue           1m
    timeout connect         10s
    timeout client          1m
    timeout server          1m
    timeout http-keep-alive 10s
    timeout check           10s
    maxconn                 3000
#---------------------------------------------------------------------
# kubernetes apiserver frontend which proxys to the backends
#---------------------------------------------------------------------
frontend kubernetes-apiserver
    mode                 tcp
    bind                 *:16443
    option               tcplog
    default_backend      kubernetes-apiserver
#---------------------------------------------------------------------
# round robin balancing between the various backends
#---------------------------------------------------------------------
backend kubernetes-apiserver
    mode        tcp
    balance     roundrobin
    server      master01.k8s.io   192.168.2.11:6443 check
    server      master02.k8s.io   192.168.2.12:6443 check
    server      master03.k8s.io   192.168.2.13:6443 check
#---------------------------------------------------------------------
# collection haproxy statistics message
#---------------------------------------------------------------------
listen stats
    bind                 *:1080
    stats auth           admin:awesomePassword
    stats refresh        5s
    stats realm          HAProxy\ Statistics
    stats uri            /admin?stats
EOF
haproxy configuration is the same on other master nodes (192.168.2.12 and 192.168.2.13)
3. Start and detect haproxy
#Set startup
systemctl enable haproxy
#Open haproxy
systemctl start haproxy
# View startup status
systemctl status haproxy
4. Detect haproxy port
ss -lnt | grep -E "16443|1080"
Show:

V. install Docker (all nodes)
1. Remove the Docker installed before
sudo yum remove docker \
                  docker-client \
                  docker-client-latest \
                  docker-common \
                  docker-latest \
                  docker-latest-logrotate \
                  docker-logrotate \
                  docker-selinux \
                  docker-engine-selinux \
                  docker-ce-cli \
                  docker-engine
Check if there are any docker components
rpm -qa|grep docker
If yes, you can delete it by the command yum -y remove XXX, for example:
yum remove docker-ce-cli
2. Configure the yum source of docker.
Choose one of the following two image sources. Because the official download speed is slow, Alibaba image source is recommended.
Alibaba image source
sudo yum-config-manager --add-repo http://mirrors.aliyun.com/docker-ce/linux/centos/docker-ce.repo
Docker official image source
sudo yum-config-manager --add-repo https://download.docker.com/linux/centos/docker-ce.repo
2. Install Docker:
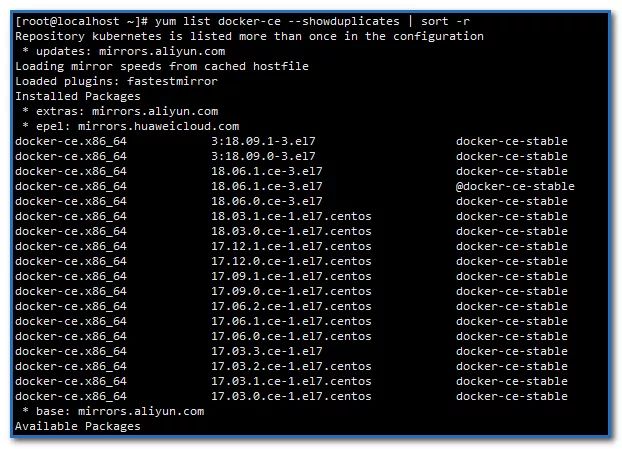
Show all installable versions of docker Ce:
yum list docker-ce --showduplicates | sort -r
Install the specified docker version
sudo yum install docker-ce-18.06.1.ce-3.el7 -y
Setting up mirror storage directory
Find bigger mounted directories for storage
#Modify docker configuration
vi /lib/systemd/system/docker.service

Find this line and add a storage directory to the queen, such as here -- graph /apps/docker
ExecStart=/usr/bin/docker --graph /apps/docker
Start docker and set docker to start
systemctl enable docker
systemctl start docker
Confirm iptables
Verify that the default policy (pllicy) for the FOWARD chain in the iptables filter table is ACCEPT.
iptables -nvL
Show:
Chain FORWARD (policy ACCEPT 0 packets, 0 bytes)
 pkts bytes target     prot opt in     out     source               destination
    0     0 DOCKER-USER  all  --  *      *       0.0.0.0/0            0.0.0.0/0
    0     0 DOCKER-ISOLATION-STAGE-1  all  --  *      *       0.0.0.0/0            0.0.0.0/0
    0     0 ACCEPT     all  --  *      docker0  0.0.0.0/0            0.0.0.0/0            ctstate RELATED,ESTABLISHED
    0     0 DOCKER     all  --  *      docker0  0.0.0.0/0            0.0.0.0/0
    0     0 ACCEPT     all  --  docker0 !docker0  0.0.0.0/0            0.0.0.0/0
    0     0 ACCEPT     all  --  docker0 docker0  0.0.0.0/0            0.0.0.0/0
Docker has adjusted the default firewall rules since version 1.13 and disabled the FOWARD chain in the iptables filter table, which will cause the OD across Node in the Kubernetes cluster to fail to communicate. However, through the installation of docker 1806, it is found that the default policy has been changed back to ACCEPT. I don't know which version it was changed back from, because the 1706 used by our online version still needs to be adjusted manually.
Vi. installation of kubeadm and kubelet
1. Configure available domestic yum sources for installation:
cat <<EOF > /etc/yum.repos.d/kubernetes.repo
[kubernetes]
name=Kubernetes
baseurl=https://mirrors.aliyun.com/kubernetes/yum/repos/kubernetes-el7-x86_64/
enabled=1
gpgcheck=0
repo_gpgcheck=0
gpgkey=https://mirrors.aliyun.com/kubernetes/yum/doc/yum-key.gpg https://mirrors.aliyun.com/kubernetes/yum/doc/rpm-package-key.gpg
EOF
2. Install kubelet
-
The following software packages need to be installed on each machine:
kubeadm: the instruction used to initialize the cluster.
kubelet: used to start pod, container, etc. on each node in the cluster.
kubectl: command line tool for communicating with clusters.
View the kubelet version list
yum list kubelet --showduplicates | sort -r
Install kubelet
yum install -y kubelet-1.13.4-0
Start kubelet and set the startup
systemctl enable kubelet
systemctl start kubelet
Check state
Check the status. It is found that the status is failed. OK. kubelet will restart once every 10 seconds. It will be normal after initializing the master node.
systemctl status kubelet
3. Installing kubeadm
Responsible for initializing clusters
View the kubeadm version list
yum list kubeadm --showduplicates | sort -r
Install kubeadm
yum install -y kubeadm-1.13.4-0
Kubectl will be installed by default when kubecadm is installed, so there is no need to install kubectl separately.
4. Restart the server
In order to prevent some unknown errors, here we restart the server to facilitate subsequent operations
reboot
VII. Initialize the first kubernetes master node
Because you need to bind virtual IP, you need to first check which master machine the virtual IP starts.
ip address show ens33
Show:
 ens33: <BROADCAST,MULTICAST,UP,LOWER_UP> mtu 1500 qdisc pfifo_fast state UP group default qlen 1000
    link/ether 00:0c:29:7e:65:b3 brd ff:ff:ff:ff:ff:ff
    inet 192.168.2.11/24 brd 192.168.2.255 scope global noprefixroute ens33
       valid_lft forever preferred_lft forever
    inet 192.168.2.10/32 scope global ens33
       valid_lft forever preferred_lft forever
You can see that 10 virtual ip and 11 ip are on the same machine, so the first master to initialize kubernetes needs to be installed on the master 01 machine.
1. Create yaml file for kubeadm configuration
cat > kubeadm-config.yaml << EOF
apiServer:
  certSANs:
    - k8s-master-01
    - k8s-master-02
    - k8s-master-03
    - master.k8s.io
    - 192.168.2.10
    - 192.168.2.11
    - 192.168.2.12
    - 192.168.2.13
    - 127.0.0.1
  extraArgs:
    authorization-mode: Node,RBAC
  timeoutForControlPlane: 4m0s
apiVersion: kubeadm.k8s.io/v1beta1
certificatesDir: /etc/kubernetes/pki
clusterName: kubernetes
controlPlaneEndpoint: "master.k8s.io:16443"
controllerManager: {}
dns:
  type: CoreDNS
etcd:
  local:
    dataDir: /var/lib/etcd
imageRepository: registry.aliyuncs.com/google_containers
kind: ClusterConfiguration
kubernetesVersion: v1.13.4
networking:
  dnsDomain: cluster.local
  podSubnet: 10.20.0.0/16
  serviceSubnet: 10.10.0.0/16
scheduler: {}
EOF
The following two places are set: - certSANs: - virtual IP address (add all cluster addresses for security reasons) - controlPlaneEndpoint: - virtual IP: monitoring port number
Configuration Description:
imageRepository: registry.aliyuncs.com/google'u containers (using alicloud image warehouse)
podSubnet: 10.20.0.0/16 (pod address pool)
serviceSubnet: 10.10.0.0/16
# service address pool
2. Initialize the first master node
kubeadm init --config kubeadm-config.yaml
Journal:
Your Kubernetes master has initialized successfully!

To start using your cluster, you need to run the following as a regular user:

  mkdir -p $HOME/.kube
  sudo cp -i /etc/kubernetes/admin.conf $HOME/.kube/config
  sudo chown $(id -u):$(id -g) $HOME/.kube/config

You should now deploy a pod network to the cluster.
Run "kubectl apply -f [podnetwork].yaml" with one of the options listed at:
  https://kubernetes.io/docs/concepts/cluster-administration/addons/

You can now join any number of machines by running the following on each node
as root:

  kubeadm join master.k8s.io:16443 --token dm3cw1.kw4hq84ie1376hji --discovery-token-ca-cert-hash sha256:f079b624773145ba714b56e177f52143f90f75a1dcebabda6538a49e224d4009
You can see from the log here that
kubeadm join master.k8s.io:16443 --token dm3cw1.kw4hq84ie1376hji --discovery-token-ca-cert-hash sha256:f079b624773145ba714b56e177f52143f90f75a1dcebabda6538a49e224d4009
To allow nodes to join the cluster
3. Configure the kubectl environment variable
Configuring environment variables
mkdir -p $HOME/.kube
sudo cp -i /etc/kubernetes/admin.conf $HOME/.kube/config
sudo chown $(id -u):$(id -g) $HOME/.kube/config
4. View component status
kubectl get cs
Show:
NAME                 STATUS    MESSAGE              ERROR
controller-manager   Healthy   ok
scheduler            Healthy   ok
etcd-0               Healthy   {"health": "true"}
View pod status
kubectl get pods --namespace=kube-system
Show:
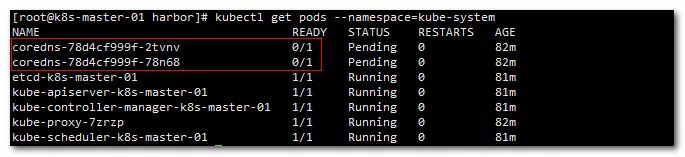
You can see that coredns did not start. This is because the network plug-in has not been configured. Next, check the startup status again after configuration.
VIII. Install network plug-ins
1. Configure yaml file of flannel plug-in
cat > kube-flannel.yaml << EOF
---
kind: ClusterRole
apiVersion: rbac.authorization.k8s.io/v1beta1
metadata:
  name: flannel
rules:
  - apiGroups:
      - ""
    resources:
      - pods
    verbs:
      - get
  - apiGroups:
      - ""
    resources:
      - nodes
    verbs:
      - list
      - watch
  - apiGroups:
      - ""
    resources:
      - nodes/status
    verbs:
      - patch
---
kind: ClusterRoleBinding
apiVersion: rbac.authorization.k8s.io/v1beta1
metadata:
  name: flannel
roleRef:
  apiGroup: rbac.authorization.k8s.io
  kind: ClusterRole
  name: flannel
subjects:
- kind: ServiceAccount
  name: flannel
  namespace: kube-system
---
apiVersion: v1
kind: ServiceAccount
metadata:
  name: flannel
  namespace: kube-system
---
kind: ConfigMap
apiVersion: v1
metadata:
  name: kube-flannel-cfg
  namespace: kube-system
  labels:
    tier: node
    app: flannel
data:
  cni-conf.json: |
    {
      "name": "cbr0",
      "plugins": [
        {
          "type": "flannel",
          "delegate": {
            "hairpinMode": true,
            "isDefaultGateway": true
          }
        },
        {
          "type": "portmap",
          "capabilities": {
            "portMappings": true
          }
        }
      ]
    }
  net-conf.json: |
    {
      "Network": "10.20.0.0/16",
      "Backend": {
        "Type": "vxlan"
      }
    }
---
apiVersion: extensions/v1beta1
kind: DaemonSet
metadata:
  name: kube-flannel-ds-amd64
  namespace: kube-system
  labels:
    tier: node
    app: flannel
spec:
  template:
    metadata:
      labels:
        tier: node
        app: flannel
    spec:
      hostNetwork: true
      nodeSelector:
        beta.kubernetes.io/arch: amd64
      tolerations:
      - operator: Exists
        effect: NoSchedule
      serviceAccountName: flannel
      initContainers:
      - name: install-cni
        image: registry.cn-shenzhen.aliyuncs.com/cp_m/flannel:v0.10.0-amd64
        command:
        - cp
        args:
        - -f
        - /etc/kube-flannel/cni-conf.json
        - /etc/cni/net.d/10-flannel.conflist
        volumeMounts:
        - name: cni
          mountPath: /etc/cni/net.d
        - name: flannel-cfg
          mountPath: /etc/kube-flannel/
      containers:
      - name: kube-flannel
        image: registry.cn-shenzhen.aliyuncs.com/cp_m/flannel:v0.10.0-amd64
        command:
        - /opt/bin/flanneld
        args:
        - --ip-masq
        - --kube-subnet-mgr
        resources:
          requests:
            cpu: "100m"
            memory: "50Mi"
          limits:
            cpu: "100m"
            memory: "50Mi"
        securityContext:
          privileged: true
        env:
        - name: POD_NAME
          valueFrom:
            fieldRef:
              fieldPath: metadata.name
        - name: POD_NAMESPACE
          valueFrom:
            fieldRef:
              fieldPath: metadata.namespace
        volumeMounts:
        - name: run
          mountPath: /run
        - name: flannel-cfg
          mountPath: /etc/kube-flannel/
      volumes:
        - name: run
          hostPath:
            path: /run
        - name: cni
          hostPath:
            path: /etc/cni/net.d
        - name: flannel-cfg
          configMap:
            name: kube-flannel-cfg
EOF
"Network": "10.20.0.0/16" is the same as podSubnet: 10.20.0.0/16 in kubeadm-config.yaml configuration file.
2. Create flanner related role s and pod s
kubectl apply -f kube-flannel.yaml
Wait for a moment to see the status of each pods again
kubectl get pods --namespace=kube-system
Show:

You can see that coredns has started
9. Join the cluster
1. Master joins the cluster to form high availability
Copy secret key to each node
Execute the following command on the master01 server to copy the kubernetes related files to master02 and master03
If the other node initializes the first master node, the configuration file of the node is copied to the other two master nodes. For example, if master03 is the first master node, its k8s configuration is copied to master02 and master01.
Copy files to master 02
ssh root@master02.k8s.io mkdir -p /etc/kubernetes/pki/etcd
scp /etc/kubernetes/admin.conf root@master02.k8s.io:/etc/kubernetes
scp /etc/kubernetes/pki/{ca.*,sa.*,front-proxy-ca.*} root@master02.k8s.io:/etc/kubernetes/pki
scp /etc/kubernetes/pki/etcd/ca.* root@master02.k8s.io:/etc/kubernetes/pki/etcd
Copy files to master 03
ssh root@master03.k8s.io mkdir -p /etc/kubernetes/pki/etcd
scp /etc/kubernetes/admin.conf root@master03.k8s.io:/etc/kubernetes
scp /etc/kubernetes/pki/{ca.*,sa.*,front-proxy-ca.*} root@master03.k8s.io:/etc/kubernetes/pki
scp /etc/kubernetes/pki/etcd/ca.* root@master03.k8s.io:/etc/kubernetes/pki/etcd
master node joins cluster
Join the cluster on both master02 and master03 servers
kubeadm join master.k8s.io:16443 --token dm3cw1.kw4hq84ie1376hji --discovery-token-ca-cert-hash sha256:f079b624773145ba714b56e177f52143f90f75a1dcebabda6538a49e224d4009 --experimental-control-plane
If the join fails and you want to try again, enter the kubeadm reset command to clear the previous settings and re-execute the steps from "copy the secret key" and "join the cluster"
Display the installation process:
......
This node has joined the cluster and a new control plane instance was created:

* Certificate signing request was sent to apiserver and approval was received.
* The Kubelet was informed of the new secure connection details.
* Master label and taint were applied to the new node.
* The Kubernetes control plane instances scaled up.
* A new etcd member was added to the local/stacked etcd cluster.

To start administering your cluster from this node, you need to run the following as a regular user:

 mkdir -p $HOME/.kube
 sudo cp -i /etc/kubernetes/admin.conf $HOME/.kube/config
 sudo chown $(id -u):$(id -g) $HOME/.kube/config

Run 'kubectl get nodes' to see this node join the cluster.
Configure the kubectl environment variable
mkdir -p $HOME/.kube
sudo cp -i /etc/kubernetes/admin.conf $HOME/.kube/config
sudo chown $(id -u):$(id -g) $HOME/.kube/config
2. node joins the cluster
In addition to allowing the master node to join the cluster to form a high availability, the slave node should also join the cluster.
Here, k8s-node-01 and k8s-node-02 are added to the cluster for work.
Enter the add command prompted when initializing k8s master, as follows:
kubeadm join master.k8s.io:16443 --token dm3cw1.kw4hq84ie1376hji --discovery-token-ca-cert-hash sha256:f079b624773145ba714b56e177f52143f90f75a1dcebabda6538a49e224d4009
3. If you forget to join the cluster, token and sha256 (skip if normal)
Show get token list
kubeadm token list
By default, the Token expiration time is 24 hours. If the Token expires, you can enter the following command to generate a new Token
kubeadm token create
Get ca certificate sha256 encoded hash value
openssl x509 -pubkey -in /etc/kubernetes/pki/ca.crt | openssl rsa -pubin -outform der 2>/dev/null | openssl dgst -sha256 -hex | sed 's/^.* //'
Splicing command
kubeadm join master.k8s.io:16443 --token 882ik4.9ib2kb0eftvuhb58 --discovery-token-ca-cert-hash sha256:0b1a836894d930c8558b350feeac8210c85c9d35b6d91fde202b870f3244016a
If master joins, add the experiment-control-plane parameter at the end.
4. View the status of each node joining the cluster
kubectl get nodes -o wide
Show:
NAME            STATUS   ROLES    AGE   VERSION   INTERNAL-IP    EXTERNAL-IP   OS-IMAGE                KERNEL-VERSION              CONTAINER-RUNTIME
k8s-master-01   Ready    master   12m   v1.13.4   192.168.2.11   <none>        CentOS Linux 7 (Core)   3.10.0-957.1.3.el7.x86_64   docker://18.6.1
k8s-master-02   Ready    master   10m   v1.13.4   192.168.2.12   <none>        CentOS Linux 7 (Core)   3.10.0-957.1.3.el7.x86_64   docker://18.6.1
k8s-master-03   Ready    master   38m   v1.13.4   192.168.2.13   <none>        CentOS Linux 7 (Core)   3.10.0-957.1.3.el7.x86_64   docker://18.6.1
k8s-node-01     Ready    <none>   68s   v1.13.4   192.168.2.21   <none>        CentOS Linux 7 (Core)   3.10.0-957.1.3.el7.x86_64   docker://18.6.1
k8s-node-02     Ready    <none>   61s   v1.13.4   192.168.2.22   <none>        CentOS Linux 7 (Core)   3.10.0-957.1.3.el7.x86_64   docker://18.6.1
10. Delete Node from Cluster
Master node:
kubectl drain <node name> --delete-local-data --force --ignore-daemonsets
kubectl delete node <node name>
slave node
kubeadm reset
Configuration of dashboard
This is deployed on one server, and other servers copy the deployed pod, so dashboard is deployed on master 01 server here.
1. Create dashboard.yaml and start it
# ------------------- Dashboard Secret ------------------- #
apiVersion: v1
kind: Secret
metadata:
  labels:
    k8s-app: kubernetes-dashboard
  name: kubernetes-dashboard-certs
  namespace: kube-system
type: Opaque

---
# ------------------- Dashboard Service Account ------------------- #

apiVersion: v1
kind: ServiceAccount
metadata:
  labels:
    k8s-app: kubernetes-dashboard
  name: kubernetes-dashboard
  namespace: kube-system

---
# ------------------- Dashboard Role & Role Binding ------------------- #

kind: Role
apiVersion: rbac.authorization.k8s.io/v1
metadata:
  name: kubernetes-dashboard-minimal
  namespace: kube-system
rules:
  # Allow Dashboard to create 'kubernetes-dashboard-key-holder' secret.
- apiGroups: [""]
  resources: ["secrets"]
  verbs: ["create"]
  # Allow Dashboard to create 'kubernetes-dashboard-settings' config map.
- apiGroups: [""]
  resources: ["configmaps"]
  verbs: ["create"]
  # Allow Dashboard to get, update and delete Dashboard exclusive secrets.
- apiGroups: [""]
  resources: ["secrets"]
  resourceNames: ["kubernetes-dashboard-key-holder", "kubernetes-dashboard-certs"]
  verbs: ["get", "update", "delete"]
  # Allow Dashboard to get and update 'kubernetes-dashboard-settings' config map.
- apiGroups: [""]
  resources: ["configmaps"]
  resourceNames: ["kubernetes-dashboard-settings"]
  verbs: ["get", "update"]
  # Allow Dashboard to get metrics from heapster.
- apiGroups: [""]
  resources: ["services"]
  resourceNames: ["heapster"]
  verbs: ["proxy"]
- apiGroups: [""]
  resources: ["services/proxy"]
  resourceNames: ["heapster", "http:heapster:", "https:heapster:"]
  verbs: ["get"]

---

apiVersion: rbac.authorization.k8s.io/v1
kind: RoleBinding
metadata:
  name: kubernetes-dashboard-minimal
  namespace: kube-system
roleRef:
  apiGroup: rbac.authorization.k8s.io
  kind: Role
  name: kubernetes-dashboard-minimal
subjects:
- kind: ServiceAccount
  name: kubernetes-dashboard
  namespace: kube-system

---

# ------------------- Dashboard Deployment ------------------- #
# 1.Modify the image warehouse location and edit it into your own image warehouse
# 2.Changed the mirror pull-out strategy imagePullPolicy: IfNotPresent
kind: Deployment
apiVersion: apps/v1
metadata:
  labels:
    k8s-app: kubernetes-dashboard
  name: kubernetes-dashboard
  namespace: kube-system
spec:
  replicas: 1
  revisionHistoryLimit: 10
  selector:
    matchLabels:
      k8s-app: kubernetes-dashboard
  template:
    metadata:
      labels:
        k8s-app: kubernetes-dashboard
    spec:
      containers:
      - name: kubernetes-dashboard
        image: registry.cn-hangzhou.aliyuncs.com/google_containers/kubernetes-dashboard-amd64:v1.10.1
        imagePullPolicy: IfNotPresent
        ports:
        - containerPort: 8443
          protocol: TCP
        args:
          - --auto-generate-certificates
          # Uncomment the following line to manually specify Kubernetes API server Host
          # If not specified, Dashboard will attempt to auto discover the API server and connect
          # to it. Uncomment only if the default does not work.
          # - --apiserver-host=http://my-address:port
        volumeMounts:
        - name: kubernetes-dashboard-certs
          mountPath: /certs
          # Create on-disk volume to store exec logs
        - mountPath: /tmp
          name: tmp-volume
        livenessProbe:
          httpGet:
            scheme: HTTPS
            path: /
            port: 8443
          initialDelaySeconds: 30
          timeoutSeconds: 30
      volumes:
      - name: kubernetes-dashboard-certs
        secret:
          secretName: kubernetes-dashboard-certs
      - name: tmp-volume
        emptyDir: {}
      serviceAccountName: kubernetes-dashboard
      # Comment the following tolerations if Dashboard must not be deployed on master
      tolerations:
      - key: node-role.kubernetes.io/master
        effect: NoSchedule
---
# ------------------- Dashboard Service ------------------- #
# Increased nodePort,Enable access,Change default type type ClusterIP,Turn into NodePort
# If it is not configured, it can only be accessed within the cluster by default.
kind: Service
apiVersion: v1
metadata:
  labels:
    k8s-app: kubernetes-dashboard
  name: kubernetes-dashboard
  namespace: kube-system
spec:
  type: NodePort
  ports:
    - port: 443
      targetPort: 8443
      nodePort: 30001
  selector:
    k8s-app: kubernetes-dashboard
Running dashboard
kubectl create -f kubernetes-dashboard.yaml
2. Dashboard creates ServiceAccount and binds Admin role
kind: ClusterRoleBinding
apiVersion: rbac.authorization.k8s.io/v1beta1
metadata:
  name: admin
  annotations:
    rbac.authorization.kubernetes.io/autoupdate: "true"
roleRef:
  kind: ClusterRole
  name: cluster-admin
  apiGroup: rbac.authorization.k8s.io
subjects:
- kind: ServiceAccount
  name: admin
  namespace: kube-system
---
apiVersion: v1
kind: ServiceAccount
metadata:
  name: admin
  namespace: kube-system
  labels:
    kubernetes.io/cluster-service: "true"
    addonmanager.kubernetes.io/mode: Reconcile
User and role binding for running dashboard
kubectl create -f dashboard-user-role.yaml
Get login token
kubectl describe secret/$(kubectl get secret -n kube-system |grep admin|awk '{print $1}') -n kube-system
Show:
[root@k8s-master-01 local]# kubectl describe secret/$(kubectl get secret -nkube-system |grep admin|awk '{print $1}') -nkube-system
Name:         admin-token-2mfdz
Namespace:    kube-system
Labels:       <none>
Annotations:  kubernetes.io/service-account.name: admin
              kubernetes.io/service-account.uid: 74efd994-38d8-11e9-8740-000c299624e4

Type:  kubernetes.io/service-account-token

Data
====
ca.crt:     1025 bytes
namespace:  11 bytes
token:
eyJhbGciOiJSUzI1NiIsImtpZCI6IiJ9.eyJpc3MiOiJrdWJlcm5ldGVzL3NlcnZpY2VhY2NvdW50Iiwia3ViZXJuZXRlcy5pby9zZXJ2aWNlYWNjb3VudC9uYW1lc3BhY2UiOiJrdWJlLXN5c3RlbSIsImt1YmVybmV0ZXMuaW8vc2VydmljZWFjY291bnQvc2VjcmV0Lm5hbWUiOiJhZG1pbi10b2tlbi1qdjd4ayIsImt1YmVybmV0ZXMuaW8vc2VydmljZWFjY291bnQvc2VydmljZS1hY2NvdW50Lm5hbWUiOiJhZG1pbiIsImt1YmVybmV0ZXMuaW8vc2VydmljZWFjY291bnQvc2VydmljZS1hY2NvdW50LnVpZCI6ImM4ZTMxYzk0LTQ2MWEtMTFlOS1iY2M5LTAwMGMyOTEzYzUxZCIsInN1YiI6InN5c3RlbTpzZXJ2aWNlYWNjb3VudDprdWJlLXN5c3RlbTphZG1pbiJ9.TNw1iFEsZmJsVG4cki8iLtEoiY1pjpnOYm8ZIFjctpBdTOw6kUMvv2b2B2BJ_5rFle31gqGAZBIRyYj9LPAs06qT5uVP_l9o7IyFX4HToBF3veiun4e71822eQRUsgqiPh5uSjKXEkf9yGq9ujiCdtzFxnp3Pnpeuge73syuwd7J6F0-dJAp3b48MLZ1JJwEo6CTCMhm9buysycUYTbT_mUDQMNrHVH0868CdN_H8azA4PdLLLrFfTiVgoGu4c3sG5rgh9kKFqZA6dzV0Kq10W5JJwJRM1808ybLHyV9jfKN8N2_lZ7ehE6PbPU0cV-PyP74iA-HrzFW1yVwSLPVYA
3. Run dashboard and log in
Input address: https://192.168.2.10:30001 enters dashboard interface
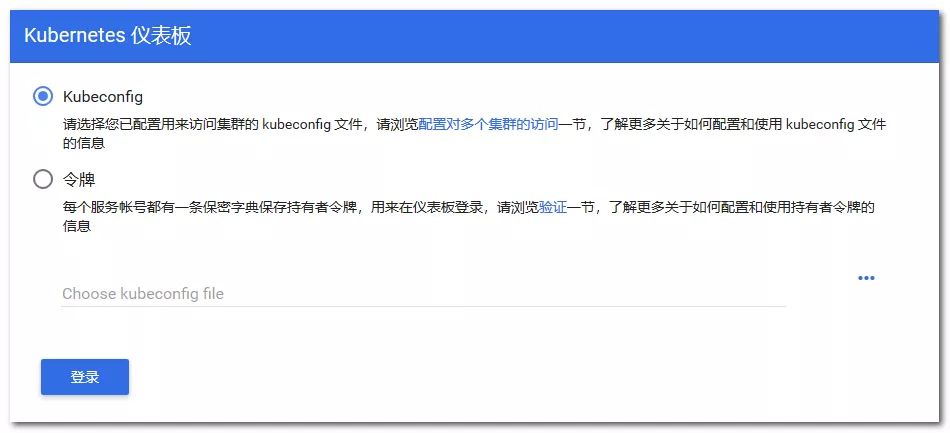
Enter the token obtained above to enter the dashboard.
problem
1. Master will not participate in load work
Master will not participate in the load work, how to let it participate, here we need to understand the train
View traint
#Check whether all nodes can be scheduled
kubectl describe nodes | grep -E '(Roles|Taints)'
Delete traint
#All node s can be scheduled
kubectl taint nodes --all node-role.kubernetes.io/master-
# Specify that node can be scheduled
kubectl taint nodes k8s-master-01 node-role.kubernetes.io/master-
2. Rejoin the cluster
Sometimes the nodes have problems rejoining the cluster, and some settings need to be cleared before joining, otherwise some errors may occur, such as
network is not ready: [runtime network not ready: NetworkReady=false reason:NetworkPluginNotReady message:docker: network plugin is not ready: cni config uninitialized]
Back-off restarting failed container
Follow these steps and then execute the join cluster command.
#Reset kubernetes service, reset network. Delete network configuration, link
kubeadm reset

# Restart kubelet
systemctl stop kubelet

#Stop docker
systemctl stop docker

cni reset
rm -rf /var/lib/cni/
rm -rf /var/lib/kubelet/*
rm -rf /etc/cni/
ifconfig cni0 down
ifconfig flannel.1 down
ifconfig docker0 down
ip link delete cni0
ip link delete flannel.1

# Restart docker
systemctl start docker
Join the cluster again
kubeadm join cluster.kube.com:16443 --token gaeyou.k2650x660c8eb98c --discovery-token-ca-cert-hash sha256:daf4c2e0264422baa7076a2587f9224a5bd9c5667307927b0238743799dfb362