K8S is so popular, there are many online tutorials, but the official update is too fast, many deployment tutorials have lagged behind, and there are countless pits, for beginners, not everyone has the ability to climb out.
For every student who wants to make progress, deploying K8S is a mountain. If you can deploy it clearly, you already know a little about all kinds of components and functions. So today this note-based tutorial can lay a solid foundation stone on the way forward for you and your classmates, no matter what reason you see this article. Well, that means you want to make progress on the way of exploration, then, Since some people want to know, then there is no reason not to share their little experience.
Note: Thanks to bokeyuan's little droplets, I just stood on the giant's shoulders and went further. Many of the contents were also revised from his articles.
docker: kubernetes-dependent container runtime
 kubelet: The core agent component of kubernetes, each node will start one, responsible for management such as pods and node life cycle.
kubectl: The command line control tool of kubernetes can only be used by master.
kubeadm: Used for bootstrap kubernetes. Initialize a k8s cluster.
I. Environment preparation for all nodes
1. Software Version
| Software | Edition |
|---|---|
| kubernetes | v1.15.2 |
| CentOS 7.5 | CentOS mini 7.6.1809 |
| Docker | v18.09 |
| flannel | 0.10.0 |
2. Node Planning
| IP | role | host name |
|---|---|---|
| 192.168.3.10 | k8s master | master |
| 192.168.3.11 | k8s node01 | slaver1 |
| 192.168.3.12 | k8s node02 | slaver2 |
I won't post the network architecture here, and assume that you are ready for the virtual machine, shut down the firewall and selinux, and add hosts files to the three nodes, modify the hostname, and make sure the network is smooth.
For those who need proxy or accelerated docker image retrieval, in order to simplify this tutorial, it is assumed that you are in the free web world and can retrieve arbitrary files (refer to other tutorials or manually retrieve images if you need to);
My test host is located in Hong Kong, so there is no need to configure agents or accelerate:
iptables process bridge data:
Create A / etc/sysctl.d/k8s.conf file and add the following:
net.bridge.bridge-nf-call-ip6tables = 1
net.bridge.bridge-nf-call-iptables = 1
net.ipv4.ip_forward = 1
Execute the order to make the modification effective.
modprobe br_netfilter
sysctl -p /etc/sysctl.d/k8s.conf
Shut down Swap
Kubernetes 1.8 started requiring Swap to shut down the system. If not, kubelet would not be able to start under the default configuration. Method 1: Change this restriction through the kubelet startup parameter - fail-swap-on=false. The second method is to shut down Swap.
swapoff -a
Modify the / etc/fstab file, comment out the automatic mounting of SWAP, and use free -m to confirm that swap is closed.
#Comment out swap partitions
[root@localhost /]# sed -i 's/.*swap.*/#&/' /etc/fstab

[root@localhost /]# free -m
              total        used        free      shared  buff/cache   available
Mem:            962         154         446           6         361         612
Swap:             0           0           0
Permanently disable swap
echo "vm.swappiness = 0">> /etc/sysctl.conf
Execute the following scripts on all Kubernetes nodes Noe1 and Noe2:
cat > /etc/sysconfig/modules/ipvs.modules <<EOF
#!/bin/bash
modprobe -- ip_vs
modprobe -- ip_vs_rr
modprobe -- ip_vs_wrr
modprobe -- ip_vs_sh
modprobe -- nf_conntrack_ipv4
EOF
chmod 755 /etc/sysconfig/modules/ipvs.modules && bash /etc/sysconfig/modules/ipvs.modules && lsmod | grep -e ip_vs -e nf_conntrack_ipv4
Install docker
The docker version is very important for the success of K8S. Many friends will fall in (some of them are in the pit without knowing it). The highest version of docker supported by K8S 1.15.2 is 18.09, so we will install the smallest version 18.09.8 in this version.
According to docker's official installation tutorial:
First clean up centos with all docker programs:
yum remove docker \
                  docker-client \
                  docker-client-latest \
                  docker-common \
                  docker-latest \
                  docker-latest-logrotate \
                  docker-logrotate \
                  docker-engine
yum install -y yum-utils \
  device-mapper-persistent-data \
  lvm2
Add the latest docker yum warehouse:
yum-config-manager \
    --add-repo \
    https://download.docker.com/linux/centos/docker-ce.repo
Official Installation Order:
yum install docker-ce-<VERSION_STRING> docker-ce-cli-<VERSION_STRING> containerd.io
View the various versions of information provided by the warehouse and rank them from top to bottom:
yum list docker-ce.x86_64 --showduplicates |sort -r
Here we install 18.09.8:
yum install docker-ce-18.09.8 docker-ce-cli-18.09.8 containerd.io -y
Start:
systemctl start docker ; systemctl enable docker
Modify docker cgroup driver to system D
For Linux distributions using system D as init system, using system D as docker's cgroup driver can ensure that server nodes are more stable under resource constraints. Therefore, we modify the cgroup driver of docker on each node as system D.
Create or modify/etc/docker/daemon.json:
{
    "exec-opts": ["native.cgroupdriver=systemd"]
}
Restart docker:
systemctl restart docker

docker info | grep Cgroup
Cgroup Driver: systemd
Install kubeadm and kubelet
cat <<EOF > /etc/yum.repos.d/kubernetes.repo
[kubernetes]
name=Kubernetes
baseurl=https://packages.cloud.google.com/yum/repos/kubernetes-el7-x86_64
enabled=1
gpgcheck=1
repo_gpgcheck=1
gpgkey=https://packages.cloud.google.com/yum/doc/yum-key.gpg
        https://packages.cloud.google.com/yum/doc/rpm-package-key.gpg
EOF
Installation:
yum install -y kubelet kubeadm kubectl
The above command will install the latest version of the program by default, which is currently 1.15.2
Installing the docker image needed to initialize the cluster with kubeadm init
Before initializing the cluster, you can use kubeadm config images pull to pre-pull the docker image required by k8s on each node
[root@localhost /]# kubeadm config images list
k8s.gcr.io/kube-apiserver:v1.15.2
k8s.gcr.io/kube-controller-manager:v1.15.2
k8s.gcr.io/kube-scheduler:v1.15.2
k8s.gcr.io/kube-proxy:v1.15.2
k8s.gcr.io/pause:3.1
k8s.gcr.io/etcd:3.3.10
k8s.gcr.io/coredns:1.3.1
Manual pull one by one, first a little trick, in front of each line with a docker pull, so as to avoid writing scripts or manual input trouble:
kubeadm config images list |awk '{print "docker pull " $0}'
docker pull k8s.gcr.io/kube-apiserver:v1.15.2
docker pull k8s.gcr.io/kube-controller-manager:v1.15.2
docker pull k8s.gcr.io/kube-scheduler:v1.15.2
docker pull k8s.gcr.io/kube-proxy:v1.15.2
docker pull k8s.gcr.io/pause:3.1
docker pull k8s.gcr.io/etcd:3.3.10
docker pull k8s.gcr.io/coredns:1.3.1
Just copy and run directly.
kubeadm initialization cluster
Initialize the cluster using kubeadm and execute the following commands on the master:
kubeadm init --kubernetes-version=v1.15.2 --pod-network-cidr=10.244.0.0/16 --service-cidr=10.96.0.0/12
After successful deployment, the focus is here:

Configure the necessary environment paths as prompted:
mkdir -p $HOME/.kube
cp -i /etc/kubernetes/admin.conf $HOME/.kube/config
chown $(id -u):$(id -g) $HOME/.kube/config
Look at the cluster state and confirm that each component is in health state:
[root@master /]# kubectl get cs
NAME                 STATUS    MESSAGE             ERROR
scheduler            Healthy   ok
controller-manager   Healthy   ok
etcd-0               Healthy   {"health":"true"}
Because the pod network has not been deployed yet, coredns is delayed waiting for startup.
Configuring the network for pod
The pod network plug-in is necessary to install so that pods can communicate with each other. Before deploying applications and starting kube-dns, a network needs to be deployed, and kubeadm only supports CNI networks.
There are many network plug-ins supported by pod, such as Calico, Canal, Flannel, Romana, Weave Net, etc., because we used the parameter pod-network-cidr=10.244.0.0/16 to initialize before, so we used the plug-in flannel.
Installation:
kubectl apply -f https://raw.githubusercontent.com/coreos/flannel/bc79dd1505b0c8681ece4de4c0d86c5cd2643275/Documentation/kube-flannel.yml
After configuring, the command clearly shows the process that coredns are gradually scheduled as flannel is installed successfully and initialized:

Don't rush to add nodes, first configure the master to the end:
After deployment, dashboard is deployed. There is a command line and there is no web. It feels almost nothing.
Installation of Kubernetes Dashboard
The docker image of k8s dashboard
k8s.gcr.io/kubernetes-dashboard-amd64:v1.10.0
Prepare the dashboard image first, no way, it's so casual, domestic have to go around the bend to find and label:
docker pull k8s.gcr.io/kubernetes-dashboard-amd64:v1.10.1
Installation, this is the latest arrangement of file addresses, many pits on the Internet because the file path has changed:
kubectl apply -f https://raw.githubusercontent.com/kubernetes/dashboard/v1.10.1/src/deploy/recommended/kubernetes-dashboard.yaml
Modify NodePort:
Because Service is a ClusterIP type, we can modify it to NodePort type by following commands for ease of use.
kubectl patch svc kubernetes-dashboard -p '{"spec":{"type":"NodePort"}}' -n kube-systemView Port
[root@master ~]# kubectl get svc -n kube-system
NAME           TYPE           CLUSTER-IP       EXTERNAL-IP       PORT(S)        AGE
kube-dns       ClusterIP     10.96.0.10       <none>           53/UDP,53/TCP   6h
kubernetes-dashboard  NodePort  10.107.238.193  <none>         443:32238/TCP   167m
Log on to the web side: https://192.168.3.10:32238
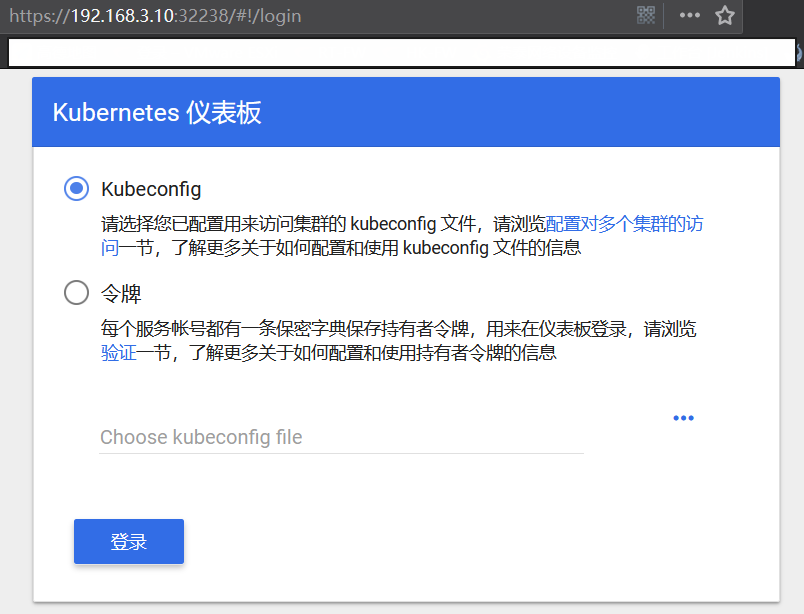
Configure login permissions
Dashboard supports Kubeconfig and Token authentication. To simplify the configuration, we give Dashboard default users admin privileges through the configuration file dashboard-admin.yaml.
[root@ken ~]# cat dashboard-admin.yml
apiVersion: rbac.authorization.k8s.io/v1beta1
kind: ClusterRoleBinding
metadata:
  name: kubernetes-dashboard
  labels:
     k8s-app: kubernetes-dashboard
roleRef:
  apiGroup: rbac.authorization.k8s.io
  kind: ClusterRole
  name: cluster-admin
subjects:
- kind: ServiceAccount
  name: kubernetes-dashboard
  namespace: kube-system
The point here is to create a system service account for kubernetes-dashboard with Service Account Name. We need to remember that it is useful.
Apply and obtain token:
kubectl apply -f dashboard-admin.yaml
kubectl -n kube-system describe secret $(kubectl -n kube-system get secret | grep kubernetes-dashboard| awk '{print $1}')
Similar to the following paragraph, just fill in token for confirmation.
Name: admin-user-token-xln5d
Namespace: kube-system
Labels: <none>Annotations: kubernetes.io/service-account.name: admin-user
kubernetes.io/service-account.uid: 54801c01-01e2-11e9-857e-00505689640f
Type: kubernetes.io/service-account-token
Data====ca.crt: 1025 bytes
namespace: 11 bytes
token:
eyJhbGciOiJSUzI1NiIsImtpZCI6IiJ9.eyJpc3MiOiJrdWJlcm5ldGVzL3NlcnZpY2VhY2NvdW50Iiwia3ViZXJuZXRlcy5pby9zZXJ2aWNlYWNjb3VudC9uYW1lc3BhY2UiOiJrdWJ
lLXN5c3RlbSIsImt1YmVybmV0ZXMuaW8vc2VydmljZWFjY291bnQvc2VjcmV0Lm5hbWUiOiJhZG1pbi11c2VyLXRva2VuLXhsbjVkIiwia3ViZXJuZXRlcy5pby9zZXJ2aWNlYWNjb3V
udC9zZXJ2aWNlLWFjY291bnQubmFtZSI6ImFkbWluLXVzZXIiLCJrdWJlcm5ldGVzLmlvL3NlcnZpY2VhY2NvdW50L3NlcnZpY2UtYWNjb3VudC51aWQiOiI1NDgwMWMwMS0wMWUyLTE
xZTktODU3ZS0wMDUwNTY4OTY0MGYiLCJzdWIiOiJzeXN0ZW06c2VydmljZWFjY291bnQ6a3ViZS1zeXN0ZW06YWRtaW4tdXNlciJ9.MbGeROnjA9f1AhBO8v2GuHC1ihVk1UcxpM8lYk
IC_P9Mx9jVZcM56zr4jcxjSnIuZPZxIznLJIIo7TRY94Ya2VujzF2lpDxlNYF2hWY3Ss9d5LqRtP3JsJNZVLmxvYIGnmnGyVCEikCM6W44WPu-S
The basic login is successful, but it's not finished yet. If you want to see the resource usage of each pod and container, you need to install the basic visual monitoring plug-in supported by K8S. Here we say: heapster+influxdb+grafana combination;
Heapster It's a Kubernetes in itself. The deployment method is simple, but it is not apply like dashboard, because it is not K8S default system application, so master default is not allowed to directly schedule to master node to run, so in order to deploy heapster to master node, we must first release this restriction:
kubectl taint node master node-role.kubernetes.io/master-
For the sake of insurance, it's better to pull the required mirror manually first, otherwise the service will be in a delayed waiting state for start-up.
docker pull k8s.gcr.io/heapster-amd64:v1.5.4
docker pull k8s.gcr.io/heapster-grafana-amd64:v5.0.4
docker pull k8s.gcr.io/heapster-influxdb-amd64:v1.5.2
So the three swordsmen came.
Up to the official clone heapster and install:
git clone https://github.com/kubernetes/heapster.git
kubectl apply -f heapster/deploy/kube-config/influxdb/
kubectl apply -f heapster/deploy/kube-config/rbac/heapster-rbac.yaml
When deployed, Master Only status is restored, and no other pod s are scheduled to master node:
kubectl taint node master node-role.kubernetes.io/master=:NoSchedule
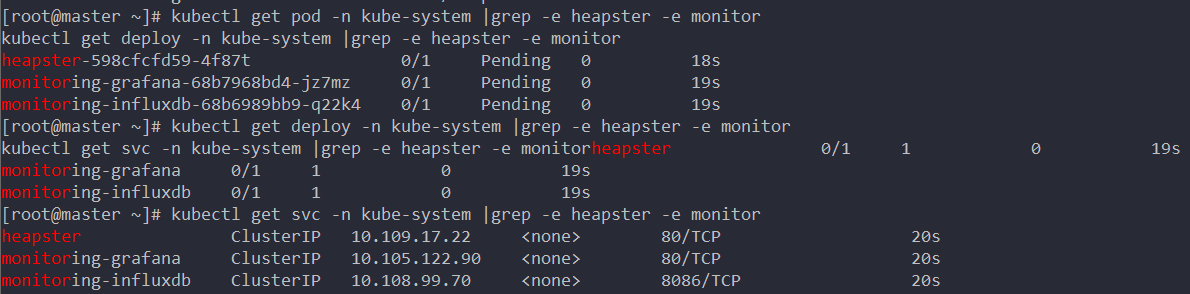
Run the command to see the deployment:
kubectl get pod -n kube-system |grep -e heapster -e monitor
kubectl get deploy -n kube-system |grep -e heapster -e monitor
kubectl get svc -n kube-system |grep -e heapster -e monitor
Modify NodePort to expose grafana to public access:
kubectl patch svc monitoring-grafana -p '{"spec":{"type":"NodePort"}}' -n kube-system
Well, that's the end of deployment. You think that the basic master has been deployed so simply that more pits are waving to you.
After waiting for half a day on the web page to refresh the visual monitoring chart, we opened the heapster container's log and found that the api interface was rejected, so we modified the heapster deployment file:
#In the heapster.yaml file
- --source=kubernetes:https://kubernetes.default

#Amend to read
- --source=kubernetes:kubernetes:https://kubernetes.default?useServiceAccount=true&kubeletHttps=true&kubeletPort=10250&insecure=true
And modify this place, before deploying token, let you remember that it has great use, this is the account used here:

This is a web editor using dashboard. Of course, it's a bit anti-human. Good yaml grammar is destroyed, so you can do it directly from the command line.
kubectl edit deployment heapster -n kube-system
After updating, K8S destroys the original container and automatically recreates a new container. This phenomenon arises.


Parameter name     Default values     Explain
token-ttl     15 minutes     Expiration time (in seconds) of JWE tokens generated by dashboard. Default: 15 min. 0 - never expires.
To modify the deployment file of kubernetes-dashboard directly, the Token failure time of Dashboard can be set by token-ttl parameter.
ports:
- containerPort: 8443
  protocol: TCP
args:
  - --auto-generate-certificates
  - --token-ttl=43200
If your docker and docker-CLI versions are incorrect, then you may go into another pit and not be able to shell the login container.
The name of the kubectl exec-it container - n kube-system sh (/ bin/sh, / bin/bash, bash) is said to be impossible to execute without this path in either case.
Later, you will find that the time of container log is UTC time zone format, and it is a pit. Slowly climb.
grafana is interested in downloading the K8S template from the official website, importing it directly and playing slowly.