Preface
In all virtualization solutions, data persistence is a problem that we need to be very concerned about, such as docker, k8s is no exception. In k8s, there is a concept of data volume.
k8s data volume mainly solves the following two problems:
- Data persistence: usually, when a container is running, the files written to its file system are temporary. When the container crashes, kebelet will kill the container and generate a new container. At this time, the new running container will have no files in the original container, because the container is re created from the image.
- Data sharing: there is often a need to share files / folders between containers running in the same pod.
In k8s, a Volume has an explicit lifecycle (the same as the container group (POD) that contains the Volume). Therefore, the life cycle of Volume is longer than that of any container in the same container group (POD). No matter how many times the container is restarted, the data is preserved. Of course, if the pod doesn't exist, the data Volume exits naturally. At this time, depending on the type of data Volume used by the pod, the data may be deleted as the data Volume exits, or it may be truly persistent, and it can still be used the next time the container group restarts.
Basically, a data volume is just a directory or file that can be accessed by a pod. How this directory comes from depends on the type of data volume (different types of data volumes use different storage media). Two containers in the same pod can mount a data volume to different directories.
I. data volume type
The k8s currently supports 28 data volume types (most of which are specific to the cloud environment). Here are several data volume types commonly used in the k8s.
1,emptyDir
Data volume of type emptyDir is assigned to the pod when it is created, and the data volume is not released until the pod is removed. When the data volume is initially allocated, it is always an empty directory. Different containers in the same pod can read and write to the directory and share the data in it (although different containers may mount the data volume to different paths in the container). When the pod is deleted, the data in the emptyDir data volume will be permanently deleted. (PS: when the container crashes, kubelet does not delete the pod, but just restarts the container, so the data in emptyDir still exists after the container crashes and restarts).
The usage scenario of emptyDir is as follows:
- A blank initial space, such as in a merge / sort algorithm, that temporarily stores data on disk.
- The checkpoint (intermediate result) is stored in the long-term calculation so that when the container crashes, it can continue from the last stored checkpoint (intermediate result), instead of starting from scratch.
- As the shared storage of two containers, the first content management container can store the generated data in it, and a web server container provides these pages.
- By default, emptyDir data volumes are stored on the node's storage media (mechanical hard disk, SSD, or network storage).
Use example of emptyDir
[root@master ~]# vim emtydir.yaml     #The yaml file for pod is as follows

apiVersion: v1
kind: Pod
metadata:
  name: read-write
spec:
  containers:
  - name: write         #Define a container named write
    image: busybox
    volumeMounts:
    - mountPath: /write    #When the data persistence type is emtydir, the path here refers to the path inside the container
      name: share-volume     #Specify the local directory name
    args:        #Write after container is running
    - /bin/sh
    - -c
    - echo "emtydir test" > /write/hello;sleep 30000

  - name: read           #Define a container named read
    image: busybox
    volumeMounts:
    - mountPath: /read
      name: share-volume      #Specify the local directory name
    args:                #Read after the container is running
    - /bin/sh
    - -c
    - cat /read/hello; sleep 30000
  volumes:               #volumes here refers to the explanation of the above mount
  - name: share-volume    #The name here must correspond to the name value under the mountPath of the pod above
    emptyDir: {}            #This indicates that it is an empty directory, mainly defining a data persistence type
[root@master ~]# kubectl apply -f emtydir.yaml    #Execute yaml file
[root@master ~]# kubectl exec -it read-write -c write /bin/sh  #Enter the first pod
/ # cat /write/hello        #Confirm whether the command executed by yaml file is effective
emtydir test

[root@master ~]# kubectl exec -it read-write -c read /bin/sh  #Enter the second container named read to view
/ # cat /read/hello        #Check whether the contents of the specified mounted directory are consistent with those of the write container
emtydir test
#At this point, you can at least confirm that the two pod s are mounted in the same local directory, and the file contents are consistent.
#Now, let's see which directory is mounted locally?
[root@master ~]# kubectl get pod -o wide    #First, use this command to see which node the pod is running on
#I'm running on node node01 here, so I need to check on node node01 next

#node01 node operation is as follows:
[root@node01 ~]# docker ps             #Use this command to view the running container ID number
CONTAINER ID        IMAGE              #Omit part of the content
6186a08c6d5f        busybox
5f19986f0879        busybox
[root@node01 ~]# docker inspect 6186a08c6d5f      #View details of the first container
 "Mounts": [          #Find the mount Field
            {
                "Type": "bind",
                "Source": "/var/lib/kubelet/pods/86b67ff4-9ca0-4f40-86d8-6778cfe949ec/volumes/kubernetes.io~empty-dir/share-volume",
#The above source is the specified local directory
                "Destination": "/read",
                "Mode": "Z",
                "RW": true,
                "Propagation": "rprivate"

[root@node01 ~]# docker inspect 5f19986f0879    #View details of the second container

        "Mounts": [    #Also navigate to the mount Field
            {
                "Type": "bind",
                "Source": "/var/lib/kubelet/pods/86b67ff4-9ca0-4f40-86d8-6778cfe949ec/volumes/kubernetes.io~empty-dir/share-volume",
#As you can see, the local directory specified above and the first container are the same directory
                "Destination": "/write",
                "Mode": "Z",
                "RW": true,
                "Propagation": "rprivate"
            },
#At this point, it can be determined that the mount directories of the two containers share the same local directory
[root@node01 ~]# cat /var/lib/kubelet/pods/86b67ff4-9ca0-4f40-86d8-6778cfe949ec/volumes/kubernetes.io~empty-dir/share-volume/hello
#View the contents in the local directory, which is consistent with the contents in the pod
emtydir test
At this point, the emptyDir feature has been verified. As long as there is a container running in the pod, the local data will not be lost, but if the pod is deleted, the local data will no longer exist.
Verify as follows:
Delete a pod on node01 and view the local directory again:
[root@node01 ~]# docker rm -f 6186a08c6d5f    #Delete a pod
6186a08c6d5f
[root@node01 ~]# cat /var/lib/kubelet/pods/86b67ff4-9ca0-4f40-86d8-6778cfe949ec/volumes/kubernetes.io~empty-dir/share-volume/hello
#Check the local directory and find that the file is still in
emtydir test
Delete the pod on the master node, and check whether the local directory exists on the node01 node again:
#Delete pod on master
[root@master ~]# kubectl delete -f emtydir.yaml
#Check the local directory again on node01, and you will be prompted that the directory does not exist
[root@node01 ~]# cat /var/lib/kubelet/pods/86b67ff4-9ca0-4f40-86d8-6778cfe949ec/volumes/kubernetes.io~empty-dir/share-volume/hello
cat: /var/lib/kubelet/pods/86b67ff4-9ca0-4f40-86d8-6778cfe949ec/volumes/kubernetes.io~empty-dir/share-volume/hello: There is no file or directory
emptyDir summary:
Different containers in the same pod share the same persistent directory. When the pod node is deleted, the contents of volume will also be deleted. But if only the container is destroyed and the pod is still there, the volume will not be affected. To put it bluntly, the data persistence life cycle of emptyDir is consistent with the pod used. It is generally used as temporary storage.
2. HostPath data volume type
A data volume of hostPath type mounts a file or directory on the file system of the node where the Pod (container group) is located into the container group (inside the container), similar to the bind mount mount mode in docker.
This way of data persistence is not used in many scenarios, because it increases the coupling between pod and nodes.
Most container groups do not need to use the hostPath data volume, but in a few cases, the hostPath data volume is very useful:
Applicable scenarios are as follows:
- A container needs to access Docker. You can use hostPath to mount / var/lib/docker of the host node
- Run the C advisor in the container and use the hostPath to mount the / sys of the host node
In general, this method is generally used for data persistence of K8s cluster and docker.
Because of its relatively few use scenarios, there is no example here.
3. Persistent data volume type
Persistent volume (PV storage volume) is a piece of storage space in a cluster. It is managed by the cluster administrator or automatically by the Storage class. PV, like pod, deployment and Service, is a resource object.
Now that there is the concept of PV, the concept of PVC (persistent volume claim) has to be mentioned. PVC represents the user's request to use storage, and applies an application and declaration for PV persistence space. K8s cluster may have multiple PVS. You need to create multiple PVS for different applications.
For example, pod consumes the computing resources of node node, while PVC storage volume declaration consumes the storage resources of PV. Pod can request a specific amount of computing resources (CPU or memory, etc.), while PVC requests storage resources of a specific size or access mode (only read-write by single node / read-only by multiple nodes / read-write by multiple nodes).
Relationship between PV and PVC
The relationship between PV (storage volume) and PVC (storage volume declaration) is shown in the following figure:
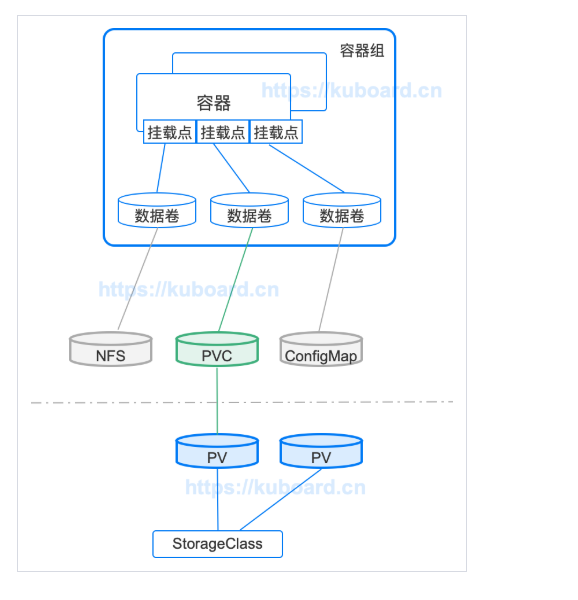
The explanation in the figure above is as follows:
- PV is the storage resource in the cluster, which is usually created and managed by the Cluster Administrator;
- StorageClass is used to classify PV. If the configuration is correct, Storage can also dynamically create PV according to the request of PVC;
- PVC is a request to use this resource, which is usually made by the application program, and specifies the corresponding StorageClass and the required space size;
- PVC can be used as a kind of data volume to be mounted in pod.
Management process of storage volume declaration (PVC)
The management process of PV and PVC is described as follows:
1. Partition a separate directory on the host for PV use and define its available size
2. Create PVC as a resource object to request storage space of PV
3. Add data volume to pod, which is related to PVC;
4. Pod contains containers, which mount data volumes
In fact, there are so many explanations above, which may still be in the clouds. Here is a use case for reference only.
The general process of the case is as follows:
The underlying storage adopts nfs storage, and then 1G capacity is divided under the nfs directory for PV scheduling. Then, the storage resource space of PV is applied by creating PVC. Finally, the pod test is created. The storage resource declared by PVC is used to realize data persistence.
1) build nfs storage
For the convenience of operation, I directly set up nfs storage on the master.
[root@master ~]# yum -y install nfs-utils
[root@master ~]# systemctl enable rpcbind
[root@master ~]# vim /etc/exports
/nfsdata *(rw,sync,no_root_squash)
[root@master ~]# systemctl start nfs-server
[root@master ~]# systemctl enable nfs-server
[root@master ~]# showmount -e
Export list for master:
/nfsdata *
2) create PV resource object
[root@master ~]# vim test-pv.yaml    #Edit yaml file of PV

apiVersion: v1
kind: PersistentVolume
metadata:
  name: test-pv
spec:
  capacity:
    storage: 1Gi          #The PV can be allocated 1G capacity
  accessModes:
    - ReadWriteOnce              #The access mode is to mount to a single node only in read-write mode
  persistentVolumeReclaimPolicy: Recycle   #Recycle policy is recycle
  storageClassName: nfs            #Define storage class name
  nfs:                                #The name of the storage class defined above needs to be consistent
    path: /nfsdata/test-pv       #Specify the directory for nfs
    server: 192.168.20.6           #IP address of nfs server
#Specific explanation of the above
#capacity: Specifies the size of the PV
#AccessModes: specify access modes
    #ReadWriteOnce: can only mount to a single node in a read-write way (a single node means can only be used by a single PVC declaration)
    #ReadOnlyMany: can mount to multiple nodes in a read-only way
    #ReadWriteMany: can mount to multiple nodes in a read-write way
#Persistentvolumerreclaimpolicy: recycling policy for PV
    #Recycle: clear the data in PV and recycle it automatically.
    #Retain: manual recycle is required.
    #Delete: delete cloud storage resources. (dedicated to cloud storage)
    #PS: note that the recycling policy here refers to whether the source files stored under the PV are deleted after the PV is deleted.
#storageClassName: the basis of association between PV and PVC.
[root@master ~]# kubectl apply -f test-pv.yaml     #Execute yaml file
[root@master ~]# kubectl get pv test-pv    #Since PV is a resource object, you can naturally view its status in this way
NAME      CAPACITY   ACCESS MODES   RECLAIM POLICY   STATUS      CLAIM   STORAGECLASS   REASON   AGE
test-pv   1Gi        RWO            Recycle          Available           nfs                     38s
#Viewing PV status must be Available for normal use
3) create PVC resource object
[root@master ~]# vim test-pvc.yaml         #Write yaml file

apiVersion: v1
kind: PersistentVolumeClaim
metadata:
  name: test-pvc
spec:
  accessModes:          #Define access mode, which must be consistent with that defined by PV
    - ReadWriteOnce
  resources:
    requests:
      storage: 1Gi          #Direct request uses maximum capacity
  storageClassName: nfs      #The name here must be the same as that defined by PV
[root@master ~]# kubectl apply -f test-pvc.yaml     #Execute yaml file

#Check the status of PV and PVC again (the status is bound, indicating that the PV is in use)
[root@master ~]# kubectl get pvc      #View the status of PVC
NAME       STATUS   VOLUME    CAPACITY   ACCESS MODES   STORAGECLASS   AGE
test-pvc   Bound    test-pv   1Gi        RWO            nfs            2m10s
[root@master ~]# kubectl get pv      #View PV status
NAME      CAPACITY   ACCESS MODES   RECLAIM POLICY   STATUS   CLAIM              STORAGECLASS   REASON   AGE
test-pv   1Gi        RWO            Recycle          Bound    default/test-pvc   nfs                     8m24s
4) create a Pod
The pod created here uses the PV just created to persist the data.
[root@master ~]# vim test-pod.yaml       #Write yaml file of pod
apiVersion: v1
kind: Pod
metadata:
  name: test-pod
spec:
  containers:
  - name: test-pod
    image: busybox
    args:
    - /bin/sh
    - -c
    - sleep 30000
    volumeMounts:
    - mountPath: /testdata
      name: volumedata     #Custom name here
  volumes:
    - name: volumedata      #Here is the explanation of the name defined above. The two names must be the same
      persistentVolumeClaim:
        claimName: test-pvc
[root@master ~]# kubectl apply -f test-pod.yaml        #Execute yaml file
[root@master ~]# kubectl get pod     #Check the status of pod and find that it has been in ContainerCreating status
#What's the matter?
NAME       READY   STATUS              RESTARTS   AGE
test-pod   0/1     ContainerCreating   0          23s
#When the pod status is abnormal, generally we can use three ways to troubleshoot
#The first is to use the kubectl describe command to view the details of the pod
#The second is to use the kubectl logs command to view the log of the pod
#The third is to view the message log of the host computer
#Here I use the first method to correct the mistake
[root@master ~]# kubectl describe pod test-pod
#The last message output is as follows:
mount.nfs: mounting 192.168.20.6:/nfsdata/test-pv failed, reason given by server: No such file or directory
#It turns out that when we mount the nfs storage directory, the specified directory does not exist
#Then create the relevant directory on the nfs server (this is the local machine)
[root@master ~]# mkdir -p /nfsdata/test-pv      #Create corresponding directory
[root@master ~]# kubectl get pod test-pod   #Then check the status of the pod again
#If the state of the pod is still being created, it is because the kubelet component on the node where the pod is running has not yet responded
#If you want to pursue the startup speed of pod, you can manually restart the kubelet component of the node where the pod is located.
[root@master ~]# kubectl get pod test-pod    #Wait a moment, check again, and find that its pod is running
NAME       READY   STATUS    RESTARTS   AGE
test-pod   1/1     Running   0          8m
5) test the effect of data persistence
[root@master ~]# kubectl exec -it test-pod /bin/sh   #Enter pod
/ # echo "test pv pvc" > /testdata/test.txt       #Write test information to data persistent directory
#Go back to the nfs server and check whether there is any information written in the container in the shared directory
[root@master ~]# cat /nfsdata/test-pv/test.txt   #Sure there is
test pv pvc
#Now look at the node where the pod container is located, and then go to the corresponding node to delete it
[root@master ~]# kubectl get pod -o wide       #I'm running on node02
NAME       READY   STATUS    RESTARTS   AGE   IP           NODE     NOMINATED NODE   READINESS GATES
test-pod   1/1     Running   0          11m   10.244.2.2   node02   <none>           <none>
#View the ID number of its pod container in node02 node and delete it
[root@node02 ~]# docker ps      #Get ID number of container
[root@node02 ~]# docker rm -f dd445dce9530   #Delete the container you just created
#Go back to the nfs server and find that the data in its local directory is still there
[root@master ~]# cat /nfsdata/test-pv/test.txt
test pv pvc
#Now test whether the local data of nfs is still available when the pod is deleted?
[root@master ~]# kubectl delete -f test-pod.yaml
[root@master ~]# cat /nfsdata/test-pv/test.txt      #Oh, the data is still there
test pv pvc
#What about deleting PVC now?
[root@master ~]# kubectl delete -f test-pvc.yaml
[root@master ~]# cat /nfsdata/test-pv/test.txt       #Oh, no data.
cat: /nfsdata/test-pv/test.txt: There is no file or directory
Summary: when we create the PV resource object, the recycling strategy is to clear the data in the PV, and then recycle it automatically. The PV resource object is applied for by PVC, so whether it's a container or a pod, their destruction will not affect the data in the nfs local directory used for data persistence. However, once the PVC is deleted, then Then the local data will disappear with the destruction of PVC, that is to say, PV data volume is used to realize data persistence, and its data persistence life cycle is consistent with that of PVC.
————————Thank you for reading————————