Java learning_ 08_GUI programming
GUI programming
1. Introduction
GUI programming
Swing and AWT are common technologies used in java GUI development. However, due to the poor appearance, the number of components is too small, and the JRE environment is needed to run (hundreds of M JRE packages can be run at any time) )So it's not popular. However, it needs simple learning and understanding
1. Many components (JTable,JList, etc.) are classic demonstrations of MVC. You can also learn about MVC architecture
- It is quite convenient to write some software for your own use
2. Introduction to AWT
2.1 introduction to AWT
- AWT (Abstract Window Toolkit) includes many classes and interfaces for GUI programming of Java Application. Container and Component are two core classes in AWT.
2.2 components and containers
-
Component represents all visible graphic elements. There is a special graphic element called container in component. Container is a kind of container that can hold other component elements in graphic interface. Container itself is also a kind of component, and other containers can also be contained in container.
-
The Container is divided into window and pannel. Window can be displayed independently. The windows of various application programs we see at ordinary times can be called window. Pannel can also contain other graphic elements, but pannel cannot be seen generally. Pannel cannot be displayed as an independent window of application programs. Pannel must be loaded into w to display It can only be displayed in indow.
2.3Frame
-
Frame is a subclass of Window. The Window we usually see is frame, which is the top-level Window with title and border
-
Construction method
- Frame(): construct a new instance of frame that is not initially visible
- Frame(String title): construct a new, initially invisible frame object with the specified title
-
Common member methods
- void pack(): resize this window to fit the preferred size and layout of its subcomponents
- void setBounds(int x, int y, int width, int height): move and resize components
- void setSize(int width, int height): resize the component to width and height
- void setVisible(boolean b): display or hide this window according to the value of parameter B (true is visible)
-
[code example]
package com.lee.lesson1;

import java.awt.*;

//The first GUI interface
public class TestFrame {
    public static void main(String[] args) {
        //Frame,JDK, see the source code
        Frame frame = new Frame("My first Java Image interface window");

        //Visibility needs to be set
        frame.setVisible(true);

        //Set window size
        frame.setSize(400, 400);

        //Set background color
        frame.setBackground(new Color(0x3E1455));

        //Initial position of eject
        frame.setLocation(200, 200);

        //Set fixed size
        frame.setResizable(false);


    }
}
This code will pop up a window, but the window can only be minimized and cannot be closed (unless the program is stopped)
-
[code example 2: show multiple windows]
package com.lee.lesson1;

import java.awt.*;

//Open multiple windows at a time
public class TestFrame2 {
    public static void main(String[] args) {
        MyFrame myFrame1 = new MyFrame(100, 100, 200, 200, Color.blue);
        MyFrame myFrame2 = new MyFrame(300, 100, 200, 200, Color.yellow);
        MyFrame myFrame3 = new MyFrame(100, 300, 200, 200, Color.red);
        MyFrame myFrame4 = new MyFrame(300, 300, 200, 200, Color.MAGENTA);
    }
}

class MyFrame extends Frame {
    static int id = 0;//When there are multiple windows, we need a counter

    public MyFrame(int x,int y,int w,int h,Color color){
        super("MyFrame" + (++id));
        setBackground(color);
        setBounds(x,y,w,h);
        setVisible(true);
    }
}
2.4 Panel
-
Panel can be regarded as a space that can hold components, with its own layout manager, but it cannot exist alone (to be embedded in Frame window)
-
Construction method
- Panel(): use the default layout manager to create a new panel (the default layout manager for all panels is the FlowLayout class)
- Panel(LayoutManager layout): creates a new panel with the specified layout manager.
-
[code example]
package com.lee.lesson1;

import java.awt.*;
import java.awt.event.WindowAdapter;
import java.awt.event.WindowEvent;

public class TestPanel {
    public static void main(String[] args) {
        Frame frame = new Frame();

        Panel panel = new Panel();

        //Set layout
        frame.setLayout(null);

        //coordinate
        frame.setBounds(300, 300, 500, 500);
        frame.setBackground(new Color(193, 15, 60));

        //frame.add(panel)
        frame.add(panel);

        frame.setVisible(true);

        //Listening event, listening window close event System.exit(0)
        //Adapter mode
        frame.addWindowListener(new WindowAdapter() {
            //What to do when the window is closed
            @Override
            public void windowClosing(WindowEvent e) {
                System.exit(0);
            }
        });

    }
}
Here we realize the normal closing of the window
We mentioned earlier that Panel has its own layout manager. Next, we will focus on the common layout managers
2.4.1FlowLayout
-
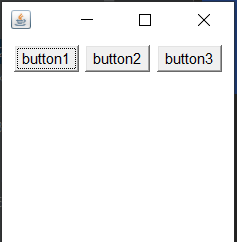
Flow layout is the default layout manager of Panel class, which is similar to the text line in a paragraph. It is used to locate components line by line, from left to right in a line, and wrap after a line is full
-
Construction method
- FlowLayout(): construct a new FlowLayout, which is centered and aligned. The default horizontal and vertical gaps are 5 units
- FlowLayout(int align): construct a new FlowLayout with the specified alignment. The default horizontal and vertical gaps are 5 units.
-
[code example]
package com.lee.lesson1;

import java.awt.*;

public class TestFlowLayout {
    public static void main(String[] args) {
        Frame frame = new Frame();

        //Component button
        Button button1 = new Button("button1");
        Button button2 = new Button("button2");
        Button button3 = new Button("button3");

        //Set to flow layout

        frame.setLayout(new FlowLayout());

        frame.setSize(200, 200);

        //add button
        frame.add(button1);
        frame.add(button2);
        frame.add(button3);

        frame.setVisible(true);
    }
}
Operation result:
2.4.2 BorderLayout
-
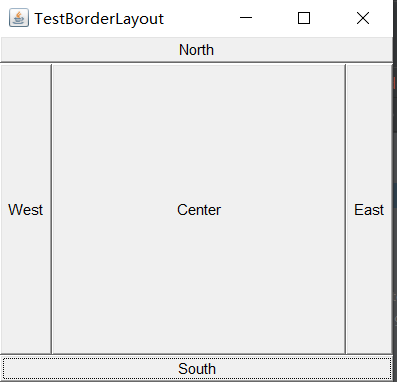
This is a border layout for arranging containers. It can arrange and resize container components to meet the following five areas: NORTH, SOUTH, EAST, WEST, and middle. Each area can contain at most one component and be identified by corresponding constants: NORTH, SOUTH, EAST, WEST, CENTER
-
[code display]
package com.lee.lesson1;

import java.awt.*;

public class TestBorderLayout {
    public static void main(String[] args) {
        Frame frame = new Frame("TestBorderLayout");
        Button east = new Button("East");
        Button west = new Button("West");
        Button north = new Button("North");
        Button south = new Button("South");
        Button center = new Button("Center");

        frame.add(east, BorderLayout.EAST);
        frame.add(west, BorderLayout.WEST);
        frame.add(north, BorderLayout.NORTH);
        frame.add(south, BorderLayout.SOUTH);
        frame.add(center, BorderLayout.CENTER);

        frame.setSize(200,200);

        frame.setVisible(true);

    }
}
Operation result:
2.4.3 GridLayout
-
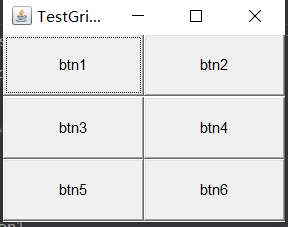
GridLayout layout, which arranges the components of the container in the form of a rectangular grid. The container is divided into equal sized rectangles, in which a component is placed
-
[code display]
package com.lee.lesson1;

import java.awt.*;

public class TestGridLayout {
    public static void main(String[] args) {
        Frame frame = new Frame("TestGridLayout");
        Button btn1 = new Button("btn1");
        Button btn2 = new Button("btn2");
        Button btn3 = new Button("btn3");
        Button btn4 = new Button("btn4");
        Button btn5 = new Button("btn5");
        Button btn6 = new Button("btn6");

        frame.setLayout(new GridLayout(3,2));

        frame.add(btn1);
        frame.add(btn2);
        frame.add(btn3);
        frame.add(btn4);
        frame.add(btn5);
        frame.add(btn6);

        frame.pack();//Auto layout, Java functions

        frame.setVisible(true);
    }
}
Operation result:
2.4.4 layout exercise
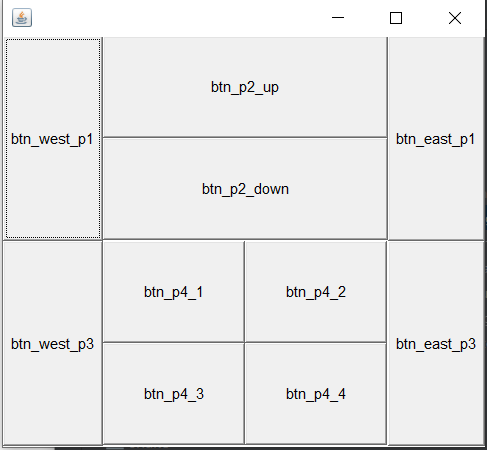
With the feature that panels can be nested with each other, the following layouts can be realized (hands-on)
package com.lee.lesson1;

import java.awt.*;
import java.awt.event.WindowAdapter;
import java.awt.event.WindowEvent;

public class TestDemo {
    public static void main(String[] args) {
        Frame frame = new Frame();

        frame.setVisible(true);

        frame.setSize(400, 400);
        //Layout set to two rows and one column
        frame.setLayout(new GridLayout(2, 1));

        //Using the feature that panels can be nested with each other to realize complex layout
        Panel panel1 = new Panel(new BorderLayout());
        Panel panel2 = new Panel(new GridLayout(2, 1));
        Panel panel3 = new Panel(new BorderLayout());
        Panel panel4 = new Panel(new GridLayout(2, 2));

        //Fill the panel with components

        panel1.add(new Button("btn_west_p1"), BorderLayout.WEST);
        panel1.add(new Button("btn_east_p1"), BorderLayout.EAST);
        panel2.add(new Button("btn_p2_up"));
        panel2.add(new Button("btn_p2_down"));
        panel1.add(panel2, BorderLayout.CENTER);

        panel3.add(new Button("btn_west_p3"), BorderLayout.WEST);
        panel3.add(new Button("btn_east_p3"), BorderLayout.EAST);
        for (int i = 0; i < 4; i++) {
            panel4.add(new Button("btn_p4_" + (i + 1)));
        }
        panel3.add(panel4, BorderLayout.CENTER);

        frame.add(panel1);
        frame.add(panel3);

        frame.addWindowListener(new WindowAdapter() {
            @Override
            public void windowClosing(WindowEvent e) {
                System.exit(0);

            }
        });

    }
}
2.5 event monitoring
-
Event listening is to listen to the event source object by using the class object that implements a listener interface. When an event occurs, we will process the received event object
-
[code example]
package com.lee.lesson2; import java.awt.*; import java.awt.event.ActionEvent; import java.awt.event.ActionListener; import java.awt.event.WindowAdapter; import java.awt.event.WindowEvent; public class TestActionEvent { public static void main(String[] args) { //Press the button to trigger some events Frame frame = new Frame(); Button button = new Button(); //Because addActionListener() needs an ActionListener, we need to construct an ActionListener MyActionListener listener = new MyActionListener(); button.addActionListener(listener); frame.add(button, BorderLayout.CENTER); frame.pack(); frame.setVisible(true); windowClosed(frame); } //Close form event private static void windowClosed(Frame frame) { frame.addWindowListener(new WindowAdapter() { @Override public void windowClosing(WindowEvent e) { System.exit(0); } }); } } //event listeners class MyActionListener implements ActionListener { @Override public void actionPerformed(ActionEvent actionEvent) { System.out.println("aaa"); } } -
[code example 2]
package com.lee.lesson2; import java.awt.*; import java.awt.event.ActionEvent; import java.awt.event.ActionListener; public class TestActionTwo { public static void main(String[] args) { //Two buttons realize the same monitoring //Start stop Frame frame = new Frame(); Button button1 = new Button("start"); Button button2 = new Button("stop"); //Display the command value that will be returned when the definition is triggered. If it is not defined, go to the default value //You can write only one monitor class for multiple buttons, but you don't use many button2.setActionCommand("button2_stop"); MyMonitor myMonitor = new MyMonitor(); button1.addActionListener(myMonitor); button2.addActionListener(myMonitor); frame.add(button1,BorderLayout.NORTH); frame.add(button2,BorderLayout.SOUTH); frame.pack(); frame.setVisible(true); } } class MyMonitor implements ActionListener{ @Override public void actionPerformed(ActionEvent e) { //e.getActionCommand() gets the information of the button System.out.println("Button clicked:msg"+e.getActionCommand()); } } -
[TextField monitoring]
package com.lee.lesson2;

import java.awt.*;
import java.awt.event.ActionEvent;
import java.awt.event.ActionListener;

public class TestText01 {
    public static void main(String[] args) {
        MyFrame myFrame = new MyFrame();
    }
}

class MyFrame extends Frame {
    public MyFrame() {
        TextField textField = new TextField();//Single line text box
        add(textField);

        //Listen for text entered in text box
        MyActionListener2 listener = new MyActionListener2();
        textField.addActionListener(listener);

        //Set alternate encoding
        textField.setEchoChar('*');

        setVisible(true);
        pack();
    }
}
class MyActionListener2 implements ActionListener{

    @Override
    public void actionPerformed(ActionEvent e) {
        TextField field = (TextField) e.getSource();//Get some resources, return an object, and force it to a text field object
        System.out.println(field.getText());
        field.setText("");
    }
}
Textfile text line (single line), textarea text box
2.6 graphics
-
Each Component has a paint (Graphics g) for drawing purposes, and the paint method is called automatically every time the Component is redrawn
-
[code example]
package com.lee.lesson3;

  import java.awt.*;

  public class TestPaint {
      public static void main(String[] args) {
          new MyPaint().loadFrame();
      }
  }

  class MyPaint extends Frame {

      public void loadFrame() {
          setBounds(200, 200, 600, 400);
          setVisible(true);
      }

      @Override
      public void paint(Graphics g) {
        //The brush needs to have color, and then draw
  //        g.setColor(Color.red);
  //        g.drawOval(100,100,100,100);
          g.fillOval(100,100,100,100);

  //        g.setColor(Color.green);
          g.fillRect(150,200,200,200);

          //Make it a habit to use up your brush and restore it to its original color

      }
  }
2.7 mouse event adapter
-
abstract class java.awt.event.MouseAdapter implements the MouseListener interface. Its subclass can be used as the listener of MouseEvent, as long as its corresponding method is rewritten (for other listeners, there is also a corresponding adapter).
-
The applicable adapter can avoid unnecessary null methods defined by the listener.
-
[code display: drawing points]
package com.lee.lesson3;

import java.awt.*;
import java.awt.event.MouseAdapter;
import java.awt.event.MouseEvent;
import java.util.ArrayList;
import java.util.Iterator;

//Test mouse listening events
public class TestMouse {
    public static void main(String[] args) {
        new MyFrame("Drawing");
    }
}

class MyFrame extends Frame {
    //You need a brush to draw, you need to monitor the current position of the mouse, and you need a collection to store these points
    ArrayList points;

    public MyFrame(String title) {
        super(title);
        setBounds(200, 200, 400, 300);
        //Save the point of mouse click
        points = new ArrayList<>();
        //Mouse monitor, right at this window
        this.addMouseListener(new MyMouseListener());
        setVisible(true);
    }

    @Override
    public void paint(Graphics g) {
        //Draw, monitor mouse events
        Iterator iterator = points.iterator();
        while (iterator.hasNext()) {
            Point point = (Point) iterator.next();
            g.setColor(Color.blue);
            g.fillOval(point.x, point.y, 10, 10);
        }
    }
    //Add a point to the interface
    public void addPoint(Point point){
        points.add(point);
    }
    //monitor
    private class MyMouseListener extends MouseAdapter {
        //Just click and listen

        @Override
        public void mousePressed(MouseEvent e) {
            MyFrame myFrame = (MyFrame) e.getSource();
            //Click here to create a point on the interface! painting
            //This point is the point of the mouse
            myFrame.addPoint(new Point(e.getX(), e.getY()));

            //You need to redraw every time you click the mouse
            myFrame.repaint();//Refresh

        }
    }

}
2.8 keyboard response events
-
[code display: keyboard response KeyEvent]
package com.lee.lesson3;

import java.awt.*;
import java.awt.event.KeyAdapter;
import java.awt.event.KeyEvent;

public class TestKey {
    public static void main(String[] args) {
        new KeyFrame();
    }
}

class KeyFrame extends Frame {
    public KeyFrame() {
        setBounds(1, 2, 300, 400);
        setVisible(true);

        this.addKeyListener(new KeyAdapter() {
            @Override
            public void keyPressed(KeyEvent e) {
                //Get current keyboard key
                int keyCode = e.getKeyCode();
                System.out.println(keyCode);
                if (keyCode == KeyEvent.VK_UP) {
                    System.out.println("You press the up key");
                }
            }
        });
    }
}
3.Swing
-
Swing is a GUI (graphical user interface) development kit. There are many contents. It will be written in blocks here. But here, we only talk about the basic elements of swing, including containers, components and layout. More in-depth contents will not be introduced here. For those who want to study in depth, please refer to relevant materials or books, such as Java Swing GUI development and case details.
-
When the application developed by AWT components is transplanted to other platform systems to run, its appearance style cannot be guaranteed. When the Java application developed by Swing is transplanted to other system platforms, its interface appearance will not change.
3.1 JFrame frame form
-
After the JFrame object is created, you need to call the getContentPane() method to convert the form to a container, and then add components or set the layout manager in the container, which is usually used to contain and display components.
-
[code display]
package com.lee.lesson4;

import javax.swing.*;
import java.awt.*;

public class JFrameDemo {
    //init() initialization
    public void init(){
        JFrame frame = new JFrame("This one JFrame window");
        frame.setVisible(true);
        frame.setBounds(100, 100, 200, 200);
        frame.setBackground(Color.cyan);
        //Set text label
        JLabel jLabel = new JLabel("Small test ox knife");

        //Close event
        frame.setDefaultCloseOperation(WindowConstants.EXIT_ON_CLOSE);
    }
    public static void main(String[] args) {
        //Create a window
        new JFrameDemo().init();
    }
}
Now that the code mentions the closing method of the form, here are four ways to close the form:
-
DO_NOTHING_ON_CLOSE: close the window without doing anything;
-
“DISPOSE_ON_CLOSE: any listener object registered will automatically hide and release the window;
-
“HIDE_ON_CLOSE: the default window of the hidden window is closed;
-
“EXIT_ON_CLOSE: exit application default window closed
3.2 jdialog form
-
JDialog form is a dialog box in Swing component, which inherits the dialog box in AWT component java.awt.Dialog Class. The function is to pop up another form from one form
-
[code display]
package com.lee.lesson4;

import javax.swing.*;
import java.awt.*;
import java.awt.event.ActionEvent;
import java.awt.event.ActionListener;

//main window
public class DialogDemo extends JFrame {
    public DialogDemo() {
        this.setVisible(true);
        this.setSize(700, 500);
        this.setDefaultCloseOperation(EXIT_ON_CLOSE);

        //Container, put things
        Container container = this.getContentPane();
        //Absolute layout
        container.setLayout(null);

        //Button
        JButton jButton = new JButton("Click to open a dialog box");
        jButton.setBounds(30, 30, 200, 50);


        //When you click this button, a pop-up window pops up
        jButton.addActionListener(new ActionListener() {
            @Override
            public void actionPerformed(ActionEvent e) {
                //Popup
                new MyDialog();
            }
        });
        container.add(jButton);
    }

    public static void main(String[] args) {
        new DialogDemo();
    }
}
//Pop up window
class MyDialog extends JDialog{

    public MyDialog() {
        this.setVisible(true);
        this.setBounds(100,100,500,500);
//        this.setDefaultCloseOperation(EXIT_ON_CLOSE); / / the pop-up window can be closed by default

        Container container = this.getContentPane();
        container.setLayout(null);

        container.add(new Label("Learn from you"));
    }
}
3.3 label assembly
The way to display text or prompt information in Swing is to use labels, which support text strings and icons. The JLabel we mentioned above is the content here
3.3.1 label
- The label is defined by the JLabel class, which can display a line of read-only text, an image or text with image (as shown above, it will not be described in detail here)
3.3.2 Icon
-
Icons in Swing can be placed on buttons, labels and other components to describe the purpose of components. Icons can be created using Java supported image file types, or they can be created using java.awt.Graphics Class to create. Icon interface is used to create icons in Swing, and the size, color and other characteristics of icons can be given at the time of creation.
-
Note: Icon is an interface. When using the Icon interface, you must implement three methods of the Icon interface:
- int getIconHeight(): returns the height of the icon.
- int getIconWidth(): returns the width of the icon.
- void paintIcon(Component c, Graphics g, int x, int y): draws an icon at a specified location.
-
[code display]
package com.lee.lesson4;

import javax.swing.*;
import java.awt.*;

//The icon is an interface. Need to implement class
public class IconDemo extends JFrame implements Icon {

    private int width;
    private int height;

    public IconDemo() {
        //Nonparametric structure
    }//Nonparametric structure

    public IconDemo(int width, int height) {
        //Parametrical structure
        this.width = width;
        this.height = height;
    }

    public void init() {
        IconDemo iconDemo = new IconDemo(15, 15);
        JLabel label = new JLabel("icontest", iconDemo, SwingConstants.CENTER);
        Container container = getContentPane();

        container.add(label);
        this.setVisible(true);
        this.setDefaultCloseOperation(EXIT_ON_CLOSE);
    }


    public static void main(String[] args) {
        new IconDemo().init();
    }

    @Override
    public void paintIcon(Component c, Graphics g, int x, int y) {
        g.fillOval(x, y, width, height);

    }

    @Override
    public int getIconWidth() {
        return this.width;
    }

    @Override
    public int getIconHeight() {
        return this.height;
    }
}
3.3.3 Picture Icon
-
In addition to drawing, icons in Swing can be created with a specific picture. utilize javax.swing.ImageIcon Class to create an icon based on an existing image (note the path of the image placement)
-
[code display]
package com.lee.lesson4;

import javax.swing.*;
import java.awt.*;
import java.net.URL;

public class ImageIconDemo extends JFrame {
    public ImageIconDemo(){
        JLabel label = new JLabel("This is a JFrame Form, next to a picture");
        URL url = ImageIconDemo.class.getResource("body.png");//Get the URL of the picture
        Icon icon = new ImageIcon(url);
        label.setIcon(icon);//Set up pictures for labels
        label.setHorizontalAlignment(SwingConstants.CENTER);
        label.setOpaque(true);//Set label to opaque

        Container container = this.getContentPane();
        container.add(label);
        this.setVisible(true);
        this.setSize(500, 350);
        this.setDefaultCloseOperation(EXIT_ON_CLOSE);

    }

    public static void main(String[] args) {
        new ImageIconDemo();
    }
}
3.4 panel
The layout is similar to that in AWT, so it will not be introduced here
-
A panel is also a container that can hold other components as a container, but it must also be added to other containers. Common panels in Swing include JPanel panel and JScrollPane panel
-
JPanel is equivalent to the Panel in AWT, which will not be introduced here
-
JScrollPane: This is a panel with scroll bar, just like the scroll bar you often encounter when browsing the web. If you need to place multiple components in the JScrollPane, you need to place these components on the JPanel panel, and then add the JPanel panel as an integral component to the JScrollPane panel.
-
[code display]
package com.lee.lesson5;

import javax.swing.*;
import java.awt.*;

public class JScroll extends JFrame {
    public JScroll() {
        Container container = this.getContentPane();
        JTextArea tArea = new JTextArea("welcome to the league of legends"); // Create a text area component

        JScrollPane sp = new JScrollPane(tArea);
        container.add(sp);
        this.setVisible(true);
        this.setSize(300, 150);
        this.setDefaultCloseOperation(WindowConstants.EXIT_ON_CLOSE);
    }

    public static void main(String[] args) {
        new JScroll();
    }
}
3.5 button assembly
Ordinary buttons are just introduced. Here is a brief description of the radio box and multi selection box
3.5.1 radio box
-
By default, radio buttons display a circular icon, usually with descriptive text next to it. When the user selects a radio button, other buttons in the button group will be automatically cancelled. In this case, the button group is required to put the buttons in the same group together. Only one button in the button group can be selected, while the buttons not in the button group will not be affected
-
[code display]
package com.lee.lesson5;

import javax.swing.*;
import java.awt.*;

public class RadioButtonDemo extends JFrame {
    public RadioButtonDemo() {
        Container container = this.getContentPane();
        //Radio
        JRadioButton jr1 = new JRadioButton("JRadioButton1");
        JRadioButton jr2 = new JRadioButton("JRadioButton2");
        JRadioButton jr3 = new JRadioButton("JRadioButton3");
        //Button group, only one radio box can be selected
        ButtonGroup group = new ButtonGroup();
        group.add(jr1);
        group.add(jr2);
        group.add(jr3);
        container.add(jr1, BorderLayout.CENTER);
        container.add(jr2, BorderLayout.NORTH);
        container.add(jr3, BorderLayout.SOUTH);
        this.setVisible(true);
        this.setSize(500, 350);
        this.setDefaultCloseOperation(WindowConstants.EXIT_ON_CLOSE);
    }

    public static void main(String[] args) {
        new RadioButtonDemo();
    }
}
3.5.2 multi selection box
-
The check box is a box icon, plus a descriptive text. The difference between the check box and the radio button is that multiple choices are allowed. Each check box provides two states of "selected" and "unchecked"
-
[code display]
-
package com.lee.lesson5;

import javax.swing.*;
import java.awt.*;

public class CheckedBoxDemo extends JFrame {
    public CheckedBoxDemo(){
        Container container = this.getContentPane();

        //Checkbox
        JCheckBox jrb = new JCheckBox("abc");
        JCheckBox jrb2 = new JCheckBox("abc");
        container.add(jrb);
        container.add(jrb2,BorderLayout.NORTH);

        this.setVisible(true);
        this.setSize(500, 350);
        this.setDefaultCloseOperation(WindowConstants.EXIT_ON_CLOSE);
    }

    public static void main(String[] args) {
        new CheckedBoxDemo();
    }
}
3.6 list components
3.6.1 drop down list (JComboBox)
-
It's equivalent to our common dropdown box, so we won't go into details
-
[code display]
package com.lee.lesson5;

import javax.swing.*;
import java.awt.*;

public class Demo extends JFrame {
    public Demo(){
        Container container = this.getContentPane();

        JComboBox status = new JComboBox();
        status.addItem(null);
        status.addItem("On show");
        status.addItem("Coming soon");
        status.addItem("Dismount");
        container.add(status);
        this.setVisible(true);
        this.setSize(500, 350);
        this.setDefaultCloseOperation(WindowConstants.EXIT_ON_CLOSE);
    }

    public static void main(String[] args) {
        new Demo();
    }
}
3.6.2 list box (JList)
-
The list box only occupies a fixed size on the form. If you want the list box to have a scrolling effect, you can put the list box in the scrolling panel.
-
[code display]
package com.lee.lesson5;

import javax.swing.*;
import java.awt.*;
import java.util.Vector;

public class Demo extends JFrame {
    public Demo(){
        Container container = this.getContentPane();

        //Using Vector type data as parameters to initialize JList is as follows
        Vector contents = new Vector();
        JList jl = new JList(contents);
        contents.add("1");
        contents.add("2");
        contents.add("3");

        container.add(jl);
        this.setVisible(true);
        this.setSize(500, 350);
        this.setDefaultCloseOperation(WindowConstants.EXIT_ON_CLOSE);
    }

    public static void main(String[] args) {
        new Demo();
    }
}
3.7 text components
The usage of text field and text box is similar to that of the previous usage. Only a few object examples have more class names than J
-
The following password box is introduced here. The definition and usage of password box and text box are similar, but the string entered by the user will be encrypted with some symbol, such as the code below
JPasswordField jp = new JPasswordField();
 jp.setEchoChar('#'; / / set echo symbol
3.8 Games: snake eating
Idea: with visual persistence, we can refresh by Timer to achieve static resource dynamic
-
[code display: Main startup class]
package com.lee.snake;

import javax.swing.*;

//Main startup class of the game
public class StartGame {
    public static void main(String[] args) {
        JFrame frame = new JFrame();


        frame.setBounds(10, 10, 900, 720);
        frame.setResizable(false);
        frame.setDefaultCloseOperation(WindowConstants.EXIT_ON_CLOSE);

        //The normal game interface should be on the panel
        frame.add(new GamePanel());

        frame.setVisible(true);
    }
}
-
[code display: Game panel]
package com.lee.snake;

import javax.swing.*;
import java.awt.*;
import java.awt.event.ActionEvent;
import java.awt.event.ActionListener;
import java.awt.event.KeyEvent;
import java.awt.event.KeyListener;
import java.util.Random;

public class GamePanel extends JPanel implements KeyListener, ActionListener {

    //Define snake's data structure
    int length;//Length of snake
    int[] snakeX = new int[600];//X coordinate of snake 25 * 25
    int[] snakeY = new int[500];//Y coordinate of snake 25 * 25

    String fx;//Initial direction

    //The start of the game starts to pause
    boolean isStart = false;//Default no start
    boolean isFail = false;//Whether the game fails

    //Coordinates of things
    int foodx;
    int foody;
    Random random = new Random();

    //integral
    int score;

    //Timer in milliseconds
    Timer timer = new Timer(100, this);//Once in 100ms

    //constructor
    public GamePanel() {
        init();
        //Get focus and keyboard events
        this.setFocusable(true);//Get focus events
        this.addKeyListener(this);//Get keyboard events
    }

    //Initialization method
    public void init() {
        length = 3;
        score = 0;
        snakeX[0] = 100;
        snakeY[0] = 100;//Brain coordinates
        snakeX[1] = 75;
        snakeY[1] = 100;//Coordinates of the first body
        snakeX[2] = 50;
        snakeY[2] = 100;//Coordinates of the second body

        fx = "R";//Initial direction right
        //Randomly distribute things on the interface
        foodx = 25 + 25 * random.nextInt(34);
        foody = 75 + 25 * random.nextInt(24);

        timer.start();//At the beginning of the game, let the timer start, that is, use the visual persistence feature, once the timing frequency is too high, you can make the static resources move

    }


    //The drawing panel, everything in our game, is drawn with this brush
    @Override
    protected void paintComponent(Graphics g) {
        super.paintComponent(g);//Refresh, clear screen, flash screen if not used

        //Draw static panel
        this.setBackground(Color.WHITE);
        com.lee.snake.Data.header.paintIcon(this, g, 25, 11);//Banner
        g.fillRect(25, 75, 850, 600);//Default game interface


        //Draw the snake
        if (fx.equals("R")) {
            com.lee.snake.Data.right.paintIcon(this, g, snakeX[0], snakeY[0]);//The initialization of the snake is to the right and the length of the head does not change
        } else if (fx.equals("L")) {
            com.lee.snake.Data.left.paintIcon(this, g, snakeX[0], snakeY[0]);//Snake initialization left, head length unchanged
        } else if (fx.equals("U")) {
            com.lee.snake.Data.up.paintIcon(this, g, snakeX[0], snakeY[0]);//The initialization of the snake is upward, and the length of the head is unchanged
        } else if (fx.equals("D")) {
            com.lee.snake.Data.down.paintIcon(this, g, snakeX[0], snakeY[0]);//The initialization of the snake is downward, and the length of the head is unchanged
        }

        //Dynamic increase of snake's body
        for (int i = 0; i < length; i++) {
            com.lee.snake.Data.body.paintIcon(this, g, snakeX[i], snakeY[i]);
        }

        //Painting things
        com.lee.snake.Data.food.paintIcon(this, g, foodx, foody);

        //Draw integral
        g.setColor(Color.WHITE);
        g.setFont(new Font("Microsoft YaHei ", Font.BOLD, 18));
        g.drawString("length"+length,750,35);
        g.drawString("fraction"+score,750,50);
        //Game state
        if (isStart == false) {
            g.setColor(Color.WHITE);
            g.setFont(new Font("Microsoft YaHei ", Font.BOLD, 40));
            g.drawString("Press the space to start the game", 300, 300);
        }

        //Determine if the game fails
        if (isFail == true) {
            g.setColor(Color.RED);
            g.setFont(new Font("Microsoft YaHei ", Font.BOLD, 40));
            g.drawString("Failed, press space to restart", 300, 300);
        }
    }

    @Override
    public void keyTyped(KeyEvent e) {

    }

    //Keyboard listening events
    @Override
    public void keyPressed(KeyEvent e) {
        int keyCode = e.getKeyCode();//Get the keyboard press the key
        if (keyCode == KeyEvent.VK_SPACE) {//If you press the space bar
            if (isFail) {
                //restart
                isFail = false;
                init();
            } else {
                isStart = !isStart;//Reverse
            }
            repaint();
        }

        //Snake move
        if (keyCode == KeyEvent.VK_UP) {
            fx = "U";
        } else if (keyCode == KeyEvent.VK_DOWN) {
            fx = "D";
        } else if (keyCode == KeyEvent.VK_LEFT) {
            fx = "L";
        } else if (keyCode == KeyEvent.VK_RIGHT) {
            fx = "R";
        }

    }

    @Override
    public void keyReleased(KeyEvent e) {

    }

    //Event monitoring -- refresh 1s=10 times through fixed events
    @Override
    public void actionPerformed(ActionEvent e) {
        if (isStart && isFail == false) {//If it's starting and the game doesn't fail, let the snake move
            //Eat food
            if (snakeX[0] == foodx && snakeY[0] == foody) {
                length++;//Length plus one
                score += 10;
                //Again random things
                foodx = 25 + 25 * random.nextInt(34);
                foody = 75 + 25 * random.nextInt(24);
            }

            //move
            for (int i = length - 1; i > 0; i--) {//Move the next section to the previous section's position snake [1] = snake [0]
                snakeX[i] = snakeX[i - 1];
                snakeY[i] = snakeY[i - 1];
            }
            //trend
            if (fx.equals("R")) {
                snakeX[0] = snakeX[0] + 25;
                if (snakeX[0] > 850) {
                    snakeX[0] = 25;
                }
            } else if (fx.equals("L")) {
                snakeX[0] = snakeX[0] - 25;
                if (snakeX[0] < 25) {
                    snakeX[0] = 850;
                }
            } else if (fx.equals("U")) {
                snakeY[0] = snakeY[0] - 25;
                if (snakeY[0] < 75) {
                    snakeY[0] = 650;
                }
            } else if (fx.equals("D")) {
                snakeY[0] = snakeY[0] + 25;
                if (snakeY[0] > 650) {
                    snakeY[0] = 75;
                }
            }

            //Failure judgment, if you hit yourself, you will fail
            for (int i = 1; i < length ; i++) {
                if (snakeX[0]==snakeX[i] && snakeY[0]==snakeY[i]){
                    isFail = true;
                }
            }

            repaint();//Refresh redraw page
        }
        timer.start();
    }

}
The game panel mainly does the following three things: define the data structure required by the game, initialize and draw, monitor monitoring (including keyboard monitoring and event monitoring)
-
[code display: data center]
package com.lee.snake;

import javax.swing.*;
import java.net.URL;

//Data center
public class Data {
    public static URL headerURL = Data.class.getResource("statics/header.png");
    public static ImageIcon header = new ImageIcon(headerURL);

    public static URL upURL = Data.class.getResource("statics//up.png");
    public static ImageIcon up = new ImageIcon(upURL);

    public static URL downURL = Data.class.getResource("statics/down.png");
    public static ImageIcon down = new ImageIcon(downURL);

    public static URL leftURL = Data.class.getResource("statics/left.png");
    public static ImageIcon left = new ImageIcon(leftURL);

    public static URL rightURL = Data.class.getResource("statics/right.png");
    public static ImageIcon right = new ImageIcon(rightURL);

    public static URL bodyURL = Data.class.getResource("statics/body.png");
    public static ImageIcon body = new ImageIcon(bodyURL);

    public static URL foodURL = Data.class.getResource("statics/food.png");
    public static ImageIcon food = new ImageIcon(foodURL);


}

       repaint();//Refresh redraw page
        }
        timer.start();
    }

}