Welcome to my GitHub
Here we classify and summarize all the original works of Xinchen (including supporting source code): https://github.com/zq2599/blog_demos
Overview of this article
- Above Distributed call chain tracing tool Jaeger? Two minute fast experience We've experienced Jaeger's basic abilities. Today, let's practice coding and learn how to integrate our own applications into Jaeger;
- The goal of this article: today we will deploy and use jaeger in a distributed system. There are two ways to use jaeger: first, the span built in the SDK, such as web requests, mysql or redis operations, which will be reported automatically, and the second is user-defined span;
- In general, today's practical steps are as follows:
- Today, we are going to develop a mini distributed system from scratch. The system architecture is shown in the figure below. It can be seen that there are two web applications: the service provider Jaeger service provider and the service caller Jaeger service consumer, plus redis:
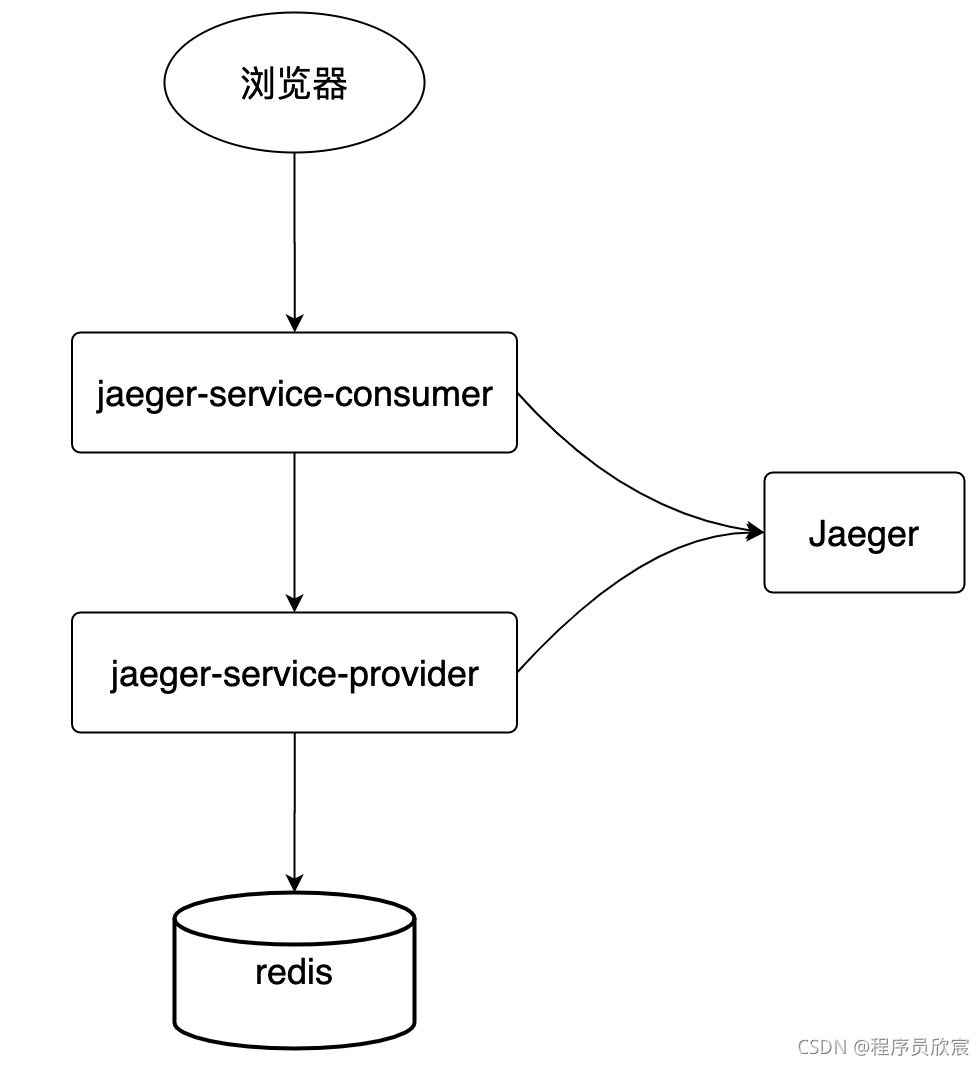
- When Jaeger service consumer receives the http request sent by the user through the browser, it will call the web service provided by Jaeger service provider, and Jaeger service provider will operate redis again. The whole process is similar to that of a typical distributed system
- In the process of responding to the service, jaeger service consumer and jaeger service provider will report the data related to this service to jaeger, so that we can observe the applications that a customer's request will pass through, the time-consuming at key locations, and the key parameters on jaeger's web page;
- Make all applications into images, and then write docker-compose.yml file to integrate them
- Run, verify
Reference articles
- In this article, the springboot application will be made into a docker image. If you want to know the detailed production process, you can refer to the following two articles:
- Experience SpringBoot(2.3) application making Docker image (official scheme)
- Explain in detail the Docker image produced by SpringBoot(2.3) application (official scheme)
jaeger access routine
- First, summarize the routine of Spring Cloud application accessing jaeger in advance to facilitate your use:
- Add the dependency library opentracing spring Jaeger cloud starter. This is version 3.3.1
- Configure jaeger remote port
- Create a configuration class and register the TracerBuilderCustomizer instance with the spring environment
- In the code that needs to use a custom span, use the @ Autowired annotation to introduce Trace and use its API to customize the span
- You can create a span or create a sub span based on an existing span
- In addition to specifying the name of span, you can also add tags and logs to span with the help of Trace API, which will be displayed on jaeger's web page
- The above six steps are the routine access routine, and the next actual combat is carried out according to this routine
Source download
- The complete source code in this actual combat can be downloaded from GitHub. The address and link information are shown in the table below( https://github.com/zq2599/blog_demos):
| name | link | remarks |
|---|---|---|
| Project Home | https://github.com/zq2599/blog_demos | The project is on the GitHub home page |
| git warehouse address (https) | https://github.com/zq2599/blog_demos.git | The warehouse address of the source code of the project, https protocol |
| git warehouse address (ssh) | git@github.com:zq2599/blog_demos.git | The project source code warehouse address, ssh protocol |
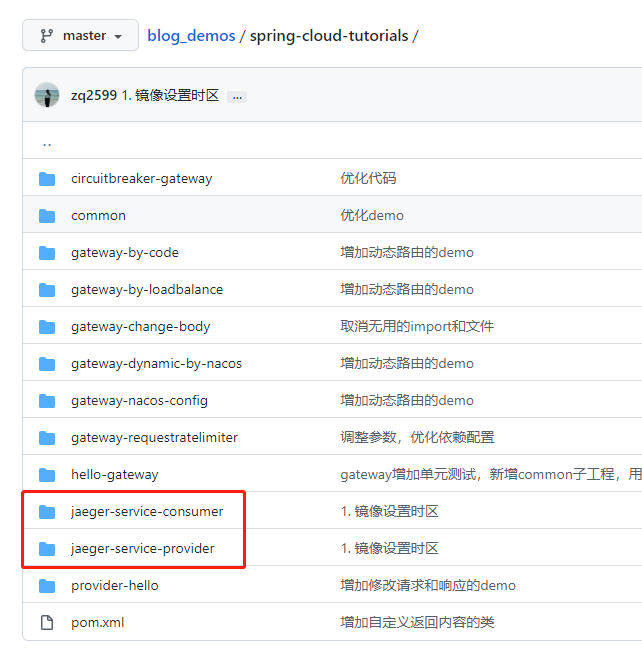
- There are multiple folders in this git project. The source code of this article is in the spring cloud tutorials folder, as shown in the red box below:

- There are several sub projects under the spring cloud tutorials folder. The codes in this chapter are Jaeger service consumer and Jaeger service provider, as shown in the red box below:
Create one of the web projects: Jaeger service provider
- To facilitate the management of dependent library versions, the Jaeger service provider project is created as a sub project of spring cloud tutorials. Its pom.xml is as follows:
<?xml version="1.0" encoding="UTF-8"?>
<project xmlns="http://maven.apache.org/POM/4.0.0"
         xmlns:xsi="http://www.w3.org/2001/XMLSchema-instance"
         xsi:schemaLocation="http://maven.apache.org/POM/4.0.0 http://maven.apache.org/xsd/maven-4.0.0.xsd">
    <parent>
        <artifactId>spring-cloud-tutorials</artifactId>
        <groupId>com.bolingcavalry</groupId>
        <version>1.0-SNAPSHOT</version>
    </parent>
    <modelVersion>4.0.0</modelVersion>

    <artifactId>jaeger-service-provider</artifactId>

    <dependencies>

        <dependency>
            <groupId>com.bolingcavalry</groupId>
            <artifactId>common</artifactId>
            <version>${project.version}</version>
        </dependency>

        <dependency>
            <groupId>org.springframework.boot</groupId>
            <artifactId>spring-boot-starter-web</artifactId>
        </dependency>

        <dependency>
            <groupId>io.opentracing.contrib</groupId>
            <artifactId>opentracing-spring-jaeger-cloud-starter</artifactId>
        </dependency>

        <dependency>
            <groupId>org.springframework.boot</groupId>
            <artifactId>spring-boot-starter-data-redis</artifactId>
        </dependency>
    </dependencies>
    <build>
        <plugins>
            <plugin>
                <groupId>org.springframework.boot</groupId>
                <artifactId>spring-boot-maven-plugin</artifactId>
                <configuration>
                    <layers>
                        <enabled>true</enabled>
                    </layers>
                </configuration>
            </plugin>
        </plugins>
    </build>
</project>
- For the configuration file application.yml, note that since docker compose will be used later, the addresses of redis and jaeger do not need to fill in specific IP addresses, just fill in their container names:
spring:
  application:
    name: jaeger-service-provider
  redis:
    database: 0
    # Write your ip address in the Redis server address
    host: redis
    # Redis server connection port
    port: 6379
    # Redis server connection password (blank by default)
    password:
    # The maximum number of connections in the connection pool (a negative value indicates that there is no limit on the connection pool similar to mysql)
    jedis:
      pool:
        max-active: 10
        # The maximum blocking waiting time of the connection pool (a negative value indicates no limit) indicates the waiting time to apply for the connection pool after the connection pool is finished
        max-wait: -1
        # Maximum free connections in the connection pool
        max-idle: 10
        # Minimum free connections in connection pool
        min-idle: 0
    # Connection timeout (MS) to link the redis server
    timeout: 6000

opentracing:
  jaeger:
    enabled: true
    udp-sender:
      host: jaeger
      port: 6831
- Configuration class:
package com.bolingcavalry.jaeger.provider.config;

import io.jaegertracing.internal.MDCScopeManager;
import io.opentracing.contrib.java.spring.jaeger.starter.TracerBuilderCustomizer;
import org.springframework.context.annotation.Bean;
import org.springframework.context.annotation.Configuration;

@Configuration
public class JaegerConfig {
    @Bean
    public TracerBuilderCustomizer mdcBuilderCustomizer() {
        // 1.8 new features, functional interface
        return builder -> builder.withScopeManager(new MDCScopeManager.Builder().build());
    }
}
- In addition, since the focus of this article is jaeger, redis related codes will not be posted. Readers who need to check here: RedisConfig.java,RedisUtils.java
- Next, let's take a look at how to customize span by using the instance of trace. The following is the web interface class that defines span and its sub span. Please note the use of trace API. There are detailed comments in the code, so I won't repeat them:
package com.bolingcavalry.jaeger.provider.controller;

import com.bolingcavalry.common.Constants;
import com.bolingcavalry.jaeger.provider.util.RedisUtils;
import io.opentracing.Span;
import io.opentracing.Tracer;
import lombok.extern.slf4j.Slf4j;
import org.springframework.beans.factory.annotation.Autowired;
import org.springframework.web.bind.annotation.GetMapping;
import org.springframework.web.bind.annotation.RestController;
import java.text.SimpleDateFormat;
import java.util.Date;

@RestController
@Slf4j
public class HelloController {

    @Autowired
    private Tracer tracer;

    @Autowired
    private RedisUtils redisUtils;

    private String dateStr(){
        return new SimpleDateFormat("yyyy-MM-dd hh:mm:ss").format(new Date());
    }

    /**
     * Simulating service execution takes 100 milliseconds
     * @param parentSpan
     */
    private void mockBiz(Span parentSpan) {
        // Creates its child span based on the specified span
        Span span = tracer.buildSpan("mockBizChild").asChildOf(parentSpan).start();

        log.info("hello");
        try {
            Thread.sleep(100);
        } catch (InterruptedException e) {
            e.printStackTrace();
        }

        span.finish();
    }

    /**
     * Return string type
     * @return
     */
    @GetMapping("/hello")
    public String hello() {
        long startTime = System.currentTimeMillis();

        // Generate current time
        String timeStr = dateStr();

        // Create a span and add a tag when creating it
        Span span = tracer.buildSpan("mockBiz")
                    .withTag("time-str", timeStr)
                    .start();

        // span log
        span.log("normal span log");

        // Simulate a service that takes 100 milliseconds
        mockBiz(span);

        // Add a tag
        span.setTag("tiem-used", System.currentTimeMillis()-startTime);

        // span end
        span.finish();

        // Write redis
        redisUtils.set("Hello",  timeStr);
        // return
        return Constants.HELLO_PREFIX + ", " + timeStr;
    }
}
- The coding is finished. Next, make the project into a docker image. Create a Dockerfile file in the same directory as pom.xml:
# Specifies the base image, which is the early stage of a phased build
FROM openjdk:8-jdk-alpine as builder

# Set time zone
RUN ln -sf /usr/share/zoneinfo/Asia/Shanghai /etc/localtime
RUN echo 'Asia/Shanghai' >/etc/timezone

# Execute working directory
WORKDIR application
# configuration parameter
ARG JAR_FILE=target/*.jar
# Copy the compiled jar file to the image space
COPY ${JAR_FILE} application.jar
# Extract the split build results from application.jar through the tool spring boot jarmode layertools
RUN java -Djarmode=layertools -jar application.jar extract

# Formal build image
FROM openjdk:8-jdk-alpine
WORKDIR application
# In the previous stage, except for multiple files extracted from the jar, the COPY command is executed here to COPY to the image space. Each COPY is a layer
COPY --from=builder application/dependencies/ ./
COPY --from=builder application/spring-boot-loader/ ./
COPY --from=builder application/snapshot-dependencies/ ./
COPY --from=builder application/application/ ./
ENTRYPOINT ["java", "org.springframework.boot.loader.JarLauncher"]
- First, execute the following command in the pom.xml directory of the parent project spring cloud tutorials to complete the compilation and construction:
mvn clean package -U -DskipTests
- Then execute the following command in the directory where the Dockerfile is located to create a docker image:
docker build -t bolingcavalry/jaeger-service-provider:0.0.1 .
- So far, the development of Jaeger service provider has been completed
Creating web project 2: Jaeger service consumer
- The creation process of Jaeger service consumer project is the same as that of Jaeger service provider, and even simpler (redis is not operated), so the description of its development process should be simplified as much as possible to save space
- pom.xml is less dependent on redis than Jaeger service provider, and others can be copied
- redis is also missing from application.yml:
spring:
  application:
    name: jaeger-service-consumer
opentracing:
  jaeger:
    enabled: true
    udp-sender:
      host: jaeger
      port: 6831
- The configuration class JaegerConfig.java can copy Jaeger service provider
- Because the web interface of Jaeger service provider needs to be called remotely, a new configuration class of restTemplate is added:
package com.bolingcavalry.jaeger.consumer.config;

import org.springframework.context.annotation.Bean;
import org.springframework.context.annotation.Configuration;
import org.springframework.http.client.ClientHttpRequestFactory;
import org.springframework.http.client.SimpleClientHttpRequestFactory;
import org.springframework.web.client.RestTemplate;

@Configuration
public class RestTemplateConfig {
    @Bean
    public RestTemplate restTemplate(ClientHttpRequestFactory factory) {
        RestTemplate restTemplate = new RestTemplate(factory);
        return restTemplate;
    }

    @Bean
    public ClientHttpRequestFactory simpleClientHttpRequestFactory() {
        SimpleClientHttpRequestFactory factory = new SimpleClientHttpRequestFactory();
        factory.setReadTimeout(5000);
        factory.setConnectTimeout(15000);
        return factory;
    }
}
- The key code is the implementation of web interface. Jaeger service provider interface will be called through restTemplate:
package com.bolingcavalry.jaeger.consumer.controller;

import lombok.extern.slf4j.Slf4j;
import org.springframework.beans.factory.annotation.Autowired;
import org.springframework.http.HttpStatus;
import org.springframework.http.ResponseEntity;
import org.springframework.web.bind.annotation.GetMapping;
import org.springframework.web.bind.annotation.RestController;
import org.springframework.web.client.RestTemplate;

@RestController
@Slf4j
public class HelloConsumerController {

    @Autowired
    RestTemplate restTemplate;

    /**
     * Return string type
     * @return
     */
    @GetMapping("/hello")
    public String hello() {
        String url = "http://jaeger-service-provider:8080/hello";
        ResponseEntity<String> responseEntity = restTemplate.getForEntity(url, String.class);
        StringBuffer sb = new StringBuffer();
        HttpStatus statusCode = responseEntity.getStatusCode();
        String body = responseEntity.getBody();

        // return
        return "response from jaeger-service-provider \nstatus : " + statusCode + "\nbody : " + body;
    }
}
- The next step is to compile and build the docker image, which is the same as Jaeger service provider;
docker-compose.yml file preparation
- Now let's run all the services. First, check which services need to be started in docker compose, as shown below. There are four services in total:
- jaeger
- redis
- jaeger-service-provider
- jaeger-service-consumer
- The complete docker-compose.yml is as follows:
version: '3.0'

networks:
  jaeger-tutorials-net:
    driver: bridge
    ipam:
      config:
        - subnet: 192.168.1.0/24
          gateway: 192.168.1.1

services:
  jaeger:
    image: jaegertracing/all-in-one:1.26
    container_name: jaeger
    # Deal with the problem of calculating negative numbers caused by clock drift
    command: ["--query.max-clock-skew-adjustment=100ms"]
    #Select network
    networks:
      - jaeger-tutorials-net
    #Select port
    ports:
      - 16686:16686/tcp
    restart: always
  redis:
    image: redis:6.2.5
    container_name: redis
    #Select network
    networks:
      - jaeger-tutorials-net
    restart: always
  jaeger-service-provider:
    image: bolingcavalry/jaeger-service-provider:0.0.1
    container_name: jaeger-service-provider
    #Select network
    networks:
      - jaeger-tutorials-net
    restart: always
  jaeger-service-consumer:
    image: bolingcavalry/jaeger-service-consumer:0.0.1
    container_name: jaeger-consumer-provider
    #Select port
    ports:
      - 18080:8080/tcp
    #Select network
    networks:
      - jaeger-tutorials-net
    restart: always
- So far, the development work has been completed and the verification has begun
verification
- Execute the command docker compose up - D in the directory where docker-compose.yml is located to start all containers:
will$ docker-compose up -d
Creating network "jaeger-service-provider_jaeger-tutorials-net" with driver "bridge"
Creating jaeger-service-provider  ... done
Creating jaeger                   ... done
Creating redis                    ... done
Creating jaeger-consumer-provider ... done
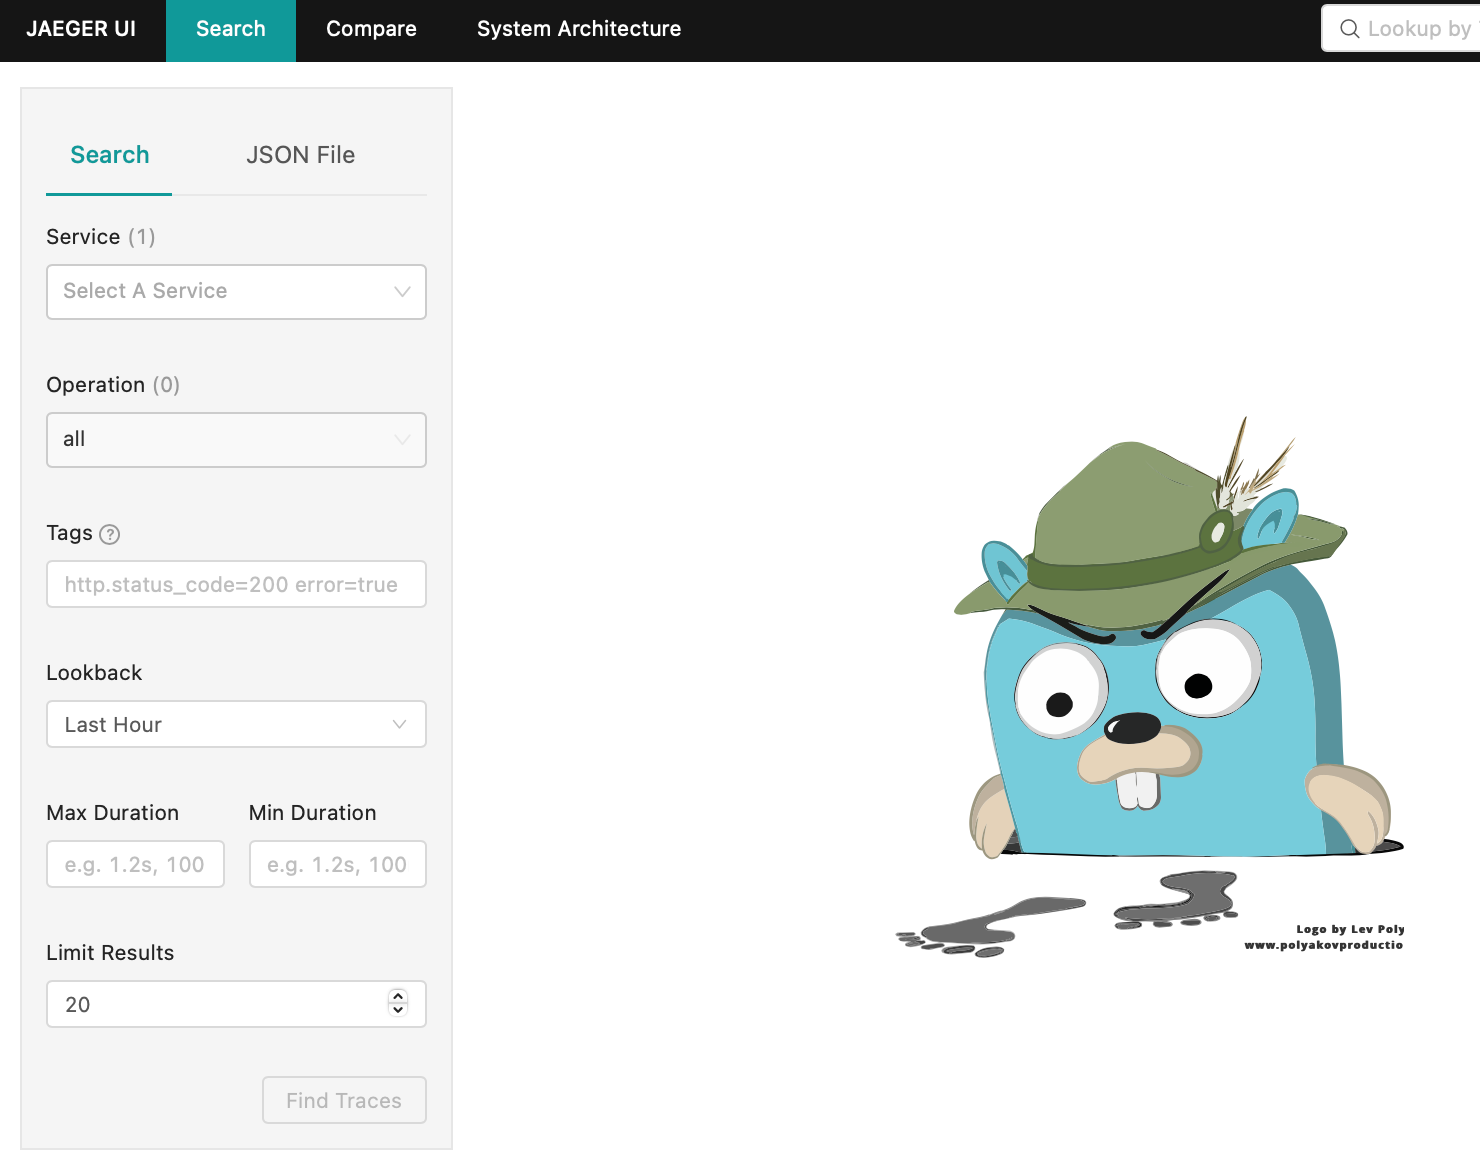
- Browser open http://localhost:16686/search , familiar jaeger page:
- Call the web service of Jaeger service consumer and visit the browser http://localhost:18080/hello :

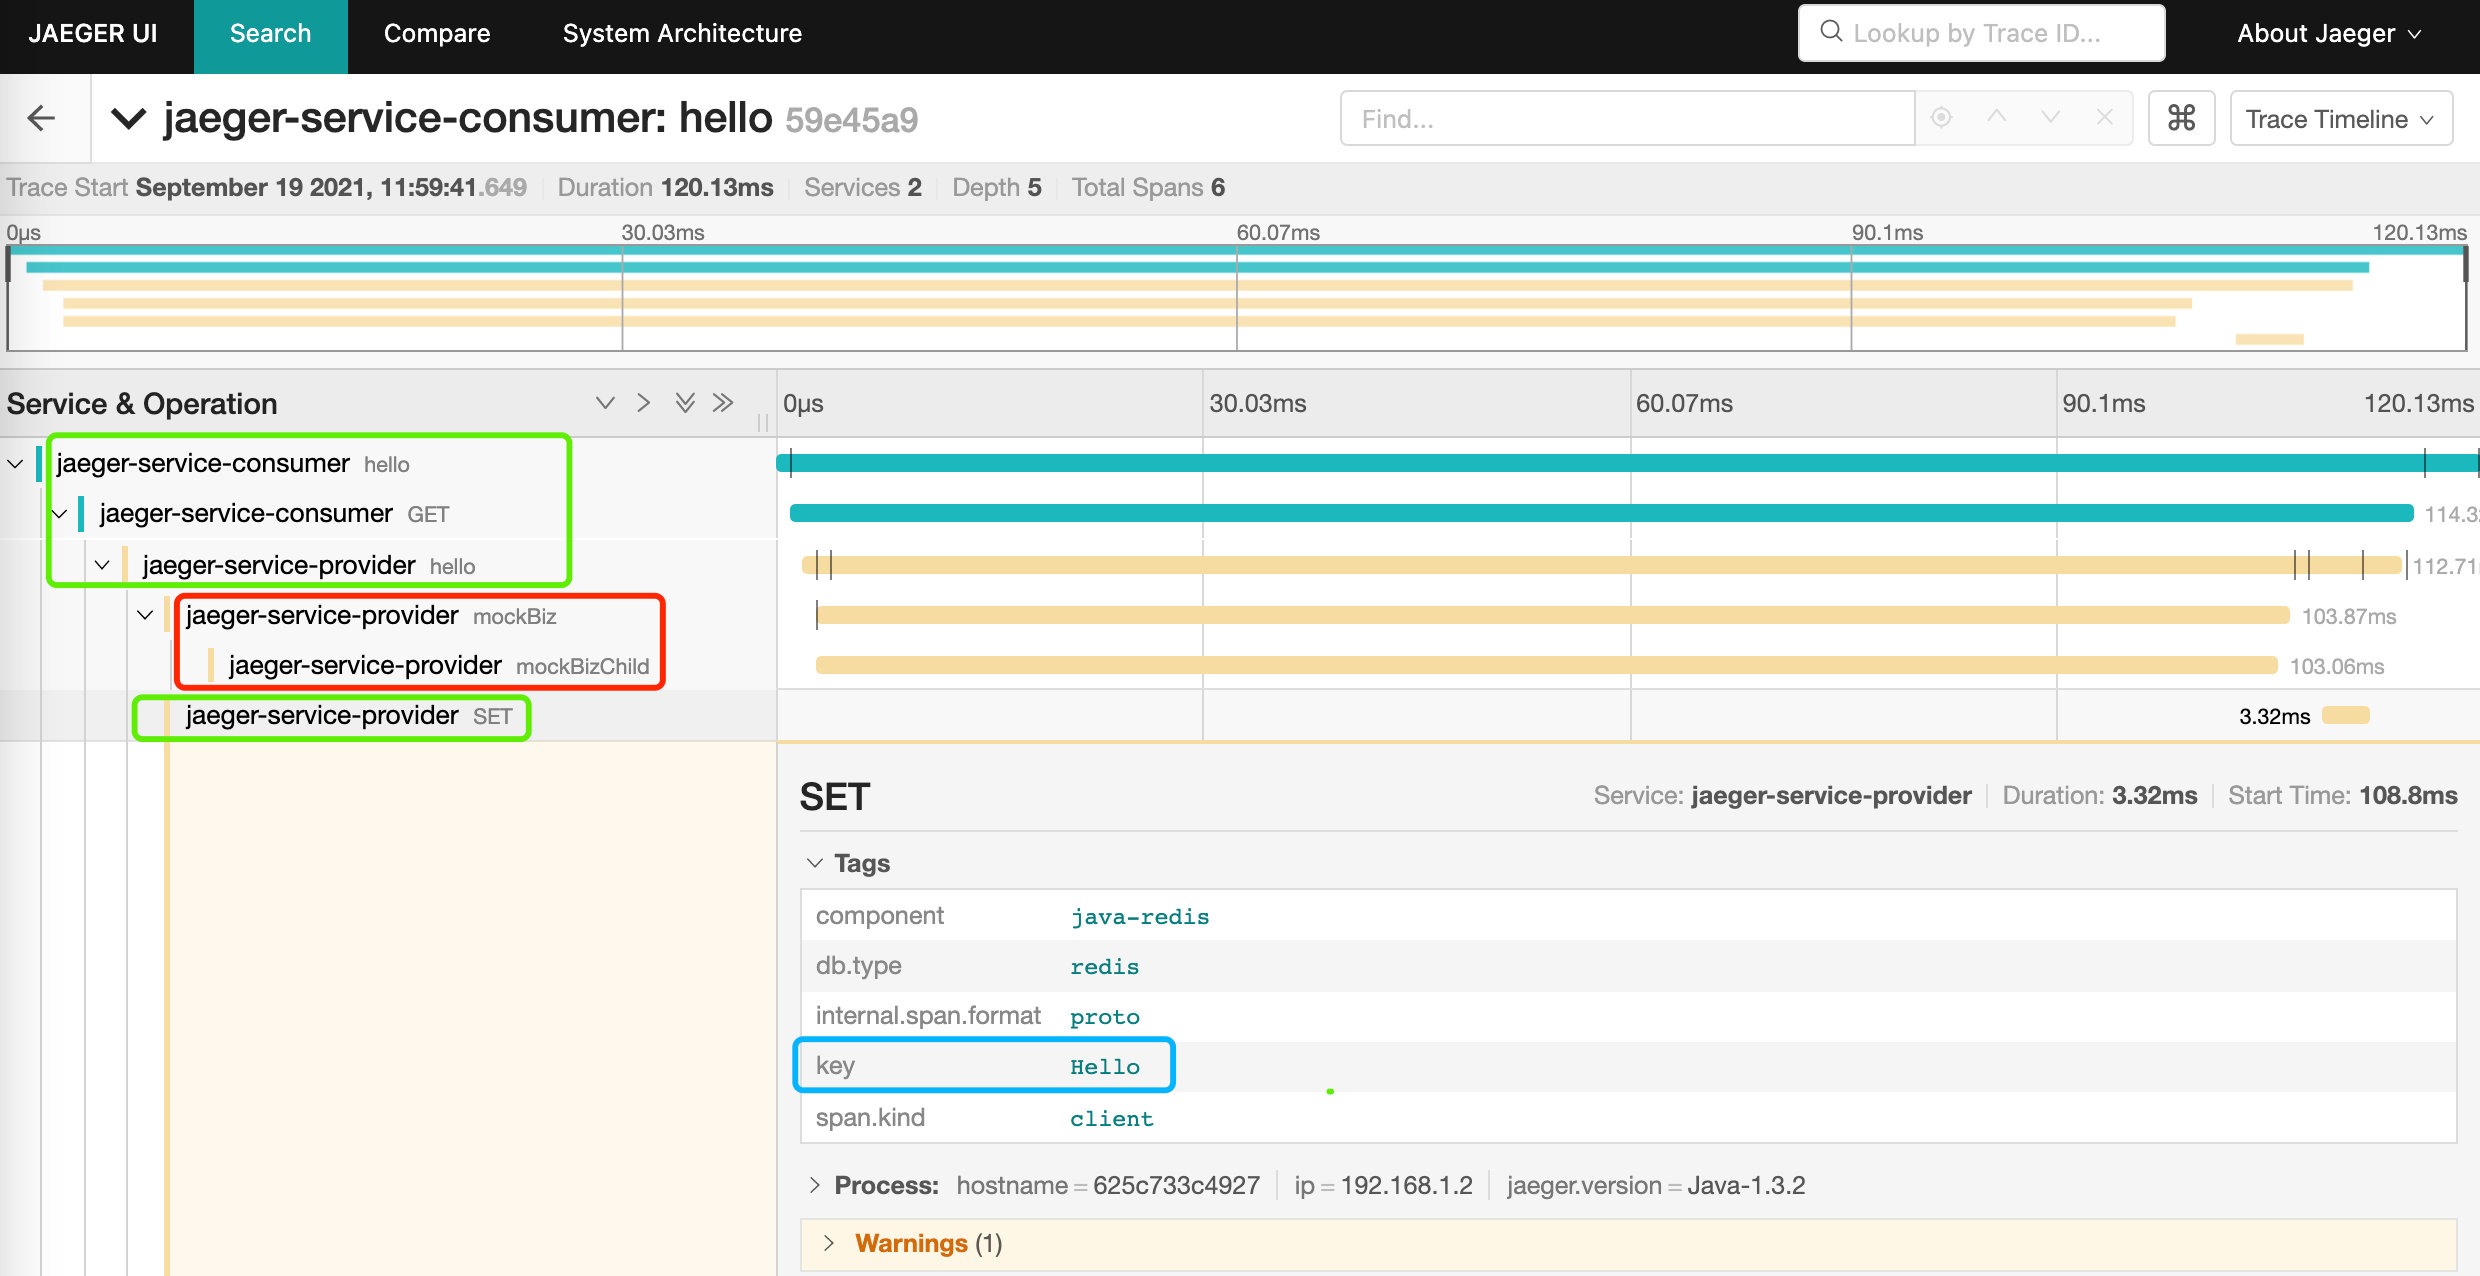
- Go to jaeger to see the tracking details of the above visit:
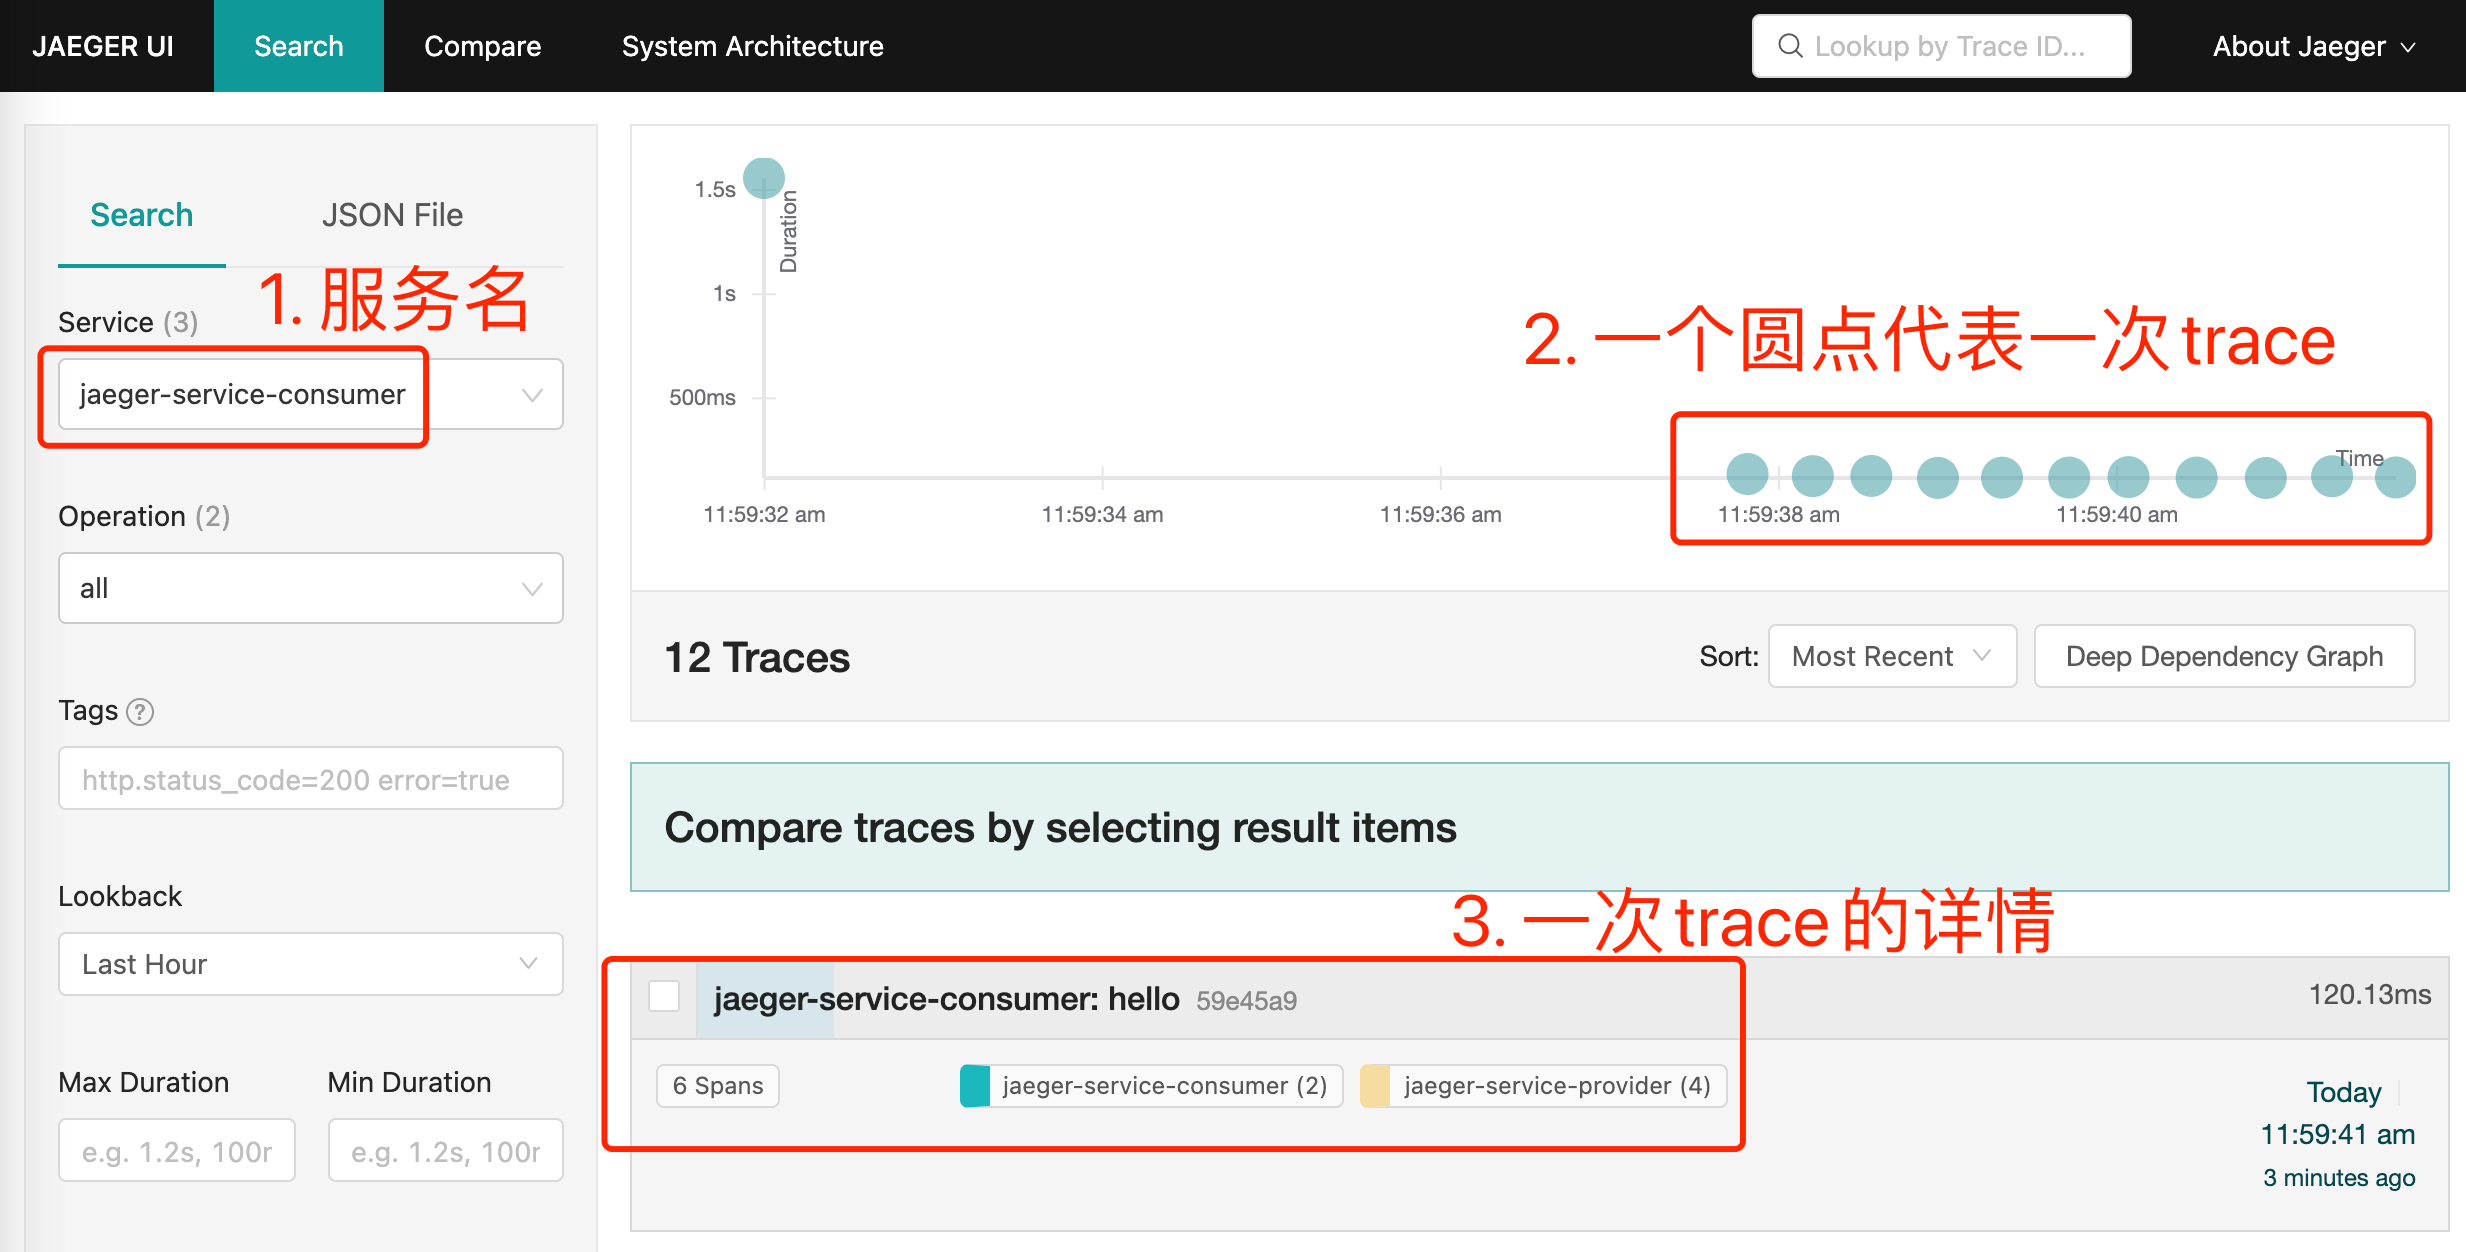
- Click red box 3 in the figure above to expand all span details of this trace, as shown in the following figure. In the red box are the customized spans in our program, in the green box are all the spans provided by the SDK, and in the blue box are the tags of redis's span. The value of this tag is the key of this redis writing operation. With the help of tags, you can provide key clues when locating problems:
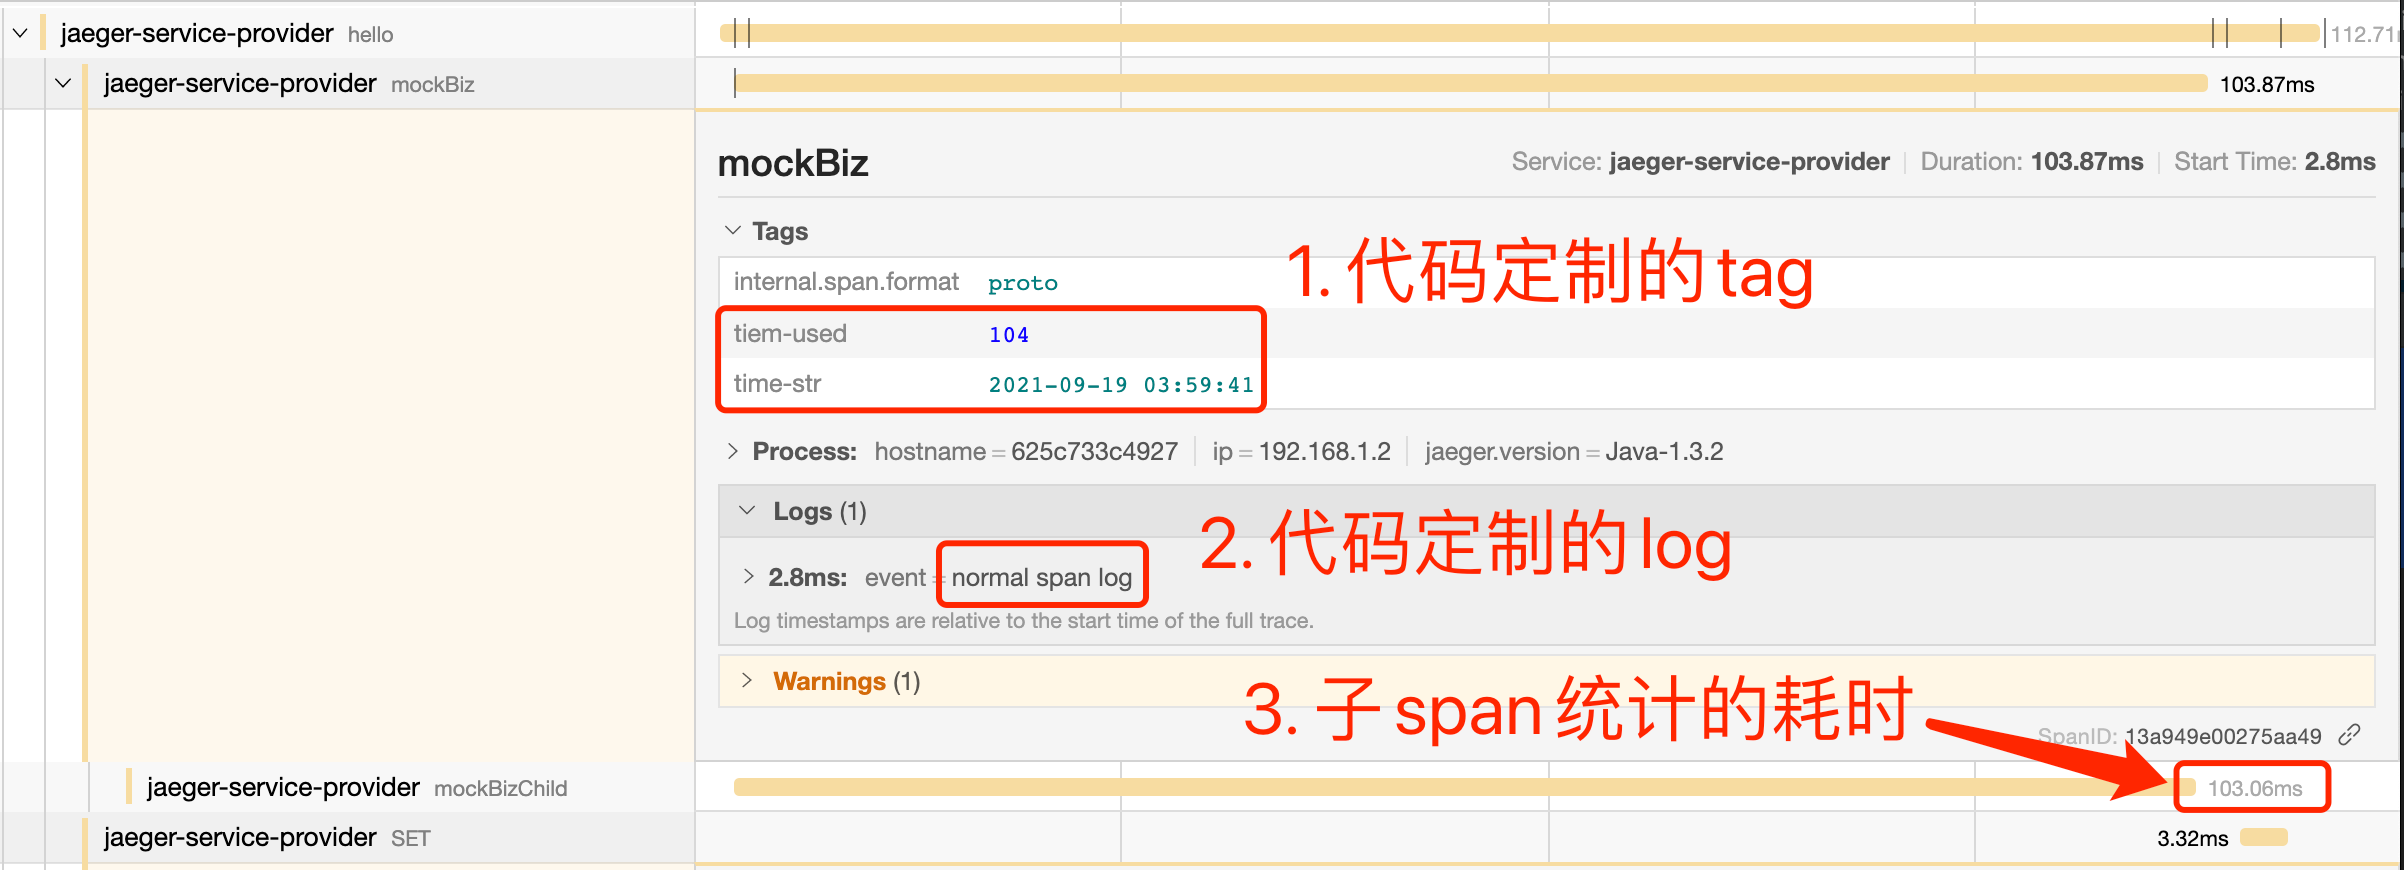
- Click the custom span in the red box in the figure above. As shown in the figure below, both tag and log correspond to the code:
- So far, the basic operations of Spring Cloud application accessing and using Jaeger have been completed. I hope if you are accessing Jaeger, I hope this article can give you some references. In the next article, we will continue to learn more about Jaeger and learn more about its features;