reference resources
[crazy God talking about Java] Docker's latest super detailed tutorial is easy to understand
preface
Take notes and review later
Docker installation
Basic composition of Docker
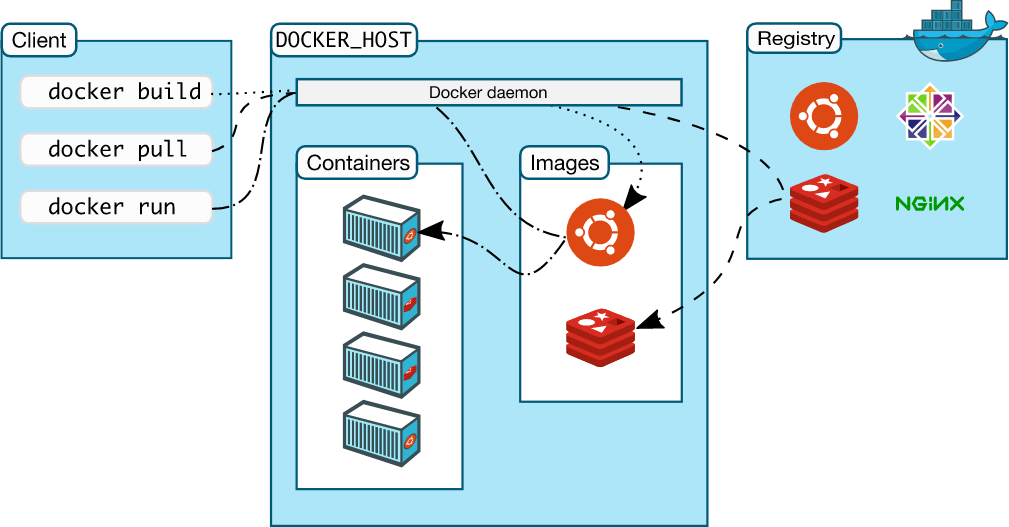
Image:
The Docker image is like a template, which can be used to create container services. The tomcat image - > Run - > tomacat01 container can be used to create multiple containers (the final service run or project run is in the container)
Container:
Docker uses container technology to run one or a group of references independently and create them through mirroring
Start, stop, delete, basic command
At present, this container can be understood as a simple linux system
Repository:
The warehouse is where the images are stored
Warehouses are divided into public warehouses and private warehouses
Docker hub (foreign by default)
Alicloud... All have container servers (configure image acceleration)
Docker installation
# 1. Uninstall the old version
sudo yum remove docker \
                  docker-client \
                  docker-client-latest \
                  docker-common \
                  docker-latest \
                  docker-latest-logrotate \
                  docker-logrotate \
                  docker-engine

# 2. Required installation package
sudo yum install -y yum-utils

# 3. Set image warehouse
sudo yum-config-manager \
    --add-repo \
    https://download.docker.com/linux/centos/docker-ce.repo # is from abroad by default, which is very slow

sudo yum-config-manager \
    --add-repo \
    http://mirrors.aliyun.com/docker-ce/linux/centos/docker-ce.repo # recommend Alibaba cloud

# 4. Update the yum software index (optional)
sudo yum makecache fast # centos7
sudo yum makecache # centos8
# centos 7 is OK. centos 8 j will report an error

# 5. Install docker engine docker CE community version ee enterprise version
#				   core 		  client 		 container
sudo yum install docker-ce docker-ce-cli containerd.io

# 6. View docker version
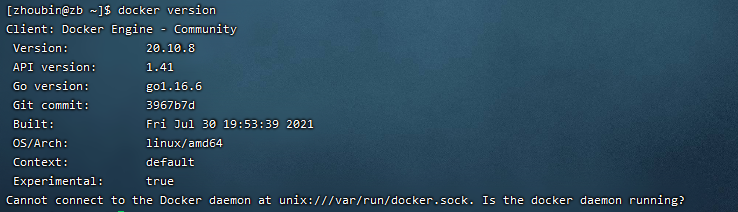
# 7. Start docker
sudo systemctl start docker

# 8. Verify whether docker engine is installed successfully
sudo docker run hello-world

# 9. View the downloaded Hello world image
sudo docker images

Docker uninstall
# 1. Uninstall the installation package
sudo yum remove docker-ce docker-ce-cli containerd.io

# 2. Uninstall resources
 sudo rm -rf /var/lib/docker     # Default working path of docker
 sudo rm -rf /var/lib/containerd
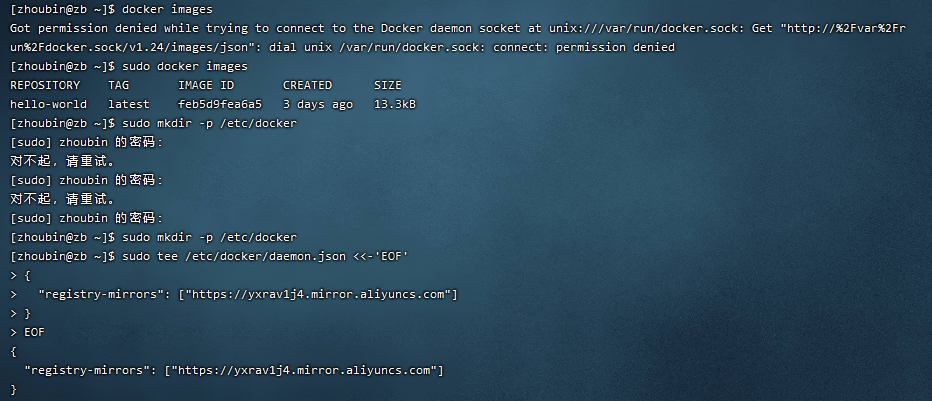
Configuring alicloud image acceleration
-
Find Alibaba cloud acceleration address
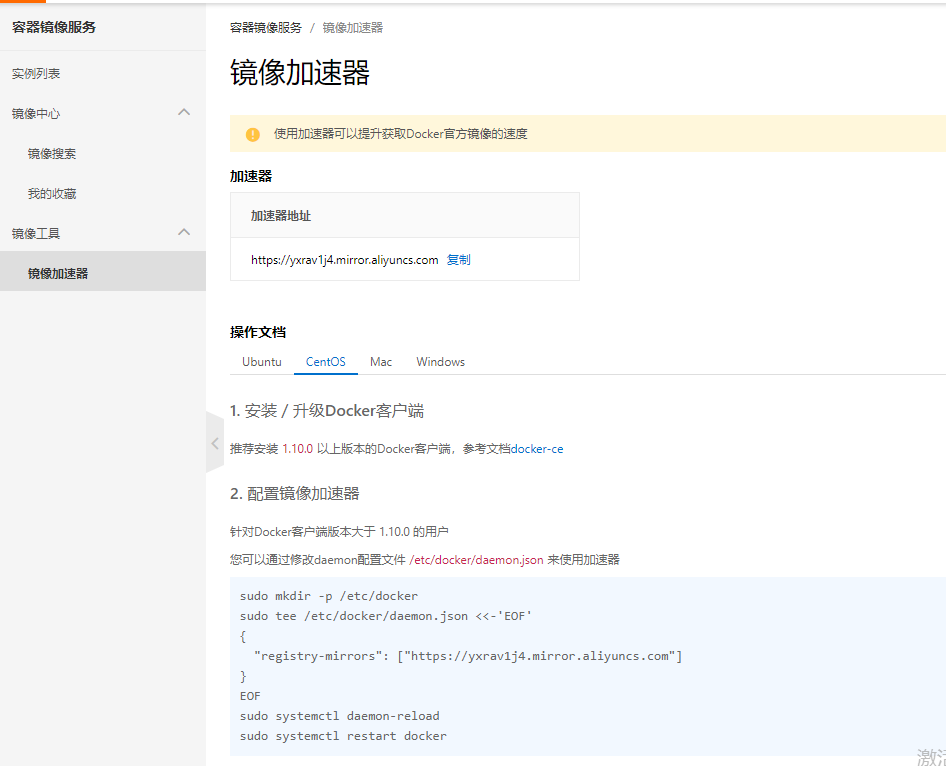
-
Configuration use
sudo mkdir -p /etc/docker

sudo tee /etc/docker/daemon.json <<-'EOF'
{
  "registry-mirrors": ["https://yxrav1j4.mirror.aliyuncs.com"]
}
EOF

sudo systemctl daemon-reload

sudo systemctl restart docker
Review the Hello world process

Underlying principle
What does Docker do?
Docker is a client server system. The daemon of docker runs on the host and is accessed from the client through the Socket
DockerServer will execute the docker client command after receiving it
[the external chain image transfer fails. The source station may have an anti-theft chain mechanism. It is recommended to save the image and upload it directly (img-cg0kah3m-1633015080651) (C: \ users \ ZB \ appdata \ roaming \ typora \ user images \ image-20210927160722927. PNG)]
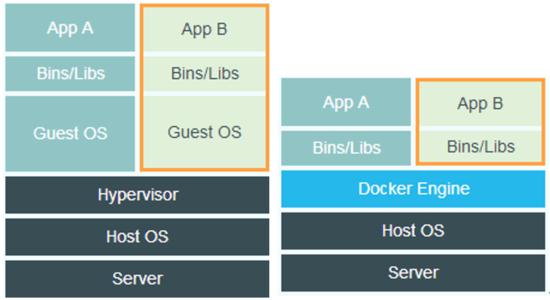
Why is Docker faster than VM?
- Docker has fewer abstraction layers than virtual machines
- Docker uses the kernel of the host, and the VM requires the Guest OS
Common commands of Docker
Help command
docker version 	# Displays the version information of docker
docker info		# Displays the system information of docker, including the number of images and containers
docker command --help	# Help command
Address of help document: https://docs.docker.com/reference/
Mirror command
docker images view images on all local hosts
[root@zb zhoubin]# docker images
REPOSITORY    TAG       IMAGE ID       CREATED      SIZE
hello-world   latest    feb5d9fea6a5   3 days ago   13.3kB

# explain
REPOSITORY	Mirrored warehouse source
TAG		    Mirrored label
IMAGE ID   	mirrored  id
CREATED		Creation time of the image
SIZE		Mirror size

# Optional
  -a, --all             Show all images (default hides intermediate images)
      --digests         Show digests
  -f, --filter filter   Filter output based on conditions provided
      --format string   Pretty-print images using a Go template
      --no-trunc        Don't truncate output
  -q, --quiet           # Only the id of the mirror is displayed
docker search search image
[root@zb zhoubin]# docker search mysql
NAME                              DESCRIPTION                                     STARS     OFFICIAL   AUTOMATED
mysql                             MySQL is a widely used, open-source relation...   11473     [OK]
mariadb                           MariaDB Server is a high performing open sou...   4356      [OK]

# Optional
  -f, --filter filter   Filter output based on conditions provided
      --format string   Pretty-print search using a Go template
      --limit int       Max number of search results (default 25)
      --no-trunc        Don't truncate output

# example
	docker search mysql -f=STARS=3000	# Search for Stars greater than 3000
docker pull Download Image
# Download Image docker pull image name [: tag]
[root@zb zhoubin]# docker pull mysql
Using default tag: latest # If you do not write tag, the default is latest
latest: Pulling from library/mysql
a330b6cecb98: Pull complete 	# Layered download, the core federated file system of docker image
9c8f656c32b8: Pull complete
88e473c3f553: Pull complete
062463ea5d2f: Pull complete
daf7e3bdf4b6: Pull complete
1839c0b7aac9: Pull complete
cf0a0cfee6d0: Pull complete
1b42041bb11e: Pull complete
10459d86c7e6: Pull complete
b7199599d5f9: Pull complete
1d6f51e17d45: Pull complete
50e0789bacad: Pull complete
Digest: sha256:99e0989e7e3797cfbdb8d51a19d32c8d286dd8862794d01a547651a896bcf00c # Signature anti-counterfeiting mark
Status: Downloaded newer image for mysql:latest
docker.io/library/mysql:latest	# Real address

# Two equivalence
docker pull mysql
docker pull docker.io/library/mysql:latest

# Image of the downloaded version
docker pull mysql:5.7

docker rmi delete image
[root@zb zhoubin]# docker rmi -f image id	# Deletes the specified mirror
[root@zb zhoubin]# docker rmi -f image id image id image id image id	# Delete multiple mirrors
[root@zb zhoubin]# docker rmi -f $(docker images -aq)	# Delete all mirrors

# Optional
  -f, --force      Force removal of the image
      --no-prune   Do not delete untagged parents
Container command
Only when you have an image can you create a container. Download a centos image to test learning
docker pull centos
docker run creates a new container and starts it
docker run [Optional parameters] image

# Optional
--name="Name" 	Container name, Used to distinguish containers
-d				Run in background mode
-it				Run interactively, Enter the container to view the contents
-p				Specifies the port of the container -p 8080:8080
	-p ip:Host port:Container port
	-p Host port:Container port(Commonly used)
	-p Container port
	Container port
-P				Randomly assigned port

# example
# Start and enter the container
[root@zb zhoubin]# docker run -it centos /bin/bash
[root@af490be56050 /]# ls
bin  dev  etc  home  lib  lib64  lost+found  media  mnt  opt  proc  root  run  sbin  srv  sys  tmp  usr  var

# Exit from container
[root@af490be56050 /]# exit
exit
[root@zb /]# ls
bin  boot  dev  etc  home  lib  lib64  media  mnt  opt  proc  root  run  sbin  srv  sys  tmp  usr  var  zhoubin
docker ps lists all running containers
[root@zb /]# docker ps
CONTAINER ID   IMAGE     COMMAND   CREATED   STATUS    PORTS     NAMES
[root@zb /]# docker ps -a
CONTAINER ID   IMAGE          COMMAND       CREATED         STATUS                     PORTS     NAMES
af490be56050   centos         "/bin/bash"   4 minutes ago   Exited (0) 3 minutes ago             infallible_mccarthy
f9456648c272   feb5d9fea6a5   "/hello"      2 hours ago     Exited (0) 2 hours ago               hungry_curran

# Optional
  -a, --all             Show all containers (default shows just running), Including historical operation
  -f, --filter filter   Filter output based on conditions provided
      --format string   Pretty-print containers using a Go template
  -n, --last int        Show n last created containers (includes all states) (default -1)
  -l, --latest          Show the latest created container (includes all states)
      --no-trunc        Don't truncate output
  -q, --quiet           # Displays only the number of the container
  -s, --size            Display total file sizes
Exit container
exit	# Direct container stop and push out
Ctrl + P + Q	# The container does not stop exiting
docker rm delete container
docker rm container id					# Delete the specified container. You cannot delete the running container. If you want to forcibly delete rm -f
docker rm -f $(docker ps -aq)	 # Delete all containers
docker ps -a -q|xargs docker rm 	# Delete all containers
Start and stop container operation
docker start container id	# Start container
docker restart container id	# Restart container
docker stop container id	# Stop the currently running container
docker kill container id	# Force customization of the current container
Other commonly used commands
Background startup container
# Command docker run -d image name
[root@zb /]# docker run -d centos
# Problem: docker ps found centos stopped
# Common pitfalls: when the docker container runs in the background, there must be a foreground process. If docker finds no reference, it will stop automatically
# After the centos container starts, it will stop immediately if it finds that it does not provide services
docker logs view logs
docker logs [Optional parameters] container

# Optional
      --details        Show extra details provided to logs
  -f, --follow         Follow log output
      --since string   Show logs since timestamp (e.g. 2013-01-02T13:23:37Z) or relative (e.g. 42m for 42 minutes)
  -n, --tail string    Number of lines to show from the end of the logs (default "all")
  -t, --timestamps     Show timestamps
      --until string   Show logs before a timestamp (e.g. 2013-01-02T13:23:37Z) or relative (e.g. 42m for 42 minutes)
docker top often looks at the process information in the container
# Command docker top container id
[root@zb /]# docker top fdcb4ce7d32c
UID                 PID                 PPID                C                   STIME               TTY                 TIME                CMD
root                2049439             2049419             0                   17:35               pts/0               00:00:00            /bin/bash
docker inspect view the source data of the image
# Command docker inspect container id

[root@zb /]# docker inspect fdcb4ce7d32c
[
    {
        "Id": "fdcb4ce7d32ce6d1c0024b8616b4cb7bd346458b7adf1e4be5364edd5033ee74",
        "Created": "2021-09-27T09:35:55.474260558Z",
        "Path": "/bin/bash",
        "Args": [],
        "State": {
            "Status": "running",
            "Running": true,
            "Paused": false,
            "Restarting": false,
            "OOMKilled": false,
            "Dead": false,
            "Pid": 2049439,
            "ExitCode": 0,
            "Error": "",
            "StartedAt": "2021-09-27T09:35:55.740878875Z",
            "FinishedAt": "0001-01-01T00:00:00Z"
        },
        "Image": "sha256:5d0da3dc976460b72c77d94c8a1ad043720b0416bfc16c52c45d4847e53fadb6",
        "ResolvConfPath": "/var/lib/docker/containers/fdcb4ce7d32ce6d1c0024b8616b4cb7bd346458b7adf1e4be5364edd5033ee74/resolv.conf",
        "HostnamePath": "/var/lib/docker/containers/fdcb4ce7d32ce6d1c0024b8616b4cb7bd346458b7adf1e4be5364edd5033ee74/hostname",
        "HostsPath": "/var/lib/docker/containers/fdcb4ce7d32ce6d1c0024b8616b4cb7bd346458b7adf1e4be5364edd5033ee74/hosts",
        "LogPath": "/var/lib/docker/containers/fdcb4ce7d32ce6d1c0024b8616b4cb7bd346458b7adf1e4be5364edd5033ee74/fdcb4ce7d32ce6d1c0024b8616b4cb7bd346458b7adf1e4be5364edd5033ee74-json.log",
        "Name": "/cranky_elbakyan",
        "RestartCount": 0,
        "Driver": "overlay2",
        "Platform": "linux",
        "MountLabel": "",
        "ProcessLabel": "",
        "AppArmorProfile": "",
        "ExecIDs": null,
        "HostConfig": {
            "Binds": null,
            "ContainerIDFile": "",
            "LogConfig": {
                "Type": "json-file",
                "Config": {}
            },
            "NetworkMode": "default",
            "PortBindings": {},
            "RestartPolicy": {
                "Name": "no",
                "MaximumRetryCount": 0
            },
            "AutoRemove": false,
            "VolumeDriver": "",
            "VolumesFrom": null,
            "CapAdd": null,
            "CapDrop": null,
            "CgroupnsMode": "host",
            "Dns": [],
            "DnsOptions": [],
            "DnsSearch": [],
            "ExtraHosts": null,
            "GroupAdd": null,
            "IpcMode": "private",
            "Cgroup": "",
            "Links": null,
            "OomScoreAdj": 0,
            "PidMode": "",
            "Privileged": false,
            "PublishAllPorts": false,
            "ReadonlyRootfs": false,
            "SecurityOpt": null,
            "UTSMode": "",
            "UsernsMode": "",
            "ShmSize": 67108864,
            "Runtime": "runc",
            "ConsoleSize": [
                0,
                0
            ],
            "Isolation": "",
            "CpuShares": 0,
            "Memory": 0,
            "NanoCpus": 0,
            "CgroupParent": "",
            "BlkioWeight": 0,
            "BlkioWeightDevice": [],
            "BlkioDeviceReadBps": null,
            "BlkioDeviceWriteBps": null,
            "BlkioDeviceReadIOps": null,
            "BlkioDeviceWriteIOps": null,
            "CpuPeriod": 0,
            "CpuQuota": 0,
            "CpuRealtimePeriod": 0,
            "CpuRealtimeRuntime": 0,
            "CpusetCpus": "",
            "CpusetMems": "",
            "Devices": [],
            "DeviceCgroupRules": null,
            "DeviceRequests": null,
            "KernelMemory": 0,
            "KernelMemoryTCP": 0,
            "MemoryReservation": 0,
            "MemorySwap": 0,
            "MemorySwappiness": null,
            "OomKillDisable": false,
            "PidsLimit": null,
            "Ulimits": null,
            "CpuCount": 0,
            "CpuPercent": 0,
            "IOMaximumIOps": 0,
            "IOMaximumBandwidth": 0,
            "MaskedPaths": [
                "/proc/asound",
                "/proc/acpi",
                "/proc/kcore",
                "/proc/keys",
                "/proc/latency_stats",
                "/proc/timer_list",
                "/proc/timer_stats",
                "/proc/sched_debug",
                "/proc/scsi",
                "/sys/firmware"
            ],
            "ReadonlyPaths": [
                "/proc/bus",
                "/proc/fs",
                "/proc/irq",
                "/proc/sys",
                "/proc/sysrq-trigger"
            ]
        },
        "GraphDriver": {
            "Data": {
                "LowerDir": "/var/lib/docker/overlay2/2546a273abe99c7335fbb03d67f8d380f743d91b6a47647231a4548967e23832-init/diff:/var/lib/docker/overlay2/ae442db66d110d0f4da98712944be8533e5c129299d4378bd8b50157e1715767/diff",
                "MergedDir": "/var/lib/docker/overlay2/2546a273abe99c7335fbb03d67f8d380f743d91b6a47647231a4548967e23832/merged",
                "UpperDir": "/var/lib/docker/overlay2/2546a273abe99c7335fbb03d67f8d380f743d91b6a47647231a4548967e23832/diff",
                "WorkDir": "/var/lib/docker/overlay2/2546a273abe99c7335fbb03d67f8d380f743d91b6a47647231a4548967e23832/work"
            },
            "Name": "overlay2"
        },
        "Mounts": [],
        "Config": {
            "Hostname": "fdcb4ce7d32c",
            "Domainname": "",
            "User": "",
            "AttachStdin": true,
            "AttachStdout": true,
            "AttachStderr": true,
            "Tty": true,
            "OpenStdin": true,
            "StdinOnce": true,
            "Env": [
                "PATH=/usr/local/sbin:/usr/local/bin:/usr/sbin:/usr/bin:/sbin:/bin"
            ],
            "Cmd": [
                "/bin/bash"
            ],
            "Image": "centos",
            "Volumes": null,
            "WorkingDir": "",
            "Entrypoint": null,
            "OnBuild": null,
            "Labels": {
                "org.label-schema.build-date": "20210915",
                "org.label-schema.license": "GPLv2",
                "org.label-schema.name": "CentOS Base Image",
                "org.label-schema.schema-version": "1.0",
                "org.label-schema.vendor": "CentOS"
            }
        },
        "NetworkSettings": {
            "Bridge": "",
            "SandboxID": "7949bffe1d061e2cf0ea576114c80fc61f593d9ac8b33cc3b65823af443dc449",
            "HairpinMode": false,
            "LinkLocalIPv6Address": "",
            "LinkLocalIPv6PrefixLen": 0,
            "Ports": {},
            "SandboxKey": "/var/run/docker/netns/7949bffe1d06",
            "SecondaryIPAddresses": null,
            "SecondaryIPv6Addresses": null,
            "EndpointID": "1e0662f10c7915bee627d362cf5ec94a9a460a88ac4d17d7ce856e3fc2c5c94a",
            "Gateway": "172.17.0.1",
            "GlobalIPv6Address": "",
            "GlobalIPv6PrefixLen": 0,
            "IPAddress": "172.17.0.2",
            "IPPrefixLen": 16,
            "IPv6Gateway": "",
            "MacAddress": "02:42:ac:11:00:02",
            "Networks": {
                "bridge": {
                    "IPAMConfig": null,
                    "Links": null,
                    "Aliases": null,
                    "NetworkID": "aa59f89e5467987caa069f8a0de56691ac5d953cdafb7b842287b0c8b3bc6d1e",
                    "EndpointID": "1e0662f10c7915bee627d362cf5ec94a9a460a88ac4d17d7ce856e3fc2c5c94a",
                    "Gateway": "172.17.0.1",
                    "IPAddress": "172.17.0.2",
                    "IPPrefixLen": 16,
                    "IPv6Gateway": "",
                    "GlobalIPv6Address": "",
                    "GlobalIPv6PrefixLen": 0,
                    "MacAddress": "02:42:ac:11:00:02",
                    "DriverOpts": null
                }
            }
        }
    }
]
Enter the currently running container
Usually, the container runs in the background mode. You need to enter the container and modify some configurations
Mode 1:
# command
docker exec -it container id bashShell

# example
[root@zb /]# docker ps
CONTAINER ID   IMAGE     COMMAND       CREATED          STATUS          PORTS     NAMES
fdcb4ce7d32c   centos    "/bin/bash"   11 minutes ago   Up 11 minutes             cranky_elbakyan
[root@zb /]# docker exec -it fdcb4ce7d32c /bin/bash
[root@fdcb4ce7d32c /]# ls
bin  dev  etc  home  lib  lib64  lost+found  media  mnt  opt  proc  root  run  sbin  srv  sys  tmp  usr  var
[root@fdcb4ce7d32c /]# ps -ef
UID          PID    PPID  C STIME TTY          TIME CMD
root           1       0  0 09:35 pts/0    00:00:00 /bin/bash
root          15       0  0 09:47 pts/1    00:00:00 /bin/bash
root          30      15  0 09:47 pts/1    00:00:00 ps -ef
Mode 2:
# command
docker attach container id
# example
[root@zb /]# docker attach fdcb4ce7d32c
 Executing current code...
difference:
docker exec: after entering the container, open a new terminal where you can operate (commonly used)
docker attach: enter the terminal where the container is executing, and no new process will be started
docker cp copies files from the container to the host
#Command docker cp container id: path in container target host path

[root@zb home]# docker ps
CONTAINER ID   IMAGE     COMMAND       CREATED         STATUS         PORTS     NAMES
806a97d603e4   centos    "/bin/bash"   3 minutes ago   Up 2 minutes             mystifying_leakey
[root@zb home]# docker exec -it 806a97d603e4 /bin/bash
[root@806a97d603e4 /]# cd /home
[root@806a97d603e4 home]# ls
[root@806a97d603e4 home]# touch text.cpp
[root@806a97d603e4 home]# read escape sequence
[root@zb home]# docker ps
CONTAINER ID   IMAGE     COMMAND       CREATED         STATUS         PORTS     NAMES
806a97d603e4   centos    "/bin/bash"   3 minutes ago   Up 3 minutes             mystifying_leakey
[root@zb home]# ls
test.java
[root@zb home]# docker cp 806a97d603e4:/home/text.cpp /home
[root@zb home]# ls
test.java  text.cpp

# Copying is a manual process. In the future, we will use -v volume technology to realize automatic synchronization
Summary
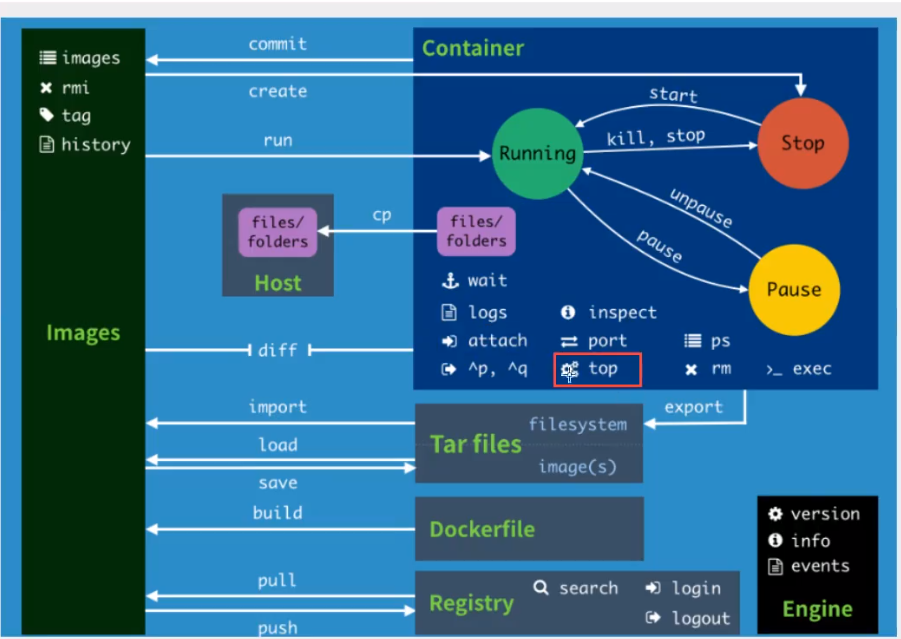
attach	Attach local standard input, output, and error streams to a running container	# The attach link under the current shell specifies the running image
build	Build an image from a Dockerfile	# Customized image through Dockerfile
commit	Create a new image from a container's changes	# Commit the current container as a new image
cp		Copy files/folders between a container and the local filesystem		# Copy the specified file or directory from the container to the host
create	Create a new container	# Create a new container, the same as run, but do not start the container
diff	Inspect changes to files or directories on a container's filesystem		# View docker container changes
events	Get real time events from the server	# Get container real-time events from docker service
exec	Run a command in a running container	# Run the command on an existing container
export	Export a container's filesystem as a tar archive	# Export the content stream of the container as a tar archive [corresponding to import]
history	Show the history of an image	# Show a mirror formation history
images	List images						# Lists the current image of the system
import	Import the contents from a tarball to create a filesystem image		# Create a new file system image from the contents of the tar package [corresponding to export]
info	Display system-wide information								# Display system related information
inspect	Return low-level information on Docker objects				# View container details
kill	Kill one or more running containers							# kill specifies the docker container
load	Load an image from a tar archive or STDIN					# Load an image from a tar package [corresponding to save]
login	Log in to a Docker registry									# Register or log in to a docker source server
logout	Log out from a Docker registry								# From the current Docker registry
logs	Fetch the logs of a container								# Output current container log information
pause	Pause all processes within one or more containers			# Pause container
port	List port mappings or a specific mapping for the container	# View the internal source port of the container corresponding to the mapped port
ps		List containers												# List containers
pull	Pull an image or a repository from a registry				# Pull the specified image or library image from the docker image source server
push	Push an image or a repository to a registry					# Push the specified image or library image to the docker source server
rename	Rename a container
restart	Restart one or more containers								# Restart the running container
rm		Remove one or more containers								# Remove one or more containers
rmi		Remove one or more images									# Remove one or more images [no container can be deleted without using the image, otherwise relevant containers need to be deleted before continuing or -f forced deletion]
run		Run a command in a new container							# Create a new container and run a command
save	Save one or more images to a tar archive (streamed to STDOUT by default) # Save an image as a tar package [corresponding to load]
search	Search the Docker Hub for images										# Search for images in docker hub
start	Start one or more stopped containers									# Start container
stats	Display a live stream of container(s) resource usage statistics
stop	Stop one or more running containers										# Stop container
tag		Create a tag TARGET_IMAGE that refers to SOURCE_IMAGE					# Label images in source
top		Display the running processes of a container							# View the process information running in the container
unpause	Unpause all processes within one or more containers						# Unsuspend container
update	Update configuration of one or more containers
version	Show the Docker version information										# View docker version number
wait	Block until one or more containers stop, then print their exit codes	# Intercepts the exit status value when the container stops
visualization
-
Portal (use this first)
docker run -d -p 8088:9000 --restart=always -v /var/run/docker.sock:/var/run/docker.sock --privileged=true portainer/portianer
-
Rancher(CI/CD reuse)
What is a portal?
Docker graphical interface management tool provides a background panel for us to operate
docker run -d -p 8088:9000 --restart=always -v /var/run/docker.sock:/var/run/docker.sock --privileged=true portainer/portainer
Access test: http://120.55.42.144:8088/
Docker image explanation
What is mirroring
Image is a lightweight, executable independent software package used to package software developed by software running environment and opportunity running environment. It contains all the contents required to run a software, including code, runtime, library, environment variables and configuration files
All applications can run directly by directly packaging the docker image
How to get the image
- Download from remote warehouse
- Friend copy to you
- Make an image DockerFile by yourself
Docker image loading principle
Unionfs (Federated file system)
Union fs (Federated file system): Union file system (Union FS) is a layered, lightweight and high-performance file system. It supports the superposition of file system modifications from one submission to another. At the same time, it can mount different directories into a single virtual file system The union file system is the foundation of Docker image. The image can be inherited through layering. Based on the basic image (without parent image), various specific application images can be made
Features: multiple file systems can be loaded at the same time, but from the outside, only one file system can be seen. Joint loading will overlay all layers of file systems, so that the final file system will contain all underlying files and directories
Docker image loading principle
The image of docker is actually composed of a layer of file systems, such as UnionFS
bootfs(boot file system) mainly includes bootloader and kernel. Bootloader is mainly used to boot and load the kernel. Bootfs file system will be loaded when Linux starts. Bootfs is at the bottom of Docker image. This layer is the same as our classic Linux/Unix system, including boot loader and kernel. After boot loading, the whole kernel is in memory. At this time, the right to use memory has been transferred from bootfs to the kernel, and the system will also be written in bootfs
rootfs(root file system), above bootfs. It contains standard directories and files such as / dev,/proc,/bin,/etc in a typical Linux system. rootfs is a variety of operating system distributions, such as Ubuntu, Centos and so on
Usually, the CentOS installed into the virtual machine is several G, why is Docker only 200M?
For a streamlined OS, rootfs can be very small. It only needs to contain the most basic commands, tools and program libraries. Because the bottom layer directly uses the Host kernel, it only needs to provide rootfs. Therefore, for different linux distributions, bootf is basically always, and rootfs will be different, because different distributions can share bootfs
Hierarchical understanding
Tiered mirroring
We can download an image. We can see that it is downloaded layer by layer

Why does the Docker image adopt this hierarchical structure?
The biggest advantage is resource sharing. For example, if multiple images are built from the same base image, the host only needs to keep one base image on the disk, and only one base image needs to be loaded into the colleague's memory, so that all containers can be served, and each layer of the image can be shared
You can view the image hierarchy through the docker image inspect command
[root@zb zhoubin]# docker image inspect redis:latest
[
	// .....
        "RootFS": {
            "Type": "layers",
            "Layers": [
                "sha256:d000633a56813933cb0ac5ee3246cf7a4c0205db6290018a169d7cb096581046",
                "sha256:bdad86443e47c5665683ac41c1f24f28479d830d7e3cc47d0a337ee5166c7714",
                "sha256:6a7992ac480029d82b7dbb757d16fe5d023aa283ed32b52267cd1fe9e6b73c49",
                "sha256:be43d2475cf809c0f2ec31950e849d0f888f3121970fd99196a11a903f8c3820",
                "sha256:be5818ef2907adfe19be14bf66647b5fb5a2029143f9297f8ce1ff1fd1d35753",
                "sha256:c54e0c16ea22fa873c12f6a7f3fb4e021bb58d67c292156a6ce6e08637458b7c"
            ]
        },
        "Metadata": {
            "LastTagTime": "0001-01-01T00:00:00Z"
        }
    }
]
understand:
All Docker images start from a basic image layer. When modifying or adding new content, a new image layer will be created above the current image layer
For example, create a new image based on Ubuntu Linux 16.04, which is the first layer of the new image. If you add a Python package to the image, you will create a second image layer above the basic image layer. If you continue to add a security patch, you will create a third image layer
The mirror currently contains 3 mirror layers

While adding additional image layers, it is very important to understand that the image always remains the combination of all current images. The following figure gives a simple example. Each image layer contains 3 files, while the image contains 6 files of two image layers

The image layer in the above figure is slightly different from that in the previous figure. The main purpose is to facilitate the display of files
The following figure shows a slightly complex three-tier image. Externally, there are only 6 files in the entire image, because the top-level file 7 is an updated version of file 5
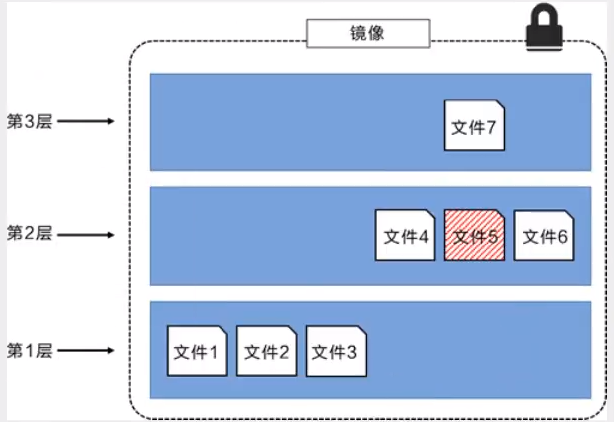
In this case, the files in the upper image layer cover the files in the lower image layer, so that the updated eight copies of the files are added to the image as a new image layer
Docker implements the image layer stack through the storage engine (the new version adopts the snapshot mechanism), and ensures that multiple image layers are displayed as a unified file system
The storage engines available on Linux include AUFS, Overlay2, Device Mapper, Btrfs and ZFS. As the name suggests, each storage engine is based on the corresponding file system or block device technology in Linux, and each storage engine has its unique performance characteristics
Docker only supports a storage engine of Windows filter on Windows. The engine is based on NTFS file system to realize layering and Cow[1]
The following figure shows the same three-layer mirror image as the system. All mirror layers are stacked and merged to provide a unified view

characteristic
Docker images are read-only. When the container is started, a new writable layer is loaded on the top of the image
This layer is what we usually call the container layer. What is under the container is called the mirror layer

Commit image
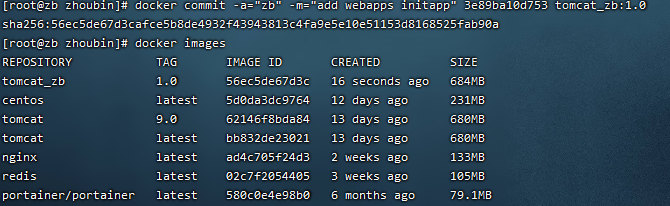
The docker commit submission container becomes a new copy
# The principle of the command is similar to that of git
docker commit -m="Description information submitted" -a="author" container id Target image name:[TAG]
Actual test
# 1. Start a default tomcat

# 2. It is found that the default tomcat does not have a webapps application. The reason for the image is that there are no files under the official image default webapps

# 3. I copied in the basic files myself

# 4. Submit the container we have operated to an image through commit
Container data volume
What is a container data volume
Review of Docker's concept
Package the application and environment into one image
Data. If the data is in the container, the container will be deleted and the data will be lost. Requirement: data can be persisted
Mysql, container deletion, database deletion and running requirements: MySQL data can be stored locally
Before the container, there can be a data sharing technology to synchronize the data generated in the Docker container to the local
This is volume technology, directory mounting. Mount the directory in our container to linux
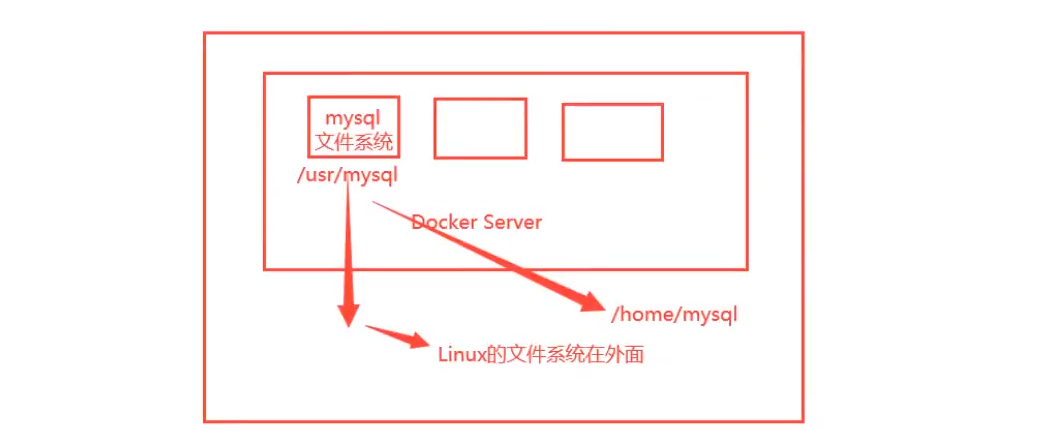
Summary: the persistence and synchronization of containers, and data sharing between containers
Using data volumes
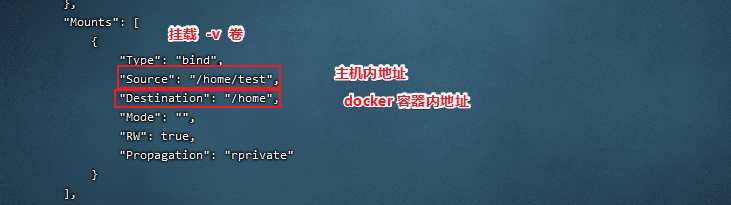
Method 1: directly use the command to mount - v
docker run -it -v Host Directory:In container directory

# test
[root@zb home]# docker run -it -v /home/test:/home centos /bin/bash

# After startup, inspect the container id through docker
Benefit: you only need to modify locally later
Actual combat: install mysql
Thinking: the problem of data persistence in MySQL
# Get image
[root@zb test]# docker pull mysql:5.7

# Run container, Data mounting is required # To install and start mysql, you need to configure the password
# Official test: docker run -- name some MySQL - e MySQL_ ROOT_ PASSWORD=my-secret-pw -d mysql:tag

# mysql start
[root@zb test]# docker run -d -p 3310:3306 -v /home/mysql/conf:/etc/mysql/conf.d -v /home/mysql/data:/var/lib/mysql -e MYSQL_ROOT_PASSWORD=123456 --name mysql01 mysql:5.7
Named and anonymous mount
# Anonymous mount
-v In container path
[root@zb data]# docker run -d -P --name nginx01 -v /etc/nginx/ nginx
de24b43780f17972c33f104d377c6fe19c9cdcf5b7a8f4db78f8f0596d76e304

# View all volume s
[root@zb data]# docker volume ls
DRIVER    VOLUME NAME
local     19be477cd4e0b3b2822f7d00e18fd5179198d5e0dcd37354c8d8af26a32cb5b7
local     a4f93cf8eb95af73bd61ac16ec45d0d69d7e240b368bbdd9e1c536d68e6a7aa0


# This is anonymous mount. In -v, only the path inside the container is written, and no path outside the container is written

# Named mount
[root@zb data]# docker run -d -P --name nginx02 -v juming-nginx:/etc/nginx nginx
35663552faf1b1a7661bb84a854f67c2e2e514d8daab79191f6cd331b13edb2e
[root@zb data]# docker volume ls
DRIVER    VOLUME NAME
local     19be477cd4e0b3b2822f7d00e18fd5179198d5e0dcd37354c8d8af26a32cb5b7
local     a4f93cf8eb95af73bd61ac16ec45d0d69d7e240b368bbdd9e1c536d68e6a7aa0
local     juming-nginx

# Via -v volume name: path within container
# Take a look at this volume
[root@zb data]# docker volume inspect juming-nginx
[
    {
        "CreatedAt": "2021-09-29T10:01:57+08:00",
        "Driver": "local",
        "Labels": null,
        "Mountpoint": "/var/lib/docker/volumes/juming-nginx/_data",
        "Name": "juming-nginx",
        "Options": null,
        "Scope": "local"
    }
]
All volumes in the docker container are in / var / lib / docker / volumes / xxx without a specified directory/_ data
Through named mount, we can easily find one of our volumes. In most cases, named mount is used
# How to determine whether a named mount or an anonymous mount or a specified path mount
-v In container path			# Anonymous mount
-v Volume name:In container path		   # Named mount
-v /Host path:In container path  # Specified path mount
expand:
# ro rw changes the read and write permissions through the path in the -v container
ro	readonly	# read-only
rw 	readwrite	# Readable and writable

# Once the permission of the container is set, the container has restrictions on the mounted content
docker run -d -P --name nginx02 -v juming-nginx:/etc/nginx:ro nginx
docker run -d -P --name nginx02 -v juming-nginx:/etc/nginx:rw nginx

# ro indicates that this path can only be changed by the host, and the container cannot be operated inside
# The default is rw
First acquaintance with Dockerfile
Dockerfile is the build file and command script used to build docker image. Let's experience it
Through this script, you can generate an image. The image is layer by layer. The script commands one by one, and each command is a layer
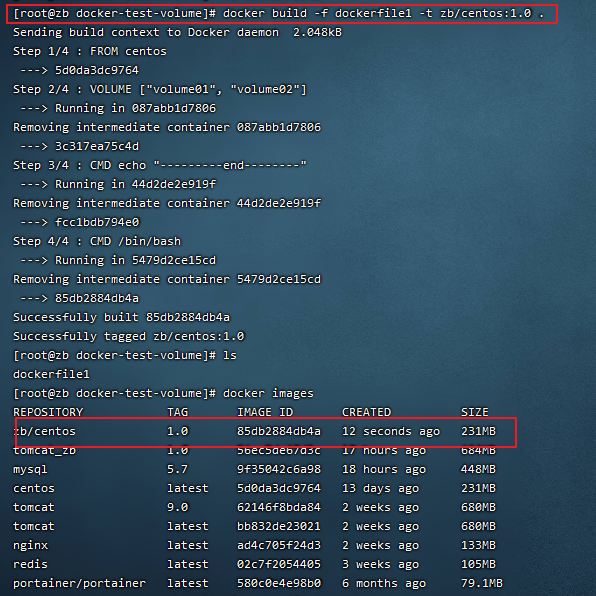
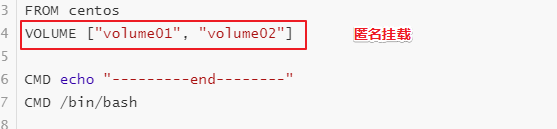
# Create a Dockerfile. It is recommended to use Dockerfile
# Content directive (uppercase) parameter in file
FROM centos
VOLUME ["volume01", "volume02"]

CMD echo "---------end--------"
CMD /bin/bash

#Each command here is a layer of image
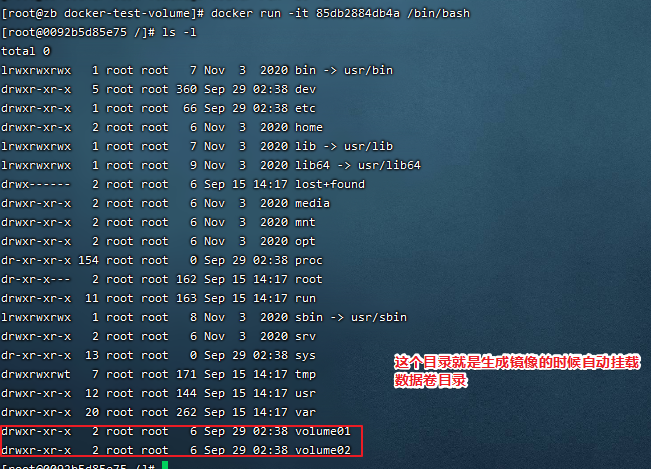
This volume must have a synchronized directory with the outside
View the path of the volume mount

Many will be used in the future and will build their own images
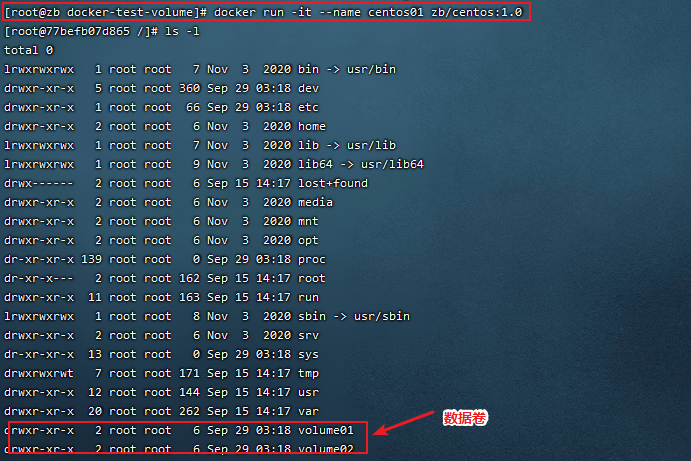
There is no mounted volume when building the image. You need to manually mount the image -v volume name: path in the container
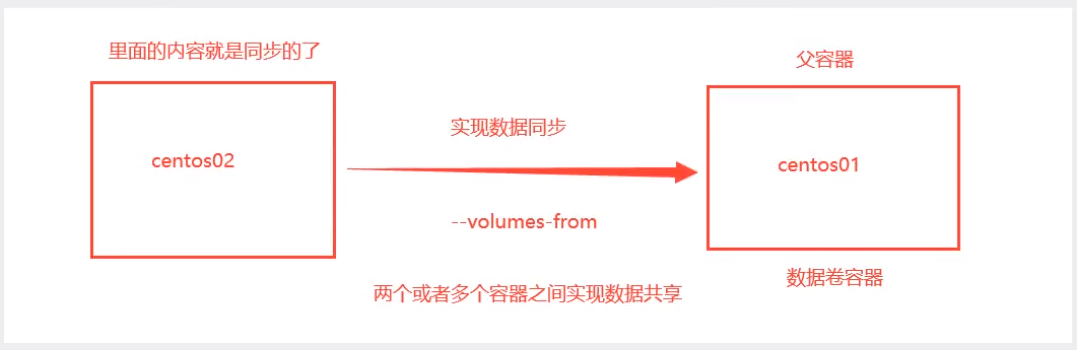
Data volume container
Multiple mysql synchronization data
# Start 3 containers
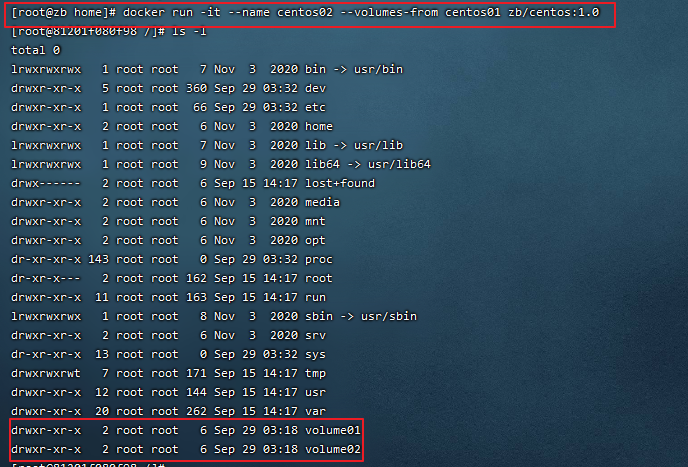
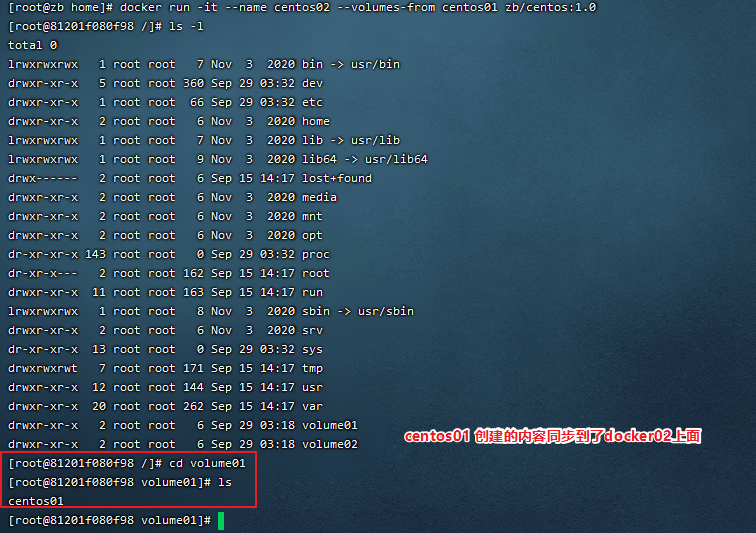

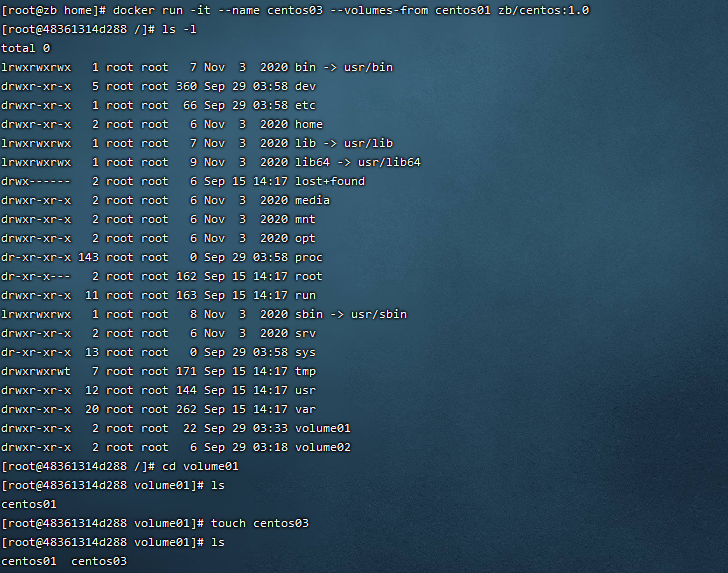
# Test, delete centos01, and check whether centos02 and centos03 can still access this file
# The test is still accessible

Data sharing with multiple mysql
[root@zb test]# docker run -d -p 3310:3306 -v /home/mysql/conf:/etc/mysql/conf.d -v /home/mysql/data:/var/lib/mysql -e MYSQL_ROOT_PASSWORD=123456 --name mysql01 mysql:5.7

[root@zb test]# docker run -d -p 3310:3306 -e MYSQL_ROOT_PASSWORD=123456 --name mysql01 --volumes-from mysql01 mysql:5.7

# Data synchronization between two containers
Conclusion:
For the transfer of configuration information between containers, the life cycle of data volume containers continues until no containers are used
Once persisted locally, the local data will not be deleted
DockerFile
Docker construction introduction
dockerfile is used to build docker image files, command parameters and scripts
Construction steps:
- Write a dockerfile file
- docker build is called an image
- docker run run image
- docker push publishing images (DockerHub, Alibaba cloud image warehouse)
DockerFile construction process
Basics:
-
Each reserved keyword (instruction) must be an uppercase letter
-
Execute from top to bottom
-
/#Indicates a comment
-
Each instruction creates and commits a new mirror layer

Dockerfiles are development oriented. Projects should be published and mirrored
Steps: development, deployment and operation
DockerFile: build a file that defines all the steps
DockerImages: the image generated through DockerFile construction, and the product finally released and run. It was originally jar and war
Docker container: a container is an image that runs to provide a server
DockerFile instruction
FROM	# Basic image, everything starts from here
MAINTAINER	# Who wrote the image, name + email
RUN			# Commands to run during image construction
ADD			# Step: tomcat image, this tomcat compressed package, and add content
WORKDIR		# Mirrored working directory
VOLUME		# Mount directory
EXPOST		# Exposed port configuration
CMD			# Specifies the command to run when the container is started. Only the last one will take effect and can be replaced
ENTRYPOINT	# Specify the fame and fortune to run when the container is started, and you can append commands
ONBUILD		# When an inherited DockerFile is built, the ONBUILD instruction will be run to trigger the instruction
COPY		# Similar to ADD, copy our files to the image
ENV			# Setting environment variables during construction

Actual test
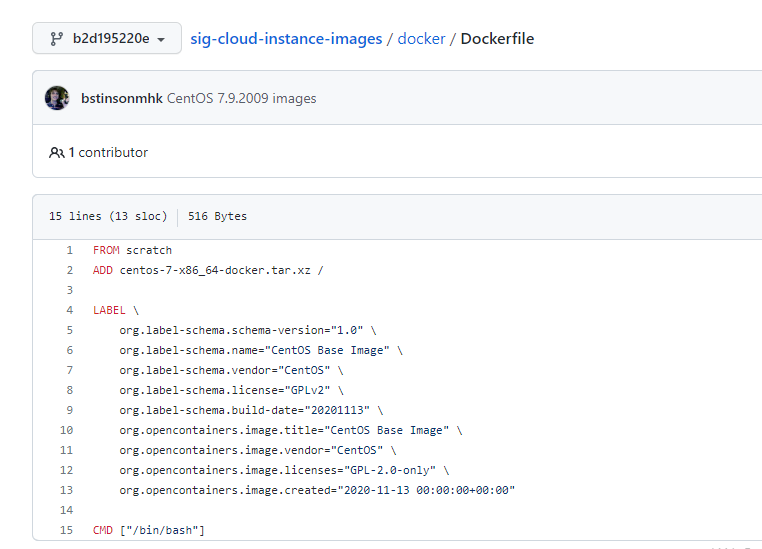
99% of the images in the Docker Hub are built from this basic image, FROM scratch, and then configured with the required software and configuration
Create your own centos
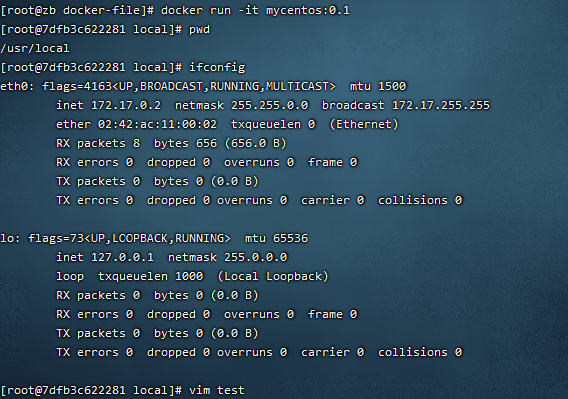
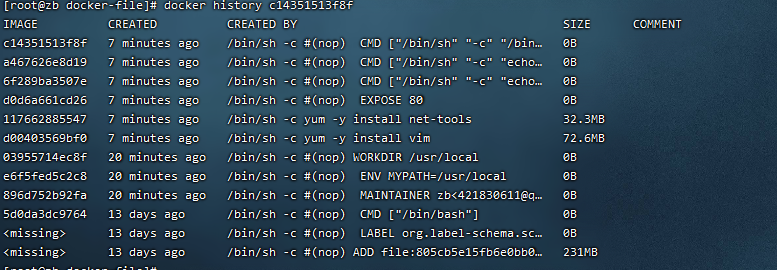
# 1. Prepare Dockerfile file
[root@zb docker-file]# cat mydockerfile
FROM centos
MAINTAINER zb<421830611@qq.com>

ENV MYPATH /usr/local
WORKDIR $MYPATH

RUN yum -y install vim
RUN yum -y install net-tools

EXPOSE 80

CMD echo $MYPATH
CMD echo "-----end---"
CMD /bin/bash

# 2. Build an image from this file
# Command docker build -f dockerfile file path - t image name: [tag]
[root@zb docker-file]# docker build -f mydockerfile -t mycentos:0.1 .

# 3. Test run
Contrast: Previous native centos

We added the scene
You can list the history of changes made locally
Difference between CMD and ENTRYPOINT
ENTRYPOINT	# Specify the fame and fortune to run when the container is started, and you can append commands
COPY		# Similar to ADD, copy our files to the image
Test cmd
# Write dockerfile file
[root@zb docker-file]# vim dockerfile-cmd-test
FROM centos
CMD ["ls", "-a"]

# Build mirror
[root@zb docker-file]# docker build -f dockerfile-cmd-test -t cmdtest .


# run and find that the ls -a command takes effect
[root@zb docker-file]# docker run 04f016b4925e
.
..
.dockerenv
bin

# Want to append a command - l, want to have la -al effect
[root@zb docker-file]# docker run 04f016b4925e -l
docker: Error response from daemon: OCI runtime create failed: container_linux.go:380: starting container process caused: exec: "-l": executable file not found in $PATH: unknown.
ERRO[0000] error waiting for container: context canceled

# cmd cleanup - l replaces CMD["ls", "-a"] command, - l is not a command, and an error is reported
Test ENTRYPOINT
# Write dockerfile file
[root@zb docker-file]# vim dockefile-cmd-entrypoint
FROM centos
ENTRYPOINT ["ls", "-a"]

# Build mirror
[root@zb docker-file]# docker build -f dockefile-cmd-entrypoint -t entorypoint-test .
Sending build context to Docker daemon  4.096kB
Step 1/2 : FROM centos
 ---> 5d0da3dc9764
Step 2/2 : ENTRYPOINT ["ls", "-a"]
 ---> Running in ba2c39e2bfe3
Removing intermediate container ba2c39e2bfe3
 ---> 488df2cac5a4
Successfully built 488df2cac5a4
Successfully tagged entorypoint-test:latest

[root@zb docker-file]# docker run 488df2cac5a4
.
..
.dockerenv
bin
dev
etc
home
lib
lib64
lost+found
media
mnt
opt
proc
root
run
sbin
srv
sys
tmp
usr
var

# The append command is spliced directly after the ENTRYPOINT
[root@zb docker-file]# docker run 488df2cac5a4 -l
total 0
drwxr-xr-x   1 root root   6 Sep 29 07:19 .
drwxr-xr-x   1 root root   6 Sep 29 07:19 ..
-rwxr-xr-x   1 root root   0 Sep 29 07:19 .dockerenv
lrwxrwxrwx   1 root root   7 Nov  3  2020 bin -> usr/bin
drwxr-xr-x   5 root root 340 Sep 29 07:19 dev
drwxr-xr-x   1 root root  66 Sep 29 07:19 etc
drwxr-xr-x   2 root root   6 Nov  3  2020 home
lrwxrwxrwx   1 root root   7 Nov  3  2020 lib -> usr/lib
lrwxrwxrwx   1 root root   9 Nov  3  2020 lib64 -> usr/lib64
drwx------   2 root root   6 Sep 15 14:17 lost+found
drwxr-xr-x   2 root root   6 Nov  3  2020 media
drwxr-xr-x   2 root root   6 Nov  3  2020 mnt
drwxr-xr-x   2 root root   6 Nov  3  2020 opt
dr-xr-xr-x 147 root root   0 Sep 29 07:19 proc
dr-xr-x---   2 root root 162 Sep 15 14:17 root
drwxr-xr-x  11 root root 163 Sep 15 14:17 run
lrwxrwxrwx   1 root root   8 Nov  3  2020 sbin -> usr/sbin
drwxr-xr-x   2 root root   6 Nov  3  2020 srv
dr-xr-xr-x  13 root root   0 Sep 29 07:19 sys
drwxrwxrwt   7 root root 171 Sep 15 14:17 tmp
drwxr-xr-x  12 root root 144 Sep 15 14:17 usr
drwxr-xr-x  20 root root 262 Sep 15 14:17 var
Actual combat: tomcat image
-
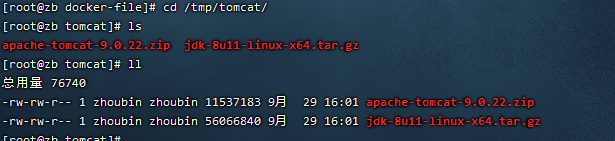
Prepare the image file tomcat compressed package and jdk compressed package
-
Write a dockerfile file, which is officially named dockerfile. Build will automatically find this file without specifying - f
MAINTAINET zb<421830611@qq.com>

COPY readme.txt /usr/local/readme.txt
ADD jdk-8u11-linux-x64.tar.gz /usr/local/
ADD apache-tomcat-9.0.22.tar.gz /usr/local/

RUN yum -y install vim

ENV MYPATH /usr/local
WORKDIR $MYPATH

ENV JAVA_HOME /usr/local/jdk1.8.0_11
ENV CLASSPATH $JAVA_HOME/lib/dt.jar:$JAVA_HOME/lib/tools.jar
ENV CATLINA_HOME /usr/local/apache-tomcat-9.0.22
ENV CATLINA_PASH /usr/local/apache-tomcat-9.0.22
ENV PATH $PATH:$JAVA_HOME/bin:$CATALINA_HOME/lib:$CATALINA_HOME/bin

EXPOSE 8080

CMD /usr/local/apache-tomcat-9.0.22/bin/startup.sh && tail -F /usr/local/apache-tomcat-9.0.22/logs/catalina.out
-
Build mirror
# docker build -t zbtomcat .
-
Start mirroring
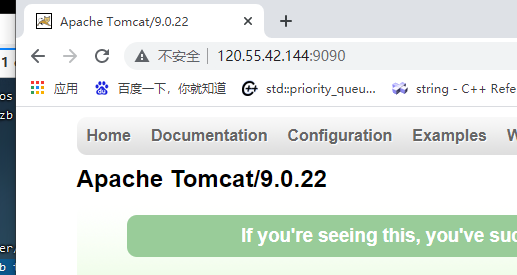
[root@zb tomcat]# docker run -it -p 9090:8080 --name zbtomcat -v /tmp/tomcat/test:/usr/local/apache-tomcat-9.0.22/webapps/test -v /tmp/tomcat/tomcatlogs/:/usr/local/apache-tomcat-9.0.22/logs zbtomcat
-
Access test
-
Publish the project (because the volume is mounted, you can publish the project directly by writing the project locally)
<?xml version="1.0" encoding="UTF-8"?>
<web-app version="2.4"
    xmlns="http://java.sun.com/xml/ns/j2ee"
    xmlns:xsi="http://www.w3.org/2001/XMLSchema-instance"
    xsi:schemaLocation="http://java.sun.com/xml/ns/j2ee
        http://java.sun.com/xml/ns/j2ee/web-app_2_4.xsd">
</web-app>
<%@ page language="java" contentType="text/html; charset=UTF-8" pageEncoding="UTF-8"%> <!DOCTYPE html> <html> <head> <meta charset="utf-8"> <title>hello</title> </head> <body> Hello World!<br/> <% System.out.println("------my test web logs -----"); %> </body> </html>
Publish your own image
DockerHub
-
address https://hub.docker.com/ Register your account
-
Make sure this account can log in
-
Commit your own image on the server
[root@zb zhoubin]# docker login --help Usage: docker login [OPTIONS] [SERVER] Log in to a Docker registry. If no server is specified, the default is defined by the daemon. Options: -p, --password string Password --password-stdin Take the password from stdin -u, --username string Username [root@zb zhoubin]# docker login -u zzbbzb Password: WARNING! Your password will be stored unencrypted in /root/.docker/config.json. Configure a credential helper to remove this warning. See https://docs.docker.com/engine/reference/commandline/login/#credentials-store Login Succeeded -
After logging in, you can submit the image, which is a one-step docker push
# push your own image to the server
[root@zb zhoubin]# docker push zbtomcat
Using default tag: latest
The push refers to repository [docker.io/library/zbtomcat]
606a9fcc1aa2: Preparing
2580ff04a607: Preparing
255d8e8398a5: Preparing
e7d27dc20f3e: Preparing
74ddd0ec08fa: Preparing
denied: requested access to the resource is denied # refuse

# Mirror problem?
[root@zb zhoubin]# docker push zb/zbtomcat:1.0
The push refers to repository [docker.io/zb/zbtomcat]
An image does not exist locally with the tag: zb/zbtomcat

# Processing, add tag, user name / image name: tag
[root@zb tomcat]# docker tag a42188e7ed03 zzbbzb/zbtomcat:1.0
[root@zb tomcat]# docker images
REPOSITORY            TAG       IMAGE ID       CREATED         SIZE
zbtomcat              latest    a42188e7ed03   2 minutes ago   643MB
zzbbzb/zbtomcat       1.0       a42188e7ed03   2 minutes ago   643MB
entorypoint-test      latest    488df2cac5a4   31 hours ago    231MB
cmdtest               latest    04f016b4925e   31 hours ago    231MB
mycentos              0.1       c14351513f8f   32 hours ago    336MB
zb/centos             1.0       85db2884db4a   36 hours ago    231MB
tomcat_zb             1.0       56ec5de67d3c   2 days ago      684MB
mysql                 5.7       9f35042c6a98   2 days ago      448MB
centos                latest    5d0da3dc9764   2 weeks ago     231MB
tomcat                9.0       62146f8bda84   2 weeks ago     680MB
tomcat                latest    bb832de23021   2 weeks ago     680MB
nginx                 latest    ad4c705f24d3   2 weeks ago     133MB
redis                 latest    02c7f2054405   3 weeks ago     105MB
portainer/portainer   latest    580c0e4e98b0   6 months ago    79.1MB


# docker push up
[root@zb tomcat]# docker push zzbbzb/zbtomcat:1.0
The push refers to repository [docker.io/zzbbzb/zbtomcat]
d2d29553047a: Pushing [=>                                                 ]   1.66MB/72.56MB
beb0f6e2950e: Pushing [====>                                              ]  1.361MB/15.41MB
1c2f3be1f20c: Pushing [>                                                  ]  1.594MB/324MB
4b5e8fca88ed: Pushed
74ddd0ec08fa: Pushing [>                                                  ]  2.196MB/231.3MB
Alicloud image
-
Log in to alicloud
-
Container mirroring service found
-
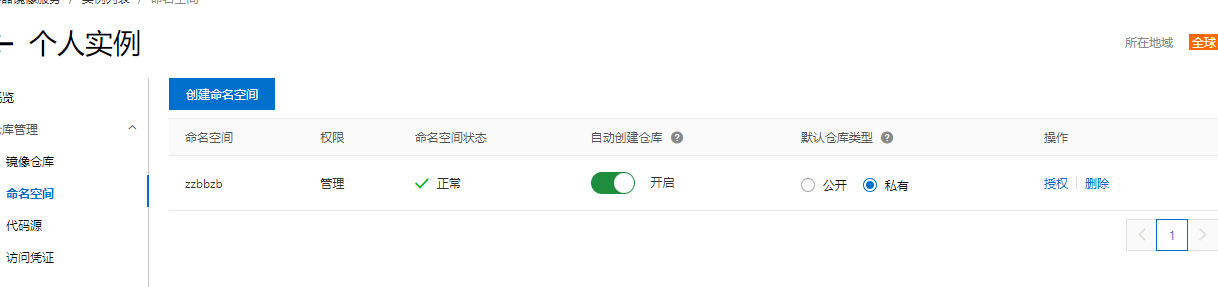
Create namespace
-
Create container image

-
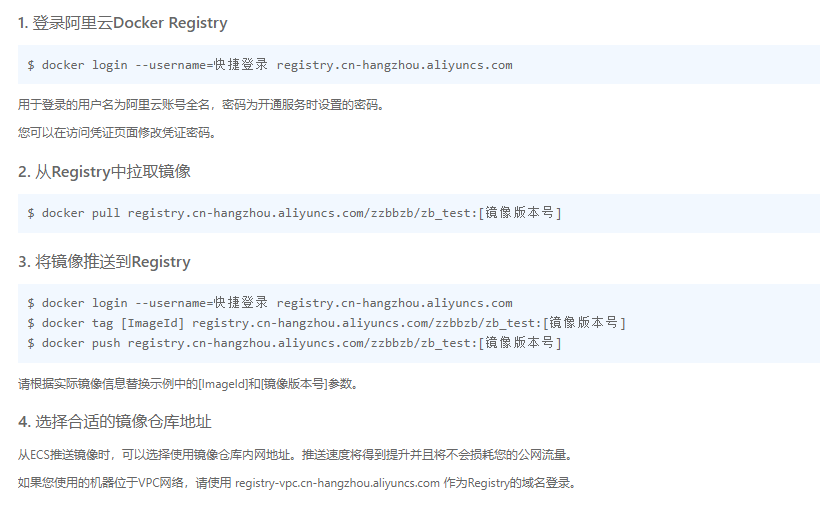
Browse alicloud documents
Summary

Docker network (bedding container arrangement cluster deployment)
Understand Docker0
Empty all images and containers
test
Three networks
# How does docker handle container network access?

# [root@zb /]# docker run -d -P --name tomcat01 tomcat

# Check the internal network address ip addr of the container and find that you will get an IP address when the container is started eth0@if116 ip address, assigned by docker
[root@zb tomcat]# docker exec -it tomcat01 ip addr
1: lo: <LOOPBACK,UP,LOWER_UP> mtu 65536 qdisc noqueue state UNKNOWN group default qlen 1000
    link/loopback 00:00:00:00:00:00 brd 00:00:00:00:00:00
    inet 127.0.0.1/8 scope host lo
       valid_lft forever preferred_lft forever
115: eth0@if116: <BROADCAST,MULTICAST,UP,LOWER_UP> mtu 1500 qdisc noqueue state UP group default
    link/ether 02:42:ac:11:00:02 brd ff:ff:ff:ff:ff:ff link-netnsid 0
    inet 172.17.0.2/16 brd 172.17.255.255 scope global eth0
       valid_lft forever preferred_lft forever

# Can linux ping the container
[root@zb tomcat]# ping 172.17.0.2
PING 172.17.0.2 (172.17.0.2) 56(84) bytes of data.
64 bytes from 172.17.0.2: icmp_seq=1 ttl=64 time=0.084 ms
64 bytes from 172.17.0.2: icmp_seq=2 ttl=64 time=0.039 ms
64 bytes from 172.17.0.2: icmp_seq=3 ttl=64 time=0.047 ms
64 bytes from 172.17.0.2: icmp_seq=4 ttl=64 time=0.044 ms

# linux can ping through the docker container
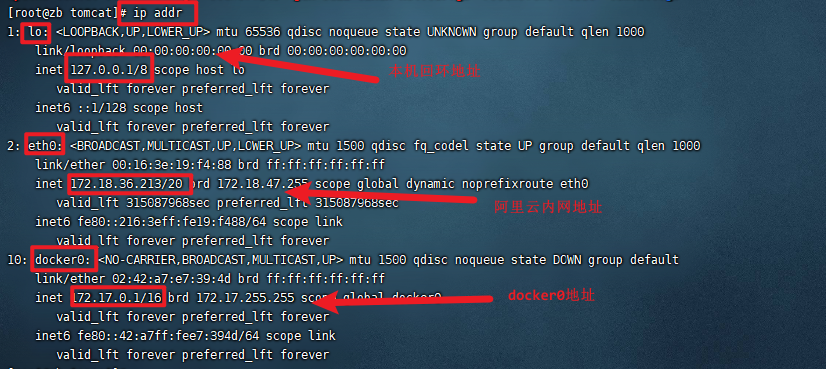
principle
- Every time a docker container is started, docker will assign an ip to the docker container. As long as docker is installed, there will be a network card docker0 bridging mode. The technology used is Veth pair technology
Test ip addr again
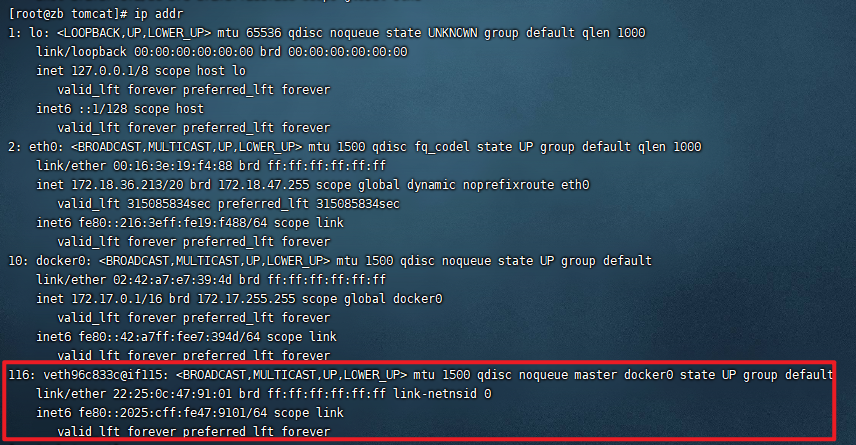
- Start another test and find another network card
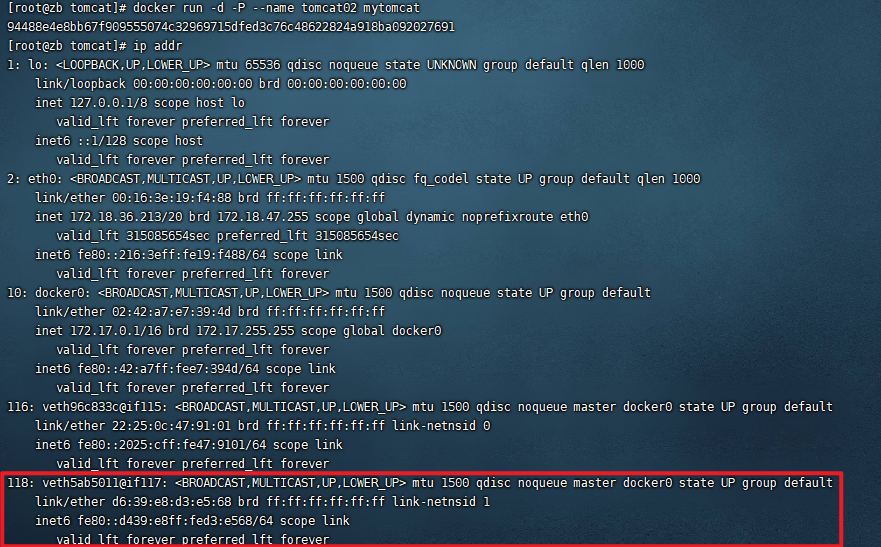
# We found that the network cards brought by this container are a pair
# Veth pair is a pair of virtual device interfaces, which appear in pairs, one connected to the protocol and the other connected to each other
# With this feature, Veth pair acts as a bridge to link various virtual network devices
# The links between OpenStac, Docker containers and ovs all use Veth pair technology
-
Test whether tomcat01 and tomcat02 can be ping ed
[root@zb tomcat]# docker exec -it tomcat02 ping 172.17.0.1
PING 172.17.0.1 (172.17.0.1) 56(84) bytes of data.
64 bytes from 172.17.0.1: icmp_seq=1 ttl=64 time=0.075 ms
64 bytes from 172.17.0.1: icmp_seq=2 ttl=64 time=0.051 ms

# Conclusion: containers and containers can ping each other
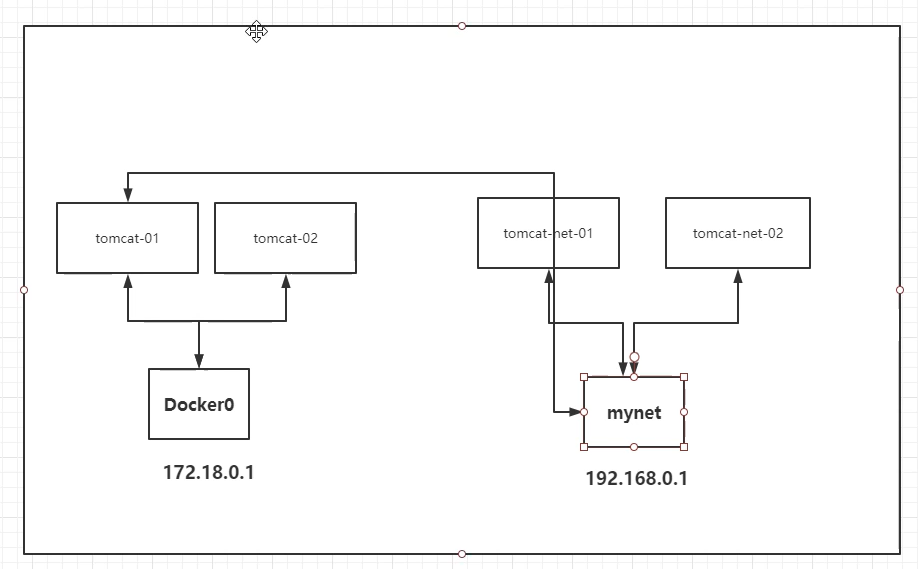
Draw a network model diagram:
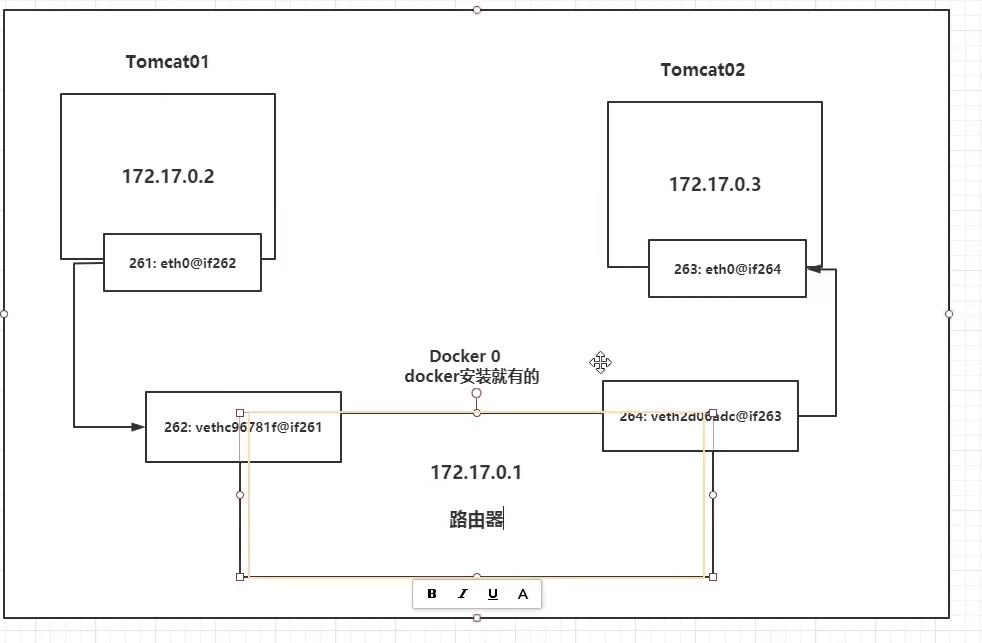
Conclusion: tomcat01 and tomcat02 are common routers docker0
When all containers do not specify a network, they are routed by docker0. Docker will assign a default available ip address to our container
Summary
Docker uses LInux bridge, and the host computer is a docker container bridge docker0
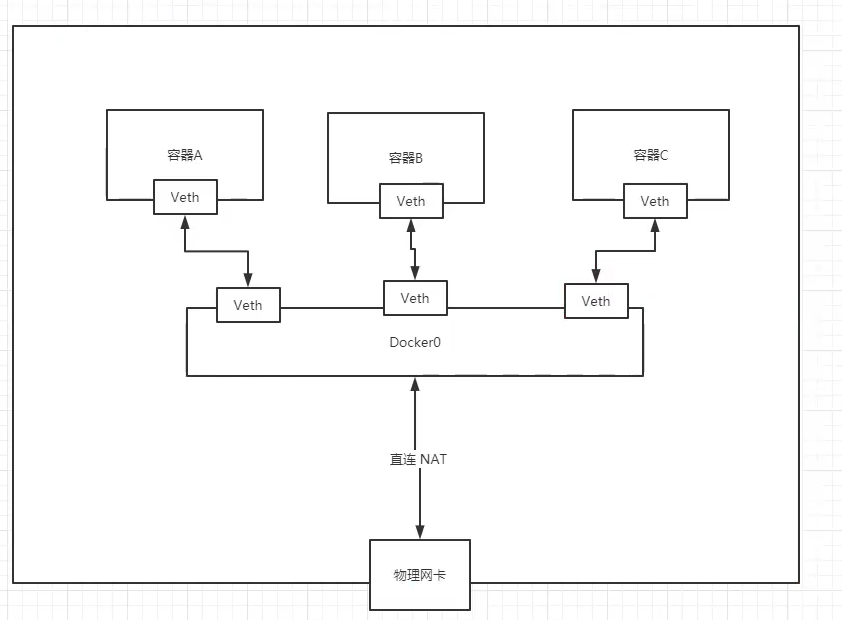
All network interfaces in Docker are virtual, and virtual forwarding efficiency is high
As long as the container is deleted, the corresponding pair of bridges will disappear
–link
Consider a scenario where the project does not restart, the database ip is changed, and the container can be accessed by name
[root@zb tomcat]# docker exec -it tomcat02 ping tomcat01
ping: tomcat01: Name or service not known

# How to solve
# The problem of network connectivity can be solved through -- link
[root@zb tomcat]# docker run -d -P --name tomcat03 --link tomcat02  mytomcat
a513374a099c59c789df5c3a5cd2c65a4a3558ff0b4e2fc93ce02ed5bf9f9ce5
[root@zb tomcat]# docker exec -it tomcat03 ping tomcat02
PING tomcat02 (172.17.0.3) 56(84) bytes of data.
64 bytes from tomcat02 (172.17.0.3): icmp_seq=1 ttl=64 time=0.076 ms
64 bytes from tomcat02 (172.17.0.3): icmp_seq=2 ttl=64 time=0.071 ms
64 bytes from tomcat02 (172.17.0.3): icmp_seq=3 ttl=64 time=0.076 ms
64 bytes from tomcat02 (172.17.0.3): icmp_seq=4 ttl=64 time=0.057 ms
64 bytes from tomcat02 (172.17.0.3): icmp_seq=5 ttl=64 time=0.045 ms
64 bytes from tomcat02 (172.17.0.3): icmp_seq=6 ttl=64 time=0.057 ms
64 bytes from tomcat02 (172.17.0.3): icmp_seq=7 ttl=64 time=0.055 ms
--- tomcat02 ping statistics ---
7 packets transmitted, 7 received, 0% packet loss, time 6121ms
rtt min/avg/max/mdev = 0.045/0.062/0.076/0.013 ms

# Can you ping the direction
[root@zb tomcat]# docker exec -it tomcat02 ping tomcat03
ping: tomcat03: Name or service not known
Probe: inspect

In fact, tomcat03 is configured locally with tomcat02 configuration
# View host configuration
[root@zb tomcat]# docker exec -it tomcat03 cat /etc/hosts
127.0.0.1       localhost
::1     localhost ip6-localhost ip6-loopback
fe00::0 ip6-localnet
ff00::0 ip6-mcastprefix
ff02::1 ip6-allnodes
ff02::2 ip6-allrouters
172.17.0.3      tomcat02 94488e4e8bb6
172.17.0.4      a513374a099c
Essential exploration: - link is to add 172.17.0.3 tomcat02 94488e4e8bb6 to the hosts configuration
Now play what Docker doesn't recommend – link
Custom network without docker0
docker0 problem: container name link access is not supported
Custom network
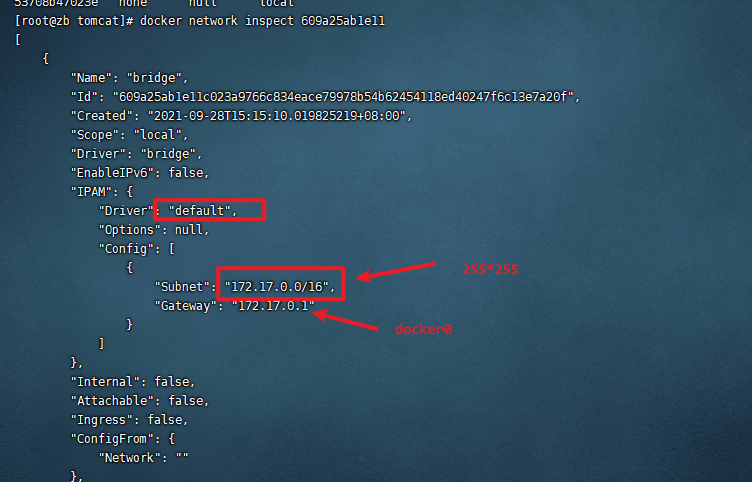
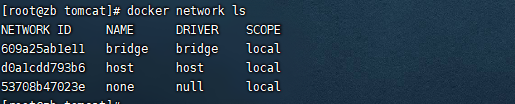
View all docker networks
Network mode
Bridge: bridge mode docker0 (by default, birdge mode is also applicable for self creation)
none: do not configure network
Host: share network with host
Container: container network connectivity (less used)
test
# The command we started directly -- net bridge, this is our docker0
docker run -d -P --name tomcat01 mytomcat
docker run -d -P --name tomcat01 --net bridge mytomcat

# docker0 features: the default domain name cannot be accessed, - link can open the connection
# Customize a network
# --driver bridge
# --subnet 192.168.0.0/16 192.168.0.2 192.168.255.255
# --gateway 192.168.0.1
[root@zb tomcat]# docker network create --driver bridge --subnet 192.168.0.0/16 --gateway 192.168.0.1 mynet
84219c18de814d86d92b12f51a3c5df4786ee92531c7c26f0516574c8e002648
[root@zb tomcat]# docker network ls
NETWORK ID     NAME      DRIVER    SCOPE
609a25ab1e11   bridge    bridge    local
d0a1cdd793b6   host      host      local
84219c18de81   mynet     bridge    local
Your own network will be created

[root@zb tomcat]# docker network inspect mynet
[
    {
        "Name": "mynet",
        "Id": "84219c18de814d86d92b12f51a3c5df4786ee92531c7c26f0516574c8e002648",
        "Created": "2021-10-01T19:49:51.739326047+08:00",
        "Scope": "local",
        "Driver": "bridge",
        "EnableIPv6": false,
        "IPAM": {
            "Driver": "default",
            "Options": {},
            "Config": [
                {
                    "Subnet": "192.168.0.0/16",
                    "Gateway": "192.168.0.1"
                }
            ]
        },
        "Internal": false,
        "Attachable": false,
        "Ingress": false,
        "ConfigFrom": {
            "Network": ""
        },
        "ConfigOnly": false,
        "Containers": {
            "88451c50139b7134879879aba1c29fc10c52b5aaa2828bc8050591375e9a7a17": {
                "Name": "tomcat_net_02",
                "EndpointID": "5ef468aca35753f6ed899e817adbe1ccd6cc1376224208028f77585ef2ec09aa",
                "MacAddress": "02:42:c0:a8:00:03",
                "IPv4Address": "192.168.0.3/16",
                "IPv6Address": ""
            },
            "9caf86f431f3fa336f5da303c4c6d2ae48d579b779457f8b282d1d5abbaa459b": {
                "Name": "tomcat_net_01",
                "EndpointID": "8b55ac78dd05ee2832932a3fe512985c33545c665016d12db102bace6ac6f964",
                "MacAddress": "02:42:c0:a8:00:02",
                "IPv4Address": "192.168.0.2/16",
                "IPv6Address": ""
            }
        },
        "Options": {},
        "Labels": {}

# Test the ping link again
[root@zb tomcat]# docker exec -it tomcat_net_01 ping 192.168.0.3
PING 192.168.0.3 (192.168.0.3) 56(84) bytes of data.
64 bytes from 192.168.0.3: icmp_seq=1 ttl=64 time=0.107 ms
64 bytes from 192.168.0.3: icmp_seq=2 ttl=64 time=0.072 ms
--- 192.168.0.3 ping statistics ---
2 packets transmitted, 2 received, 0% packet loss, time 1041ms
rtt min/avg/max/mdev = 0.072/0.089/0.107/0.019 ms

# You can ping the name without -- link now
[root@zb tomcat]# docker exec -it tomcat_net_01 ping tomcat_net_02
PING tomcat_net_02 (192.168.0.3) 56(84) bytes of data.
64 bytes from tomcat_net_02.mynet (192.168.0.3): icmp_seq=1 ttl=64 time=0.050 ms
64 bytes from tomcat_net_02.mynet (192.168.0.3): icmp_seq=2 ttl=64 time=0.059 ms
64 bytes from tomcat_net_02.mynet (192.168.0.3): icmp_seq=3 ttl=64 time=0.064 ms
--- tomcat_net_02 ping statistics ---
3 packets transmitted, 3 received, 0% packet loss, time 2037ms
rtt min/avg/max/mdev = 0.050/0.057/0.064/0.010 ms
The customized network docker has helped us maintain the team correspondence. It is recommended to use the network in this way
Benefits:
redis - different clusters use different networks to ensure that the cluster is safe and healthy
mysql - different clusters use different networks to ensure that the cluster is safe and healthy
Network connectivity

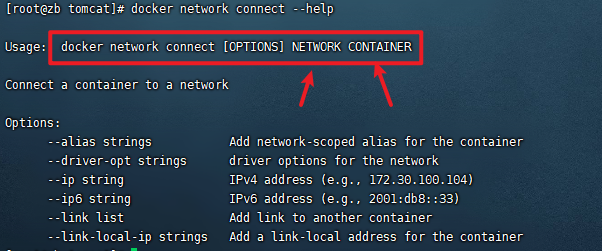
# Test and get through tomcat01 - mynet
[root@zb tomcat]# docker network connect mynet tomcat01

# After connecting, tomcat01 is put under the mynet network
# One container two ip addresses
# It is similar to Alibaba cloud, a public network and a private network
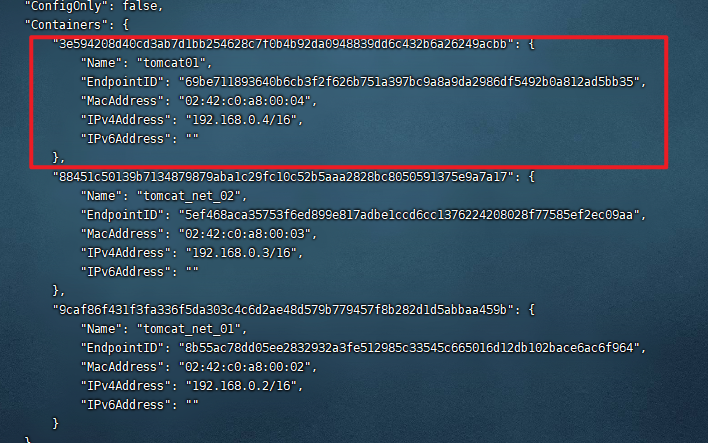
# 01 link ok
[root@zb tomcat]# docker exec -it tomcat01 ping tomcat_net_01
PING tomcat_net_01 (192.168.0.2) 56(84) bytes of data.
64 bytes from tomcat_net_01.mynet (192.168.0.2): icmp_seq=1 ttl=64 time=0.069 ms
64 bytes from tomcat_net_01.mynet (192.168.0.2): icmp_seq=2 ttl=64 time=0.052 ms

# 02 still can't get through
[root@zb tomcat]# docker exec -it tomcat02 ping tomcat_net_01
ping: tomcat_net_01: Name or service not known
Conclusion: if you want to operate others across the network, you need to use docker net connect to connect
task
Docker installation Nginx
# 1. Search for images
[root@zb home]# docker search nginx
# 2. Download Image
[root@zb home]# docker pull nginx
# 3. Operation test
[root@zb home]# docker run -d --name nginx01 -p 3389:80 nginx
[root@zb home]# curl localhost:3389
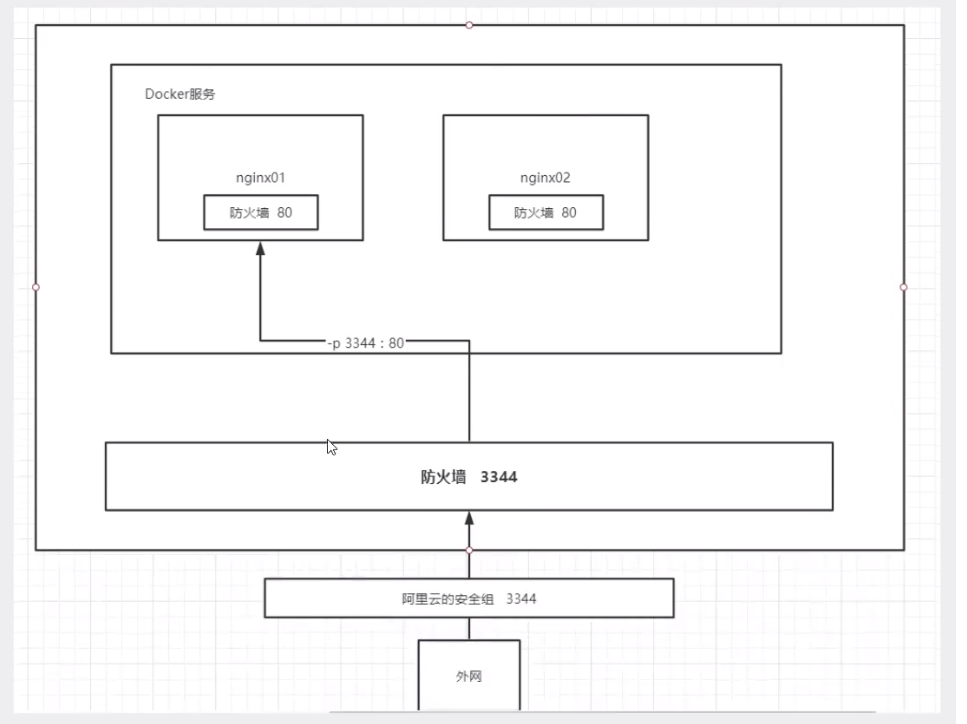
Concept of port exposure
Docker installation tomacat
# Official use
docker run -it --rm tomcat:9.0

# Before starting, the container was started in the background. After stopping the container, the container can still access it
# docker run -it --rm, which is generally used for testing and deletion when used up

# Download started at
docker pull tomcat:9.0

# Start operation
docker run -d -p 3355:8080 --name tomcat01 tomcat

# There is no problem with the test access


# Enter container
[root@zb home]# docker exec -it tomcat01 /bin/bash

# Problems found: 1. Lack of Linux commands 2. No webapps
# Reason: the reason for alicloud image is the minimum image by default, and all unnecessary images are eliminated
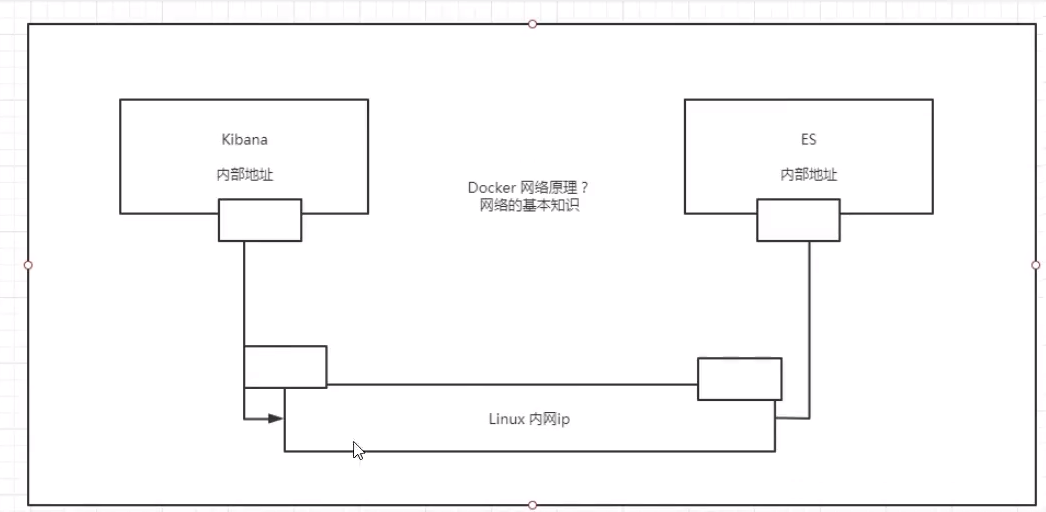
Deploy es + kibana
# es exposes many ports
# It's very memory intensive
# The data of es generally needs to be placed in the security directory and mounted

# Start elasticsearch
docker run -d --name elasticsearch -p 9200:9200 -p 9300:9300 -e "discovery.type=single-node" elasticsearch:7.6.2

# Start linux is too laggy docker stats to see cpu's status.

# Increase the memory limit and modify the configuration file -e environment configuration
docker run -d --name elasticsearch02 -p 9200:9200 -p 9300:9300 -e "discovery.type=single-node" -e ES_JAVA_OPTS="-Xms64m -Xmx512m" elasticsearch:7.6.2
Use kinana to connect es? Think about the network if you can connect to the past