Step 1: Check the JDK
View the JDK version and type: java-version on the command line
[root@test ~]# java -version
bash: java: command not found
As above, prove that your linux is very clean, go directly to Step 2 Or the following
[root@test ~]# java -version
openjdk version "1.8.0_102"
OpenJDK Runtime Environment (build 1.8.0_102-b14)
OpenJDK 64-Bit Server VM (build 25.102-b14, mixed mode)
Linux usually comes with OpenJDK. Congratulations if you know that OpenJDK is what you need.You can turn off this article directly ~If you are not sure, please tell the difference between Baidu Oracle JDK and OpenJDK Suspect the trouble, please follow the cannon man directly to install Oracle JDK (also known as Sun JDK, which was acquired by Oracle) which is the most commonly used JDK in our sense.
Remove OpenJDK and type rpm-qa|grep Java on the command line
[root@test ~]# rpm -qa|grep java
tzdata-java-2016g-2.el7.noarch
java-1.7.0-openjdk-headless-1.7.0.111-2.6.7.8.el7.x86_64
python-javapackages-3.4.1-11.el7.noarch
java-1.8.0-openjdk-headless-1.8.0.102-4.b14.el7.x86_64
java-1.8.0-openjdk-1.8.0.102-4.b14.el7.x86_64
javapackages-tools-3.4.1-11.el7.noarch
java-1.7.0-openjdk-1.7.0.111-2.6.7.8.el7.x86_64
Delete four of them, and the remaining three.noarch files can be deleted or not deleted. The complete command is as follows:
rpm -e --nodeps java-1.7.0-openjdk-1.7.0.111-2.6.7.8.el7.x86_64
rpm -e --nodeps java-1.8.0-openjdk-1.8.0.102-4.b14.el7.x86_64
rpm -e --nodeps java-1.8.0-openjdk-headless-1.8.0.102-4.b14.el7.x86_64
rpm -e --nodeps java-1.7.0-openjdk-headless-1.7.0.111-2.6.7.8.el7.x86_64
Check if the uninstallation is clean and enter the first command: java-version
[root@test ~]# java -version
bash: java: command not found
As above, uninstallation is complete
Step 2 Download and Unzip Oracle JDK
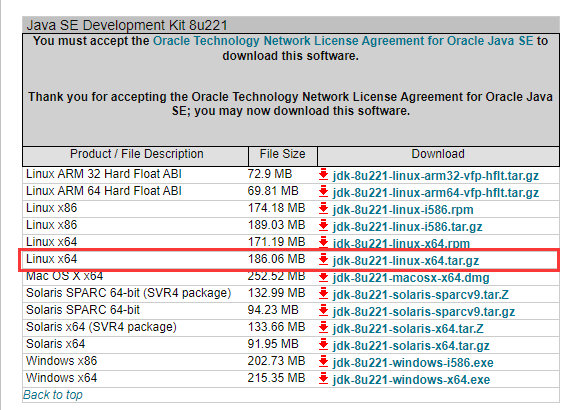
Download the address and download the version you want.Select tar.gz format
Recommended choice: jdk-8u221-linux-x64.tar.gz

Create a directory on linux to store the JDK. The path I put here is/usr/java
cd /usr
mkdir java
Upload the downloaded installation package to the directory you just created using ftp tools such as WinScp, SecureFXPortable, and so on

Unzip installation package: tar-zxvf file name
[root@test]# tar -zxvf jdk-8u201-linux-x64.tar.gz
Enter command when finished:ll
[root@izwz9e6s12kjmx8er6bvevz download]# ll
total 189244
drwxr-xr-x 7   10  143      4096 Dec 16  2018 jdk1.8.0_201
-rw-r--r-- 1 root root 191817140 Jan 31  2019 jdk-8u201-linux-x64.tar.gz
Unzip complete, by this time the entire process has been completed 90%
Finally, configure JDK environment variables
Edit profile:
vi /etc/profile
Add this section at the end (press o to turn on editable mode, paste this section on, hold shift+: last enter wq after esc!JAVA_HOME is the path to the unzipped file of the installation package:
#java path config
export JAVA_HOME=/usr/java/jdk1.8.0_201
export CLASSPATH=.:${JAVA_HOME}/jre/lib/rt.jar:${JAVA_HOME}/lib/dt.jar:${JAVA_HOME}/lib/tools.jar
export PATH=$PATH:${JAVA_HOME}/bin
After saving, the configuration you just added does not take effect immediately. You need to enter the following command to make it work:
source /etc/profile
At this point the configuration is in effect, and finally the java-version is used to check:

Here, we're done with great success.
- Copyright Statement: This is an original blogger article, which follows the CC 4.0 BY-SA copyright agreement. Please attach a link to the original source and this statement for reproduction.
- Everything is still in time, down to earth.Cannon buddy with you, grow together, and eventually become a bull.Focus on the Subscription Number of Cannon: Cai Cannon