Some common summaries of HTML 5 and CSS
The front-end (usually refers to the web page that users can see) is usually composed of three parts:
1.html: it is also the basic framework structure of the front-end web page, which is similar to the skeleton
2.CSS: also known as cascading style sheet, it exists to beautify the interface
3.Javascript: make the page have dynamic effects (including an interaction with the user)
I & II. Html
HTML (HyperText Markup Language) is a brick by brick of the Web world. It is a markup language used to tell browsers how to organize pages.
The so-called Hypertext hypertext refers to the link connecting web pages between single or multiple websites. We can access the content on the Internet through links.
The so-called Markup is used to indicate text, pictures and other contents for easy display in the browser, such as < head >, < body >, etc.
- Brief history of HTML development [understand]
- HTML 1.0 was released as a working draft of the Internet Engineering Task Force (IETF) in June 1993 (not a standard)
- HTML 2.0 - released as RFC 1866 in November 1995, was declared obsolete after RFC 2854 was released in June 2000
- HTML 3.2 - January 14, 1997, W3C recommendations
- HTML 4.0 - December 18, 1997, W3C recommendations
- HTML 4.01 (minor improvements) - December 24, 1999, W3C recommendation
- HTML5 - on October 29, 2014, the World Wide Web Alliance announced that after nearly eight years of hard work, the standard specification was finally formulated. It is the most popular version at present and provides many new tag features. Most modern browsers already have HTML5 support.
1.1.2 composition of HTML
An HTML page consists of a series of elements( elements )Components, and elements are created using labels.
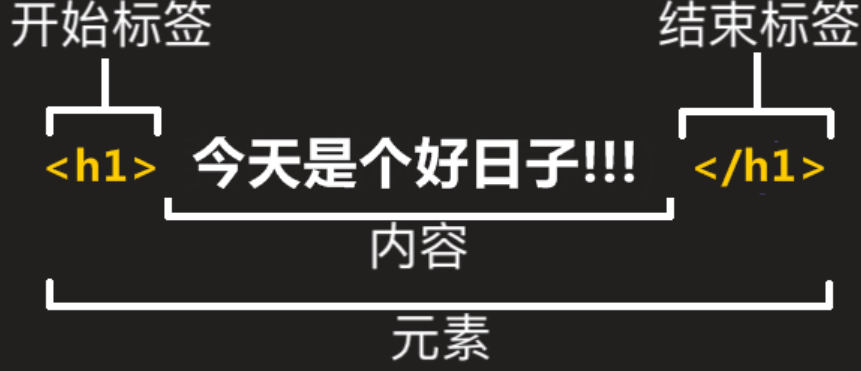
1) Label
A pair of labels( tags )You can set a text style, add a picture or add a hyperlink, and so on. For example:
<h1>Today is a good day</h1>
In HTML, the < H1 > tag represents the title, so we can use the start tag and end tag to surround the text content, so that the content is displayed in the form of title.
2) Attributes
HTML tags can have attribute . Property provides more information about HTML elements. We can only add attributes to the start tag. It usually appears in the form of name = value pairs, for example: name = 'value'. For example:
<h1 align="center">Today is a good day!!!</h1>
In HTML tags, the align attribute indicates the horizontal alignment, and we can assign a value of center to indicate the center.
Attribute can also be regarded as one of the original ways of modifying the interface of html

1.2 HTML interface structure
-
<! DOCTYPE HTML >: declares the document type. Specifies the good rules that HTML pages must follow. After HTML5, <! DOCTYPE HTML > is the shortest valid document declaration.
-
<html>: this tag wraps the entire page and is a root element (top-level element). All other elements must be descendants of this element, and each HTML document has only one root element.
-
< head >: this tag is a container that contains all the content you want to include in the HTML page but do not want to display in the HTML page. These include keywords and page descriptions that you want to appear in search results, CSS styles, character set declarations, and so on. About the < head > element. At present, we mainly know two labels:
-
< meta charset = "utf-8" >: this tag is the metadata information of the page. Set the document to use utf-8 character set encoding. utf-8 character set contains most human text to avoid page scrambling.
-
< title >: this tag defines the document title, and the position appears on the browser tag rather than in the page body. When collecting a page, it can be used to describe the page.

-
-
<body>: contains the document content, all the text, pictures, audio, games, etc. displayed on the page when you visit the page. The body is also the main part of the code and the interface content you want to display
<!DOCTYPE html>
<html lang="en">
<head>
    <meta charset="UTF-8">
    <title>This is a HTML page</title>
</head>
<body>
</body>
</html>
The whole html interface consists of head and body. When learning html, the main thing to learn is the use of some tags in the body and some attributes attached to the tags.
1.3 some common labels
Composition of label:
< tag name attribute name = attribute value > text content < / tag name >
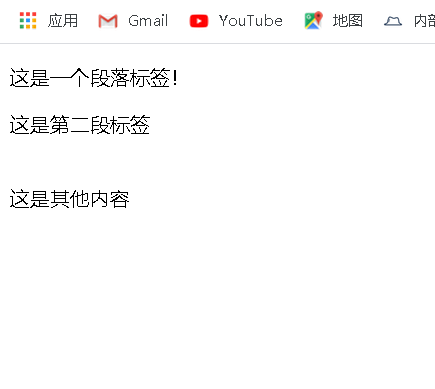
- P tag: paragraph tag, which will be empty before and after
- : annotation labels
- b label: emphasis label
<!DOCTYPE html>
<html lang="en">
<head>
    <meta charset="UTF-8">
    <title>This is a HTML page</title>
</head>
<body>
    <p>This is a paragraph label!</p>
    <p>This is the second label</p>
    <br> <!--Notes, br Represents a newline label-->
    This is something else
</body>
</html>
1.3.1 text labels
Use the text content label to set the basic style of the text.
| Tag name | effect |
|---|---|
| p | Represents a paragraph of text |
| h | Represents the document title, < H1 > – < H6 >, which presents six different levels of titles, < H1 > has the highest level and < H6 > has the lowest level |
| hr | Represents the topic conversion between paragraph level elements, which is generally displayed as a horizontal line |
| li | Represents an entry in the list. |
| ul | Represents an unordered list, which can contain multiple elements and is displayed without numbers. |
| ol | Represents a sequential table, usually rendered as a numbered list |
| em | Indicates that the text is highlighted and is generally displayed in italics |
| strong | Indicates that the text is important and is generally displayed in bold |
| font | Represents a font that can be styled (outdated) |
| i | Indicates italics |
| b | Indicates bold text |
1.3.2 label nesting:
<p><b>This is the third paragraph and the emphasis!</b></p>
As the name suggests, it is to embed another tag in one tag, which is also widely used in html
1.4 two important labels: block level and inline
-
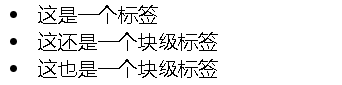
Block level elements:
Exclusive line before and after. block level elements (blocks) are displayed in the form of blocks in the page. Compared with the content in front of it, it will appear in a new line, and the subsequent content will be squeezed to the next line. For example, < p >, < HR >, < li >, < div >, etc.
<li>This is a label</li>
<li>This is also a block level label</li>
<li>This is also a block level label</li>
effect
-
Inline element
There is no need to wrap lines. In line elements usually appear in block level elements to display some text.
<span>This is an in-line</span>
<span>This is the second inline element!</span>

Two common block level and inline labels:
- Block level: div tag, a general container tag, is usually used for some settings of some personalities in text
- In line: span tag is a general line content container for phrase content and has no special semantics. It can be used to group elements to achieve a certain style. It is an inline element.
div and span tags play an important role in layout
1.5 label attributes
Attribute is an important part of html, which emphasizes the format and function of attribute
**Overview: * * tag attribute, mainly used to expand tags. Attribute contains additional information about the element that does not appear in the actual content. However, you can change some behaviors of tags or provide data. Attributes are always displayed in the format of name = value.
-
Attribute name: attribute names cannot be duplicate in the same label.
-
Case: attributes and attribute values are case insensitive. However, in the W3C standard, lowercase attributes / attribute values are recommended.
-
Quotation marks: double quotation marks are the most commonly used, but there is no problem with single quotation marks.
-
Common attributes:
| Attribute name | effect |
|---|---|
| class | Defines the element class name, which is used to select and access specific elements |
| id | Defines the unique identifier of the element, which must be unique throughout the document |
| name | Defines the element name that can be used to submit form fields to the server |
| value | Defines the default values displayed within the element |
| style | Define CSS styles that override previously set styles |
1.6 news case analysis
Effect achieved:
Basic layout analysis:
1.6.2 implementation method
div style layout
The text consists of several parts, and we can use div to divide the page into layout. Let's take a look at how to make a simple layout using Div.
In the head tag, add styles through the style tag.
Basic format:
format:
<style>
    Tag name{
        Attribute name:Attribute value;
    }
</style>
Multiple attribute name formats:
<style>
    Tag name{
        Property name 1:Attribute value 1;
        Property name 2:Attribute value 2;
        Property name 3:Attribute value 3;
    }
</style>
Multiple styles of div:
A property name can contain multiple values and set multiple styles at the same time.
Format:
<style>
    Tag name{
        Attribute name:Attribute value 1 attribute value 2 attribute value 3;
    }
</style>
tips:
For the convenience of layout, we can usually set the border style for layout. After that, remove the border to visually display the complete interface, that is, the basic skeleton of the display is usually depicted, and then slowly add content.
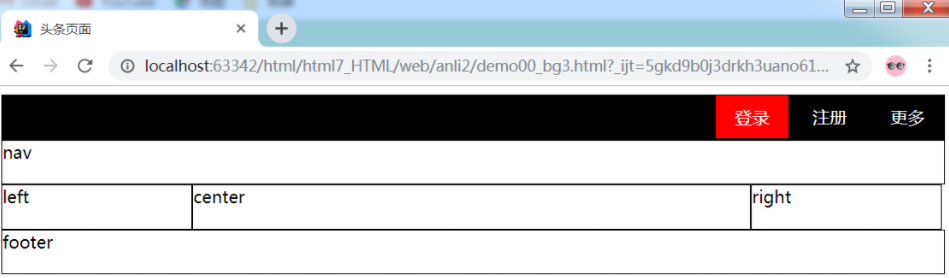
1. Call out the basic layout box first
<!doctype html>
<html lang="en">
<head>
    <meta charset="UTF-8">
    <meta name="viewport"
          content="width=device-width, user-scalable=no, initial-scale=1.0, maximum-scale=1.0, minimum-scale=1.0">
    <meta http-equiv="X-UA-Compatible" content="ie=edge">
    <title>News case list</title>
  <style>
    li{
      display: inline;        //Inline style no width or height
      display: inline-block; //Inline style with width and height
    }
    div{
      border: 1px solid blue;
    }
  </style>
</head>
<body>
  <div>left</div>
  <div>center</div>
  <div>right</div>
</body>
</html>

It is found that the styles set through div are consistent and cannot be personalized. How to distinguish different div?
Use the value of class, format:
.class value{
    Attribute name:Attribute value;
}

<Tag name class="class value">
 Tips: class Is a custom value
Therefore, using the class attribute value can help us distinguish div and set the label style more accurately.
2. Floating layout and clearing
The main part is divided into three parts, but each div has a row. If you want to use the div layout, you need to add floating attributes
- definition
float: Specifies that an element can be placed along its left or right. The element using the attribute (usually placed on the left or right) allows text to flow around the attribute, and the element is removed, and some other elements are still used normally.
When the return is exceeded, the block level elements floating around them will wrap automatically. When designing the overall frame floating, the proportion of border lines should also be considered in order to successfully float.
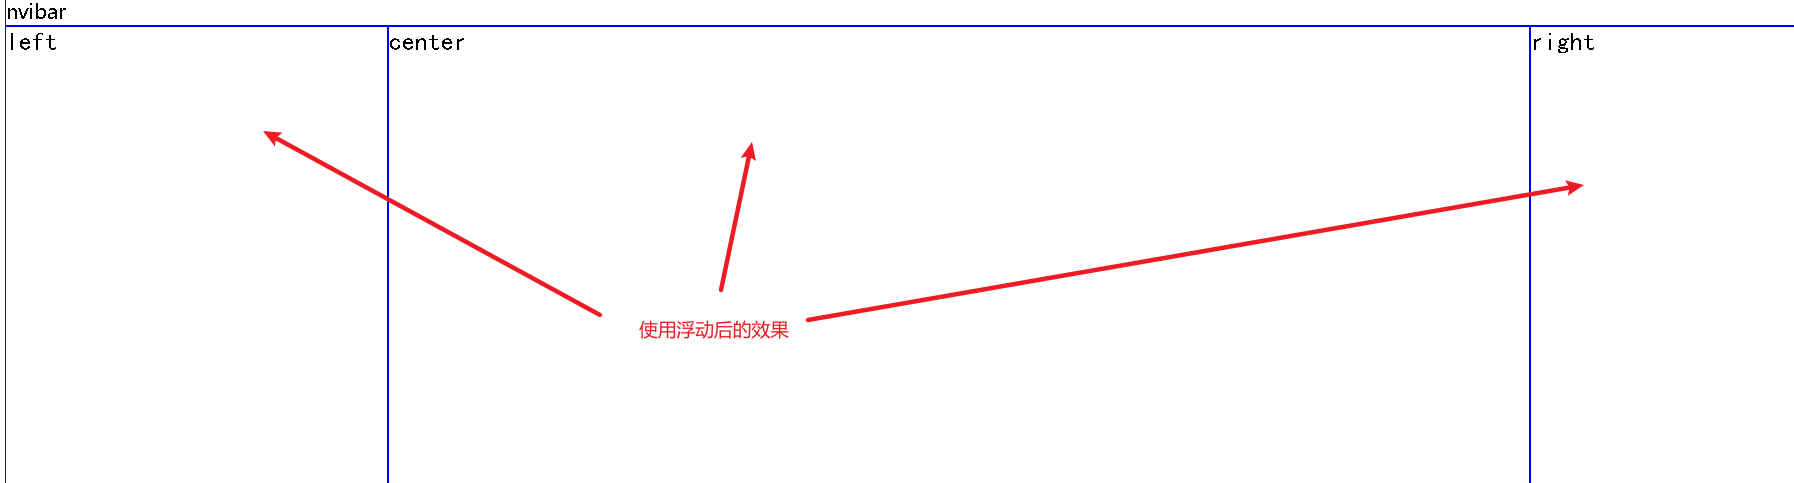
.left{
    font-family: Regular script;
    font-size: 20px;
    width: 20%;
    float: left;
    height: 600px;
}
.center{
    font-family: Regular script;
    font-size: 20px;
    width: 60%;
    float: left;
    height: 600px;
}
.right{
    font-family: Regular script;
    font-size: 20px;
    width: 19%;
    float: left;
    height: 600px;
}
Note that annotation in style requires two-way closure before and after
li{
display: inline;        /*Inline style no width or height*/
display: inline-block; /*Inline style with width and height*/
}
1.7.3 picture labels & & hyperlink labels
When using picture labels, try to choose relative paths to avoid non display problems
| Tag name | effect | remarks |
|---|---|---|
| img | Can display a picture (local or network) | src attribute, which is a required attribute, represents the address of the picture. |
Other properties:
| Attribute name | effect | remarks |
|---|---|---|
| title | Display text on mouse over. | |
| alt | Alternate text when the drawing is not displayed. | |
| height | The height of the image. | |
| width | The width of the image. |
| Tag name | effect | remarks |
|---|---|---|
| a | Represents a hyperlink. | href attribute, indicating the URL to which the hyperlink points. |
| Attribute name | effect |
|---|---|
| target | How the page is opened (_self current page _blank new tab). |
Underline
According to the layout requirements of some styles, it is more beautiful to remove the underline.
a {
    text-decoration:none;  // none means not displayed
}

<a href="demo01.html">Jump</a>

a:hover{ /*Style control when hovering the mouse*/
        color: red;
    }

<a href="demo01.html" target="_blank">Jump
    <img src="../Code_images/ad1.jpg" alt="The picture cannot be found" title="Clickable">
</a>
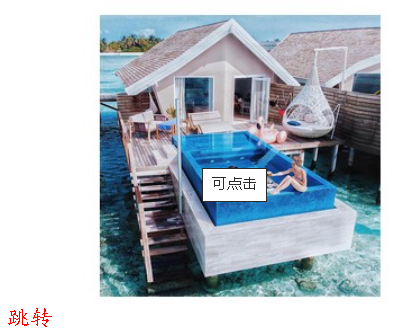
When using the src attribute of picture img tag, try to use relative path to avoid the problem of unable display. There is also the direction of the backslash (right)!
Hrthe glide line label belongs to a label inside the block level div
Concrete implementation
1.8 top realization
1.8.1 use of labels
- Use div tags to set layout, background, float, etc.
- Basic text label
- Picture label
- Hyperlink label
1.8.2 implementation steps
- Create the initial page, copy pictures and other materials.
- Overall layout.
- Implement the top bar (picture).
- Implement the navigation bar (picture).
- Realize the left sharing area (picture).
- Realize the middle body area (text + picture).
- Realize the advertising area (picture) on the right.
- Implement the bottom footer (link).
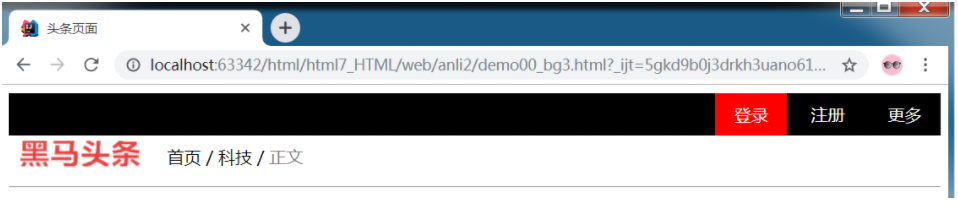
1.8.3 achieve top bar
HTML code
<div class="top_bar">
    <img src="../img/j1.png">
</div>
Style code
     img{
            width: 100%;
     }
The effects are as follows:
1.8.4 implementation of navigation bar
HTML code
<div class="nav_bar">
    <img src="../img/j2.png" width="100%">
</div>
<!-- Add split line  -->
<hr size="1"/>
Style code
      hr {
            color: lightgrey;
            size: 1px;
        }
The effects are as follows:
1.8.5 realize left sharing
HTML code
<div class="left">
    <img src="../img/j3.png" />
</div>
The effect is as follows
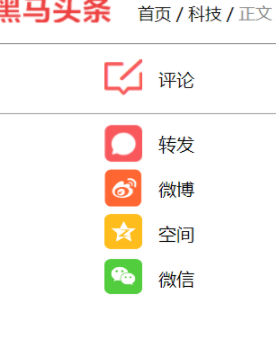
The rest is similar
<!doctype html>
<html lang="en">
<head>
<meta charset="UTF-8">
<meta name="viewport"
content="width=device-width, user-scalable=no, initial-scale=1.0, maximum-scale=1.0, minimum-scale=1.0">
<meta http-equiv="X-UA-Compatible" content="ie=edge">
<title>News case list</title>
<style>
/* div{
border: 1px solid blue;
}*/
/*Left share*/
.left{
font-family: Regular script;
font-size: 20px;
width: 20%;
float: left;
height: 600px;
}
/*Intermediate text*/
.center{
font-family: Regular script;
font-size: 20px;
width: 60%;
float: left;
/*height: 600px;*/
}
/*right banner */
.right{
font-family: Regular script;
font-size: 20px;
width: 19%;
float: left;
height: 600px;
}
.footer{
font-family: Regular script;
font-size: 20px;
/*border: blue solid 5px;*/
clear: both;/*Clear float to avoid being affected by previous elements*/
text-align: center;
background-color: cornflowerblue;
}
a{
text-decoration: none;
color: black;
}
a:hover{ /*Style control when hovering the mouse*/
color: red;
}
hr{
color: black;
size: 1px;
}
</style>
</head>
<body>
<div class="top">
<img src="../Code_images/j1.png" alt="Picture not found" width="100%">
</div>
<hr size="1">
<div class="nvibar">
<img src="../Code_images/j2.png" alt="Picture not found" width="100%" title="navigation bar">
<hr>
</div>
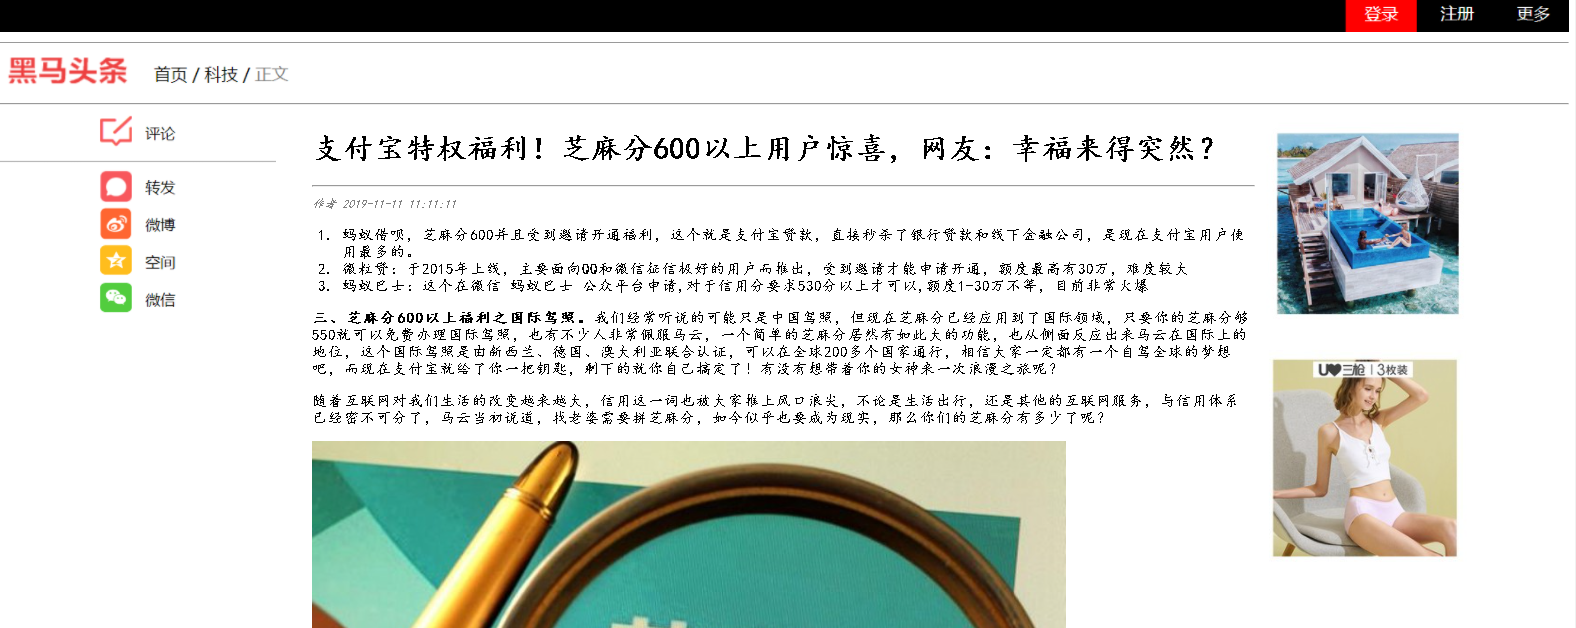
<div class="left">
<img src="../Code_images/j3.png" alt="" title="Left Navigation ">
</div>
<div class="center">
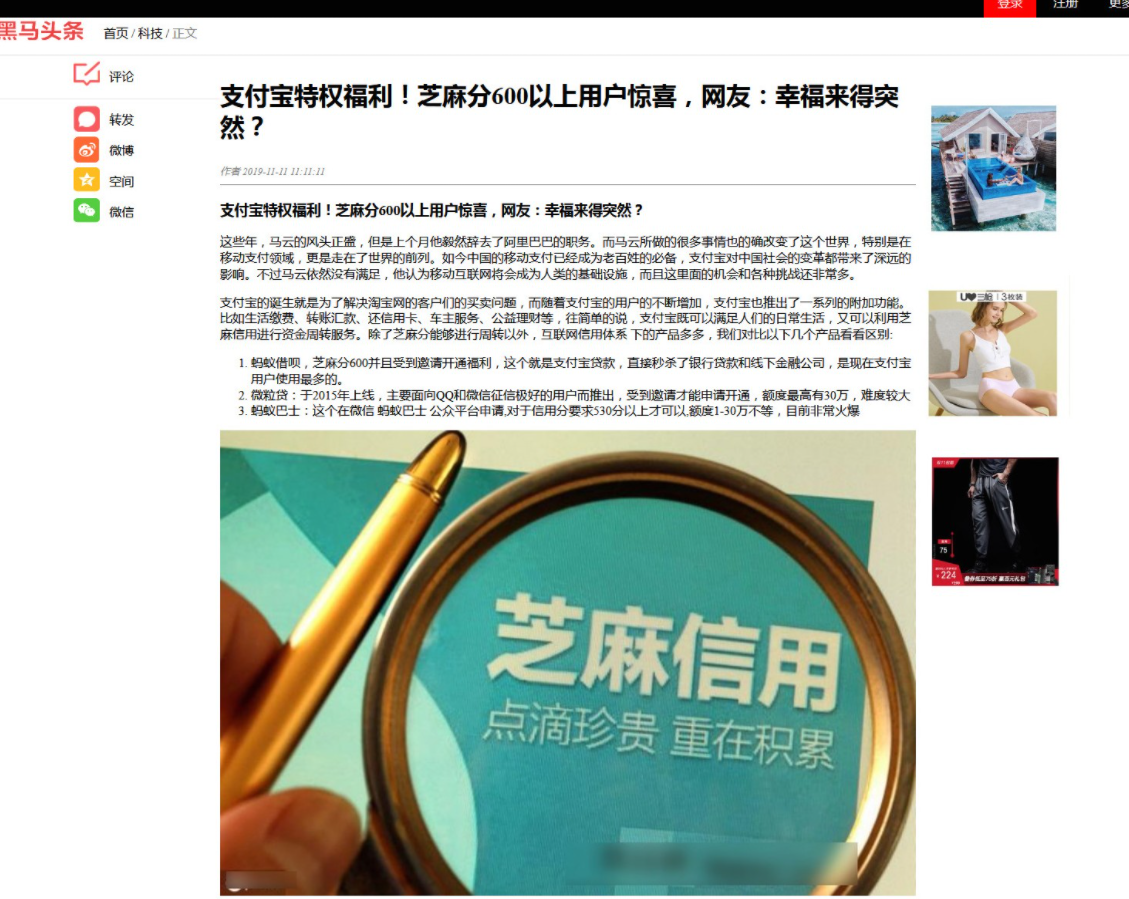
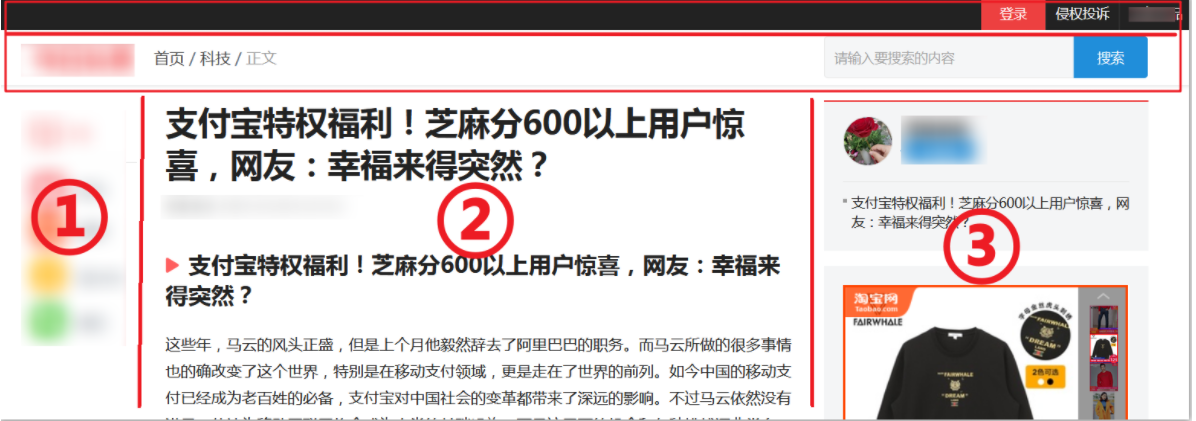
<h1>Alipay privilege benefits! Sesame points more than 600 users surprise, netizen: happiness comes suddenly?</h1>
<hr>
<div>
<font color="gray" size="3">
<em>Author 2019-11-11 11:11:11</em>
</font>
</div>
<div>
<ol>
<li>The ant is borrowed 600 yuan and is invited to open the benefits. This is Alipay loan, which directly seckill bank loans and offline financial companies. Alipay users are the most used.</li>
<li>Micro loan: launched in 2015, mainly for QQ And wechat users with excellent credit investigation. They can apply for opening only when invited. The maximum amount is 300000, which is difficult</li>
<li>Ant bus: This is applied for on the wechat ant bus public platform,The credit score is required to be more than 530 points,Quota 1-30 It's very popular at present</li>
</ol>
</div>
<p>
<strong> 3, An international driver's license with more than 600 benefits.</strong>What we often hear about may only be a Chinese driver's license, but now sesame score has been applied to the international field. As long as your sesame score is 550, you can apply for an international driver's license for free. Many people admire Ma Yun very much. A simple sesame score has such a great function, which also reflects Ma Yun's international status. This international driver's license is issued by New Zealand, Germany Australian joint certification can be used in more than 200 countries around the world. I believe you all have a dream of self driving. Now Alipay gives you a key, and the rest is your own fix. Do you want to take your goddess on a romantic trip?
</p>
<p>
As the Internet has changed our lives more and more, the word credit has also been pushed to the forefront. Whether it is life travel or other Internet services, it is inseparable from the credit system. Ma Yun said that finding a wife needs to spell sesame points. Now it seems to become a reality. How many sesame points do you have?
</p>
<img src="../Code_images/1.jpg" width="80%" alt="Sesame credit">
</div>
<div class="right">
<img src="../Code_images/ad1.jpg" alt="beauty" width="75%">
<img src="../Code_images/ad2.jpg" alt="" width="75%">
</div>
<div class="footer">
<hr>
<a href="demo01.html" target="_blank">Jump
<a href="#"> about dark horse & nbsp</a>
<a href="#"> Help Center & nbsp</ a>
<a href="#"> Open Platform & nbsp</a>
<a href="#"> looking for talents & nbsp</ a>
<a href="#"> contact us & nbsp</a>
<a href="#"> legal statement & nbsp</a>
<a href="#"> Privacy Policy & nbsp</ a>
<a href="#"> intellectual property & nbsp</a>
<a href="#">Integrity Report </a><!--#Sign means jump in place -- >
</a>
</div>
</body>
</html>

Hrthe glide line label belongs to a label inside the block level div
Conclusion: writing a front-end page is like building a house. You want to build the basic framework, and then continue to build it on the basis of the framework, and the basic framework of the web page is the layout area.
2, Form and box model
2.1 forms
The reason why the forms are listed separately is that form related data are often used in subsequent data interaction
form label
| Attribute name | effect | remarks |
|---|---|---|
| action | The URL address of the Web server that processes this form information | |
| method | How to submit this form information to the Web server | The possible values are get and post. The default value is get |
| autocomplete | Automatically complete some contents written in the previous input | HTML5 |
<form action="#" method="post" autocomplete="on">
    user name:<input type="text" name="username">
    <button type="submit" >Submit</button>
</form>
[the external chain picture transfer fails. The source station may have an anti-theft chain mechanism. It is recommended to save the picture and upload it directly (img-eccK4RDh-1631261566868)(H: \ notes \ Web stack \ III. Web project \ Day2 HTML & & CSS \ images \ case steps \ 9. Produce effect. png)]
2.2 introduction to form elements
Form elements refer to input elements, check boxes, drop-down boxes, submit buttons, and so on.
| Tag name | effect | remarks |
|---|---|---|
| **label ** | Description of the form element, used in conjunction with the form element | The for attribute value is the id attribute value of the relevant form element |
| input | Form input controls, a variety of input types, are used to accept data from users | The value of the type attribute determines the input type |
| button | The clickable buttons on the page can be submitted together with the form | The value of the type attribute determines the button type |
1) Simple text entry box
-
Label label: the description of the form.
-
Input tag: input control.
-
Type attribute: indicates the input type, and the text value is a normal text box
-
Text: normal text
-
Password: password box
-
email: mailbox box ending with @
[the external chain picture transfer fails. The source station may have an anti-theft chain mechanism. It is recommended to save the picture and upload it directly (img-1FJlIIMI-1631261566868)(H: \ notes \ Web stack \ III. Web project \ Day2 HTML & & CSS \ images \ case steps \ 10. Mailbox effect. png)]
-
Radio: radio box
-
checkbox: check box
-
New type value in HTML5
Attribute value effect remarks date HTML5 controls for entering dates Year, month, day, excluding time time HTML5 control for entering time Time zone not included datetime-local HTML5 control for entering date and time Time zone not included number HTML5 controls for entering floating point numbers range HTML5 controls for entering imprecise values max - specified maximum
min - specified minimum value
Step - specifies the step value
Value - specifies the default valuesearch HTML5 is a single line text field for entering search strings You can click x to clear the content tel HTML5 controls for entering phone numbers url HTML5 fields for editing URL s You can verify the URL address format
-
-
id attribute: indicates the unique identifier of the label
-
Name attribute: indicates the label name
-
Value attribute: indicates the tag data value
-
placeholder: default prompt
-
Required: required if this attribute is added
-
Code implementation:
<label for="username">user name:</label>
: <input type="text" name="username" id="username">
<button type="submit" >Submit</button>
The label is used to describe the element. It does not have much practical effect, and it should correspond to the subsequent input tag id.
HTML5 new attributes
| Attribute name | effect | remarks |
|---|---|---|
| placeholder | The role of the prompt user input box. Placeholder text for prompts cannot contain carriage returns or line breaks. | Only applicable when the type attribute is text, search, tel, url or email; otherwise, it will be ignored. |
| required | This attribute specifies that the user must fill in the value for the element before submitting the form | 1. Boolean attribute. The attribute value can be omitted to indicate true 2. Cannot be used when the type attribute is hidden,image or button type |
| autocomplete | Auto completion specifies whether the form or input field should be completed automatically. When auto completion is enabled, the browser will automatically fill in the value based on the user's previous input value. | 1. On is on and off is off 2. You can set the specified field to off and turn off automatic completion |
2.3 more form elements
| Tag name | effect | remarks |
|---|---|---|
| select | Form control, drop-down options menu | Practical with option |
| optgroup | Group label for option | Practical with option |
| option | The sub tag of select represents an option | |
| textarea | Represents a multiline plain text editing control | rows indicates row height and cols indicates column width |
| fieldset | It is used to group the control elements in the form (also including the label element) | |
| legend | The title used to represent its fieldset content. | Child elements of fieldset |
fieldset+legend effect
<fieldset>
    <legend>Sex selection</legend>
<input type="radio" value="man" name="Sex">male
<input type="radio" value="woman" name="Sex">female
    <select name="choice" id="2">
        <option value="Chongqing">Chongqing</option>
        <option value="Beijing">Beijing</option>
        <option value="Shanghai">Shanghai</option>
    </select>
<button type="submit" >Submit</button>
</fieldset>

textarea effect: col (row) is approximately equivalent to width, and row (row) is approximately equivalent to height (column width and row height)
<div>
  <label for="Desc">Personality statement: </label>
  <textarea name="Desc_self" id="Desc" cols="30" rows="5" placeholder="Write down your personal signature"></textarea>
</div>
Summary: the overall summary of html tags is to use more. If you use more, you will be familiar.
2, CSS
Overview: CSS is also called cascading style sheet. Its function is to make html beautiful, which can be regarded as a kind of beauty for html.
1. Basic composition of CSS
Basic composition of Css: selector + declaration
selector{
	Attribute name:Attribute value;
	Property name 2:Attribute value 2;
}
The previous html pages have been used routinely, so I won't go into too much detail here.
2. Usage
2.1 inline style
- Inside the label (not recommended)
- Inline in head
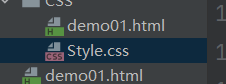
2.2 outreach style
Define a separate ". css" file outside, and then specify the path in the head tag through the link tag to connect and apply.
<head>
    <meta charset="UTF-8">
    <title>Css Basic teaching</title>
  <style>
    h3{
      background-color:orange;
    }
  </style>
  <link rel="stylesheet" href="Style.css">
</head>
<body>
    <h1 style="color: blue; font-family: Regular script; background-color: yellow; border: 1px solid black;">
      Label inline
    </h1>
    <textarea name="u2" id="u2" cols="20" rows="5">
      This is an outreach style!
    </textarea>
    <h3>
      This is an inline style.
    </h3>
    </body>
2.3 selector (!!!)
Function overview: select the specified elements in html for modification, and the purpose of learning selector is to better select the elements you want to modify, and then tell the browser which elements you choose.
Classification of selectors:
| classification | name | Symbol | effect | Example |
|---|---|---|---|---|
| Basic selector | element selector | Tag name | Matching elements based on tag names | div{ } |
| Use more | Class selector | . | Matching elements based on class attribute values | .center{ } |
| ID Selector | # | Matching elements based on id attribute values | #username{ } | |
| attribute selectors | attribute selectors | [] | Match elements based on an attribute | [type]{ } |
| Pseudo class selector | Pseudo class selector | : | Used to add special effects to some selectors, usually for dynamic effect display | a : hover{ } |
| Combination selector | Descendant Selectors | Space | Use the space symbol to combine the two selectors to match all descendant elements of the second selector based on the first selector | .top li{ } |
| Child selector | > | Use > to combine two selectors and match the direct child elements of the second selector based on the first selector | .top > li{ } | |
| Sibling selector | ~ | Use ~ to combine two selectors and match all sibling elements of the second selector based on the first selector | .l1 ~ li{ } | |
| sibling selector | + | Use + to combine two selectors and match the adjacent sibling elements of the second selector based on the first selector | .l1 + li{ } | |
| universal selector | * | Match everything in the document | *{ } |
1) Element selector
Page elements:
<div>
  <ul>
    <li>List item 1</li>
    <li>List item 2</li>
    <li>List item 3</li>
  </ul>
  <ol>
    <li>List item 1</li>
    <li>List item 2</li>
    <li>List item 3</li>
  </ol>
</div>
Selector:
Select all li label,The background turns blue
li{
    background-color: aqua;
}
2) Class selector
Page elements:
<div>
    <ul>
        <li class="ulist l1">List item 1</li>
        <li class="l2">List item 2</li>
        <li class="l3">List item 3</li>
    </ul>
    <ol>
        <!--class Is two values-->
        <li class="olist l1">List item 1</li>
        <li class="olist l2">List item 2</li>
        <li class="olist l3">List item 3</li>
    </ol>
</div>
Selector:
choice class The attribute value is l2 of,The background turns blue
.l2{
    background-color: aqua;
}
choice class The attribute value is olist l2 of,The font is white
.olist.l2{
   color: wheat;
}
3) ID selector
Page elements:
<div>
    <ul>
        <li class="l1" id="one">List item 1</li>
        <li class="l2" id="two">List item 2</li>
        <li class="l3" id="three">List item 3</li>
    </ul>
    <ol>
        <li class="l1" id="four">List item 1</li>
        <li class="l2" id="five">List item 2</li>
        <li class="l3" id="six">List item 3</li>
    </ol>
</div>
Selector:
#tow{
    background-color: aqua;
}
The effect is shown in the figure:
4) Universal selector
Page elements:
<div>
    <ul>
        <li class="l1" id="one">List item 1</li>
        <li class="l2" id="two">List item 2</li>
        <li class="l3" id="three">List item 3</li>
    </ul>
    <ol>
        <li class="l1" id="four">List item 1</li>
        <li class="l2" id="five">List item 2</li>
        <li class="l3" id="six">List item 3</li>
    </ol>
</div>
Selector:
All labels
*{
    background-color: aqua;
}
2.2.2 attribute selector
Page elements:
   <ul class="l1">
        <li  >List item 1</li>
        <li  >List item 2</li>
        <li  >List item 3</li>
    </ul>
    <ul class="l2">
        <li  id="four">List item 1</li>
        <li  id="five">List item 2</li>
        <li  id="six">List item 3</li>
    </ul>

    <p class="">
        p item
    </p>
Selector and renderings, example 1
[Attribute name]{ }
Selector and renderings, example 2
Tag name[Attribute name]{ }
Selector and renderings, example 3
Tag name[Attribute name='Attribute value']{ }
2.2.3 pseudo class selector
Pseudo class selector refers to the effect to be displayed when the element is in a specific effect. For example, the effect to be displayed when some elements are hovered by the mouse.
Format:
Tag name:Pseudo class name{}
Order of pseudo classes:
1.link
2.visited: refers to the currently accessed interface.
3.hover
4.active: the reaction of this element in the original interface after clicking the new interface
Generally in this order, otherwise it may fail
HTML code:
CSS code:
/* Select the a tag, the class value is red, and set the red link after access*/
a.red:visited {
    color: red;
}
2.2.4 combined selector
Page elements:
<div>
    <ul class="l1">
        <li>List item 1</li>
        <li>List item 2</li>
        <li>List item 3</li>
        <ul class="l2">
            <li id="four">List item 1</li>
            <li id="five">List item 2</li>
            <li id="six">List item 3</li>
        </ul>
    </ul>
</div>
1) Descendant selector
Selector:
.l1 li{
    background-color: aqua;
}
2) Child selector
Selector:
.l1 > li{
    background-color: aqua;
}
3) Sibling selector
Selector:
.l1 ~ li{
    background-color: aqua;
}
4) Adjacent selector
Selector:
.l1 + li{
    background-color: aqua;
}
2.4 summary
- There are three ways to introduce CSS. It is recommended to use external style sheets.
- Annotations are similar to java multiline annotations.
- Selectors are an important part of CSS:
- Basic selector: you can select elements by element, class and id.
- Attribute selector: you can select elements by attribute values
- Pseudo class selector: you can specify some state of an element, such as a link
- Combination selector: you can combine basic selectors to more finely divide how to select
3. Table
Data consisting of rows and columns is called a table.
In the actual design, when the table label is embedded in the block, the width attribute should be adjusted to 100% as much as possible, which can avoid many problems.
2) Table label
| Tag name | effect | remarks |
|---|---|---|
| table | Represents a table, which is a two-dimensional table of rows and columns of data cells | Container, default no style |
| tr | table row, which represents the row of the cell in the table | |
| td | table data, which represents a cell in the table | |
| th | table header, the header of a table cell. Usually, the font style is bold and centered |
Usually tr and td can be used together to produce table styles, otherwise they can't
<table border="1px solid black;">
        <tr>
            <th rowspan="3">Group</th>
            <th>FirstName</th>
            <th>LastName</th>
        </tr>
        <tr>
            <td>Jack</td>
            <td>Joc</td>
        </tr>
        <tr>
            <td>Mike</td>
            <td>Chen</td>
        </tr>
    </table>
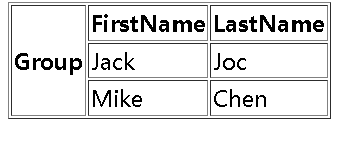
It should be noted that cross row and cross column operations, that is, colspan and rowspan are generally used when setting th.
4. Box model
The box model only works for block level elements. Non block level elements such as img need to be converted to block level when using box model related attributes.
display:block
.top > img{
    display: block;
    margin: 0px auto;
    border: 1px solid red;
  }
Box model is a layout method of elements, which is composed of inner margin + outer margin + element + border
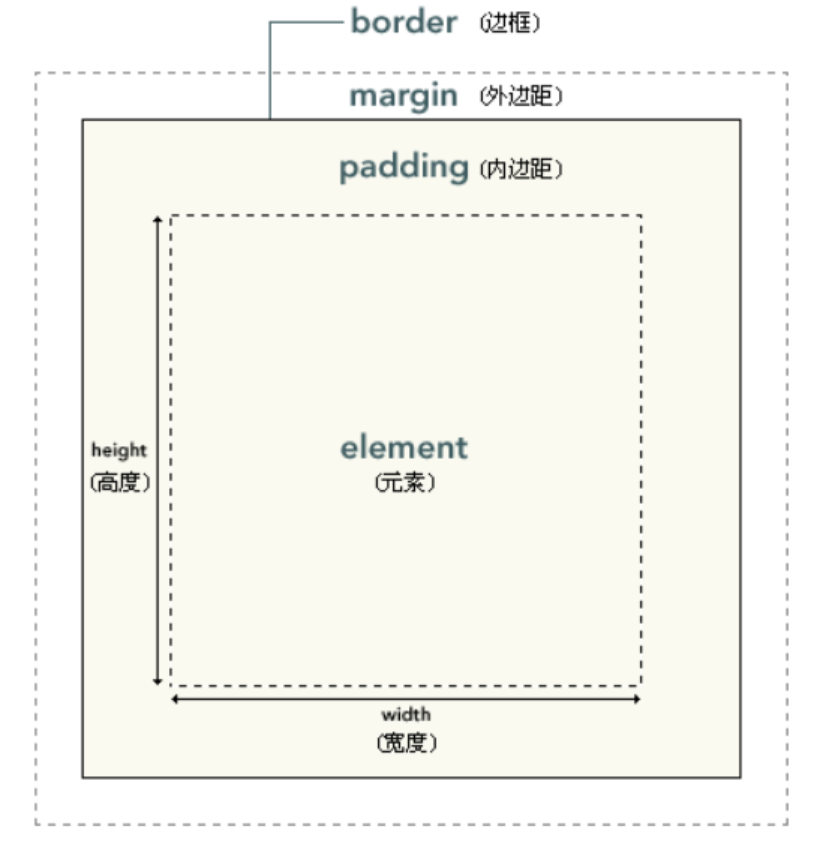
- element : Element.
- padding : The inner margin is also translated into padding.
- border : frame.
- margin : Outer margin, there are also data to translate it into blank or blank edge.
When setting margins, the usual direction is top right bottom left
Margin
Set the outer margin of the frame separately, and set the up, right, down and left directions:
margin-top
margin-right
margin-bottom
margin-left
Value meaning:
-
When a value
/*  All 4 outer margins are 10px */
margin:10px;
-
Two values
/* The top and bottom margins are 10px
 The right and left margins are 5px */

margin:10px 5px;

margin:10px auto;
auto The browser automatically calculates the outer margin, which has a centering effect.
-
Three values
/* The top outer margin is 10px
 The right and left margins are 5px
 The bottom outer margin is 15px*/

margin:10px 5px 15px;
-
Four values
/*The top outer margin is 10px
 The right outer margin is 5px
 The bottom outer margin is 15px
 The left outer margin is 20px*/

margin:10px 5px 15px 20px;
padding
Similar to the outer margin, set the inner margin of the frame separately, and set the up, right, bottom and left directions:
padding-top
padding-right
padding-bottom
padding-left