1, HTML5 document structure
in order to better understand and understand HTML5 web pages, a simple and standard HTML5 document structure code is given below.
<!DOCTYPE html>
<html>
<head>
    <meta charset="utf-8" />
    <title>hello</title>
</head>
<body>
</body>
</html>
<html>Element is the root element of the HTML page
The < head > element contains the meta data and title of the document
The < title > element describes the title of the document. When the page is opened in the browser, the identification of the page at the top
<body>The body of the document and all content, such as text, hyperlinks, images, tables and lists, are included in the label.
head: generally used to store css style js code.
utf-8: a character encoding with the best compatibility at present. It can support multiple languages and is not prone to garbled code.
Case: create a new text document named index.txt, and enter the code shown below.
<!DOCTYPE html>
<html>
<head>
<meta charset="utf-8">
<title>My first page</title>
</head>
<body>
<h1>This is my first web page</h1>
<h2>There are two things that bother the programmer most</h2>
<p>The first thing is that others ask him to document his code,</p>
<p>What about the second one? It's someone else's program that doesn't leave a document.</p>
</body>
</html>
then save as, modify the character encoding to UTF-8, change the suffix of the text document to html, and open it with a browser. This is the first web page.
2, HTML5 common elements
HTML5 can be divided into: foundation, format, form, frame, image, audio / video, link, list, table, style / section, meta information and programming according to function. The specific description is as follows. Because there are few commonly used elements, we divide them into basic format elements, form elements, frame graphic link list elements and table block section meta information elements.
the essence of HTML is a text file. The basic way to operate a text file is Notepad. In actual development, we will not use Notepad, but idea or HBuilderX, as a development tool, is also very outstanding in developing HTML.
use idea to create an enterprise web application and configure the browser.
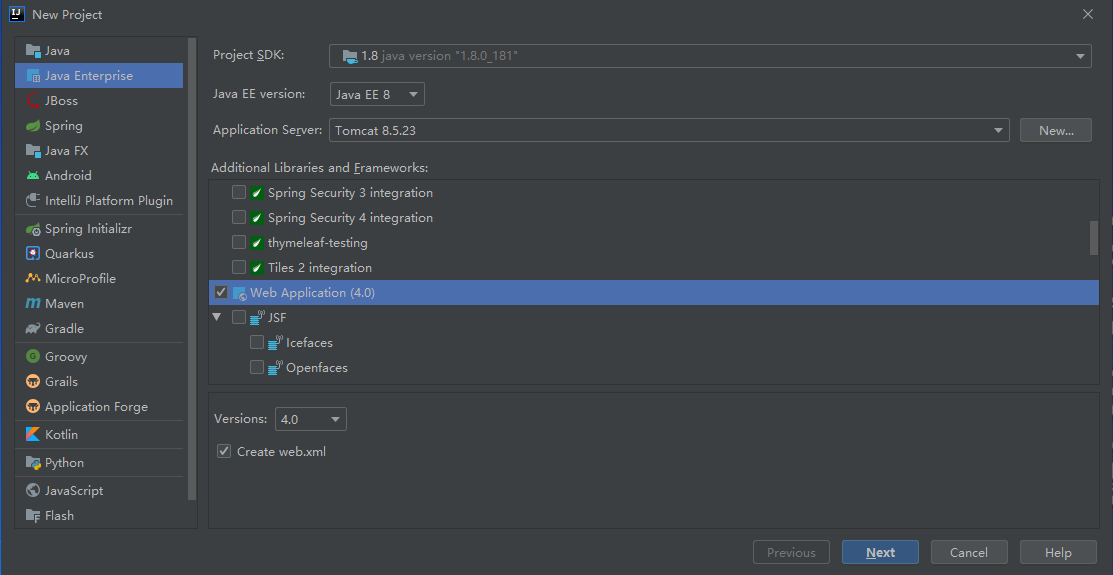
the HTML page of web application is generally stored in the web folder. Create an HTML file of index below and enter the following test stage.
3, Basic format element
including basic and format elements, common ones have been marked out.
<h1>to<h6>    definition HTML title
<p>           Define paragraph
<br>          Define simple line breaks
<hr>          Define horizontal lines
<!--...-->    Define comments
<acronym>     Define initials only
<abbr>        Definition abbreviation
<address>     Define documentation:Contact information of the owner or owner
<b>           Define bold text
<bdi>         Defines the text direction of the text so that it is separated from the direction setting of the surrounding text
<bdo>         Define text orientation
<big>         Define large text
<blockquote>  Define long references
<cite>        Define reference(citation)
<code>        Define computer code text
<del>         Define deleted text
<dfn>         Define project
<em>          Define accent text
<font>        Defines the font, size, and color of the text
<i>           Define italics
<ins>         Define inserted text
<kbd>         Define keyboard text
<mark>        Define marked text
<meter>       Define metrics within a predefined range
<pre>         Define pre formatted text
<progress>    Define the progress of any type of task
<q>           Define short references
<rp>          Definition if browser does not support ruby Element display
<rt>          definition ruby Interpretation of notes
<ruby>        definition ruby notes
<samp>        Define computer code samples
<small>       Defines small text
<strong>      Define accent text
<sup>         Define superscript text
<sub>         Define subscript text
<time>        Define date/time
<tt>          Define typewriter text
<var>         Defines the variable part of the text
<wbr>         Define line breaks
note: in HTML, <, >, & etc. have special meanings (the first two characters are used for link tab and & for escape), which cannot be used directly. When using these three characters, their escape sequences should be used as follows:
& lt; Show<
& gt; Indicates >
& nbsp; Represents a space, & emsp; Chinese space (wider)
Case:
<!DOCTYPE html>
<html>
<head>
    <meta charset="UTF-8">
    <title>Title</title>
</head>
<body>
<h1>H1</h1>
<h2>H2</h2>
<h3>H3</h3>
<h4>H4</h4>
<!--<h5>H5</h5>-->
<h6>H6</h6>
<p>
    <small>web</small> Applied <strong>HTML</strong> Pages are generally stored in web Under the folder,<br>Create a new one below index of <i>HTML</i> File, enter the following<q>test</q>Phase.
</p>
<hr>
<p>
    be careful:    <HTML in<, >,&Wait for<b>special</b>meaning,(The first two characters are used for the link tab,&For escape),
    <code>Cannot be used directly.</code>When using these three characters,<sup>answer</sup>use<sub>they</sub>of
    <del>Escape</del>
    Sequence, as follows:
</p>
</body>
</html>
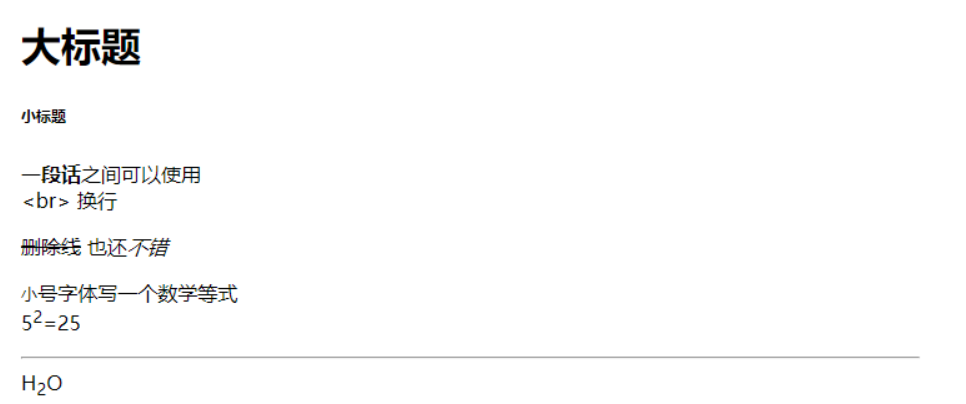
Exercise: complete the coding according to the following design drawing
Reference code:
<!DOCTYPE html>
<html>
<head>
    <meta charset="UTF-8">
    <title>Basic format element</title>
</head>
<body>
<h1>Headline</h1>
<h6>Subtitle</h6>
<p><b>A paragraph</b>Can be used between<br> <br> Line feed</p>
<p>
    <del>Delete line</del>
    Also<i>not bad</i>
</p>
<p>
    <small>Small</small>Write a mathematical equation in bold font
    <br>
    5<sup>2</sup>=25
<hr>
H<sub>2</sub>O
</p>
</body>
</html>
4, Form element
elements that control user input and output. Here, we'll have a basic understanding, and we'll learn more later.
<form>        Define for user input HTML form
<input>       Define input controls
<textarea>    Defines a multiline text input control
<button>      Define button
<select>      Define selection list(Drop down list)
<optgroup>    Defines a combination of related options in the selection list
<option>      Defines the options in the selection list
<label>       definition input Annotation of elements
<fieldset>    Defines the border around the elements in the form
<legend>      definition fieldset The title of the element
<datalist>    Define drop-down list
<keygen>      Define generation key
<output>      Define some types of output
Case:
<!DOCTYPE html>
<html>
<head>
    <meta charset="UTF-8">
    <title>Title</title>
</head>
<body>
<form>
    <label>
        full name
        <input>
    </label>
    <br>
    <input>
    <br>
    <textarea></textarea>
    <br>
    <button>Submit</button>
    <br>
    <select>
        <option>having dinner</option>
        <option>sleep</option>
    </select>
</form>
</body>
</html>
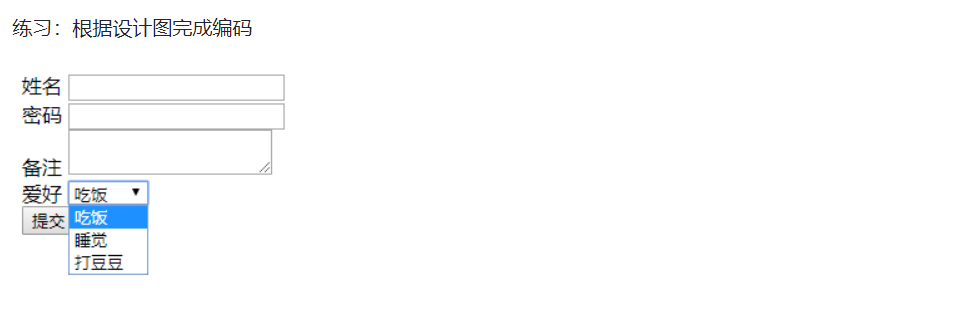
Reference code:
<!DOCTYPE html>
<html>
<head>
    <meta charset="UTF-8">
    <title>Basic format element</title>
</head>
<body>
<form>
    <label>
        full name
        <input>
    </label>
    <br>
    <label>
        password
        <input>
    </label>
    <br>
    remarks
    <textarea></textarea>
    <br>
    hobby
    <select>
        <option>having dinner</option>
        <option>sleep</option>
        <option>Beat beans</option>
    </select>
    <br>
    <button>Submit</button>
</form>
</body>
</html>
5, Frame graphic link list element
Common elements are as follows:
<frame>       Defines the window or frame of the frameset
<frameset>    Define frameset
<noframes>    Define alternative content for users who do not support frameworks
<iframe>      Define inline framework
<img>         Define image
<map>         Define image mapping
<area>        Defines the area inside the image map
<canvas>      Define graphics
<figcation>   definition figure The title of the element
<figure>      Define the grouping of media content and their titles
<a>           Define hyperlinks
<link>        Define the relationship between the document and external resources
<nav>         Define navigation links
<ul>          unordered list
<ol>          Defined sequence table
<li>          Define items for the list
<dl>          Definition list
<dt>          Define items in the list
<dd>          Defines the description of the item in the list
<menu>        Define the menu for the command/list
<menuitem>    Define the commands that users can call from the pop-up menu/Menu item
<command>     Define command buttons
note: the src of img can be either the relative picture path of the project path or the picture path on the Internet. It is best not to use local absolute paths.
Case:
<body>
<iframe src="https://www.baidu.com/" width="600" height="100"></iframe>
<br>
<img src="https://www.baidu.com/img/PCtm_d9c8750bed0b3c7d089fa7d55720d6cf.png">
<br>
<img src="animation.gif">
<br>
<a href="hello.html">Go to Baidu</a>
<ul>
    <li>1</li>
    <li>2</li>
    <li>3</li>
</ul>
<ol>
    <li>1</li>
    <li>2</li>
    <li>3</li>
</ol>
</body>
6, Table block section meta information element
Common elements are as follows:
<table>        Define table
<caption>      Define table title
<th>           Define header cells in a table
<tr>           Define rows in a table
<td>           Define cells in a table
<thead>        Define the header content in the table
<tbody>        Define the body content in the table
<tfoot>        Define the table notes in the table(footnote)
<col>          Defines attribute values for one or more columns in a table
<colgroup>     Defines the column groups in the table for formatting
<div>          Define block level elements in a document
<span>         Define inline elements in a document
<header>       definition section or page Header for
<footer>       definition section or page Footer for
<section>      definition section
<article>      Definition article
<aside>        Define content other than page content
<detais>       Define the details of the element
<dialog>       Define dialog box or window
<summary>      by<details>Element defines the visible title
<head>        Define information about the document
<meta>        Definition about HTML Meta information of the document
<base>        Define the default address or default destination for all links in the page
<basefon>     Do not approve of using. Defines the default font, color, or size of text in a page
note: to center the block level element div, you need to set the width and outer margin< Div style = "width: 500px;margin: 0 auto" > content < / div >, block elements can store block elements and other common elements in Div.
Case:
<!DOCTYPE html>
<html>
<head>
    <meta charset="UTF-8">
    <title>123</title>
</head>
<body>
<table>
    <thead>
    <tr>
        <td>id</td>
        <td>full name</td>
        <td>password</td>
    </tr>
    </thead>
    <tbody>
    <tr>
        <td>1</td>
        <td>2</td>
        <td>3</td>
    </tr>
    <tr>
        <td>4</td>
        <td>5</td>
        <td>6</td>
    </tr>
    </tbody>
</table>
<div style="width: 200px;margin: 0 auto">
    Note: to block level elements div The center needs to set the width and outer margin.
</div>
</body>
</html
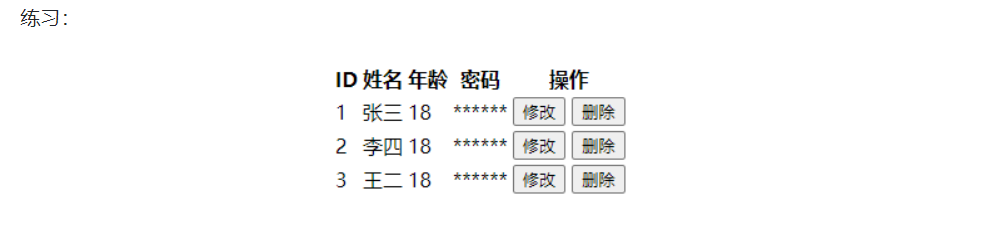
Reference code:
<!DOCTYPE html>
<html>
<head>
    <meta charset="UTF-8">
    <title>Frame graphic link list element</title>
</head>
<body>
<div style="width: 300px;margin: 0 auto">
    <table>
        <thead>
        <tr>
            <th>ID</th>
            <th>full name</th>
            <th>Age</th>
            <th>password</th>
            <th>operation</th>
        </tr>
        </thead>
        <tbody>
        <tr>
            <td>1</td>
            <td>Zhang San</td>
            <td>18</td>
            <td>******</td>
            <td>
                <button>modify</button>
                <button>delete</button>
            </td>
        </tr>
        <tr>
            <td>2</td>
            <td>Li Si</td>
            <td>18</td>
            <td>******</td>
            <td>
                <button>modify</button>
                <button>delete</button>
            </td>
        </tr>
        <tr>
            <td>3</td>
            <td>WangTwo </td>
            <td>18</td>
            <td>******</td>
            <td>
                <button>modify</button>
                <button>delete</button>
            </td>
        </tr>
        </tbody>
    </table>
</div>
</body>
</html>
7, Form form
< form > element is used to declare an area containing form elements. This element does not generate visual parts, but allows users to add form control elements that can input information in this area, such as text fields, drop-down lists, radio buttons, check boxes, etc.
< form > element can specify not only common core attributes such as id, style and class, but also event attributes such as onclick. In addition, you can specify the following properties:
1.action: Specifies the address to which the form information is submitted when the "confirm" button in the form is clicked. This attribute can specify either an absolute address or a relative address. When it is not filled in, it is the address of the current page.
2.method: specifies what type of request to send when submitting the form. The attribute value can be GET or POST, which are used to send GET or POST requests respectively. The form submits the request in GET by default. The difference between GET request and POST request is as follows:
GET request: the GET request explicitly puts the form data in the URL, and limits the length and data value encoding. The GET request will convert the requested parameter name and value into a string and append it to the original URL, so you can see the request parameter name and value in the address bar. The amount of data transmitted by GET request is small, generally not more than 2KB.
POST request: the POST request places the form data in the HTTP request body, and there is no length limit. The amount of data transmitted by POST request is always larger than that transmitted by GET request, and the POST request parameters and corresponding values are transmitted in the HEADER of HTML. Users can't see the request parameter values in the URL, so the security is relatively high.
3.enctype: Specifies the character set used when encoding the form. The values are as follows.
- applicatin/x-www-form-urlencoded, the default encoding method. Data is encoded in the form of name and value. All characters will be encoded before sending to the server, in which spaces are converted to "+", and special symbols are converted to corresponding ASCII HEX values.
- Multipart / form data: the data is encoded into a message. Each control on the page corresponds to a part of the message. This format must be used when the form carries files.
- text/plain: data is encoded in plain text without any control or format characters. Spaces are converted to plus sign "+", but special symbols are not encoded.
form elements must be combined with other form control elements before they can be used. When one or more form control elements are defined in the element, once the form is submitted, the form control of the form will be converted into request parameters. The rules for converting form controls into request parameters are as follows:
- Each form control with name attribute corresponds to a request parameter. Form controls without name attribute will not generate request parameters.
- If multiple form controls have the same name attribute, multiple form controls generate only one request parameter, but the parameter has multiple values.
- The value attribute of the form control specifies the value of the request parameter, and the placeholder is used as a prompt when there is no content.
- If a form control has the disabled or disabled = "disabled" property set, the form control will no longer generate request parameters.
- If a form control has readonly or readonly = "readonly" and hidden properties set, the value of the control cannot be modified, but the request parameters will be generated.
<!DOCTYPE html>
<html>
<head>
    <meta charset="UTF-8">
    <title>form </title>
</head>
<body>
<form action="hello.html" method="post" enctype="multipart/form-data">
    <input name="username">
    <br>
    <input name="password" value="123456" disabled>
    <br>
    <input name="age" readonly value="18">
    <br>
    <button type="submit">Submit</button>
</form>
</body>
</html>
8, input element
< input > element is the most versatile of form control elements, and many input elements can be generated by using element. This element has a type attribute, which determines the submitted data type, generally corresponding to the following:
Single line text box    text
 Password input box    password
 Radio         radio
 check box        checkbox
 File upload City    file (Add attribute accept="image/png,video/mp4" Accepted file types)
Button          button
 Submit button      submit
 Reset button      reset
Case:
<body>
<form>
    <input type="text">
    <br>
    <input type="password">
    <br>
    <label>male<input type="radio" value="male" name="sex"></label>
    <label>female<input type="radio" value="female" name="sex"></label>
    <br>
    <input type="checkbox" value="having dinner" name="hobby">
    <input type="checkbox" value="sleep" name="hobby">
    <input type="checkbox" value="Beat beans" name="hobby">
    <br>
    <input type="file" accept="image/png">
    <br>
    <input type="button" value="Normal button">
    <br>
    <input type="submit" value="Submit">
    <br>
    <input type="reset" value="Reset">
</form>
</body>
Note: the reset and submit buttons are for all elements in the form node. If the form DOM node does not exist, this function is invalid.
9, label and button elements
the label element is mainly used to bind the input box, associate the focus acquisition and loss of the input component, and prompt the general text box. Use the for attribute: specify the for attribute value of the < label > element as the attribute value of the associated form control id.
<body>
<form method="post" name="UserLogin" action="7-2-S.php">
<p>
    <label for="UserName">account number:</label>
    <input type="text" id="UserName" >
</p>
<p>
    <label for="UserPWD">Password:</label>
    <input type="password" id="UserPWD" width="30">
<input type="submit" name="Submit" value="Submit Form ">
</p>
</form>
</body>
button element
< button > element is used to define buttons. The < button > element can contain ordinary text, text formatting labels, images and other contents, which is also the difference between < button > button and < input > button.
< button > button provides more powerful functions and richer content than < input type = "button" / > button. All content between its start label < button > and end label < button > is the content of the button, including any acceptable body content, such as text or image.
it should be noted that it is not recommended to place image mapping between < button > and < / button > tags, because its actions sensitive to mouse and keyboard will interfere with the behavior of form buttons. If you use pictures, it is recommended to use background pictures.
The < button > element can specify core attributes such as id, style and class, and event response attributes such as onclick. In addition, the following attributes can be specified.
- Disabled: Specifies whether to disable this button. The property value can only be disabled or omitted.
- Type: Specifies the type of button the button belongs to. The attribute value can only be button, reset or submit
Case:
<body>
<button>
    <img src="Picture 1.png">
</button>
<br>
<button disabled>Disable button</button>
<br>
<input type="button" value="Button">
</body>