When an application interacts with a Hyperledger Fabric network, the Fabric node first verifies the identity of the application, that is, whether the certificate held by the application allows access to the Hyperledger Fabric network.In Hyperledger, these identities are stored in the wallet.In this tutorial, we will show you how to use a CouchDB wallet to save certificate and private key data in your application.
1. Type of Hyperledger Fabric Wallet
There are three types of wallets: file system wallet, memory wallet, and CouchDB wallet.
File system wallet:
A file system wallet is a simple folder, which is a good default choice in most cases.In the fabric-samples/balance-transfer example, the file system wallet is used.When you run this sample code, it creates a fabric-client-kv-orgName folder and stores all required Fabric identities in it.This configuration definition can be referenced orgname.yaml
Memory wallet:
As the name implies, a memory wallet is a wallet temporarily stored in the application memory.This wallet can be used when running in a restricted environment or when access to the file system is not required, such as in a browser.It is important to note that the identity data in this wallet disappears when the application terminates.Specific documentation for the memory wallet can be viewed Here.
CouchDB wallet:
That is, using CouchDB to save identity data, which is the most common choice in production environments.
2. Hyperledger Fabric CouchDB Wallet
Wallet uses two libraries to hold certificates and private keys:
Status Library:
A state library is used to store a certificate of a registered identity, which stores the basic information of an identity:
{
  "name": "test",
  "mspid": "org1",
  "roles": null,
  "affiliation": "",
  "enrollmentSecret": "<ENROLLMENT_SECRET>",
  "enrollment": {
    "signingIdentity": "<PRIVATE_KEY_NAME>",
    "identity": {
      "certificate": "<SIGN_CERT>"
    }
  }
}
Note: signingIdentity points to the address where the private and public keys are stored in the cryptographic database.
Cryptography Database:
A cryptographic database is used to hold the private and public keys of an identity.
3. Enable CouchDB wallet in Hyperledger Fabric application
First introduce the CouchDBKeyValueStore library provided by Fabric Node SDK:
const CDBKVS = require("fabric-client/lib/impl/CouchDBKeyValueStore.js");
Then set up the state library:
let stateStore = await new CDBKVS({
  url: "https://<USERNAME>:<PASSWORD>@<URL>",
  name: "<DB_NAME>"
});

const Client = require("fabric-client");

const client = Client.loadFromConfig("path of network.yaml");

client.setStateStore(stateStore);
Where:
- < USERNAME>:couchdb user name
- < PASSWORD>:password for couchdb
- <URL>:URL of couchdb
- < DB_NAME>: Optional, State Library name.The default name is userdb, when the specified state library Fabric Node SDK automatically creates the library when it does not exist
Finally, set up the cryptography database:
const cryptoSuite = Client.newCryptoSuite();

let cryptoKS = Client.newCryptoKeyStore(CDBKVS, {
  url: "https://<USERNAME>:<PASSWORD>@<URL>",
  name: "<DB_NAME>"
});

cryptoSuite.setCryptoKeyStore(cryptoKS);

client.setCryptoSuite(cryptoSuite);
4. Use CouchDB wallet in Balance Transfer example
Balance Transfer Is an example code officially provided by Hyperledger Fabric.
Start the balance transfer network, which consists of:
- 2 CA s
- 1 SOLO Sort Node
- Two institutions have 4 peer nodes
Start the docker image of couchdb:
~$ docker run --name couch-userdb -e COUCHDB_USER=admin \
                       -e COUCHDB_PASSWORD=password -p 5984:5984 -d couchdb
The above command automatically pulls the couchdb image from the docker hub.
The CouchDB details are as follows:
- Container name: couch-userdb
- CouchDB user name: admin
- CouchDB password: password
- URL: localhost:5984
The CouchDB connection URL s are as follows:
https://<USERNAME>:<PASSWORD>@<URL> https://admin:password@localhost:5984
Then update the client configuration in the balance-transfer example: open the file/helper.js and update the getClientForOrg function in it:
'use strict';
var log4js = require('log4js');
var logger = log4js.getLogger('Helper');
logger.setLevel('DEBUG');

var path = require('path');
var util = require('util');

var hfc = require('fabric-client');
hfc.setLogger(logger);

// couchDB config
const CDBKVS = require("fabric-client/lib/impl/CouchDBKeyValueStore.js");

async function getClientForOrg(userorg, username) {
    logger.debug('getClientForOrg - ****** START %s %s', userorg, username)
    // get a fabric client loaded with a connection profile for this org
    let config = '-connection-profile-path';

    // build a client context and load it with a connection profile
    // lets only load the network settings and save the client for later
    let client = hfc.loadFromConfig(hfc.getConfigSetting('network' + config));

    // This will load a connection profile over the top of the current one one
    // since the first one did not have a client section and the following one does
    // nothing will actually be replaced.
    // This will also set an admin identity because the organization defined in the
    // client section has one defined
    client.loadFromConfig(hfc.getConfigSetting(userorg + config));

    //********************** CouchDB configuration **************************************
    // set the state store
    let stateStore = await new CDBKVS({
        url: "https://<USERNAME>:<PASSWORD>@<URL>",
        name: "<DB_NAME>"
    });

    client.setStateStore(stateStore);

    // set the cryto store
    const cryptoSuite = hfc.newCryptoSuite();

    let cryptoKS = hfc.newCryptoKeyStore(CDBKVS, {
        url: "https://<USERNAME>:<PASSWORD>@<URL>",
        name: "<DB_NAME>"
    });

    cryptoSuite.setCryptoKeyStore(cryptoKS);

    client.setCryptoSuite(cryptoSuite);

    //********************** CouchDB configuration END **************************************

    if (username) {
        let user = await client.getUserContext(username, true);
        if (!user) {
            throw new Error(util.format('User was not found :', username));
        } else {
            logger.debug('User %s was found to be registered and enrolled', username);
        }
    }
    logger.debug('getClientForOrg - ****** END %s %s \n\n', userorg, username)

    return client;
}
Our changes are as follows:
- Line 13: Import the CouchDBKeyValueStore....
- Lines 31-52: Set up the status and cryptography databases
There is a small change in the code above:
// Client variable is used as hfc
var hfc = require("fabric-client");

// Instead of Client
const Client = require("fabric-client");
Then register a new user in balance transfer, and once registered successfully, you can use couchdb's api to view the status and cryptography databases.
For example, you can register a user with the following parameters.For org1, we use the same library, org1db, for both the state and cryptographic databases:
- Name: alice
- Org: org1
- DBNAME: org1db
- CouchDB URL: http://admin:password@localhost:5369
Open your browser and access http://localhost:5369/org1db/_all_docs, you can see All documents saved in org1db.
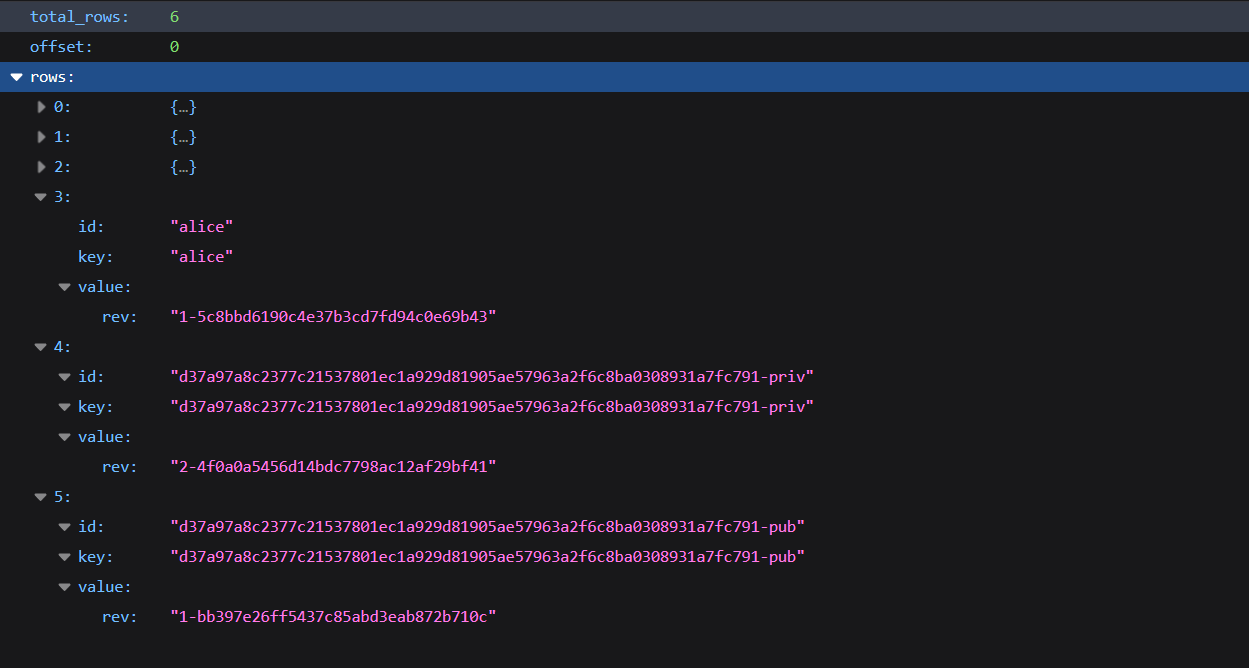
Where 0#, 1#, 2# are admin's certificates.
3#is the certificate alice saved in the State Library
4#and 5#are the public and private keys alice keeps in the cryptographic database
Visit http://localhost:5369/org1db/alice to see all the details of Alice in the state library:

View signingIdentity:
"signingIdentity":"d37a97a8c2377c21537801ec1a929d81905ae57963a2f6c8ba0308931a7fc791"
Now look at the 4# and 5# pictures above and see that they are the same.
You may remember that the signingIdentity field refers to the private and public keys stored in the cryptographic database.
Original Link: Using CouchDB Wallet-Wise in Node.js Applications