The purpose of configuring dual namenode is to prevent errors and data loss from a namenode hanging up. The specific principle is not explained in detail in this paper, but the specific installation process is described here.
The construction of Hadoop HA is based on Zookeeper. You can see the construction of Zookeeper here. hadoop, zookeeper, hbase, spark cluster environment This article can be seen as a supplement to this article. Here's how to configure and install Hadoop.
Configure Hadoop files
The configuration file that needs to be modified is under the $HADOOP_HOME/etc/hadoop directory. The specific modifications are as follows:
core-site.xml
 <!-- Appoint hdfs Of nameservice by ns -->
 <property>
      <name>fs.defaultFS</name>
      <value>hdfs://ns</value>
 </property>
 <!--Appoint hadoop Temporary Data Storage Directory-->
 <property>
      <name>hadoop.tmp.dir</name>
      <value>/data/install/hadoop-2.7.3/temp</value>
 </property>

 <property>
      <name>io.file.buffer.size</name>
      <value>4096</value>
 </property>
 <!--Appoint zookeeper address-->
 <property>
      <name>ha.zookeeper.quorum</name>
      <value>master1:2181,master2:2181,slave1:2181,slave2:2181,slave3:2181</value>
 </property>
hdfs-site.xml
    <!--Appoint hdfs Of nameservice by ns,Need and core-site.xml Consistency in -->
    <property>
        <name>dfs.nameservices</name>
        <value>ns</value>
    </property>
    <!-- ns There are two below. NameNode,Namely nn1,nn2 -->
    <property>
       <name>dfs.ha.namenodes.ns</name>
       <value>nn1,nn2</value>
    </property>
    <!-- nn1 Of RPC Mailing address -->
    <property>
       <name>dfs.namenode.rpc-address.ns.nn1</name>
       <value>master1:9000</value>
    </property>
    <!-- nn1 Of http Mailing address -->
    <property>
        <name>dfs.namenode.http-address.ns.nn1</name>
        <value>master1:50070</value>
    </property>
    <!-- nn2 Of RPC Mailing address -->
    <property>
        <name>dfs.namenode.rpc-address.ns.nn2</name>
        <value>master2:9000</value>
    </property>
    <!-- nn2 Of http Mailing address -->
    <property>
        <name>dfs.namenode.http-address.ns.nn2</name>
        <value>master2:50070</value>
    </property>
    <!-- Appoint NameNode The metadata of the JournalNode Storage location on -->
    <property>
         <name>dfs.namenode.shared.edits.dir</name>
         <value>qjournal://slave1:8485;slave2:8485;slave3:8485/ns</value>
    </property>
    <!-- Appoint JournalNode Location of data on local disk -->
    <property>
          <name>dfs.journalnode.edits.dir</name>
          <value>/data/install/hadoop-2.7.3/journal</value>
    </property>
    <!-- open NameNode Automatic switching in case of failure -->
    <property>
          <name>dfs.ha.automatic-failover.enabled</name>
          <value>true</value>
    </property>
    <!-- Configuration Failure Automatic Switching Implementation -->
    <property>
            <name>dfs.client.failover.proxy.provider.ns</name>
            <value>org.apache.hadoop.hdfs.server.namenode.ha.ConfiguredFailoverProxyProvider</value>
    </property>
    <!-- Configure the isolation mechanism if ssh It is the default port 22. value direct writing sshfence that will do -->
    <property>
             <name>dfs.ha.fencing.methods</name>
             <value>sshfence(hadoop:22022)</value>
    </property>
    <!-- Requirements when using isolation mechanisms ssh No landfall -->
    <property>
            <name>dfs.ha.fencing.ssh.private-key-files</name>
            <value>/home/hadoop/.ssh/id_rsa</value>
    </property>

    <property>
        <name>dfs.namenode.name.dir</name>
        <value>file:/data/install/hadoop-2.7.3/hdfs/name</value>
    </property>

    <property>
        <name>dfs.datanode.data.dir</name>
        <value>file:/data/install/hadoop-2.7.3/hdfs/data</value>
    </property>

    <property>
       <name>dfs.replication</name>
       <value>2</value>
    </property>
    <!-- stay NN and DN Upper opening WebHDFS (REST API)function,Not necessary -->
    <property>
       <name>dfs.webhdfs.enabled</name>
       <value>true</value>
    </property>
mapred-site.xml
 <property>
        <name>mapreduce.framework.name</name>
        <value>yarn</value>
 </property>
yarn-site.xml
    <!-- Appoint nodemanager Start-up loading server The way is shuffle server -->
    <property>
            <name>yarn.nodemanager.aux-services</name>
            <value>mapreduce_shuffle</value>
     </property>
     <property>
            <name>yarn.nodemanager.aux-services.mapreduce_shuffle.class</name>
            <value>org.apache.hadoop.mapred.ShuffleHandler</value>
     </property>
     <!-- Appoint resourcemanager address -->
     <property>
            <name>yarn.resourcemanager.hostname</name>
            <value>master1</value>
      </property>
Add the following to hadoop-env.sh
export JAVA_HOME=/data/install/jdk
# ssh port is not the default port 22
export HADOOP_SSH_OPTS="-p 22022"
yarn-env.sh adds the following
export JAVA_HOME=/data/install/jdkStart command
Note that the first initialization start command is different from the subsequent start command. The first start is more complex, and if the steps are wrong, the error will be reported, but then it will be all right.
First Start Command
1. Start Zookeeper of each node and execute the following commands on each node:
bin/zkServer.sh start2. Start journalnode at each node with the following command
sbin/hadoop-daemon.sh start journalnode3. Format namenode and journalnode directories in the main namenode
hdfs namenode -format ns4. Start the namenode process on the main namenode
sbin/hadoop-daemon.sh start namenode5. Execute the first line of command at the standby namenode node. This is to format the directory of the standby namenode and copy metadata from the main namenode, and this command will not format the journalnode directory again! Then start the standby namenode process with the second command!
hdfs namenode -bootstrapStandby
sbin/hadoop-daemon.sh start namenode
6. Execute the following commands on both namenode nodes
sbin/hadoop-daemon.sh start zkfc7. Start the datanode by executing the following commands on all datanode nodes
sbin/hadoop-daemon.sh start datanodeDaily Start and Stop Order
sbin/start-dfs.sh
sbin/stop-dfs.sh
Test verification
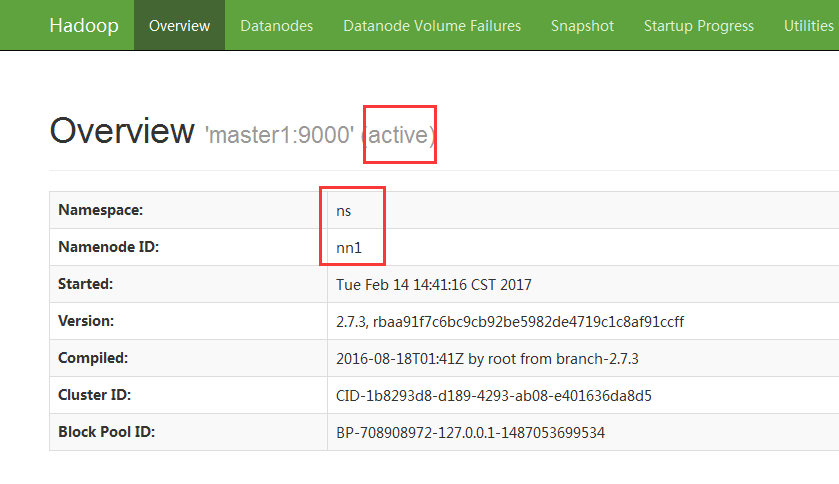
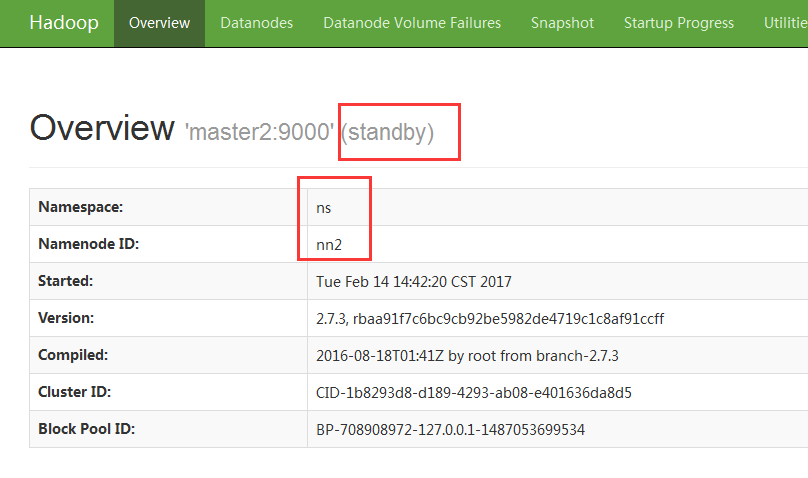
First, open the namenode status of two nodes in the browser, one showing active and the other showing standby
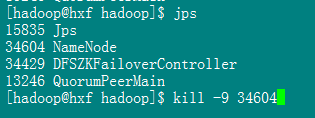
Then execute jps on the namenode where the activity is located, killing the corresponding namenode process
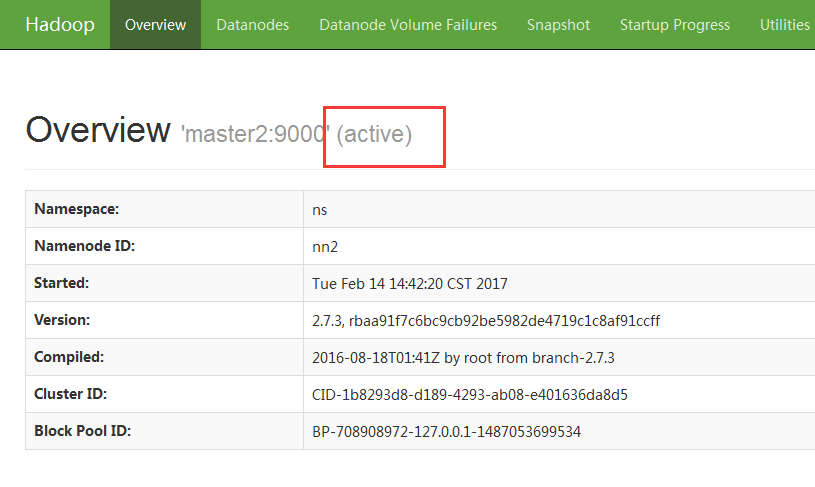
The namenode corresponding to the previous standby becomes active
Men were born to be suffering, the pain of struggle, or the pain of regret?