Write before
The previous series of articles have introduced the architecture, installation, upgrade and quick start of kubernetes. Readers have a preliminary understanding of kubernetes through the implementation of this article. Starting from this chapter, the basic concepts and core concepts of kubernetes are gradually introduced, including: namespace, labels, annotations, pods, volumes, etc. The core concepts include each of the kubernetesA controller that contains the following:
- The application replica controllers are Deployments, ReplicaSets, DaemonSets, StatefulSets;
- Batch task controllers Jobs and CronJob
- Storage Controller PersistentVoloume, PersistentVolumeClaim, StorageClass;
- Service Load Balancing Service, Ingress, NetworkPolicy, and DNS name resolution;
-
Configuration and Key ConfigMaps and Secrets
This paper starts with the most basic concept of pod, and then introduces the application deployment, storage, load balancing and other related controllers step by step. kubernetes is composed of several different controllers, each of which performs different functions.
1. Learn more about pod
1.1 Container and OD concepts
Container is a portable, lightweight container virtualization technology that uses LinuxCggroup technology achieves the isolation of various resources, such as cpu, memory, pid, mount, IPC, etc. Compared with virtualization technology such as KVM, container technology is lighter, and it mainly solves the environmental issue. Currently, the mainstream container technology is docker. When it comes to containers, it is generally equivalent to docker.
To run containers, you first need to have a mirror. Applications and applications depend on environments running in containers. Instead of running containers directly in kubernetes, you run pods. A pod contains multiple containers. Containers share the same namespace, network, storage, and so on.Mirrors are stored in private or public mirrors, and the runtime is pulled locally by docker image pull. There are two pull strategies for images:
- ImagePullPolicy is Always, whether or not downloaded locally
- ImagePullPolicy is IfNotPresent, default mirror pull policy, no local pull anymore
Pods is the smallest dispatching unit in kubernetes. One or more containers run within Pods. Containers share pod's network ip resources, store volume resources, calculate resources and so on. It facilitates quick access and interaction between containers within pods.
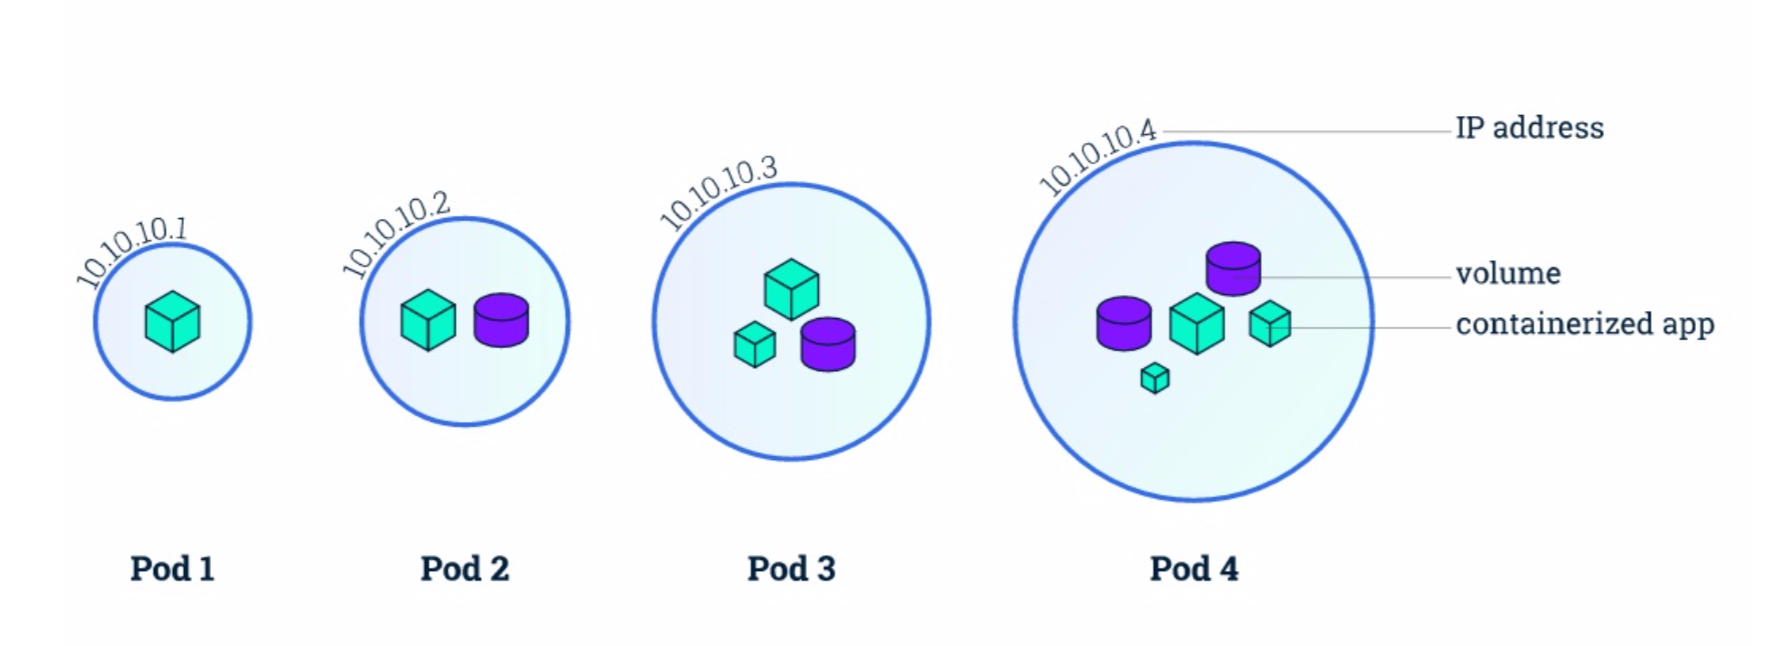
As shown in the figure above, Pod is often used in two ways:
- A container runs in a Pod, the most commonly used mode, and containers are encapsulated and dispatched in a pod, which is almost identical, but k8s does not manage containers directly
- Pod runs multiple containers, which are encapsulated and dispatched together in a pod. It is suitable for scenarios where there are data interactions and calls between containers, such as app+redis, sharing the same network namespace within a pod, storage namespace, process namespace, and so on.
1.2 How to create a pod
kubernetes generally interact in four ways:
- Command line, kubectl interacts with kubernetes to manage resources. Command line is easy to get started, but only partially supports resource creation
- API, which interacts with kubernetes by http through resfull API, is suitable for secondary development based on API
- SDK, provides native SDKs for all languages, implements programming access for all languages
- YAML, through easy-to-understand YAML file format, describes the definition of resources, is the most versatile, and eventually converts to json format
Kubernetes defines resources by defining a declarative way, that is, by defining the required resources in the yaml file, kubernetes generates the required resources by controller-manager according to the resources defined in the yaml file (match the current state to desired state).Resources are usually defined in kubernetes as yaml files, then configurations are applied as kubectl create -f files.yaml, as illustrated below to create a nginx application.
1. Write a yaml file to define a pod resource
[root@node-1 demo]# cat nginx.yaml
apiVersion: v1
kind: Pod
metadata:
  name: nginx-demo
  labels:
    name: nginx-demo
spec:
  containers:
  - name: nginx-demo
    image: nginx:1.7.9
    imagePullPolicy: IfNotPresent
    ports:
    - name: nginx-port-80
      protocol: TCP
      containerPort: 80
For configuration files, the following are explained:
- Versions used by apiVersion api, kubectl api-versions can see a list of versions supported by the current system
- kind specifies the resource type, expressed as the resource type of Pod
- Metadata specifies Pod's metadata,Metadata.nameSpecify a name,Metadata.labelsSpecify the label to which the Pod belongs
- SpecSpecify the template properties for Pod.spec.containersConfigure container information,spec.containers.name Specify a name,spec.containers.imageSpecify the name of the container image,spec.containers.imagePullPolicy Is the download method for mirrors, IfNotPresent means download when the mirror does not exist.spec.containers.ports.name specifies the name of the port,spec.containers.ports.protocol protocol typeFor TCP,spec.containers.ports.containerPort is the container port.
2. Create a pod application
[root@node-1 demo]# kubectl apply -f nginx.yaml
pod/nginx-demo created
3. Accessing applications
Getting Container's IP address
[root@node-1 demo]# kubectl get pods -o wide
NAME                    READY   STATUS    RESTARTS   AGE   IP            NODE     NOMINATED NODE   READINESS GATES
demo-7b86696648-8bq7h   1/1     Running   0          8h    10.244.1.11   node-2   <none>           <none>
demo-7b86696648-8qp46   1/1     Running   0          8h    10.244.1.10   node-2   <none>           <none>
demo-7b86696648-d6hfw   1/1     Running   0          8h    10.244.1.12   node-2   <none>           <none>
nginx-demo              1/1     Running   0          50s   10.244.2.11   node-3   <none>           <none>

//Visit site content:
[root@node-1 demo]# curl http://10.244.2.11
<!DOCTYPE html>
<html>
<head>
<title>Welcome to nginx!</title>
<style>
    body {
        width: 35em;
        margin: 0 auto;
        font-family: Tahoma, Verdana, Arial, sans-serif;
    }
</style>
</head>
<body>
<h1>Welcome to nginx!</h1>
<p>If you see this page, the nginx web server is successfully installed and
working. Further configuration is required.</p>

<p>For online documentation and support please refer to
<a href="http://nginx.org/">nginx.org</a>.<br/>
Commercial support is available at
<a href="http://nginx.com/">nginx.com</a>.</p>

<p><em>Thank you for using nginx.</em></p>
</body>
</html>
Previously, we learned how kubernetes supports rolling upgrade RollingUpdate, flexible expansion replicas, etc. How to make rolling upgrade for Pod uninterrupted, how to increase the number of copies of Pod to ensure high availability?The answer is: No.Pod is single and cannot support some advanced features that require advanced replica controllers such as ReplicaSets, Deployments, StatefulSets, DaemonSets, etc.Pod is rarely used in practical applications. In addition to testing and running some simple functions, Deployments are recommended for practical use. The definition of Pod is embedded in the replica controller as a Template.
1.3. How to write yaml files
We mentioned earlier that kubernetse is an declarative way to deploy applications. Deployment of applications is defined in a yaml file. How to write an application's yaml file? Here are two practical tips to share:
1. Kubectl creates apps-o yaml--dry-run by defining template fast generation, --dry-run is just a trial run, not actually running in the k8s cluster. Output yaml format file by specifying -o yaml and modify it based on template after generation, as follows:
[root@node-1 demo]# kubectl create deployment demo --image=nginx:latest  --dry-run -o yaml
apiVersion: apps/v1
kind: Deployment
metadata:
  creationTimestamp: null
  labels:
    app: demo
  name: demo
spec:
  replicas: 1
  selector:
    matchLabels:
      app: demo
  strategy: {}
  template:
    metadata:
      creationTimestamp: null
      labels:
        app: demo
    spec:
      containers:
      - image: nginx:latest
        name: nginx
        resources: {}
status: {}
2. The explain command, which can be called a grammar query, can find the meaning of each field, and how to use it. For example, if you want to see containers in the spec of Pod, you can use kubectl explainPod.spec.containersThe way to query is as follows:
[root@node-1 demo]# kubectl explain Pods.spec.containers
KIND:     Pod
VERSION:  v1

RESOURCE: containers <[]Object>

DESCRIPTION:
     List of containers belonging to the pod. Containers cannot currently be
     added or removed. There must be at least one container in a Pod. Cannot be
     updated.

     A single application container that you want to run within a pod.

FIELDS:
   args <[]string> #Command parameters
     Arguments to the entrypoint. The docker image's CMD is used if this is not
     provided. Variable references $(VAR_NAME) are expanded using the
     container's environment. If a variable cannot be resolved, the reference in
     the input string will be unchanged. The $(VAR_NAME) syntax can be escaped
     with a double $$, ie: $$(VAR_NAME). Escaped references will never be
     expanded, regardless of whether the variable exists or not. Cannot be
     updated. More info:
     https://kubernetes.io/docs/tasks/inject-data-application/define-command-argument-container/#running-a-command-in-a-shell

   image    <string> #Mirror Definition
     Docker image name. More info:
     https://kubernetes.io/docs/concepts/containers/images This field is
     optional to allow higher level config management to default or override
     container images in workload controllers like Deployments and StatefulSets.

   ports    <[]Object> #Port Definition
     List of ports to expose from the container. Exposing a port here gives the
     system additional information about the network connections a container
     uses, but is primarily informational. Not specifying a port here DOES NOT
     prevent that port from being exposed. Any port which is listening on the
     default "0.0.0.0" address inside a container will be accessible from the
     network. Cannot be updated.

   readinessProbe   <Object> #Available Health Checks
     Periodic probe of container service readiness. Container will be removed
     from service endpoints if the probe fails. Cannot be updated. More info:
     https://kubernetes.io/docs/concepts/workloads/pods/pod-lifecycle#container-probes

   resources    <Object> #Resource Settings
     Compute Resources required by this container. Cannot be updated. More info:
     https://kubernetes.io/docs/concepts/configuration/manage-compute-resources-container/

...Omit partial output...
   volumeMounts <[]Object> #Mount Storage
     Pod volumes to mount into the container's filesystem. Cannot be updated.

   workingDir   <string>
     Container's working directory. If not specified, the container runtime's
     default will be used, which might be configured in the container image.
     Cannot be updated.
explain content explanation
- <string>denotes a string to follow
- <[]Object>indicates that the object followed by a list needs to start with -and can be written multiple times
- <Object>Represents an object that contains multiple attributes inside
Continuing with the above, if you need to view the resource resource definition, you can do so by explainingPods.spec.containers.resource to see how to use it.
Through the introduction of the above two tools, I usually find a map to write yaml file deployment application in my daily work. I recommend writing more manually, pay attention to grammar lock-in, and get familiar with it a few more times.There are many features in Pod, such as resource allocation, health checks, storage mounts, etc. (refer to the appendix article), which we will discuss in detail later. Pod will be embedded as a Template in replica controllers such as Deployments.
appendix
Introduction to container mirroring: https://kubernetes.io/docs/concepts/containers/images/
Introduction to Pod: https://kubernetes.io/docs/concepts/workloads/pods/pod-overview/
Resource limits memory resources: https://kubernetes.io/docs/tasks/configure-pod-container/assign-memory-resource/
Resource limits CPU resources: https://kubernetes.io/docs/tasks/configure-pod-container/assign-cpu-resource/
Pod mount store: https://kubernetes.io/docs/tasks/configure-pod-container/configure-volume-storage/
Pod Configuration Health Check: https://kubernetes.io/docs/tasks/configure-pod-container/configure-liveness-readiness-probes/