The author introduces: Jiang Xue Wei Technological Partner of IT Company, Senior IT Lecturer, CSDN Community Expert, Invited Editor, Best-selling Book Author, National Patent Inventor; Published Book: Hand-to-Hand Teaching Framework 3D Game Engine. Electronic Industry Press and< Unity3D Detailed Explanation of Actual Core Technologies, Electronic Industry Press, etc.
CSDN Video Website: http://edu.csdn.net/lecturer/144
This blog post mainly decrypts the principle of post-processing rendering effect for readers. Post-processing rendering effect is used in many commercial engines such as Unity, UE4 illusion engine, such as Bloom, Blur, etc.
SSAO, PSSM, HDR and so on all belong to post-processing rendering effect. Their realization is actually realized by using frame buffer technology. This blog article mainly introduces the realization principle of frame buffer to readers.
And application cases.
Several different screen buffers were introduced to the reader: color buffers for writing color values, depth buffers for writing depth information, and template buffers that allow us to discard specified fragments based on some conditions. This blog mainly introduces frame buffer to readers. What is frame buffer? In fact, the combination of the above mentioned buffers is called frame buffer, which is stored in memory. OpenGL gives us the freedom to define our own frame buffer. We can selectively define our own color buffer, depth buffer and template buffer. The main purpose of this blog is to introduce the frame buffer to the readers. The rendering operation we introduced before is based on the default frame buffer. When you create your window, the default frame buffer is created and configured. By creating our own frame buffer, we can get an additional rendering method. Through frame buffer, you can render your scene into a different frame buffer, so that we can create mirrors in the scene, or make some cool special effects. First we'll talk about how they work, and then we'll use frame buffering to achieve some cool effects.
We often use some post-processing effects in engine rendering, which are carried out in frame buffer. Now let's tell the reader how frame buffer works.
We can use a function called glGenFramebuffers to create a frame buffer object (FBO):
GLuint fbo;
glGenFramebuffers(1, &fbo);
First we need to create a frame buffer object, bind it to the current frame buffer, do some operations, and then unbind the frame buffer. We use glBind Framebuffer to bind frame buffer:
glBindFramebuffer(GL_FRAMEBUFFER, fbo);
After binding to the GL_FRAMEBUFFER target, all subsequent read and write buffer operations will affect the current binding frame buffer. Frame buffers can also be separately bound to read or write targets, using GL_READ_FRAMEBUFFER or GL_DRAW_FRAMEBUFFER to do this. If bound to GL_READ_FRAMEBUFFER, all read operations can be performed.
Functions like glReadPixels are used to bind to GL_DRAW_FRAMEBUFFER, allowing rendering, emptying, and other write operations. Here's a summary of how to build a complete frame for the reader
The buffer satisfies the following conditions:
To construct a complete frame buffer, the following conditions must be satisfied:
- We have to add at least one accessory (color, depth, template buffer) to it.
- At least one of them is a color attachment.
- All attachments should be fully ready (stored in memory).
- Each buffer should have the same number of samples.
Samples are mentioned in the above conditions. If you don't know what a sample is, don't worry. We'll talk about it in a later blog post.
We need to create some attachments for the frame buffer, and we need to attach these attachments to the frame buffer. When we have done all the above mentioned conditions, we can use the parameter GL_FRAMEBUFFER with glCheck FramebufferStatus to check whether we have really succeeded. It then checks the current bound frame buffer and returns which value in these specifications. If GL_FRAMEBUFFER_COMPLETE is returned, that's right:
All subsequent rendering operations will render to the additional buffer of the currently bound frame buffer. Since our frame buffer is not the default frame buffer, the rendering command will have no effect on the video output of the window. For this reason, it is called off-screen rendering, which is rendered into another buffer. In order for all rendering operations to affect the main window, we must activate the default frame buffer by binding to 0:if(glCheckFramebufferStatus(GL_FRAMEBUFFER) == GL_FRAMEBUFFER_COMPLETE) // Execute victory dance
When we finish all the frame buffer operations, don't forget to delete the frame buffer object:glBindFramebuffer(GL_FRAMEBUFFER, 0);
glDeleteFramebuffers(1, &fbo);
Now before performing the detection, we need to attach one or more attachments to the frame buffer. An attachment is a memory address, which contains a buffer for frame buffer. It can be an image. There are two ways to create an attachment: texture or render buffer objects.
Next, texture is introduced. When a texture is attached to a frame buffer, all rendering commands are written to the texture as if it were a normal color/depth or template buffer. The advantage of using texture is that the results of all rendering operations are stored as a texture image, so that we can simply use it in the shader.
Creating a frame buffer texture is similar to creating a normal texture:
The main difference here is that we set the dimension of the texture to the screen size (although not required), and we also pass NULL as the data parameter of the texture. For this texture,GLuint texture; glGenTextures(1, &texture); glBindTexture(GL_TEXTURE_2D, texture); glTexImage2D(GL_TEXTURE_2D, 0, GL_RGB, 800, 600, 0, GL_RGB, GL_UNSIGNED_BYTE, NULL); glTexParameteri(GL_TEXTURE_2D, GL_TEXTURE_MIN_FILTER, GL_LINEAR); glTexParameteri(GL_TEXTURE_2D, GL_TEXTURE_MAG_FILTER, GL_LINEAR);
We allocate memory instead of filling it. Texture filling is done when rendering to frame buffer.
If you want to render the entire screen to a large or small texture, you need to call glViewport again with the size of the new texture as a parameter (before rendering to your frame buffer)
Do it well, otherwise only a small part of the texture or screen can be drawn to the texture. Now that we have created a texture, the last thing we need to do is attach it to the frame buffer:
glFramebufferTexture2D(GL_FRAMEBUFFER, GL_COLOR_ATTACHMENT0,GL_TEXTURE_2D, texture, 0);
The glFramebufferTexture2D function needs to pass in the following parameters:
- Target: The target of the frame buffer type we created (draw, read, or both).
- Attachment: the type of attachment we attach. Now we attach a color attachment. Note that the last zero implies that we can attach more than one color attachment. We'll talk about it in a later tutorial.
- textarget: You want additional texture types.
- Texture: Additional actual texture.
- Level: Mipmap level. We set it to 0.
In addition to color attachments, we can also attach a depth and a template texture to the frame buffer object. To add a depth buffer, we can know that GL_DEPTH_ATTACHMENT is the attachment type. Keep in mind that the texture format and the internal format are the storage formats of GL_DEPTH_COMPONENT to reflect the depth buffer. Adding a template buffer, you use GL_STENCIL_ATTACHMENT as the second parameter and specify the texture format as GL_STENCIL_INDEX.
A depth buffer and a template buffer can also be added as a separate texture, so that each 32-bit value of the texture contains 24-bit depth information and 8-bit template information. To attach a depth and template buffer to a single texture, we use the GL_DEPTH_STENCIL_ATTACHMENT type to configure the texture format to contain a combination of depth values and template values. Here is an example of adding depth and template buffer to a single texture:
In addition to rendering buffer objects, OpenGL introduced Renderbuffer objects, so texture was the only available type of attachment in the good old days. Like texture images, the rendering buffer object is also a buffer, which can be a bunch of bytes, integers, pixels or other things. One of the advantages of rendering buffer objects is that it stores its data in OpenGL native rendering format, so when off-screen rendering reaches frame buffer, the data is equivalent to optimized.glTexImage2D( GL_TEXTURE_2D, 0, GL_DEPTH24_STENCIL8, 800, 600, 0, GL_DEPTH_STENCIL, GL_UNSIGNED_INT_24_8, NULL ); glFramebufferTexture2D(GL_FRAMEBUFFER, GL_DEPTH_STENCIL_ATTACHMENT, GL_TEXTURE_2D, texture, 0);
The rendering buffer objects store all rendering data directly in their buffers without any conversion for a particular texture format, so they become a fast and writable storage medium. However, rendering buffer objects are usually written only and cannot be modified (just like getting textures, not writing textures). It can be read with the glReadPixels function, which returns a specific pixel area of the current bound frame buffer, rather than directly returning to the attachment itself.
Because their data is already in native format, it is very fast to write or simply put their data into other buffers. When rendering buffered objects, operations such as switching buffers become extremely fast. The glfwSwapBuffers function we use at the end of each rendering iteration is also implemented as a rendering buffer object: we simply write to one rendering buffer image and then swap it to another. Rendering buffer objects is perfect for this operation.
Creating a rendering buffer object is similar to creating a frame buffer code:
GLuint rbo;
glGenRenderbuffers(1, &rbo);
Similarly, we intend to bind rendering buffer objects so that all subsequent rendering buffer operations affect the current rendering buffer objects:
glBindRenderbuffer(GL_RENDERBUFFER, rbo);
Because rendering buffer objects are usually written-only, they are often used as depth and template attachments. Most of the time, we don't need to read data from depth and template buffer, but we still care about depth and template testing. We need depth and template values for testing, but we don't need to sample these values, so the depth buffer object is completely consistent. When we do not sample from these buffers, rendering buffer objects is usually appropriate because they are equivalent to being optimized.
Calling the glRenderbufferStorage function creates a depth and template rendering buffer object:
glRenderbufferStorage(GL_RENDERBUFFER, GL_DEPTH24_STENCIL8, 800, 600);
Creating a rendering buffer object is similar to creating a texture object. The difference is that the object is designed specifically for images, not for general purpose data buffering, such as texture. Here we choose GL_DEPTH24_STENCIL8 as the internal format, which represents both 24-bit depth and 8-bit template buffer.
The last thing to do is to attach the frame buffer object:
glFramebufferRenderbuffer(GL_FRAMEBUFFER, GL_DEPTH_STENCIL_ATTACHMENT, GL_RENDERBUFFER, rbo);
In frame buffer projects, rendering buffer objects can provide some optimization, but more importantly, it is important to know when to use rendering buffer objects and when to use textures. The general rule is that if you never need to sample from a particular buffer, rendering the buffer object is a better choice for a particular buffer. If you need to sample data from a specific buffer, such as color or depth values, you'd better use texture attachments. From the perspective of execution efficiency, it will not have a great impact on efficiency.
Here is a case study of how to use frame caching. We will render the scene to a color texture, which is attached to a frame buffer we created, and then to the texture.
Li draws it on a simple quadrilateral that covers the entire screen. The output image seems to be the same as the unused frame buffer, but this time, it's actually printed directly to a separate one.
It's above the quadrilateral. Why is this useful? We'll see why in the next section.
The first thing to do is to create a frame buffer object and bind it, which is clear:
The second thing we need to do is create a texture image, which is the color attachment we will attach to the frame buffer. We set the size of the texture to the width and height of the window and keep the data uninitialized:GLuint framebuffer; glGenFramebuffers(1, &framebuffer); glBindFramebuffer(GL_FRAMEBUFFER, framebuffer);
We also intend to let OpenGL determine that depth testing (template testing, if you use it) is possible, so we must also ensure that a depth (and template) is added to the frame buffer.// Generate texture GLuint texColorBuffer; glGenTextures(1, &texColorBuffer); glBindTexture(GL_TEXTURE_2D, texColorBuffer); glTexImage2D(GL_TEXTURE_2D, 0, GL_RGB, 800, 600, 0, GL_RGB, GL_UNSIGNED_BYTE, NULL); glTexParameteri(GL_TEXTURE_2D, GL_TEXTURE_MIN_FILTER, GL_LINEAR ); glTexParameteri(GL_TEXTURE_2D, GL_TEXTURE_MAG_FILTER, GL_LINEAR); glBindTexture(GL_TEXTURE_2D, 0); // Attach it to currently bound framebuffer object glFramebufferTexture2D(GL_FRAMEBUFFER, GL_COLOR_ATTACHMENT0, GL_TEXTURE_2D, texColorBuffer, 0);
Enclosure. Since we only sampled color buffers and did not sample other buffers, we can create a rendering buffer object to achieve this goal.
Creating a rendering buffer object is not too difficult. The only thing to remember is that we are creating a depth and template attachment for rendering buffer objects. Let's set it up internally.
For GL_DEPTH 24_STENCIL 8, this accuracy is sufficient for our purposes.
GLuint rbo; glGenRenderbuffers(1, &rbo); glBindRenderbuffer(GL_RENDERBUFFER, rbo); glRenderbufferStorage(GL_RENDERBUFFER, GL_DEPTH24_STENCIL8, 800, 600); glBindRenderbuffer(GL_RENDERBUFFER, 0);
After we have allocated enough memory for rendering buffer objects, we can unbind the rendering buffer.
Next, before we do the frame buffer, we attach the rendering buffer object to the depth of the frame buffer and the template attachment.
glFramebufferRenderbuffer(GL_FRAMEBUFFER, GL_DEPTH_STENCIL_ATTACHMENT, GL_RENDERBUFFER, rbo);
Then we need to check whether the frame buffer is really good, if not, we print an error message.
if(glCheckFramebufferStatus(GL_FRAMEBUFFER) != GL_FRAMEBUFFER_COMPLETE) cout << "ERROR::FRAMEBUFFER:: Framebuffer is not complete!" << endl; glBindFramebuffer(GL_FRAMEBUFFER, 0);
Unbound frame buffers are also guaranteed so that we do not accidentally render the wrong frame buffers.
Now that the frame buffer is ready, all we have to do is render to the frame buffer, not the default buffer bound to the frame buffer object. All the remaining commands affect the frame buffer currently bound. All depth and template operations are also read from the current bound frame buffer depth and template attachments, of course, when they are available. If you omit deep buffering, for example, all depth tests will not work because there is no deep buffer in the currently bound frame buffer.
Therefore, in order to render the scene to a single texture, we must do the following steps:
- Use the new binding to activate the frame buffer to render the scene as usual.
- Bind to the default frame buffer.
- Draw a quadrilateral and let it spread over the entire screen, using the new frame buffer color buffer as his texture.
#version 330 core
layout (location = 0) in vec2 position;
layout (location = 1) in vec2 texCoords;
out vec2 TexCoords;
void main()
{
gl_Position = vec4(position.x, position.y, 0.0f, 1.0f);
TexCoords = texCoords;
}Fragment shaders are simpler because the only thing we do is sample textures:
#version 330 core
in vec2 TexCoords;
out vec4 color;
uniform sampler2D screenTexture;
void main()
{
color = texture(screenTexture, TexCoords);
}Then you need to create and configure a VAO for the quadrilateral on the screen. Frame buffer processing in rendering iteration has the following structure:
// First pass glBindFramebuffer(GL_FRAMEBUFFER, framebuffer); glClearColor(0.1f, 0.1f, 0.1f, 1.0f); glClear(GL_COLOR_BUFFER_BIT | GL_DEPTH_BUFFER_BIT); // We're not using stencil buffer now glEnable(GL_DEPTH_TEST); DrawScene(); // Second pass glBindFramebuffer(GL_FRAMEBUFFER, 0); // back to default glClearColor(1.0f, 1.0f, 1.0f, 1.0f); glClear(GL_COLOR_BUFFER_BIT); screenShader.Use(); glBindVertexArray(quadVAO); glDisable(GL_DEPTH_TEST); glBindTexture(GL_TEXTURE_2D, textureColorbuffer); glDrawArrays(GL_TRIANGLES, 0, 6); glBindVertexArray(0);
First, since each frame buffer we use has its own set of buffers, we intend to use the bits set by glClear to clear these buffers.
Second, when rendering a quadrilateral, we close the depth test, because we don't care about the depth test, we draw a simple quadrilateral; when we draw a normal scene, we have to turn on the depth test again. The effect is as follows:
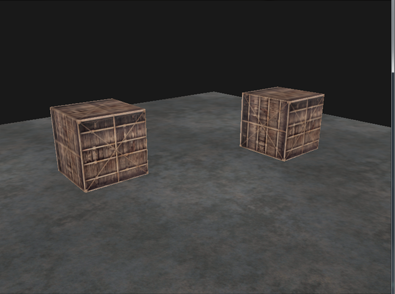
The result of the above case implementation is that any pixel in the rendering scene can be freely obtained, which is in fact regarded as a texture image. Next, we use frame buffer to achieve the post-processing effect that we often use in the game, such as the inverse processing of the color in the game, that is, to reverse the color value. This is handled in the fragment shader, and it is not difficult to return the Inversion of these colors in the fragment shader. We get the color of the screen texture and subtract it with 1.0:
void main()
{
color = vec4(vec3(1.0 - texture(screenTexture, TexCoords)), 1.0);
}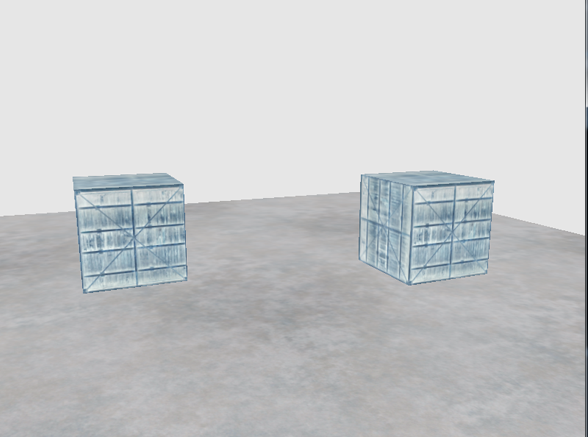
In this way, the whole scene is processed, which is also the effect of post-processing rendering, so that only one line of code can be modified in the above fragment shader.
Another advantage of post-processing on a single texture image is that we can sample from other parts of the texture. For example, we can sample multiple texture values from around the current texture value. Creatively combining them can create interesting effects.
Kenel is an array of values that looks a little like a small matrix. The center of the value in the middle of it can be mapped to a pixel. The pixel and the value around the pixel are multiplied by the kernel, and the result is added up to get a value. So basically, we add an offset around the current texture coordinate, and then combine them based on the kernel. Here's an example of a kernel:
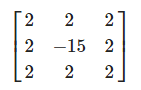
This kernel represents eight pixels around a pixel multiplied by two, and it multiplies itself by -15. This example basically multiplies the surrounding pixels by 2, and the intermediate pixels by a larger negative number to balance. Kernel is very useful for post-processing because it is easy to use. There are many examples available online, and we have to change the fragment shader in order to be able to use kernels. Let's assume that each kernel is 3 x 3 (in fact, most of them are 3 x 3):
const float offset = 1.0 / 300;
void main()
{
vec2 offsets[9] = vec2[](
vec2(-offset, offset), // top-left
vec2(0.0f, offset), // top-center
vec2(offset, offset), // top-right
vec2(-offset, 0.0f), // center-left
vec2(0.0f, 0.0f), // center-center
vec2(offset, 0.0f), // center-right
vec2(-offset, -offset), // bottom-left
vec2(0.0f, -offset), // bottom-center
vec2(offset, -offset) // bottom-right
);
float kernel[9] = float[](
-1, -1, -1,
-1, 9, -1,
-1, -1, -1
);
vec3 sampleTex[9];
for(int i = 0; i < 9; i++)
{
sampleTex[i] = vec3(texture(screenTexture, TexCoords.st + offsets[i]));
}
vec3 col;
for(int i = 0; i < 9; i++)
col += sampleTex[i] * kernel[i];
color = vec4(col, 1.0);
}In the fragment shader, we first create an array of nine vec2 offsets for each texture coordinate around it. The offset is a simple constant that you can set to your liking. Then we define the kernel, which should be a sharpening kernel, which sharpens each color value by sampling all the surrounding pixels in an interesting way. Finally, when sampling, we add each offset to the current texture coordinates, and multiply these texture values by the added kernels.
This sharpened kernel looks like this:
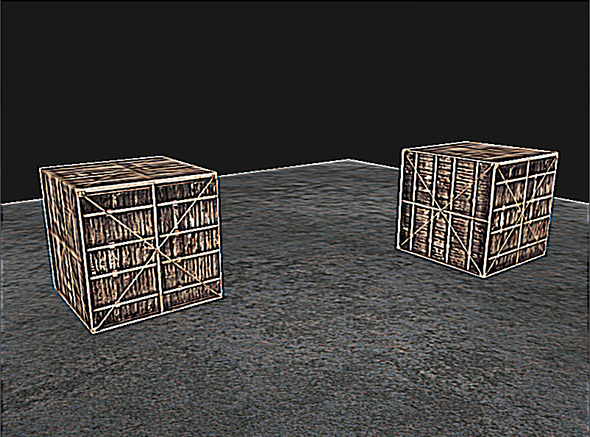
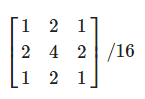
Since the sum of all the values is 16, the sample color combined by simple returns is very bright, so we must divide each value of the kernel by 16. The final array of kernels will look like this:
float kernel[9] = float[](
1.0 / 16, 2.0 / 16, 1.0 / 16,
2.0 / 16, 4.0 / 16, 2.0 / 16,
1.0 / 16, 2.0 / 16, 1.0 / 16
);
Such a blurring effect has the potential to create many interesting effects, which are used in post-processing very much, and it will be used in combination with Bloom post-processing rendering. Blurring also provides us with the ability to smooth all color values in the following tutorials.
Finally, the vertex shader and fragment shader codes about frame buffer are presented to readers as follows:
Vertex shader code:
#version 330 core
layout (location = 0) in vec2 position;
layout (location = 1) in vec2 texCoords;
out vec2 TexCoords;
void main()
{
gl_Position = vec4(position.x, position.y, 0.0f, 1.0f);
TexCoords = texCoords;
} The fragment shader code is as follows:
#version 330 core
in vec2 TexCoords;
out vec4 color;
uniform sampler2D screenTexture;
const float offset = 1.0 / 300;
void main()
{
vec2 offsets[9] = vec2[](
vec2(-offset, offset), // top-left
vec2(0.0f, offset), // top-center
vec2(offset, offset), // top-right
vec2(-offset, 0.0f), // center-left
vec2(0.0f, 0.0f), // center-center
vec2(offset, 0.0f), // center-right
vec2(-offset, -offset), // bottom-left
vec2(0.0f, -offset), // bottom-center
vec2(offset, -offset) // bottom-right
);
float kernel[9] = float[](
-1, -1, -1,
-1, 9, -1,
-1, -1, -1
);
vec3 sampleTex[9];
for(int i = 0; i < 9; i++)
{
sampleTex[i] = vec3(texture(screenTexture, TexCoords.st + offsets[i]));
}
vec3 col;
for(int i = 0; i < 9; i++)
col += sampleTex[i] * kernel[i];
color = vec4(col, 1.0);
} // Setup cube VAO
GLuint cubeVAO, cubeVBO;
glGenVertexArrays(1, &cubeVAO);
glGenBuffers(1, &cubeVBO);
glBindVertexArray(cubeVAO);
glBindBuffer(GL_ARRAY_BUFFER, cubeVBO);
glBufferData(GL_ARRAY_BUFFER, sizeof(cubeVertices), &cubeVertices, GL_STATIC_DRAW);
glEnableVertexAttribArray(0);
glVertexAttribPointer(0, 3, GL_FLOAT, GL_FALSE, 5 * sizeof(GLfloat), (GLvoid*)0);
glEnableVertexAttribArray(1);
glVertexAttribPointer(1, 2, GL_FLOAT, GL_FALSE, 5 * sizeof(GLfloat), (GLvoid*)(3 * sizeof(GLfloat)));
glBindVertexArray(0);
// Setup plane VAO
GLuint floorVAO, floorVBO;
glGenVertexArrays(1, &floorVAO);
glGenBuffers(1, &floorVBO);
glBindVertexArray(floorVAO);
glBindBuffer(GL_ARRAY_BUFFER, floorVBO);
glBufferData(GL_ARRAY_BUFFER, sizeof(floorVertices), &floorVertices, GL_STATIC_DRAW);
glEnableVertexAttribArray(0);
glVertexAttribPointer(0, 3, GL_FLOAT, GL_FALSE, 5 * sizeof(GLfloat), (GLvoid*)0);
glEnableVertexAttribArray(1);
glVertexAttribPointer(1, 2, GL_FLOAT, GL_FALSE, 5 * sizeof(GLfloat), (GLvoid*)(3 * sizeof(GLfloat)));
glBindVertexArray(0);
// Setup screen VAO
GLuint quadVAO, quadVBO;
glGenVertexArrays(1, &quadVAO);
glGenBuffers(1, &quadVBO);
glBindVertexArray(quadVAO);
glBindBuffer(GL_ARRAY_BUFFER, quadVBO);
glBufferData(GL_ARRAY_BUFFER, sizeof(quadVertices), &quadVertices, GL_STATIC_DRAW);
glEnableVertexAttribArray(0);
glVertexAttribPointer(0, 2, GL_FLOAT, GL_FALSE, 4 * sizeof(GLfloat), (GLvoid*)0);
glEnableVertexAttribArray(1);
glVertexAttribPointer(1, 2, GL_FLOAT, GL_FALSE, 4 * sizeof(GLfloat), (GLvoid*)(2 * sizeof(GLfloat)));
glBindVertexArray(0);
// Load textures
GLuint cubeTexture = loadTexture(FileSystem::getPath("resources/textures/container.jpg").c_str());
GLuint floorTexture = loadTexture(FileSystem::getPath("resources/textures/metal.png").c_str());
#pragma endregion
// Framebuffers
GLuint framebuffer;
glGenFramebuffers(1, &framebuffer);
glBindFramebuffer(GL_FRAMEBUFFER, framebuffer);
// Create a color attachment texture
GLuint textureColorbuffer = generateAttachmentTexture(false, false);
glFramebufferTexture2D(GL_FRAMEBUFFER, GL_COLOR_ATTACHMENT0, GL_TEXTURE_2D, textureColorbuffer, 0);
// Create a renderbuffer object for depth and stencil attachment (we won't be sampling these)
GLuint rbo;
glGenRenderbuffers(1, &rbo);
glBindRenderbuffer(GL_RENDERBUFFER, rbo);
glRenderbufferStorage(GL_RENDERBUFFER, GL_DEPTH24_STENCIL8, screenWidth, screenHeight); // Use a single renderbuffer object for both a depth AND stencil buffer.
glBindRenderbuffer(GL_RENDERBUFFER, 0);
glFramebufferRenderbuffer(GL_FRAMEBUFFER, GL_DEPTH_STENCIL_ATTACHMENT, GL_RENDERBUFFER, rbo); // Now actually attach it
// Now that we actually created the framebuffer and added all attachments we want to check if it is actually complete now
if(glCheckFramebufferStatus(GL_FRAMEBUFFER) != GL_FRAMEBUFFER_COMPLETE)
 cout << "ERROR::FRAMEBUFFER:: Framebuffer is not complete!" << endl;
glBindFramebuffer(GL_FRAMEBUFFER, 0);The code for each frame processing is as follows:
        /////////////////////////////////////////////////////
        // Bind to framebuffer and draw to color texture
        // as we normally would.
        // //////////////////////////////////////////////////
        glBindFramebuffer(GL_FRAMEBUFFER, framebuffer);
        // Clear all attached buffers
        glClearColor(0.1f, 0.1f, 0.1f, 1.0f);
        glClear(GL_COLOR_BUFFER_BIT | GL_DEPTH_BUFFER_BIT); // We're not using stencil buffer so why bother with clearing?

        glEnable(GL_DEPTH_TEST);
        // Set uniforms
        shader.Use();
        glm::mat4 model;
        glm::mat4 view = camera.GetViewMatrix();
        glm::mat4 projection = glm::perspective(camera.Zoom, (float)screenWidth/(float)screenHeight, 0.1f, 100.0f);
        glUniformMatrix4fv(glGetUniformLocation(shader.Program, "view"), 1, GL_FALSE, glm::value_ptr(view));
        glUniformMatrix4fv(glGetUniformLocation(shader.Program, "projection"), 1, GL_FALSE, glm::value_ptr(projection));

        // Floor
        glBindVertexArray(floorVAO);
        glBindTexture(GL_TEXTURE_2D, floorTexture);
        model = glm::mat4();
        glUniformMatrix4fv(glGetUniformLocation(shader.Program, "model"), 1, GL_FALSE, glm::value_ptr(model));
        glDrawArrays(GL_TRIANGLES, 0, 6);
        glBindVertexArray(0);
        // Cubes
        glBindVertexArray(cubeVAO);
        glBindTexture(GL_TEXTURE_2D, cubeTexture);
        model = glm::translate(model, glm::vec3(-1.0f, 0.0f, -1.0f));
        glUniformMatrix4fv(glGetUniformLocation(shader.Program, "model"), 1, GL_FALSE, glm::value_ptr(model));
        glDrawArrays(GL_TRIANGLES, 0, 36);
        model = glm::mat4();
        model = glm::translate(model, glm::vec3(2.0f, 0.0f, 0.0f));
        glUniformMatrix4fv(glGetUniformLocation(shader.Program, "model"), 1, GL_FALSE, glm::value_ptr(model));
        glDrawArrays(GL_TRIANGLES, 0, 36);
        glBindVertexArray(0);

        /////////////////////////////////////////////////////
        // Bind to default framebuffer again and draw the
        // quad plane with attched screen texture.
        // //////////////////////////////////////////////////
        glBindFramebuffer(GL_FRAMEBUFFER, 0);
        // Clear all relevant buffers
        glClearColor(1.0f, 1.0f, 1.0f, 1.0f); // Set clear color to white (not really necessery actually, since we won't be able to see behind the quad anyways)
        glClear(GL_COLOR_BUFFER_BIT);
        glDisable(GL_DEPTH_TEST); // We don't care about depth information when rendering a single quad

        // Draw Screen
        screenShader.Use();
        glBindVertexArray(quadVAO);
        glBindTexture(GL_TEXTURE_2D, textureColorbuffer);	// Use the color attachment texture as the texture of the quad plane
        glDrawArrays(GL_TRIANGLES, 0, 6);
        glBindVertexArray(0);


        // Swap the buffers
glfwSwapBuffers(window);Above is the introduction of frame buffer. Its main function is to get scene pixels. Post-processing is to render scene pixels. So this technology is widely used in post-processing development. This is also to reveal the nature of post-processing rendering for readers, and I hope it will be helpful to everyone.