Dockerfile custom image
docekr learned that so far, we are all using third-party images, that is, third-party images in the remote image warehouse, but there will be a problem?
Problem: images cannot be modified, but only have read permissions. In different specific environments, third-party images cannot support our needs. How to solve this problem?
Therefore, we need to customize the image to meet our needs, so we must understand the Dockerfile script file
brief introduction
-
Dockerfile image construction is based on the basic image. Dockerfile is a text file. The content is some docker instructions written by the user. Each instruction builds a layer. Therefore, the content of each instruction is to describe how the layer should be built.
-
Dockerfile is to build your own programs, files, environment, etc. into your desired application image to facilitate subsequent deployment, startup and maintenance; Through the form similar to simple coding commands, you can finally build your own image.
Common instruction classification
Dockerfile has 13 basic instructions: FROM, MAINTAINER, RUN, CMD, EXPOSE, ENV, ADD, COPY, ENTRYPOINT, VOLUME, USER, WORKDIR and ONBUILD
| Instruction type | command |
|---|---|
| Basic image information | FROM |
| Maintainer information | MAINTAINER |
| Mirror operation instruction | RUN, COP, ADD, EXPOSE, WORKDIR, ONBUILD, USER, VOLUME, etc |
| Execute command when container starts | CMD,ENTRYPOINT |
Instruction details
1. FROM specifies the basic image
- Specify base mirror [it also means that the instructions written next will start as the first layer of the image]
- If it is not based on any image, it is written as: FROM scratch
FROM <image>
FROM <image>:<tag>
FROM <image>:<digest>
# < tag > and < digest > are optional. If they are not selected, the default value is latest
# Tag version tag
# digest
2.MAINTAINER maintainer information
- Specify author, name & email
MAINTAINER <name>
3. RUN
- Run the specified command [e.g. perform some actions, install system software, configure system information]
- RUN is the command to RUN when the component container is and the result to submit
The run command runs a command in two formats:
- Directly follow the shell command
- On linux systems, the default is / bin/sh -c
- The default on win system is cmd /S /C
- Similar to function call exec
- Executable can be understood as an executable file, followed by two parameters.
- RUN ["executable", "parameter 1", "parameter 2"]
Syntax:
1. RUN <command>
2. RUN ["executable", "param1", "param2"]
Example:
#1. Display HTML to nginx Chinese homepage in shell command format and write 'hello'
RUN echo 'hello ' >/etc/nginx/html/index.html

# 2. In exec format, install nginx in the new image using yum or up2date
RUN ["yum","install","nginx"]
be careful:
- Do not write multiple runs for multi line commands. Each instruction in Dockerfile will establish a layer
- The number of lines of the RUN instruction represents the number of layers of the image. There is a maximum number of file layers in an image, and too many layers increase the time of component deployment
- The newline character in RUN writing is\
4. CMD
- Commands to run when the container starts
- CMD is the command executed when the container is started. It does not run when the component is started. The component tightly specifies what the command looks like
CMD can be written in three ways:
# 1. exec format: CMD ["executable", "parameter 1", "parameter 2"...]
CMD ["executable","param1","param2"]
# For example:
CMD [ "sh", "-c", "echo $HOME" ]

# 2. exec
CMD ["param1","param2"]
# For example:
CMD ["/bin/bash"]

# 3. shell format
CMD command param1 param2
# For example:
CMD /bin/bash

# The third is easier to understand. It's the execution and writing method of the shell
# The first and second are actually executable files with parameters
be careful:
- In the case of exec format, the parameter must be in double quotation marks [reason: docker parses a JSON array]
- CMD can only appear once in Dockerfile. If there are multiple, only the last one will be valid. Its function is to provide a default command item when starting the container. If the user provides a command item when executing docker run, the command will be overwritten. If not, the build time command will be used.
5. LABEL
- Specify a label for the mirror
Syntax:
LABEL <key>=<value> <key>=<value> <key>=<value> ...

# Dockerfile can have multiple LABEL labels
LABEL multi.label1="value1" \
multi.label2="value2" \
other="value3"
be careful:
- LABEL inherits the LABEL of the underlying image. If the key is the same, the value is overwritten
6. MAINTAINER author information
- Specify author and mailbox
MAINTAINER <name> <email>

# For example:
MAINTAINER autor_yuchang 8888888@qq.com
7. EXPOSE port
- Set the container port number of the external mapping of the container
EXPOSE <Port 1> [<Port 2>...]
Export 8081 is actually equivalent to docker run -p 8081. When it is necessary to map the 8081 port to a port in the host (such as 8888) for external access, you can use docker run -p 8888:8081
8. ENV environment variable
- Setting environment variables
- If it is called by a script or program in the container, this variable will be retained when the container runs
Syntax:
# Single environment variable
 ENV <key> <value>
# Multiple environment variables
ENV <key>=<value> ...

# For example, set an environment variable JAVA_HOME
ENV JAVA_HOME /opt/jdk
ENV PATH $PATH:$JAVA_HOME/bin
be careful:
- It is transitive, that is, when the current image is used as the basic image of other images, the new image will have all the environment variables of the current basic image
- Environment variables defined by ENV can be used in all subsequent instructions (except CMD) of dockerfile, but cannot be referenced by the command parameters of docker run
# Transitive
ENV tomcat_home_name tomcat_7
RUN mkdir $tomcat_home_name
9. ADD replication
- Copy command to copy the file to the image
- Same as the COPY instruction
Syntax:
# < SRC > can be a local file or a local compressed file, or a url [< SRC > is written as a url, then ADD is similar to wget command]
# The < dest > path can be either an absolute path in the container or a relative path relative to the working directory
ADD <src>... <dest>
ADD ["<src>",... "<dest>"]

# For example:
ADD test relativeDir/
ADD test /relativeDir
ADD http://example.com/foobar /

# Note: try not to write < SCR > as a folder. If < SRC > is a folder, copy the contents of the entire directory, including file system metadata
10. COPY
- Copy command
- Same as the add command
Syntax:
COPY <src>... <dest>
COPY ["<src>",... "<dest>"]
be careful:
- COPY's < SRC > can only be local files, and other uses are consistent
11. ENTRYPOINT
- Default command at startup [somewhat similar to CMD]
Syntax:
# The basic syntax of entrypoint is divided into two types
# 1. The command is directly followed by the shell command
ENTRYPOINT command param1 param2
# 2. Executable plus parameters
ENTRYPOINT ["executable", "param1", "param2"]
12. VOLUME
- Realize the mounting function [hang the inland folder or the folder in other containers in this container]
- Data persistence, container, data sharing
Syntax:
VOLUME ["/data"]
#  ["/ data"] can be a JsonArray or multiple values
VOLUME ["/var/log/"]
VOLUME /var/log
VOLUME /var/log /var/db

# You can also use docker run -v to mount anonymous mount points to a directory on the host machine
docker run -d -v Container directory:Local directory
13. USER
- Set the user who starts the container [can be user name or user uid]
Syntax:
#Note: if the container is set to run with the daemon user, RUN, CMD and ENTRYPOINT will run with this user

USER daemo
USER UID
14. WORKDIR
- Set working directory [used for directory switching. If the directory does not exist, a new directory will be created directly]
Syntax:
# Note: the WORKDIR command can appear multiple times
WORKDIR /path/to/workdir

# WORKDIR can also resolve environment variables
ENV DIRPATH /path
WORKDIR $DIRPATH/$DIRNAME
RUN pwd
# The execution result of pwd is / path/$DIRNAME
15. ONBUILD
- It is used to configure the currently created image as the basic image of other newly created images
Syntax:
ONBUILD [INSTRUCTION]
16. ENV
- Set the environment variable of the container [exists in the form of key=value and is called by a script or program in the container. This variable will also be retained when the container runs]
Syntax:
# Set a parameter
ENV <key> <value>
#You can also set multiple parameters
ENV <key1>=<value1> <key2>=<value2>...

# For example, set an environment variable JAVA_HOME
ENV JAVA_HOME /opt/jdk
ENV PATH $PATH:$JAVA_HOME/bin
be careful:
- It is transitive, that is, when the current image is used as the basic image of other images, the new image will have all the environment variables of the current basic image
- Environment variables defined by ENV can be used in all subsequent instructions (except CMD) of dockerfile, but cannot be referenced by the command parameters of docker run
- In addition to ENV, docker run -e can also set the environment variable to be passed into the container.
17. HEALTHCHECK
- Container health check command
Syntax:
# Run a command inside the container to check the health of the container
HEALTHCHECK [OPTIONS] CMD command
# Cancels the health check command in the underlying mirror
HEALTHCHECK NONE
The OPTIONS of [OPTIONS] support the following three OPTIONS:
- --interval=DURATION the default interval between two checks is 30 seconds
- --Timeout = timeout of duration health check command, 30 seconds by default
- --retries=N after a specified number of consecutive failures, the container is considered unhealthy, the status is unhealthy, and the default number is 3
be careful:
- The HEALTHCHECK command can only appear once. If it occurs multiple times, only the last one takes effect.
- The return value of the command behind CMD determines whether the health check is successful
0: success - Indicates that the container is healthy

1: unhealthy - Indicates that the container is no longer working

2: reserved - Reserved value

# For example:
example:

HEALTHCHECK --interval=5m --timeout=3s \
CMD curl -f http://localhost/ || exit 1

# The health check command is curl -f http://localhost/ || exit 1
# The interval between the two checks is 5 seconds and the command timeout is 3 seconds
Preparation and practice of Dockerfile
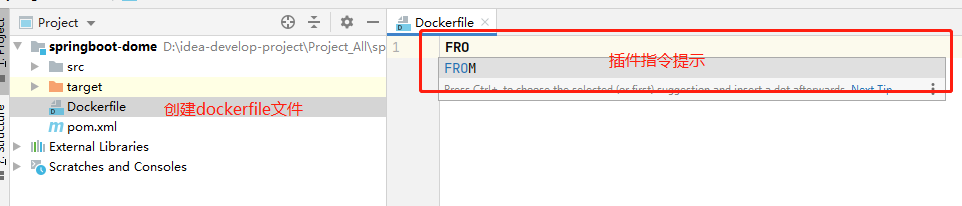
After understanding the basic commands of dockerfile, we try to write a dockerfile file
Write dockerfile
- Use idea to write and download the docker plug-in
- Install an nginx on centos system
FROM centos
MAINTAINER test123 123456789@qq.com
RUN ping -c 1 www.baidu.com
RUN yum -y install gcc make pcre-devel zlib-devel tar zlib
ADD nginx-1.18.0.tar.gz /usr/src
RUN  cd /usr/src/nginx-1.18.0 \
     && mkdir /usr/local/nginx  \
     && ./configure --prefix=/usr/local/nginx && make &&make install \
     && ln -s /usr/local/nginx/sbin/nginx  /usr/local/sbin/  \
     && nginx
RUN rm -rf /usr/src/nginx-1.18.0
EXPOSE 80
CMD ["nginx","-g","daemon off;"]
And upload the downloaded nginx package and the prepared dockerfile to the server in the same folder
- Building images with Dockerfile
docker build command
[root@bogon data]# docker build --help

Usage:  docker build [OPTIONS] PATH | URL | -

Build an image from a Dockerfile

Options:
      --add-host list           Add a custom host-to-IP mapping (host:ip)
      --build-arg list          Set build-time variables
      --cache-from strings      Images to consider as cache sources
      --cgroup-parent string    Optional parent cgroup for the container
      --compress                Compress the build context using gzip
      --cpu-period int          Limit the CPU CFS (Completely Fair Scheduler) period
      --cpu-quota int           Limit the CPU CFS (Completely Fair Scheduler) quota
  -c, --cpu-shares int          CPU shares (relative weight)
      --cpuset-cpus string      CPUs in which to allow execution (0-3, 0,1)
      --cpuset-mems string      MEMs in which to allow execution (0-3, 0,1)
      --disable-content-trust   Skip image verification (default true)
  -f, --file string             Name of the Dockerfile (Default is 'PATH/Dockerfile')
      --force-rm                Always remove intermediate containers
      --iidfile string          Write the image ID to the file
      --isolation string        Container isolation technology
      --label list              Set metadata for an image
  -m, --memory bytes            Memory limit
      --memory-swap bytes       Swap limit equal to memory plus swap: '-1' to enable unlimited swap
      --network string          Set the networking mode for the RUN instructions during build (default "default")
      --no-cache                Do not use cache when building the image
      --pull                    Always attempt to pull a newer version of the image
  -q, --quiet                   Suppress the build output and print image ID on success
      --rm                      Remove intermediate containers after a successful build (default true)
      --security-opt strings    Security options
      --shm-size bytes          Size of /dev/shm
  -t, --tag list                Name and optionally a tag in the 'name:tag' format
      --target string           Set the target build stage to build.
      --ulimit ulimit           Ulimit options (default [])
[root@bogon data]#

# Common instructions
--build-arg=[]	# Sets the variable when the mirror is created
-f 				# Specify the path of the Dockerfile to be used [Dockerfile can be specified when the Dockerfile is not in the same directory as the currently executing command]
--force-rm 		# Set the intermediate container to be deleted during mirroring
--rm			# Delete the intermediate container after setting the image successfully
--tag,-t		# The name and label of the image, usually in the format of name:tag or name
Start building and execute the command
docker build -t mynginx:1.18.0 .

# -t  	 Image name and label
# Finally, there is a '.' don't forget, which represents the current directory
We can see that there are steps in the execution process according to the instructions we write

- View and run custom images
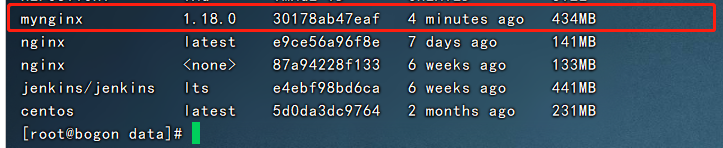
You can see that the image we built already exists locally through the docker images command
Start mirroring:
# 1. Start centos first
docker run -d -i -t -p 8081:80  30178ab47eaf
# Start the container. If / bin/bash is not added, the CMD command in dockerfilr will be overwritten, resulting in failure to start port 80

# Problem: docker curl: (56) Recv failure: Connection reset by peer
# Solution: the / bin/bash parameter cannot be added to the start command

Commit local mirror to remote
- docker login
docker login # Log in to remote warehouse
- Commit the container as a new image
docker commit container id\Container name new image name:edition

# Note: the image name must be XXX / name. XXX is the user name on your dockerhub and base is the warehouse name. Otherwise, the subsequent push will fail

docker commit 5615647e67a1 casainurbania/base:v1.0
- Push to remote warehouse
docker push casainurbania/base:v1.0
MYSQL5.6 case dockerfile analysis
recommend: MYSQL5.6 case dockerfile analysis
Recommended Docker articles
Docker file system & data volume
Docker installation and basic commands
Docker deployment nginx/tomcat/ES+kibana
Reference article:
Dockerfile Command details (super full version)[https://www.cnblogs.com/dazhoushuoceshi/p/7066041.html]
How to use Dockerfile Build mirror [https://www.cnblogs.com/momoyan/p/12437312.html]