Dockerfile common instructions:
1. FROM: which image is used to build the image
For example: FROM centos
2. MAINTAINER: name or email address of image MAINTAINER
For example: maintainer sun Qi Ming
3. RUN: the shell command to RUN when building the image
For example:
RUN [ "yum","install","httpd"]
RUN yum -y install httpd
4. CMD: shell command executed when running the container
For example:
CMD ["/bin/bash"]
5. The service port of the EXPOSE declaration container
For example: EXPOSE 80 443
EXPOSE declaration port
The format is expose < port 1 > [< port 2 >...].
The EXPOSE instruction is to declare that the runtime container provides the service port, which is only a declaration, and the application will not open the service of this port at runtime because of this declaration. There are two advantages of writing such a declaration in the Dockerfile: one is to help image users understand the guard port of the image service, so as to facilitate configuration mapping; the other is to automatically map the exit port when using random port mapping at runtime, that is, when docker run-p.
To distinguish EXPOSE from using - p < host port >: < container port > at run time. -p is to map the host port and container port. In other words, it is to EXPOSE the corresponding port service of the container to the outside world, while EXPOSE is only to declare what port the container intends to use, and it will not automatically map the port in the host.
6. ENV: set container environment variables
For example: env MySQL? Root? Password 123.com
7. ADD: copy the file or directory to the image. If it is a URL or a compressed package, it will be automatically downloaded or decompressed
Add < source file >... < destination directory >
ADD ["source file"... "Destination directory"]
For example:
ADD https://xxx.com/html.tar.gz /var/www/html
ADD html.tar.gz /var/www/html
8. COPY: COPY files or directories to the image container, similar to ADD, but without automatic download or decompression function
For example: copy. / start.sh / start.sh
9. ENTRYPOINT: the shell command executed by the running container
For example:
ENTRYPOINT ["/bin/bash","-c","/start.sh"]
ENTRYPOINT /bin/bash -c '/start.sh'
10. VOLUME: Specifies the container mount point to the directory or other containers automatically generated by the host
For example:
VOLUME ["/var/lib/mysql"]
11. USER: Specifies the running USER for the RUN, CMD, and ENTRYPOINT execution commands
USER <user>[:<group>] OR USER <UID>[:<GID>]
For example:
USER sunpengjun
12. WORKDIR: set working directory for RUN, CMD, ENTRYPOINT, COPY and ADD
For example:
WORKDIR /data
13. Health check: health check
14. ARG: specify some parameters during construction
For example:
FROM centos
ARG user
USER $user
Be careful
1. RUN runs when building and can write multiple
2. When CMD and ENTRYPOINT are running container, only one entry can be written. If more than one entry is written, the last entry will take effect.
3. CMD can be overridden by COMMAND when run ning, entrypoint will not be overridden by COMMAND, but -- entrypoint can be specified to override.
Docker cache features:
If you need to use the previously cached image in the same layer, you do not need to download it again. But if the upper layer of the image layer changes, even in the same layer, the cache will not be used. If you have to use the cache, you can add the -- no cache parameter.
Each instruction in the Dockerfile will create a mirror layer. The upper layer depends on the lower layer. Whenever a layer changes, the cache of all layers above it will fail.
In other words, if we change the execution order of the Dockerfile instructions, or modify or add instructions, the cache will be invalidated.
Advantages of Dockerfile:
By using dockerfile to make images, you can clearly see the operation of each layer of the image, which has high security and strong portability.
Dockerfile detached deployment LNMP (binary installation):
Tip: you need to download the installation package required by nginx, php and mysql to the local area in advance (the structure directory is as follows).
Preparation for deployment:
1. Solve the problem of fixed ip address of the container:
After the container is restarted, the ip address will not be changed, and it is convenient for management and operation.
1)Custom network:
[root@sqm-docker01 nginx]#  docker network create -d bridge --subnet  172.16.10.0/24 --gateway 172.16.10.1 mynet1
2. Create the mount Directory:
Web root directory / wwwroot
Configuration file directory / docker \ \ conf
[root@sqm-docker01 nginx]# mkdir /wwwroot
[root@sqm-docker01 nginx]# mkdir /docker_conf
To deploy nginx:
[root@sqm-docker01 ~]# vim Dockerfile
The code is as follows:
FROM centos:7
ADD nginx-1.8.0.tar.gz /
ADD nginx-sticky-module.zip /
ADD ngx_cache_purge-2.3.tar.gz /
RUN yum -y install gcc* pcre-devel openssl-devel zlib-devel unzip make vim net-tools elinks tree \
 && groupadd nginx \
 &&  useradd  nginx -g nginx  -s /sbin/nologin
WORKDIR nginx-1.8.0/
RUN ./configure --prefix=/usr/local/nginx \
 --user=nginx \
 --group=nginx \
 --with-http_stub_status_module \
 --with-http_realip_module \
 --with-http_ssl_module \
 --with-http_gzip_static_module \
 --http-client-body-temp-path=/var/tmp/nginx/client \
 --http-proxy-temp-path=/var/tmp/nginx/proxy \
 --http-fastcgi-temp-path=/var/tmp/nginx/fcgi \
 --with-pcre \
 --add-module=../ngx_cache_purge-2.3  \
 --with-http_flv_module \
 && make && make install \
 &&  ln  -s /usr/local/nginx/sbin/nginx   /usr/local/sbin/ \
 && mkdir -p  /var/tmp/nginx/client/ \
 && chown -R nginx   /var/tmp/nginx/client/  \
 && sed -i -e  's/nobody/nginx/' -e '2s/^#//' /usr/local/nginx/conf/nginx.conf
EXPOSE 80
CMD ["nginx","-g","daemon off;"]
//To build a nginx image:
[root@sqm-docker01 nginx]# docker build -t nginx .
Note: the name cannot have uppercase or special characters. The last. Indicates the dockerfile file in the current directory, and only one dockerfile can exist in one directory.

//Run nginx container:
[root@sqm-docker01 mysql]# docker run -itd --name nginx1.8.0 --network mynet1 --ip 172.16.10.10  --restart=always -p 80:80 nginx
Deploy PHP FPM:
[root@sqm-docker01 php]# vim Dockerfile
The code is as follows:
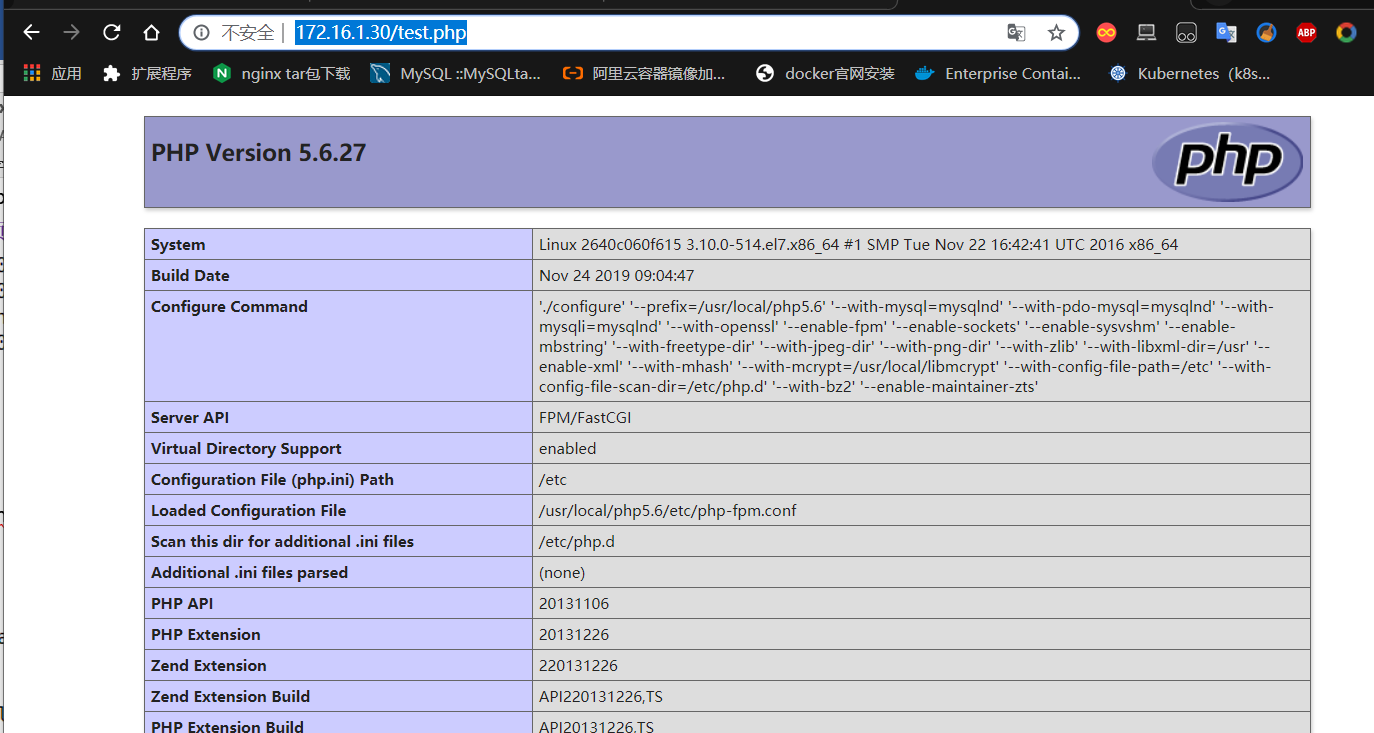
FROM centos:7
ADD libmcrypt-2.5.7.tar.gz /
ADD php-5.6.27.tar.gz /
RUN  yum -y install gcc* pcre-devel zlib-devel tree  unzip make vim net-tools elinks libxml2-devel libcurl-devel openssl-devel bzip2-devel
WORKDIR /libmcrypt-2.5.7/
RUN ./configure --prefix=/usr/local/libmcrypt && make && make install \
&& cd /php-5.6.27 \
&&  ./configure  --prefix=/usr/local/php5.6 --with-mysql=mysqlnd \
 --with-pdo-mysql=mysqlnd \
 --with-mysqli=mysqlnd \
 --with-openssl \
 --enable-fpm \
 --enable-sockets \
 --enable-sysvshm \
 --enable-mbstring \
 --with-freetype-dir \
 --with-jpeg-dir \
 --with-png-dir  \
 --with-zlib \
 --with-libxml-dir=/usr  \
 --enable-xml \
 --with-mhash \
 --with-mcrypt=/usr/local/libmcrypt \
 --with-config-file-path=/etc \
 --with-config-file-scan-dir=/etc/php.d \
 --with-bz2 --enable-maintainer-zts \
 && make &&  make install \
 && cp php.ini-production /etc/php.ini \
 && cp sapi/fpm/init.d.php-fpm /etc/init.d/php-fpm \
 && chmod +x /etc/init.d/php-fpm \
 && chkconfig --add php-fpm \
 && chkconfig php-fpm on \
 && cp /usr/local/php5.6/etc/php-fpm.conf.default /usr/local/php5.6/etc/php-fpm.conf \
 && sed -i -e  's/;daemonize = yes/daemonize = no/g' -e 's/127.0.0.1/0.0.0.0/g' /usr/local/php5.6/etc/php-fpm.conf
EXPOSE 9000
CMD ["/usr/local/php5.6/sbin/php-fpm","-c","/usr/local/php5.6/etc/php-fpm.conf"]
//To build a PHP FPM image:
[root@sqm-docker01 php]# docker build -t php-fpm .
//Run the php container:
[root@sqm-docker01 mysql]# docker run -itd --name php-fpm --network mynet1 --ip 172.16.10.20  --restart=always -p 9000:9000 php-fpm
Deploy mysql5.7.28:
[root@sqm-docker01 mysql]# vim Dockerfile
The code is as follows:
FROM centos:7
RUN yum -y install gcc*  zlib-devel make vim net-tools  cmake bison  ncurses-devel gcc gcc-c++ pcre pcre-devel openssl openssl-devel libaio initscripts
ADD boost_1_59_0.tar.gz /opt
ADD  mysql-5.7.28.tar.gz /opt
WORKDIR /opt/mysql-5.7.28
RUN cmake -DCMAKE_INSTALL_PREFIX=/usr/local/mysql-5.7.28 \
-DWITH_BOOST=/opt/boost_1_59_0 \
-DMYSQL_UNIX_ADDR=/data/mysql/tmp/mysql.sock \
-DMYSQL_DATADIR=/data/mysql \
-DDEFAULT_CHARSET=utf8mb4 \
-DDEFAULT_COLLATION=utf8mb4_general_ci \
-DWITH_EXTRA_CHARSETS=all \
-DWITH_MYISAM_STORAGE_ENGINE=1 \
-DWITH_INNOBASE_STORAGE_ENGINE=1 \
-DWITH_MEMORY_STORAGE_ENGINE=1 \
-DWITH_READLINE=1 \
-DWITH_INNODB_MEMCACHED=1 \
-DWITH_DEBUG=OFF \
-DWITH_ZLIB=bundled \
-DENABLED_LOCAL_INFILE=1 \
-DENABLED_PROFILING=ON \
-DMYSQL_MAINTAINER_MODE=OFF \
-DMYSQL_TCP_PORT=3306 \
 && make && make install
RUN  ln -s /usr/local/mysql-5.7.28 /usr/local/mysql \
 && echo "export PATH=/usr/local/mysql/bin:$PATH" >> /etc/profile \
 && echo "export PATH=/usr/local/mysql/bin:/usr/local/mysql/lib:$PATH" >> /etc/profile \
 && source /etc/profile \
 && mkdir -p /data/mysql/{data,tmp,logs,pids,share} \
 && touch /data/mysql/logs/mysqld.log \
 && touch /data/mysql/pids/mysqld.pid \
 && useradd -s /sbin/nologin -M mysql \
 && chown -R mysql:mysql /data/mysql
COPY my.cnf /etc/my.cnf
RUN cd /usr/local/mysql \
 && cp support-files/mysql.server /etc/init.d/mysqld \
 && chmod a+x /etc/init.d/mysqld \
 && chkconfig --add mysqld \
 && chkconfig mysqld on \
 && ln -s /usr/local/mysql/bin/* /usr/local/bin \
 && mysqld --initialize-insecure --user=mysql --basedir=/usr/local/mysql --datadir=/data/mysql/data
COPY mysql-start.sh /opt
COPY user.sh /opt
RUN chmod a+x /opt/mysql-start.sh \
 && chmod a+x /opt/user.sh
EXPOSE 3306
CMD ["/opt/mysql-start.sh"]
##The script code in dockerfile is as follows:
[root@sqm-docker01 mysql]# cat my.cnf
[mysqld]
character-set-server=utf8mb4
collation-server=utf8mb4_general_ci
datadir=/data/mysql/data
socket=/data/mysql/tmp/mysql.sock

[mysqld_safe]
log-error=/data/mysql/logs/mysqld.log
pid-file=/data/mysql/pids/mysqld.pid

[client]
default-character-set=utf8mb4
[root@sqm-docker01 mysql]# cat mysql-start.sh
#!/bin/bash
chown -R mysql:mysql /data/mysql
/sbin/service mysqld start
/bin/bash       #Keep a terminal to prevent the container from exiting automatically
//To change the database password and authorize the user:
[root@sqm-docker01 mysql]# cat user.sh
#!/bin/bash
mysqlpwd=` grep password /data/mysql/logs/mysqld.log | awk -F 'root@localhost: ' '{print $2}'`
mysql -uroot -p${mysqlpwd} -e 'alter user root@localhost identified by"pwd@123"' --connect-expired-password
mysql -u root -ppwd@123 <<EOF
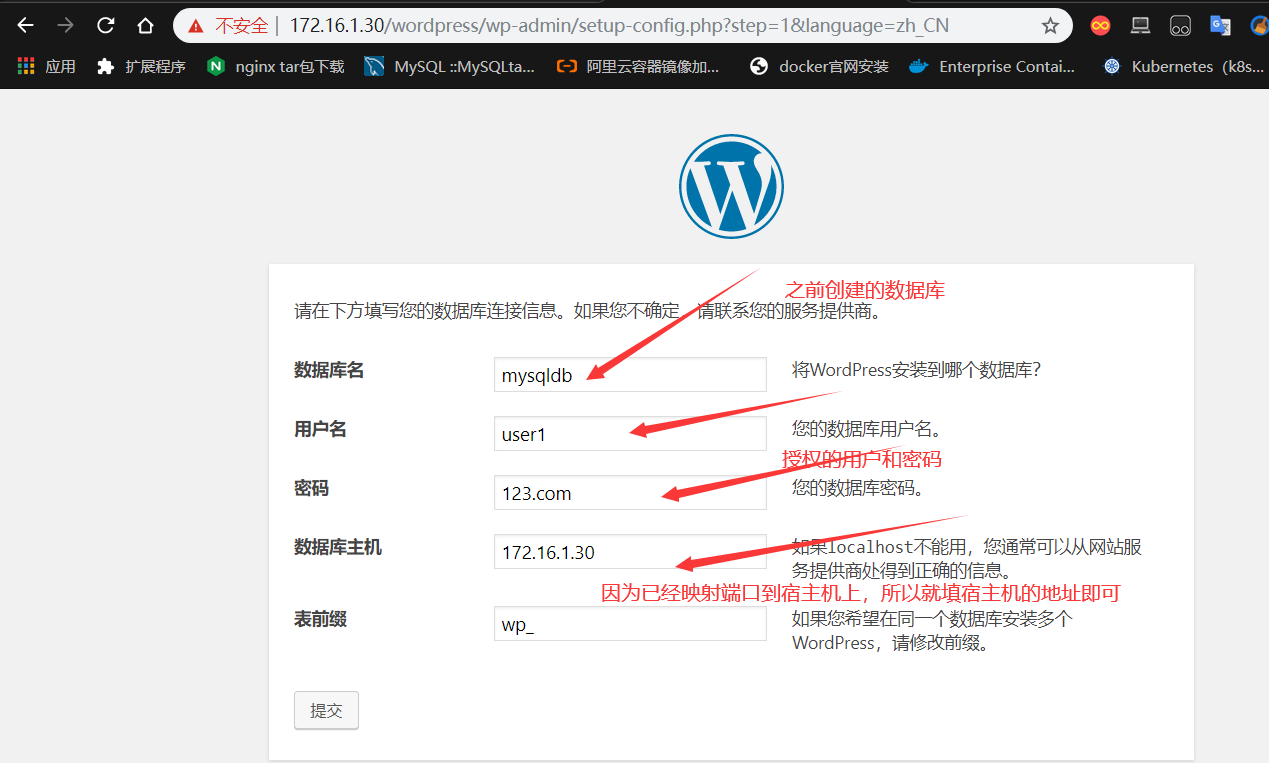
create database mysqldb;
grant all on mysqldb.* to user1@'%' identified by '123.com';
EOF
###To build mysql image:
[root@sqm-docker01 mysql]# docker build -t mysql .
//Run mysql container:
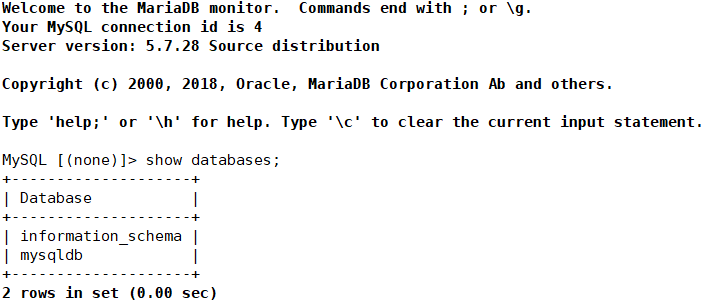
[root@sqm-docker01 mysql]# docker run -itd --name mysql5.7.28 --network mynet1 --ip 172.16.10.30 --restart=always -p 3306:3306 -e MYSQL_ROOT_PASSWORD=pwd@123 mysql

//Execute script in container (change database password)
[root@sqm-docker01 mysql]# docker exec mysql5.7.28 sh /opt/user.sh
//Test login mysql database:
Test with user1 user, because root user I only set to allow mysql server to log in locally, other hosts do not have permission. (you need to download mysql client on dockerhost)
[root@sqm-docker01 mysql]# yum -y install mysql
[root@sqm-docker01 mysql]# mysql -u user1 -p123.com -h 127.0.0.1 -P 3306
Configure nginx PHP MySQL mutual parsing:
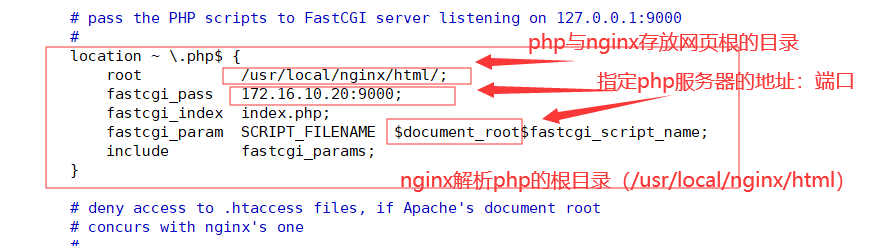
1) modify nginx configuration file:
copy the directory where nginx stores configuration files to dockerhost:
[root@sqm-docker01 ~]# docker cp nginx1.8.0:/usr/local/nginx/conf /docker_conf/

[root@sqm-docker01 conf]# vim nginx.conf
The amendment is as follows: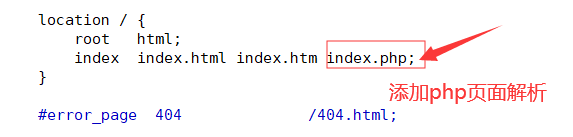
2) create a web page to test and parse php:
Same will nginx Copy the web directory of to the host:
[root@sqm-docker01 ~]# docker cp nginx1.8.0:/usr/local/nginx/html /wwwroot/
[root@sqm-docker01 ~]# cd /wwwroot/html/
[root@sqm-docker01 html]# cat > test.php <<EOF
> <?php
> phpinfo();
> ?>
> EOF
3) mount the directory on dockerhost into the container:
//We need to delete the nginx and php containers, run them again and mount them. In fact, we need to build the service on the top. Instead of running the service first, we can run it now. I want to test whether the installation is successful. Of course, you can also write web documents from the beginning and mount them directly.
[root@sqm-docker01 html]# docker rm -f nginx1.8.0
[root@sqm-docker01 html]# docker run -itd --name nginx1.8.0 --network mynet1 \
> --ip 172.16.10.10 --restart=always  -p 80:80 \
> -v /docker_conf/conf/:/usr/local/nginx/conf/  -v /wwwroot/html/:/usr/local/nginx/html  nginx
[root@sqm-docker01 ~]# docker rm -f php-fpm
[root@sqm-docker01 ~]# docker run -itd --name php-fpm --network mynet1 \
> --ip 172.16.10.20 --restart=always -p 9000:9000 \
> -v /wwwroot/html/:/usr/local/nginx/html/ php-fpm
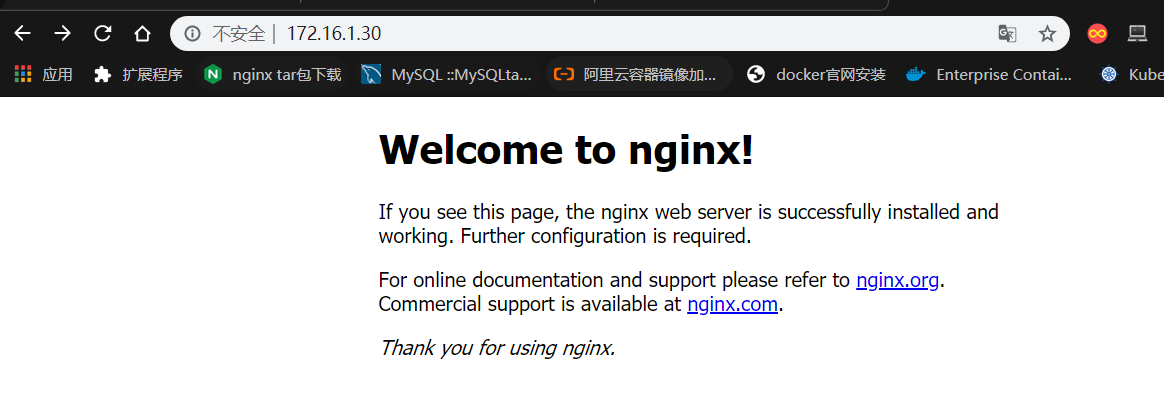
Test to visit nginx and php parsing page:
Set up wordpress test lnmp environment:
1) Download wordpress installation package to the root directory of the web page:
[root@sqm-docker01 ~]# cd /wwwroot/html/
[root@sqm-docker01 html]# wget https://cn.wordpress.org/wordpress-4.7.4-zh_CN.tar.gz
//After downloading, unzip the installation package:
[root@sqm-docker01 html]# tar zxf wordpress-4.7.4-zh_CN.tar.gz

2) browser test access:
URL: http: / / container host IP/wordpress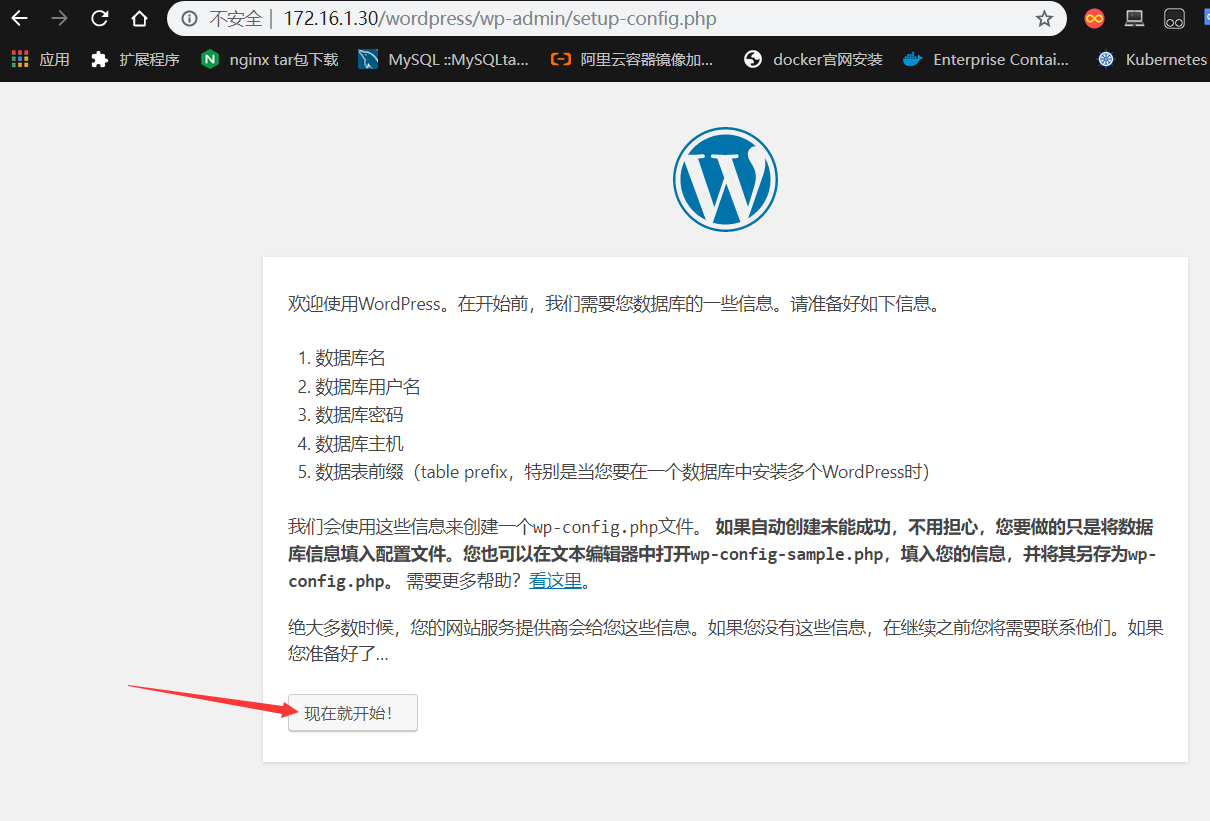

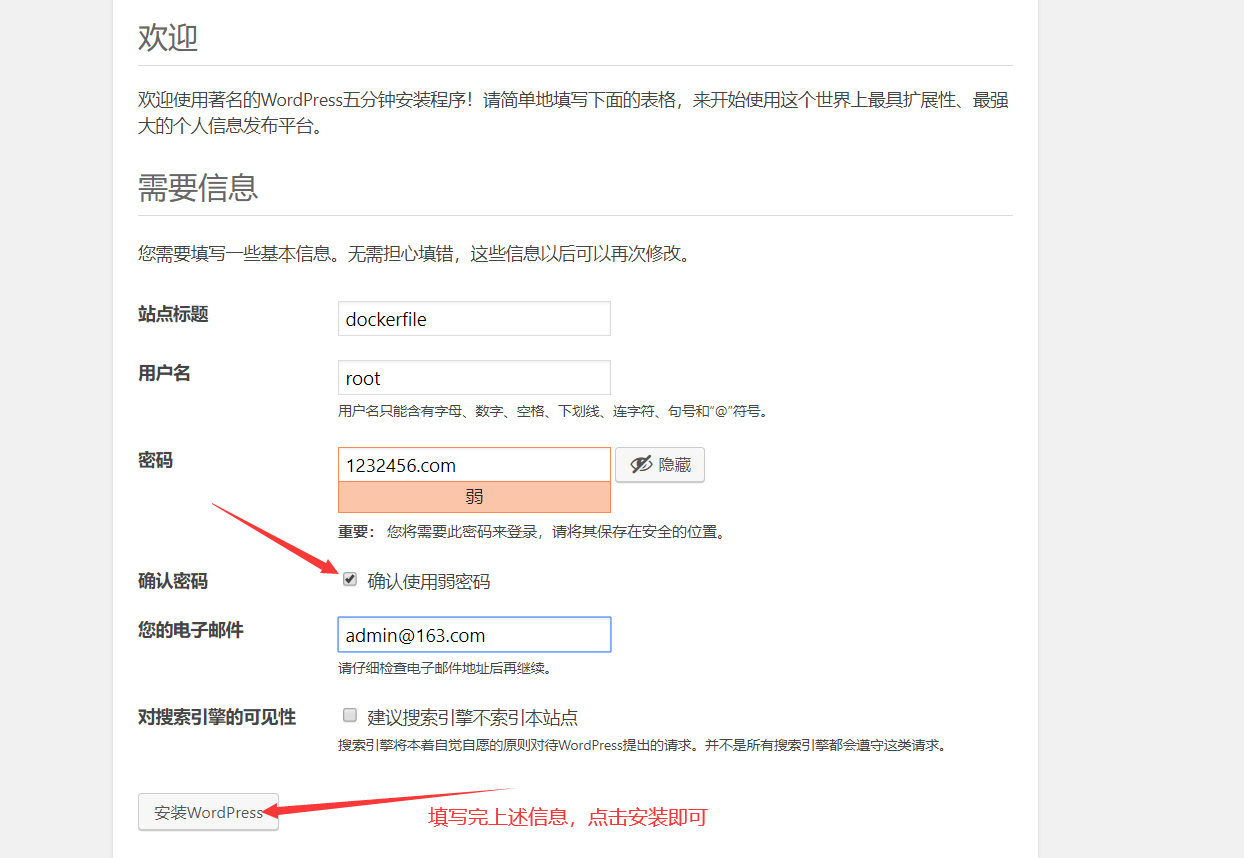
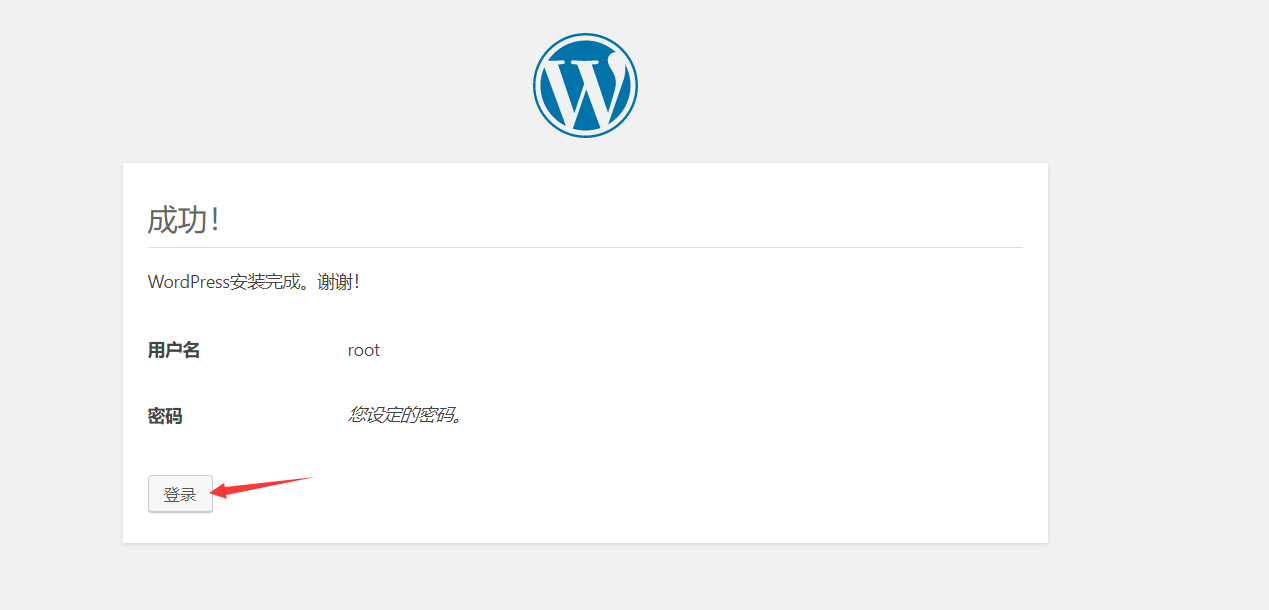

Login successful, lnmp set up........
————————Thank you for reading————————