There are too many official introductions about Docker on the Internet that I won't post. As a practical experience, Docker can greatly simplify the process of setting up environment and deploying services, greatly reduce the time cost of deployment, and free your hands.
This article will not go into the Docker underlying architecture and how it works, nor will there be a bunch of schema maps posted here.The purpose of this article is to let you learn to use Docker as quickly as possible. You can learn more about Docker's architecture and its underlying layers after you have learned the basic uses of Docker.It's a bit confusing to get to the bottom of an architecture chat, but you should know at least three of Docker's core components: warehouses, mirrors and containers, and their relationships before you use Docker.This article will take you through a MySQL sample to understand and use Docker, and it will be easy to understand if you have a basic understanding of Docker and then look back at its architecture.
Three Core Components
Warehouse: Warehouses are places where mirrors are stored centrally. After installing Docker locally, we need to pull the mirrors from the warehouse.It can be compared to Maven, which has public warehouses and private warehouses.
Mirror: is a Linux file system that stores programs and their data that can be run on the Linux kernel.
Container: A running instance created by a mirror that can be interpreted as a compact version of the Linux system in which the programs in the mirror run.
In order to better understand the relationship between the three, I make an inappropriate but very image ratio. Mirror is equivalent to your weixin.exe file, container is equivalent to your installed WeChat program, WeChat program (container) needs your weixin.exe file (mirror) to install (create), then the warehouse is equivalent to the application store, you can download your.Exe from the store.Parts (mirror).
After the installation of the Wechat program, you can choose to run or close, the Docker container can run and stop as well, the Wechat program can be uninstalled from the system, and the Docker container can also be deleted.
However, one difference is that you can delete the weixin.exe file once it is installed. It has nothing to do with your WeChat program. Deleting the installation file will not affect the operation of your WeChat program.However, mirrors are different. If a container is using the mirror, it cannot be deleted (Error will tell you not to delete it when deleted).
First address: https://www.guitu18.com/post/2020/01/20/66.html
Install Docker
CentOS Installation Docker requires:
- Must be a 64-bit operating system
- Kernel version over 3.8
You can view your system's kernel via uname-r:
[root@localhost ~]# uname -r
3.10.0-1062.18.1.el7.x86_64
[root@localhost ~]#
Install in yum mode:
yum install docker -y
After installation, you can view your docker version information via docker version:
[root@localhost ~]# docker version
Client:
 Version:         1.13.1
 API version:     1.26
 Package version: docker-1.13.1-109.gitcccb291.el7.centos.x86_64
 Go version:      go1.10.3
 Git commit:      cccb291/1.13.1
 Built:           Tue Mar  3 17:21:24 2020
 OS/Arch:         linux/amd64

Server:
 Version:         1.13.1
 API version:     1.26 (minimum version 1.12)
 Package version: docker-1.13.1-109.gitcccb291.el7.centos.x86_64
 Go version:      go1.10.3
 Git commit:      cccb291/1.13.1
 Built:           Tue Mar  3 17:21:24 2020
 OS/Arch:         linux/amd64
 Experimental:    false
 [root@localhost ~]#
Seeing the information above indicates that your Docker installation was successful, you can use the docker info command to view more detailed information.
Configure Mirror Acceleration
For a more enjoyable use of Docker you may also need to configure mirroring acceleration, which can be analogous to Maven's private clothes, using a domestic mirror warehouse allows you to pull the mirror faster.
Execute vim/etc/docker/daemon.json and modify to the following configuration:
{
    "registry-mirrors":[
        "https://reg-mirror.qiniu.com/",
        "https://hub-mirror.c.163.com/"
    ]
}
Reload the configuration and restart the Docker service:
systemctl daemon-reload
systemctl restart docker
Execute docker info and you can see that the mirror warehouse configuration is in effect.
Pull mirror
Now that the Docker installation and configuration are complete, you are ready to download the mirror from the heron. Take MySQL 5.7 for example:
# 5.7 is version number, you can also install other versions
docker pull mysql:5.7

View the local image through the docker images command after the pull succeeds:
[root@localhost ~]# docker images
REPOSITORY          TAG                 IMAGE ID            CREATED             SIZE
docker.io/mysql     5.7                 f965319e89de        3 hours ago         448 MB
[root@localhost ~]#
Create Container
With mirroring, you need to use it to create a container to run, create and run MySQL containers:
docker run -d -p 3306:3306 --name mysql -e MYSQL_ROOT_PASSWORD=123456 mysql:5.7
Instructions for command parameters (more detailed later):
-d: running in the background
-p: port mapping, host port in front and container port in back, where I point host port 3306 to container port 3336
--name: Name the startup container
-e: Specify the environment variables in the container, where the Root user password for configuring MySQL is: 123456
After successful execution, the container ID is returned to view the created container: docker ps -a
[root@localhost ~]# docker run -d -p 3306:3306 --name mysql -e MYSQL_ROOT_PASSWORD=123456 mysql:5.7
8e1cd060075db23c61cb31cecb3a3321df92cf56ea7086476cc21e8709382d19
[root@localhost ~]# docker ps -a
CONTAINER ID        IMAGE               COMMAND                  CREATED             STATUS              PORTS                               NAMES
8e1cd060075d        mysql:5.7           "docker-entrypoint..."   3 seconds ago       Up 1 second         0.0.0.0:3306->3306/tcp, 33060/tcp   mysql
[root@localhost ~]#
You can see that the MySQL container you just created is already running, and now you can connect to the MySQL database through ${IP}:3306 (remember to let the port go or close the firewall).
Mount Directory
With the steps above, you have already run your first container MySQL through Docker, and you can also connect to MySQL in the container through the host port.But it's not safe to do that, so let's start with a brief look at the relationship between containers and hosts.
The file system within the container and the host is independent (although the entire container is also stored as a file in a directory of the host), including the network between them, as well.The MySQL container you just ran has a parameter -p 3306:3306, which maps the port between the host and the container. You can also configure it to be -p 1234:3306, so that you can access port 3306 of the container by accessing port 1234 of the host.
Returning to the file system, the container itself is a compact version of the Linux system, except that it runs on the host and depends on the host's hardware.There is also a separate file system inside the container, and as the container is deleted, all files that exist within the container will be cleared.The MySQL container we just created will be cleared of all data in the database if we delete it, which is obviously not what we want to see.
Docker's run command provides a -v parameter that allows our container's internal directory to be mounted as the host's local directory so that when programs inside the container operate on this directory, they actually operate on the host's directory.Then we can mount the critical data that the program runs to the directory on the host machine, such as MySQL database files, the log files of the program runs, and so on.This way, when we delete containers, because these directories exist on the host machine, they will not be deleted along with the containers, thereby enabling the persistence of container data.
Or take the MySQL container just now for example, let's delete it first:
# mysql is either the container name or the container ID to view container information through docker PS-A
docker stop mysql
docker rm mysql
Then create and run the MySQL container with the following command, adding a -v parameter:
# Create mount directory on host
mkdir -p /usr/local/mysql/conf
mkdir -p /usr/local/mysql/logs
mkdir -p /usr/local/mysql/data
# Create and run containers
docker run -p 3306:3306 --name mysql \
-v /usr/local/mysql/conf:/etc/mysql \
-v /usr/local/mysql/logs:/var/log/mysql \
-v /usr/local/mysql/data:/var/lib/mysql \
-e MYSQL_ROOT_PASSWORD=123456 \
-d mysql:5.7
-v /usr/local/mysql/data:/var/lib/mysql
Represents that if the host's / usr/local/mysql/data directory is mounted to the / var/lib/mysql directory inside the container, the data for MySQL program operations inside the container is actually written to the host's / usr/local/mysql/data directory, and the other two are the same.
The three directories mounted here are the configuration, logs, and data for the database to run. They are also the most important data for MySQL programs. Even if this container is deleted, we can recover all the data by recreating the container as long as the data is still there.
After mounting, the files in these directories can be synchronized to the inside of the container without entering the container, such as modifying some configurations, exporting data and so on, without entering the container and operating directly on the host.
After running the container with the above commands, you will see the database files generated by the MySQL run in your host's/usr/local/mysql/data directory:
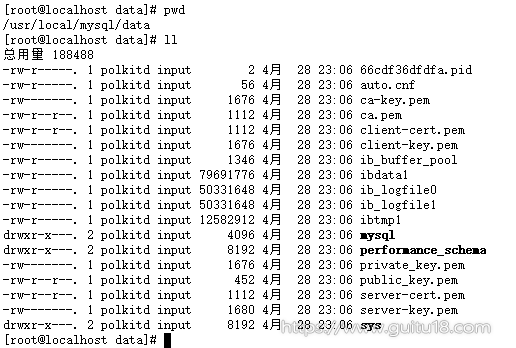
Docker's data volume mounting (which I'm accustomed to referring to as the mount directory) functionality is very important, and any program we run has data that needs to be persisted, which is very unsafe if placed directly inside a container.The mount directory can also operate the data directly inside the container and share the data between the containers. With Docker, it is important to develop the habit of mounting important data to the host.
Error Screening
This command above runs the container directly in the background. If debugging is required, you can modify the -d parameter to the -it parameter to run in the foreground. In some cases, you will likely encounter errors similar to the following (which can be seen by running in the foreground):
chown: changing ownership of '/var/lib/mysql/': Permission denied
# perhaps
mysqld: Can't create/write to file '/var/lib/mysql/is_writable' (Errcode: 13 - Permission denied)
If this happens, then you need to turn off SELINUX as follows:
-
Temporary shutdown: setenforce 0
-
Permanent shutdown: vim/etc/selinux/config, modify the value of SELINUX to disabled and restart the machine, see the picture:

Run the container again to see the success prompt.
Common Commands
You can basically see how Docker works from the example above. Here are some basic commands, including command descriptions such as the most commonly used directory mounting functions:
docker version|info
# Displays Docker information, which is often used to check the Docker version or to detect whether the Docker is installed correctly.

docker images
# List images and information on the machine: REPOSITORY, TAG, IMAGE ID, CREATED, SIZE.
# The IMAGE ID column is actually an abbreviation, with the --no-trunc option to display the entire column.
# -a Lists all local mirrors (with intermediate layers, which are filtered by default)
# -no-trunc displays complete image information
# -q silent mode, showing only mirror ID

docker search tomcat
# Search the docker index for image s, both official and public.NAME column / followed by the name of the repository.

docker pull tomcat
# Drop down image or repository from docker registry server.
# Syntax: docker pull [OPTIONS] NAME[:TAG|@DIGEST]
# -a Pull all tagged images
# --disable-content-true Ignores mirror checking and turns on by default
# The above command does not specify parameters, and before docker v1.2, all mirrors in the tomcat repository of the official image will be downloaded
# From v.13 onwards, only the image tag ged latest will be downloaded, or you can explicitly specify the specific image
# For example: docker pull tomcat:8 followed by the Tomcat version tag.

docker run -d --name tomcat -p 8081:8080 tomcat:8
# Start the container with the syntax docker run [OPTIONS] IMAGE [COMMAND] [ARG...]
# -d runs the container in the background and returns the container ID. Without-d we will see the tomcat startup log and the Ctrl+C container will stop running.
# -e Specifies the environment variable within the container
# -name Specifies the name of the container. If you don't specify docker, it will give us a name.
# -p port mapping, host port: container port, above which we map host 8081 to container 8080 port
# 	Now we can access the tomcat in the container by visiting the host's ip:8081.
# -i runs containers in an interactive mode, usually in conjunction with-t.
# -t reassigns a pseudo-input terminal to the container, usually used in conjunction with-i
# -v directory mount, local directory: container directory

docker ps
# View information about containers, showing currently running containers by default
# -a View all containers
# -l Displays a newly started container (including stopped)

docker start|stop|restart CONTAINER_ID
# Start/Stop/Restart containers. Container IDs are required. You can use docker PS-A to view the IDs of all containers.

docker attach CONTAINER_ID|NAME
# Enter the container, followed by the container ID or NANE, and use docker PS-A to view the IDs of all containers.
# This can be considered an outdated command, and more docker users will consider using docker exec to achieve the same functionality
# But since the docker official did not delete the command, it is still necessary to learn it.
# Enter the exit command after entering the container to exit, and the container stops running. If you want to exit without stopping the container, you can exit with the shortcut key Ctrl+P+Q.

docker exec -i -t CONTAINER_ID|NAME /bin/bash
# Entering the container is recommended.
# Syntax: docker exec [OPTIONS] CONTAINER COMMAND [ARG...]
# -i runs containers in an interactive mode, usually in conjunction with-t.
# -t reassigns a pseudo-input terminal to the container, usually used in conjunction with-i
# Example: docker exec-it mycentos/bin/sh/root/start.sh
# The above command indicates that the in-container/root/start.sh script is executed in interactive mode in the container mycentos

docker rm CONTAINER_ID|NAME
# Delete one or more containers, such as docker RM $(docker ps-a-q), to delete all stopped containers
# -l Remove network connections between containers, not containers themselves
# -v Delete volumes associated with containers
# -f Forces removal of a running container via a SIGKILL signal

docker rmi CONTAINER_ID|NAME
# Delete one or more local mirrors
# -f Force deletion;
# --no-prune does not remove the process image of the mirror, it is removed by default;

docker build
# Create a mirror using Dockerfile, syntax: docker build [OPTIONS] PATH | URL | -
# -f Specifies the Dockerfile path to use
#  -t,--tag Specifies the name and label of the image: name:tag or name, which can be used to set multiple labels for a single image in one build
Dockerfile
Dockerfile is a text file that is used to build a mirror. The text contains instructions and instructions for building a mirror.
Beginners don't have to focus on Dockerfile at first, and it will become clear when you become familiar with the overall architecture of Docker and how it works.
FROM
# Specify the base image, must be the first command
    FROM <image>
    FROM <image>:<tag>
    FROM <image>@<digest>
# Example
    FROM docker.io/centos:latest
MAINTAINER
# Maintainer Information
    MAINTAINER <name>
# Example
    MAINTAINER guitu "xianjian-mail@qq.com"
RUN
# There are two ways to execute commands in a mirror container
#shell execution
    RUN <command>
#exec execution
    RUN ["executable", "param1", "param2"]
#Example
    RUN apk update
    RUN ["executable", "param1", "param2"]
    RUN ["/etc/execfile", "arg1", "arg1"]
# The intermediate image created by the RUN directive is cached and will be used in the next build.
# If you don't want to use these cache mirrors, you can specify the --no-cache parameter at build time, such as docker build --no-cache
ADD
# When you copy a file from the current directory into a container, the tar type file is automatically decompressed (the network compressed resource will not be decompressed), and you can access the network resource, similar to wget
    ADD <src>... <dest>
    ADD ["<src>",... "<dest>"]
    # The second form is used to support paths that contain spaces
# Example
    ADD hom* /mydir/          # Add all files starting with "hom"
    ADD hom?.txt /mydir/      # Instead of a single character, for example, "home.txt"
    ADD test relativeDir/     # Add "test" to `WORKDIR`/relativeDir/
    ADD test /absoluteDir/    # Add "test" to/absoluteDir/
# <src>can be a relative path to the directory where Dockerfile is located, a URL, or a tar file (which is automatically decompressed into a directory)
# no such file or directory is prompted if the file or directory is not in the same directory as the Dockerfile
COPY
# Similar to ADD, but does not automatically decompress files or access network resources
CMD
# Called after the container is built, that is, when the container starts.
    CMD ["executable","param1","param2"] (Executable, preferred)
    CMD ["param1","param2"] (Set ENTRYPOINT,Then call directly ENTRYPOINT Add parameters)
    CMD command param1 param2 (implement shell Internal Command)
# Example
    CMD echo "This is a test." | wc -
    CMD ["/usr/bin/wc","--help"]
# CMD is different from RUN, which specifies the commands to execute when the container is started, and RUN is used to specify the commands to execute when the image is built.
ENTRYPOINT
# Configure the container to be executable.Cooperating with CMD eliminates "application" and only uses parameters.
    ENTRYPOINT ["executable", "param1", "param2"] (Executable File, first)
    ENTRYPOINT command param1 param2 (shell Internal Command)
#Example
    FROM ubuntu
    ENTRYPOINT ["top", "-b"]
    CMD ["-c"]
# ENTRYPOINT is very similar to CMD except that commands executed through docker run do not override ENTRYPOINT, and any parameters specified in the docker run command are passed back to ENTRYPOINT as parameters.
# Only one ENTRYPOINT command is allowed in the Dockerfile, which overrides the previous settings when specified more than one, and only executes the last ENTRYPOINT command.
LABEL
# Used to add metadata to a mirror
    LABEL <key>=<value> <key>=<value> <key>=<value> ...
# Example
    LABEL version="1.0" description="This is a Web The server" by="IT Record"
# When using LABEL to specify metadata, one LABEL specifies that one or more metadata can be specified, and when multiple metadata are specified, different metadata is separated by spaces.
# It is recommended that all metadata be specified by a single LABEL directive to avoid generating too many intermediate mirrors.
ENV
# Setting environment variables
    ENV <key> <value>
    # Everything after <key> is considered part of its <value>, so only one variable can be set at a time
    ENV <key>=<value> ...
    # Multiple variables can be set, each of which is a key-value pair of'<key>=<value>'
    # If <key> contains spaces, you can use \ to escape or''to mark them; backslashes can also be used for continuation
# Example
    ENV JAVA_HOME /docker/jdk
VOLUME
# Used to specify a persistent directory
    VOLUME ["/path/to/dir"]
# Example
    VOLUME ["/data"]
    VOLUME ["/var/www", "/var/log/apache2", "/etc/apache2"]
# A volume can exist in a specified directory of one or more containers that bypass the federated file system and have the following capabilities:
    # Volumes can be shared and reused between containers
    # Containers do not necessarily share volumes with other containers
    # Volume changes will take effect immediately
    # Modifications to volumes do not affect mirroring
    # The volume will exist until no container is using it
WORKDIR
# Working directory, similar to cd command
    WORKDIR /path/to/workdir
# Example
    WORKDIR /a  (The working directory is/a)
    WORKDIR b  (The working directory is/a/b)
    WORKDIR c  (The working directory is/a/b/c)
# After setting up the working directory through WORKDIR, subsequent commands in Dockerfile, such as RUN, CMD, ENTRYPOINT, ADD, COPY, etc., will be executed in the directory.
# When running containers with docker run, you can override the working directory that was set at the time of the build with the -w parameter.
USER
# Specify the user name or UID to RUN the container, and subsequent RUNs will use the specified user as well.
# When specifying a user using USER, you can use a user name, UID, or GID, or a combination of both.
# This command allows you to specify a running user when the service does not require administrator privileges.And you can create the users you need before
  USER user
  USER user:group
  USER uid
  USER uid:gid
  USER user:gid
  USER uid:group
# Example
  USER www
# When a user is specified using USER, the following commands in the Dockerfile, RUN, CMD, ENTRYPOINT, all use that user.
# When the mirror is built and the container is run through docker run, the specified user can be overwritten with the -u parameter.
ARG
# Used to specify variables passed to the build runtime
    ARG <name>=[<default value>]
# Example
    ARG site
    ARG build_user=www
ONBUILD
# Used to set mirror triggers
  ONBUILD [INSTRUCTION]
# Example
  ONBUILD ADD . /app/src
  ONBUILD RUN /usr/local/bin/python-build --dir /app/src
# Triggers in the built image will be triggered by the key when it is used as the base image for other mirrors
Build Mirror
After learning the commands above, we can try to create my first homemade mirror. Here is my Dockerfile example:
#Basic mirror used
FROM docker.io/centos:latest
#Author Information
MAINTAINER guitu "xianjian-mail@qq.com"
#Install SVN
RUN yum install -y subversion
#Add a JAVA environment. Replace the files below with those in your Dockerfile directory. Compressed packages will be automatically decompressed when the image is built
ADD jdk-8u231-linux-x64.tar.gz /docker/
ADD apache-tomcat-8.0.53.tar.gz /docker/
#Add environment variables
ENV JAVA_HOME /docker/jdk1.8.0_231
ENV TOMCAT_HOME /docker/apache-tomcat-8.0.53
ENV PATH $PATH:$JAVA_HOME/bin:$TOMCAT_HOME/bin
#assign work directory
WORKDIR /docker/apache-tomcat-8.0.53
#Expose port 8080
EXPOSE 8080
#Run tomcat at startup
CMD ["bin/startup.sh && tail -f logs/catalina.out"]
Create a mirror from a Dockerfile:
docker build -t mytomcat8:v0.1 .
The mirroring is done with the Dockerfile file.