The main contents of this chapter are as follows:
1, Install docker
Docker is an open source application container engine, which is based on Go language and complies with Apache 2.0 protocol. Docker allows developers to package their applications and dependency packages into a lightweight and portable container, and then publish them to any popular Linux machine. It can also realize virtualization. Containers completely use the sandbox mechanism, and there will be no interfaces between them (similar to iPhone apps). More importantly, the performance overhead of containers is very low.
we can install docker on common server systems, such as windows server, Linux, etc. Our experimental version is CentOS 7, and we will prepare a new CentOS 7 named docker.
1. Install Docker (yum or up2date)
yum install docker -y
2. Check whether the installation is successful
docker version
If you output the following, the installation is successful
Client:
 Version:         1.13.1
 API version:     1.26
 Package version:
Cannot connect to the Docker daemon at unix:///var/run/docker.sock. Is the docker daemon running?
3. Start Docker
Similarly, stop and restart
service docker start
4. Automatic startup
systemctl enable docker
2, docker uninstall
1: View installed docker packages
yum list installed|grep docker
docker.x86_64                        2:1.12.6-61.git85d7426.el7.centos @extras
docker-client.x86_64                 2:1.12.6-61.git85d7426.el7.centos @extras
docker-common.x86_64                 2:1.12.6-61.git85d7426.el7.centos @extras
2: Remove installation package
yum –y remove docker.x86_64
yum –y remove docker-client.x86_64
yum –y remove docker-common.x86_64
3: Delete Docker image
rm -rf /var/lib/docker
3, Configure docker image accelerator
Configure mirror accelerator
for users with Docker client version greater than 1.10.0, you can use the accelerator by modifying the daemon configuration file / etc/docker/daemon.json (if the file does not exist, please create a new file). The contents of the file are as follows: after modification, you need to execute systemctl daemon reload and systemctl restart docker commands.
{"registry-mirrors":["https://reg-mirror.qiniu.com/"]}
Check whether the accelerator is effective:
check whether the accelerator is effective. After configuring the accelerator, if it is still very slow to pull the image, please manually check whether the accelerator configuration is effective. Execute docker info on the command line. If you see the following contents from the results, the configuration is successful.
docker info
......
Registry Mirrors:
    https://reg-mirror.qiniu.com
4, Install mysql
Basic concepts
Warehouse: a place where image files are stored centrally
Image: a special file system that can be regarded as a running software package
Containers: mirroring runtime entities
Image warehouse: address, search and find mysql5.7, and download the image.
docker pull mysql:5.7
There are two common commands about mirroring:
- docker images view images downloaded locally
- docker rmi image id: deletes the local image based on the image id.
Start container
docker run -p 3306:3306 --name mysql -e MYSQL_ROOT_PASSWORD=123456 -d mysql:5.7
Configuration Description:
-p 3306:3306: map the 3306 port of the container to the 3306 port of the host
-e MYSQL_ROOT_PASSWORD = "123456": initialize the password of the root user
After startup, mysql can connect remotely, and docker will automatically handle the firewall.
The following commands may be used during use:
1. If startup fails, check the error log.
docker logs mysql
2. View the running container status
docker ps
3. Check the operation status of all containers
docker ps -a
4. Stop the container
docker stop container id
5. Start the stopped container again
docker start container id start-up
6. Delete container
docker rm container id
5, Install oracle
To find the Oracle image, we choose the compact oracle-xe-11g
docker search oracle
Pull image
docker pull oracleinanutshell/oracle-xe-11g
Start mirroring
docker run -d -p 1521:1521 -e ORACLE_ALLOW_REMOTE=true --name oracle11g oracleinanutshell/oracle-xe-11g
ORACLE_ ALLOW_ If remote is true, it means that it can be accessed remotely
The default password for connecting the database () system and sys is oracle
hostname: localhost
port: 1521
sid: xe
username: system
password: oracle
Connecting to Oracle using idea
6, Install redis (from)
Pull the redis image from the warehouse
docker pull redis
Start redis
docker run -p 6379:6379 --name redis -d redis
Set the container to start automatically with the docker container
docker update redis --restart=always
7, Deploying the springboot project
Package and upload the project to linux server
Sample project Download: link
Create Dockerfile file
FROM java:8
VOLUME /tmp
ADD demo.jar /demo.jar
ENTRYPOINT ["java","-Djava.security.egd=file:/dev/./urandom","-jar","/demo.jar"]
FROM: indicates that the image is based on the Jdk8 environment. If the image is not local, it will be downloaded FROM the DockerHub
VOLUME: points to a directory of / tmp. Since Spring Boot uses the built-in Tomcat container, Tomcat uses / tmp as the working directory by default. The effect of this command is to create a temporary file in the / var/lib/docker directory of the host and link it to the / tmp directory in the container
ADD: copy the file and rename it (the name of the uploaded jar package is in front, followed by rename)
Entry point: in order to shorten the startup time of Tomcat, add the system attribute of java.security.egd to point to / dev/urandom as entry point
Upload the created Dockerfile file and jar package to the server, put them in the same folder, enter the folder where the jar package is located, and execute the command
docker build -t demo .
Note: there is a space and a "." at the end. demo is the name of the created image, and "." indicates the current directory
View the generated image and run the jar package as a container
docker run -d -p 8080:8080 demo
-d: Indicates running in the background
-p: Specify the port number. The first 8080 is the internal port number of the container, and the second 8080 is the external access port number. Map the 8080 port number in the container to the external 8080 port number.
8, Distributed file system FastDFS (self)
Distributed File System means that the physical storage resources managed by the file system are not necessarily directly connected to the local node, but are connected to the node through the computer network.
Generally speaking, the files managed by the traditional file system are stored on the machine.
the files managed by the distributed file system are stored in many machines. These machines are connected through the network and should be managed uniformly. Whether you upload or access files, you need to access them through the management center.
FastDFS: a lightweight, high-performance open source distributed file system developed by Mr. Yu Qing of Taobao. Developed in pure C language with rich functions:
① file storage
② file synchronization
③ file access (upload and download)
④ access load balancing
⑤ online capacity expansion
Suitable for applications or systems with large capacity storage requirements. Similar distributed file systems include GFS (Google), HDFS (Hadoop), TFS (Taobao), etc.
Install fastDFS
1. First download the docker image of FastDFS file system
docker search fastdfs
2. Get image
docker pull delron/fastdfs
3. Use the docker image to build the tracker container (tracking server, which plays the role of scheduling):
docker run -d --network=host --name tracker delron/fastdfs tracker
4. Use the docker image to build the storage container (storage server, providing capacity and backup services):
docker run -d --network=host --name storage -e TRACKER_SERVER=192.168.175.128:22122 -e GROUP_NAME=group1 delron/fastdfs storage
5. Create the springboot project and import the following dependencies
<dependency>
    <groupId>com.github.tobato</groupId>
    <artifactId>fastdfs-client</artifactId>
    <version>1.26.1-RELEASE</version>
</dependency>
The configuration file is as follows
fdfs:
  so-timeout: 1501 #Timeout
  connect-timeout: 601 #Connection timeout
  thumb-image: # thumbnail
    width: 60
    height: 60
  tracker-list: # tracker address
    - 192.168.175.135:22122
6. Add configuration class
import com.github.tobato.fastdfs.FdfsClientConfig;
import org.springframework.context.annotation.Configuration;
import org.springframework.context.annotation.EnableMBeanExport;
import org.springframework.context.annotation.Import;
import org.springframework.jmx.support.RegistrationPolicy;

@Configuration
@Import(FdfsClientConfig.class)
@EnableMBeanExport(registration = RegistrationPolicy.IGNORE_EXISTING)
public class FastClientImporter {
}
unit testing
import com.github.tobato.fastdfs.domain.StorePath;
import com.github.tobato.fastdfs.domain.ThumbImageConfig;
import com.github.tobato.fastdfs.service.FastFileStorageClient;
import org.junit.jupiter.api.Test;
import org.springframework.beans.factory.annotation.Autowired;
import org.springframework.boot.test.context.SpringBootTest;

import java.io.File;
import java.io.FileInputStream;
import java.io.FileNotFoundException;

@SpringBootTest
class DemoApplicationTests {

    @Autowired
    private FastFileStorageClient storageClient;

    @Autowired
    private ThumbImageConfig thumbImageConfig;

    @Test
    public void testUpload() throws FileNotFoundException {
        File file = new File("C:/Users/Administrator/Desktop/up.png");
        // upload
        StorePath storePath = this.storageClient.uploadFile(
                new FileInputStream(file), file.length(), "png", null);
        // Path with grouping
        System.out.println(storePath.getFullPath());
        // Path without grouping
        System.out.println(storePath.getPath());
    }


    @Test
    public void testUploadAndCreateThumb() throws FileNotFoundException {
        File file = new File("G:\\LeYou\\upload\\spitter_logo_50.png");
        // Upload and generate thumbnails
        StorePath storePath = this.storageClient.uploadImageAndCrtThumbImage(
                new FileInputStream(file), file.length(), "png", null);
        // Path with grouping
        System.out.println(storePath.getFullPath());
        // Path without grouping
        System.out.println(storePath.getPath());
        // Get thumbnail path
        String path = thumbImageConfig.getThumbImagePath(storePath.getPath());
        System.out.println(path);
    }
}
Access picture address:
http://192.168.175.128:8888/group1/M00/00/00/wKivgF6ZzFWAa9KfAACRNhf3vVk267.png
9, Message queue rabbitmq (from)
Pull the image of rabbitmq
docker pull rabbitmq:3.8.3-management
Start rabbitmq mirroring
docker run --name rabbitmq -d -p 15672:15672 -p 5672:5672 rabbitmq:3.8.3-management
Set rabbitmq boot
docker update rabbitmq --restart=always
Access rabbitmq browser port
http://192.168.175.128:15672/
The default user name is guest, and the password is also guest
10, docker remote connection (from)
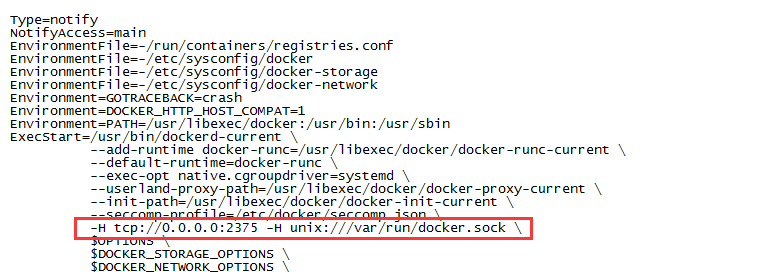
1. Configure remote access in / usr/lib/systemd/system/docker.service.
-H tcp://0.0.0.0:2375 -H unix:///var/run/docker.sock \
The system reloads the file
systemctl daemon-reload
Restart docker
systemctl restart docker
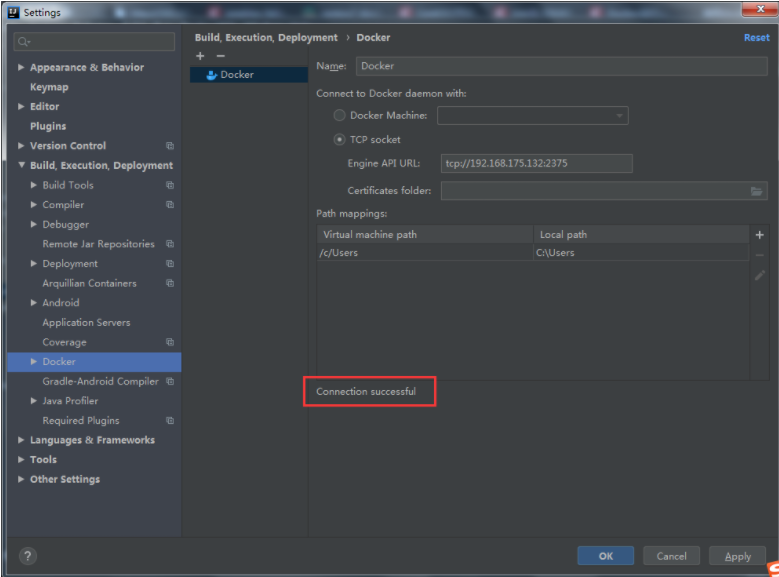
Create Dockerfile in the project directory of idea
FROM java:8
VOLUME /tmp
ADD target/docker-demo.jar /app.jar
ENTRYPOINT ["java","-Djava.security.egd=file:/dev/./urandom","-jar","/app.jar"]
The run icon appears on Docker. Click Run to create an image
Right click to create a container through image. When creating a container, specify the port mapping to successfully deploy it.
11, docker installs elasticsearch and ik participles
Pull image
docker pull elasticsearch:7.6.2
Start container
docker run --name es -p 9200:9200 -p 9300:9300 -e "discovery.type=single-node" -d elasticsearch:7.6.2
Enter container
docker exec -it es /bin/bash
After entering the bin directory, execute the command to download and install ik word splitter
elasticsearch-plugin install https://github.com/medcl/elasticsearch-analysis-ik/releases/download/v7.6.2/elasticsearch-analysis-ik-7.6.2.zip
Success flags: -- > installed analysis IK
Exit container: exit
Restart container:
docker restart es
Send a native json request to test the effect of word segmentation
Address:
http://192.168.2.128:9200/_analyze
Data: ik_smart minimum segmentation; ik_max_word most fine-grained division! Exhausted Thesaurus
{
    "analyzer": "ik_smart",
    "text": "Henan University of science and technology"
}
return:
{
  "tokens": [
    {
      "token": "Henan",
      "start_offset": 0,
      "end_offset": 2,
      "type": "CN_WORD",
      "position": 0
    },
    {
      "token": "university of science and technology",
      "start_offset": 2,
      "end_offset": 6,
      "type": "CN_WORD",
      "position": 1
    }
  ]
}
Basic operations related to ES index
# Create index (database)
# Index library name: csp, document type name: mytype, document id: 1
PUT /csp/mytype/1
{
  "name":"Straw hat Luffy driven by interest",
  "age":"22"
}

# Create a csp2 index library:
# Index library name: csp2
# There are three fields in the index library: name, age and birthday
# The types of the three fields are: text,integer,date
PUT /csp2
{
  "mappings": {
    "properties": {
      "name":{
        "type": "text"
      },
      "age":{
        "type": "integer"
      },
      "birthday":{
        "type": "date"
      }
    }
  }
}

# Get information about index csp2
GET csp2

# Create the index csp3 and use the default document type_ doc, document id: 1
# The data are: nage,age,birthday
PUT /csp3/_doc/1
{
  "name":"Straw hat Luffy driven by interest",
  "age":22,
  "birthday":"1999-01-29"
}

# View index csp3 default information
GET csp3

# View es health status
GET _cat/health

# View all index library profiles
GET _cat/indices?v

# Modify index csp3 data
# Modified field name
POST /csp3/_doc/1/_update
{
  "doc":{
    "name":"Pirate Wang Lufei"
  }
}

# Delete csp index library
DELETE csp
Basic operations related to ES documents
# Create index my_index, document type user, document id:1
# user:1
PUT /my_index/user/1
{
  "name":"Straw hat Luffy",
  "age":22,
  "description":"Pirate king, I'm determined!",
  "tags":["foodie","captain","Future pirate king","Rubber fruit ability"]
}
# user:2
PUT /my_index/user/4
{
  "name":"Pirate Hunter Sauron 1",
  "age":22,
  "description":"The scar behind the sword is a disgrace to the swordsman!",
  "tags":["have no sense of direction","Vice captain","The world's largest swordsman in the future","Three swordsman"]
}
PUT /my_index/user/5
{
  "name":"Pirate Hunter Sauron 2",
  "age":25,
  "description":"The scar behind the sword is a disgrace to the swordsman!",
  "tags":["have no sense of direction","Vice captain","The world's largest swordsman in the future","Three swordsman"]
}
PUT /my_index/user/2
{
  "name":"Pirate Hunter Sauron 3",
  "age":24,
  "description":"The scar behind the sword is a disgrace to the swordsman!",
  "tags":["have no sense of direction","Vice captain","The world's largest swordsman in the future","Three swordsman"]
}
# user:3
PUT /my_index/user/3
{
  "name":"Heizu mountain governance",
  "age":22,
  "description":"Live for women all over the world!",
  "tags":["Color embryo","cook","Initial on the future pirate king ship","Cool playing skills"]
}

# get data
# Get user:1
GET /my_index/user/1

# Search data
GET /my_index/user/_search?q=name:Monkey D Luffy

# Search data and build query parameters through json
# Among the search results:
# hits: indicates index and document related information
#     "total":
#           "value": the total number of records of the query result
#           "Relationship": relation ship between search results and search parameters: eq means equal, lt less than gt greater than
#     '_index': indicates the index name
#     '_tyoe': indicates the document type
#     "_id": indicates the document ID
#     "_score": indicates the weight of search results
#     '_source': represents the data in the document
#             The field name and value of the data in the document
GET /my_index/user/_search
{
  "query": {
    "match": {
      "name": "Sauron"
    }
  }
}

# Search data, build query parameters through json, and filter results
# query: build the criteria to search, match: build the content to match
# _ source: result filtering, only get the data of name and age fields
# Sort: sort condition age: field to sort order:desc descending
# From: starting from the first data, 0 indicates the first data, size: how many data are displayed on each page
GET /my_index/user/_search
{
  "query": {
    "match": {
      "name": "Sauron"
    }
  },
  "_source": ["name","age"],
  "sort": [
    {
      "age": {
        "order": "desc"
      }
    }
  ],
  "from": 0,
  "size": 1
}

# Search data: use bool multi condition exact query
# Query all users aged 22 with Sauron in their names
# bool: multi condition exact query
#   Must: [] all conditions in the array must meet the relationship of = = = and and
GET /my_index/user/_search
{
  "query": {
    "bool": {
      "must": [
        {
          "match": {
            "age": "22"
          }
        },
        {
          "match": {
            "name": "Sauron"
          }
        }
      ]
    }
  }
}

# Search data: use bool multi condition exact query
# Query all users aged 22, or all users with Sauron in their names
# bool: multi condition exact query
#   shoud: [] as long as one of all the conditions in the array meets the relationship of = = = or or
GET /my_index/user/_search
{
  "query": {
    "bool": {
      "should": [
        {
          "match": {
            "age": "22"
          }
        },
        {
          "match": {
            "name": "Sauron"
          }
        }
      ]
    }
  }
}

# Search data: use bool multi condition accurate query and filter
# Query all users. There are Sauron in their names and their ages are between 22 and 25
# bool: multi condition exact query, filter: filter by field = = = gt lt eq gte greater than or equal to lte less than or equal to
GET /my_index/user/_search
{
  "query": {
    "bool": {
      "must": [
        {
          "match": {
            "name": "Sauron"
          }
        }
      ],
      "filter": {
        "range": {
          "age": {
            "lt": 22,
            "gt": 25
          }
        }
      }
    }
  }
}

# Search according to the contents in the tags array, and split the query criteria with spaces
# Results: the information of Luffy and Yamaguchi can be obtained
GET /my_index/user/_search
{
  "query": {
    "match": {
      "tags": "Chef Captain"
    }
  }
}

# Exact query:
# term: exact query, which can be found directly through the terms specified in the inverted index
# match: will use the word breaker to parse (analyze the document first, and then query through the analyzed document)
# Two types: text and keyword

# Create a new index
PUT my_index2
{
  "mappings": {
    "properties": {
      "name":{
        "type": "text"
      },
      "description":{
        "type": "keyword"
      }
    }
  }
}

# Xiang my_index2 insert data
PUT /my_index2/_doc/1
{
  "name":"Munch D Monkey D Luffy",
  "description":"I'm the pirate king!"
}

# Query with word splitter
#  "analyzer": "keyword" query using ik participle
GET _analyze
{
  "analyzer": "keyword",
  "text": "I'm the pirate king!"
}

# Query with word splitter
#  "analyzer": "standard" uses the default word breaker to query
# The word splitter splits each word (word) one by one
GET _analyze
{
  "analyzer": "standard",
  "text": "I'm the pirate king!"
}

# term exact query
# The results show that:
# Fields of keyword type (description) will not be resolved by the word breaker
# Fields of type text (name) will be parsed by the word breaker
GET /my_index2/_search
{
  "query": {
    "term": {
      "name": {
        "value": "road"
      }
    }
  }
}

# Insert analog data
PUT /my_index2/_doc/3
{
  "t1":"33",
  "t2":"2020-1-17"
}
PUT /my_index2/_doc/4
{
  "t1":"44",
  "t2":"2020-1-18"
}
PUT /my_index2/_doc/5
{
  "t1":"55",
  "t2":"2020-1-19"
}
PUT /my_index2/_doc/6
{
  "t1":"66",
  "t2":"2020-1-20"
}

# Accurately query multiple values
GET /my_index2/_search
{
  "query": {
    "bool": {
      "should": [
        {
          "term": {
            "t1": {
              "value": "44"
            }
          }
        },
        {
          "term": {
            "t1": {
              "value": "55"
            }
          }
        }
      ]
    }
  }
}

# (key) highlight query:
# Highlight: highlight search results
#     fields: corresponding field array
#     pre_tags: highlight the tag prefix of the result. The default is < EM >
#     post_tags: highlight the tag suffix of the result. The default is</em>
GET /my_index/user/_search
{
  "query": {
    "match": {
      "name": "Sauron"
    }
  },
  "highlight": {
    "pre_tags": "<p class='key' style='color:red'>",
    "post_tags": "</p>",
    "fields": {
      "name":{}
    }
  }
}