Docker
Docker architecture
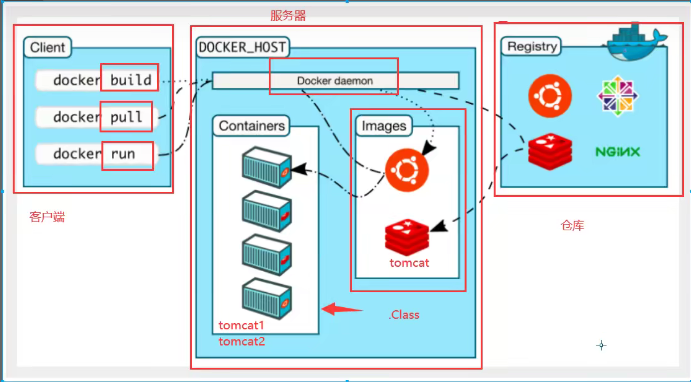
Conceptual analysis of Docker
Run steps of Docker
Why is Docker faster than virtual machines
docker has fewer abstraction layers than virtual machines
docker uses the kernel of the host to avoid booting.
Install Docker
Installation requirements
- To install Docker Engine, you need a maintained version of CentOS 7 or 8. Archived versions aren't supported or tested.
Uninstall old version
yum remove docker \
                  docker-client \
                  docker-client-latest \
                  docker-common \
                  docker-latest \
                  docker-latest-logrotate \
                  docker-logrotate \
                  docker-engine
Docker installation in warehouse
Setup Toolkit
yum install -y yum-utils
Set up mirror warehouse
yum-config-manager \
    --add-repo \
    http://mirrors.aliyun.com/docker-ce/linux/centos/docker-ce.repo # defaults to foreign, slow
Update yum or up2date
yum makecache fast
Install the latest client, service and container of Docker
yum install docker-ce docker-ce-cli containerd.io
Start Docker
systemctl start docker
Verify successful startup
docker version
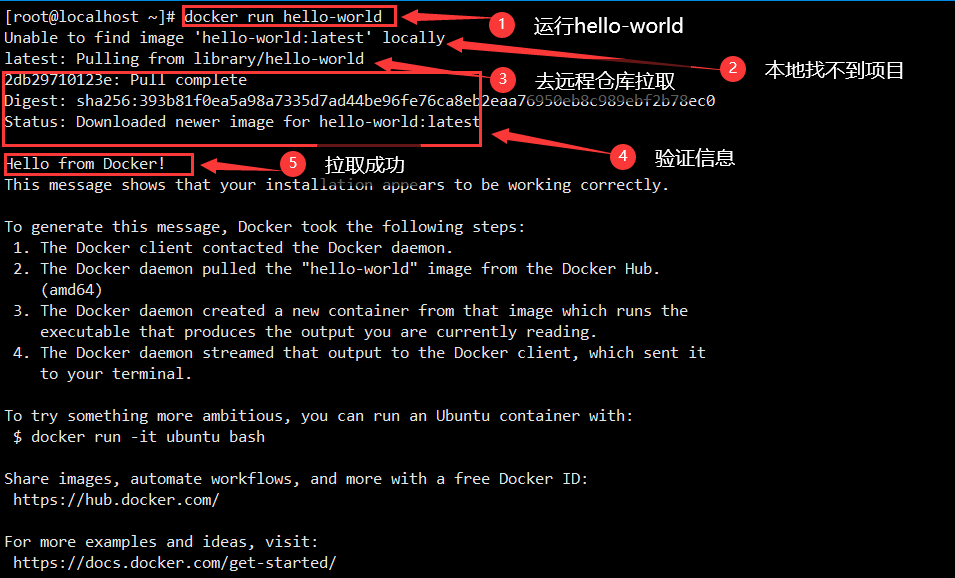
Run the Hello World program
docker run hello-world
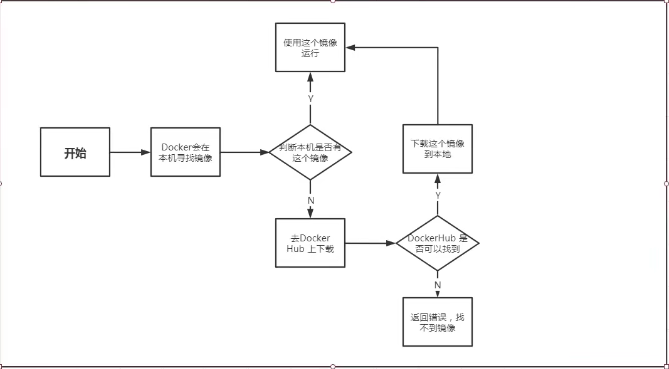
Analysis of docker run Hello World
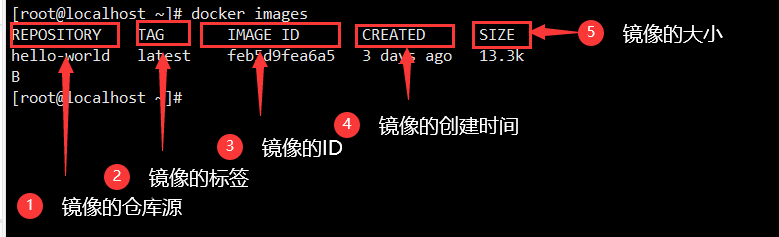
View the downloaded Hello world image
docker images
Docker uninstall
yum remove docker-ce docker-ce-cli containerd.io
 rm -rf /var/lib/docker
 rm -rf /var/lib/containerd
Alibaba cloud image acceleration
#Premise: you need an alicloud account to log in to alicloud. If you don't bother to register an account, you don't do it
Common commands of Docker
Help command
docker version #docker version display
docker info #docker system information display, including the number of images and containers
docker command --help #Help command
Official document command query
https://docs.docker.com/engine/reference/run/
Mirror command
# View all local images
docker images
# Only the ID of the mirror is displayed
docker -images -q

# Search for images on dockerHub
docker search xxx [--filter=stars=xxx] #--Filter filter

#Download Image
docker pull xxx[:tag] #tag: version

#Deletes the specified mirror
docker rmi -f Image name or image ID

#Batch delete all images
docker rmi -f $(docker images -aq)
Container command
- You cannot create a container without a mirror
Create a new container and start
docker run [Optional parameters] image
#Optional parameters
--name="xxx"  #The name of the container that was started
-d			  #Background operation
-it	 	 	  #Run interactively and enter the container to view the content
-p			  #Specifies the port of the container
-P 		 	  #Randomly assigned port
Exit container
exit  #Container stop exit
#Use the ctrl+P+Q shortcut key in the container to exit without stopping the container
Lists all running containers
docker ps [Optional parameters]
-a   #Lists currently running containers and historically running containers
-n=? #Displays recently created containers
-q	 #Displays only the number of the container
Delete container
#Delete the specified container. You cannot delete a running container
docker rm container ID

#Delete specified container
docker rm -f container ID

#Delete all containers
docker rm -f $(docekr ps -aq)
Start and stop containers
docker start container ID 	#Start the specified container
docker restart container ID #Restart the specified container
docker stop container ID   #Stops the specified container
docker kill container ID 	 #Force the currently running container to stop
Other commonly used commands
#Background operation
docker run -d Image name
#View process commands in the container
dokcer top container ID
View metadata for container
docker inspect container ID
Enter the currently running container
#Mode 1: after entering the container, open a new terminal, which can be operated
docker exec -it container ID /bin/bash

#Mode 2: enter the terminal where the container is executing
docker attach container ID
Copy files from the container to the host
docker cp container ID:In container path destination host path
Memory usage view
docker stats
ES restricted memory startup
#When es does not limit memory startup, the host with small memory may get stuck, so it is sometimes necessary to limit memory consumption
docker run -d --name es01 -p 9200:9200 -p 9300:9300 -e "discovery.type=single-node" -e ES_JAVA_OPTS="-Xms64m -Xmx512m" elasticsearch

#Parameter analysis
-d #Background start
--name es01 #Container alias
-p 9200:9200 -p 9300:9300 #Port mapping host port: port in Docker container
-e "discovery.type=single-node" #Cluster configuration, single node here
-e ES_JAVA_OPTS="-Xms64m -Xmx512m" #Limit memory consumption, minimum 64M, maximum 512M
Image management visualization panel
- portainer
#Docker's graphical interface management tool
docker run -d -p 8088:9000 \
--restart=always -v /var/run/docker.sock:/var/run/docker.sock --privileged=true portainer/portainer
- Rancher(CI/CD), advanced use
commit image
docker commit Submit as a new copy

docker commit -m="Description information submitted" -a="author" container id Target image name:[tag]
Container's data volume
The data in the container is synchronized by mounting it to a folder outside the container
Persistence and synchronization of containers! Data can also be shared between containers
Using data volumes
Use the command to mount - v
docker run -it -v Host Directory:Directory in container[:ro/rw]
#Optional parameter resolution
ro : Path read only 	#The container has permission and cannot change the content. The file can only be changed on the host
rw : The path is readable and writable
#View container details
docker inspect container ID
Named Mount & anonymous mount
Anonymous mount: only the path inside the container is written during mount, and no path outside the container is written
#The volume name of an anonymous mount host is a long string of numeric characters
-v In container path

#View all volumes
docker volume ls
Named mount: when mounting, the path outside the container is not written, but the format of volume name: path inside the container is used
#Named mount makes it easy for us to find the volume
-v Volume name:In container path
All volumes in the docker container are in the / var/lib/docker/volumes / * * * directory if no directory is specified
#Differences between the three mounts
-v /Host path:Path within container    #Specified path mount
-v Volume name:Path within container		  #Named mount
-v Path within container			   #Anonymous mount

#expand
have access to dockerfile To mount automatically when the container is built
Data volume container
When data is mounted and synchronized among multiple containers, the parent container is the data volume container
-- volumes-from

#Example
docker run New container --volumes-from Container mirroring started id/Image name[:tag]

#Multiple containers perform data mount synchronization. When one container is deleted, its related data will not be lost, and other containers will synchronously save the related file data. Data is lost only when all mounted containers are deleted. Once the container is mounted and synchronized with the host, the data will be lost only when all containers are deleted, the host data is deleted or the host is deleted
DockerFile
Dockerfile is the script file used to build the docker image
Construction steps:
- Write a dockerfile file
- docker bulid is built as an image
- docker run run image
- docker push publishing image (DockerHub)
dockerfile construction process
Basic grammar
- Each reserved keyword (instruction) must be uppercase
- Execute from top to bottom
- #Indicates a comment
- Each instruction creates and commits a new mirror layer
dockerfile directive
FROM		#Basic image, everything starts from here
 	#Who wrote the image? Standard Name: Name + email
RUN			#Commands to run during image construction
ADD			#Add content such as Tomcat, MySQL, etc
WORKDIR		#Mirrored working directory
VOLUME		#Directory of mounted volumes
EXPOSE		#Expose port [- p] Command
CMD			#Specify the commands to be run when the container starts. Only the last one will take effect and can be replaced
ENTRYPOINT	#Specify the commands to run when this container starts
ONBUILD		#When building an inherited DockerFile, the ONBUILD instruction will be run at this time
COPY		#Copy our files to the image
ENV			#Setting environment variables during construction
#View the history of mirror construction
docker histroy image ID
Docker practice 1
Tomcat image production
- Prepare a compressed package of tomcat and jdk

- Write files such as readme.txt and dockerfile
#dockerfile file
FROM centos
MMAINTAINER ycy<yucaiyuan98@gmail.com>
COPY readme.txt /usr/local/readme.txt

ADD jdk-8u221-linux-x64.rpm /usr/local/
ADD apache-tomcat-9.0.54.tar.gz /usr/local/

RUN yum -y install vim

ENV CATALINA_HOME /usr/local/apache-tomcat-9.0.54
ENV CATALINA_BASH /usr/local/apache-tomcat-9.0.54
ENV PATH $PATH:$CATALINA_HOME/lib;$CATALINA_HOME/bin

EXPOSE 8080

CMD /usr/local/apache-tomcat-9.0.54/bin/startup.sh && tail -F /url/local/apache-tomcat-9.0.54/bin/logs/catalina.out
- Build mirror
docker build [-f] -t Image name .
#When it is named Dockerfile, the [- f] parameter may not be written
- Start mirroring
docker run
-d
-p 9090:8080
--name tomcat01
-v /home/ycy/build/tomcat/test:/usr/local/apache-tomcat-9.0.54/webapps/test
-v /home/ycy/build/tomcat/tomcatlogs/:/usr/local/apache-tomcat-9.0.54/logs diytomcat
Publish image
DockerHub
#Log in to docker account
docker login -u [Account name]

docker push [author/Image name:tag]
#Error resolution
The push refers to repository [docker.io/ycy/diytomcat]
An image does not exist locally with the tag: ycy/diytomcat

#Add a tag to the image
docker tag [image id] [New mirror name:Version number]
Alibaba cloud image here is also too lazy to register an Alibaba cloud account, so I didn't do it
- Log in to alicloud
- Container mirroring service found
- Create namespace
- Create container image (image warehouse)
- There is a push mirror tutorial
Docker network
What is Docker0
Installing docker will install docker0. It will be displayed at startup. It is a virtual network card
#Experiment: Tomcat container is used to connect the database container to realize the network interworking between containers

#Start a tomcat
docker run -d -P --name tomcat01 tomcat

#View the internal network address of the container
docker exec -it Container name ip addr
#error
OCI runtime exec failed: exec failed: container_linux.go:380: starting container process caused: exec: "ifconfig": executable file not found in $PATH: unknown

#resolvent:
#Enter the container
apt update && apt install -y iproute2
#ping container address in Linux
ping 172.17.0.2 			#Status: OK
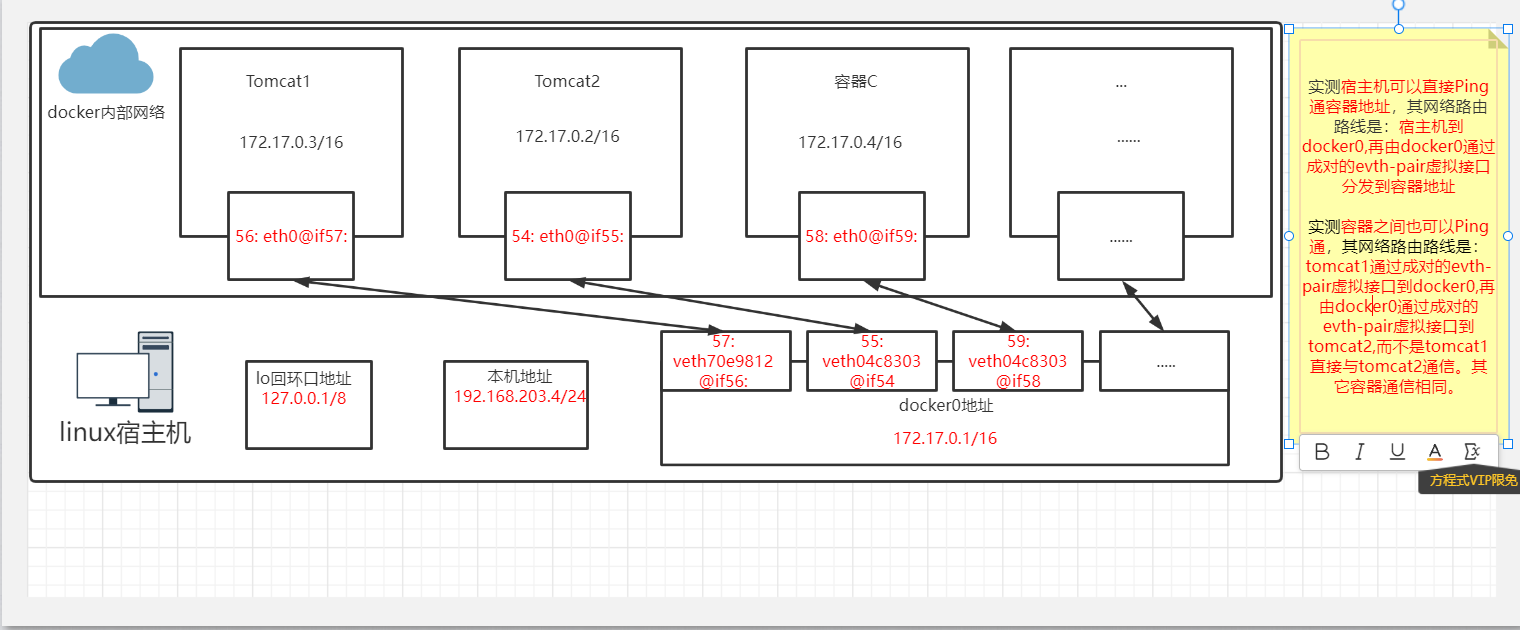
principle
- As long as docker is installed, a network card docker0 will be installed to connect to the real network in bridge mode
- Every time a container is started, it will be assigned an address by docker0
- docker network uses evth pair technology to ensure network interoperability
docker network evth pair Technology
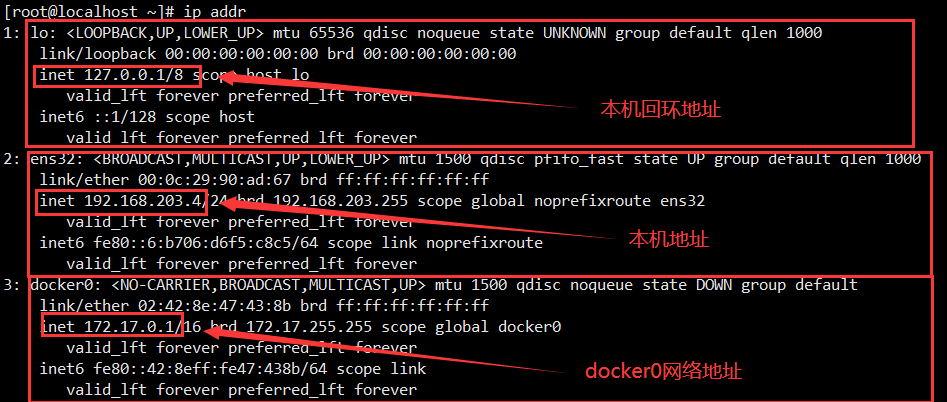
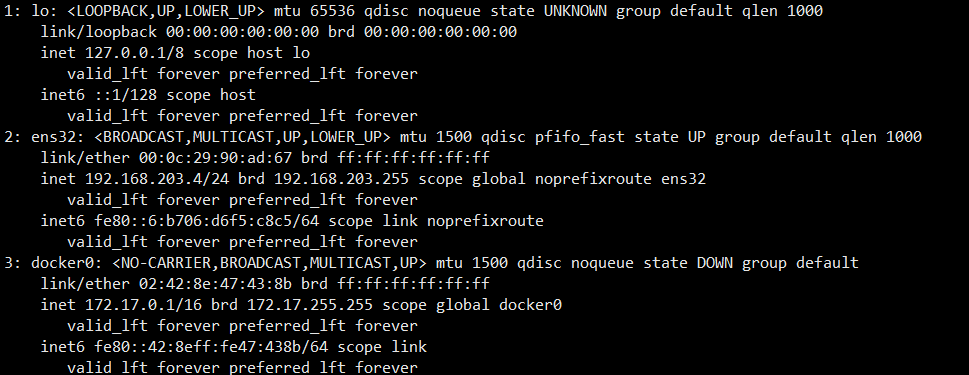
When no container is started, we use the ip addr command in Linux to view the ip address information, only the local loopback address, local network address, and docker0 address information
Look at the ip address information when we start a container
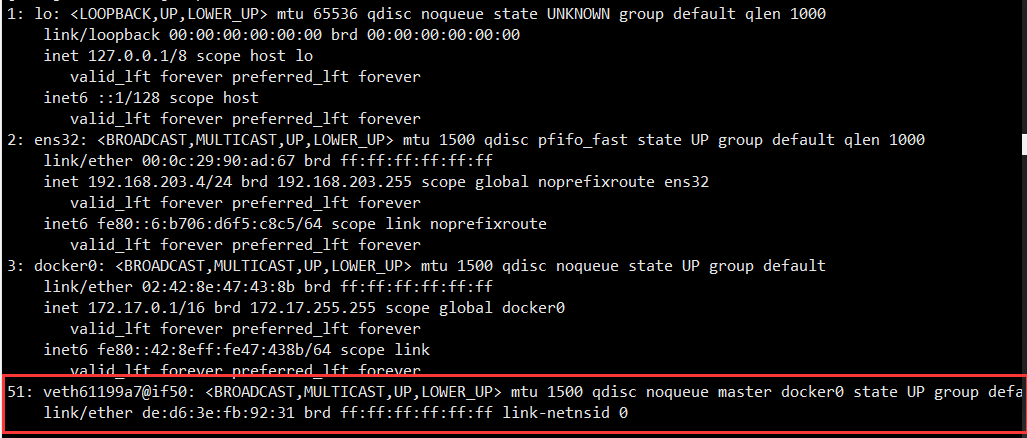
There is one more 51: veth61199a7@if50 Network card information
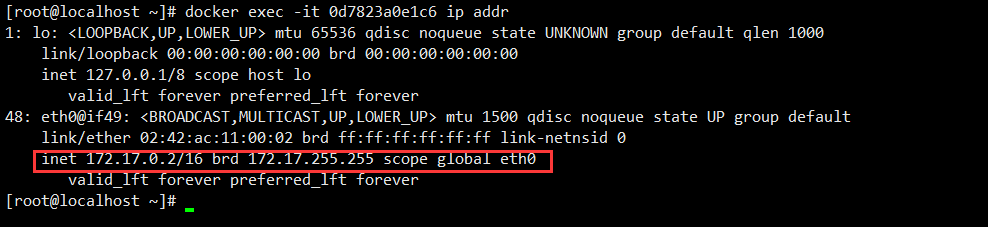
Enter the container to view the ip address information

There is also a 50: eth0@if51 Network card information
Then start a tomcat container to view the ip address information
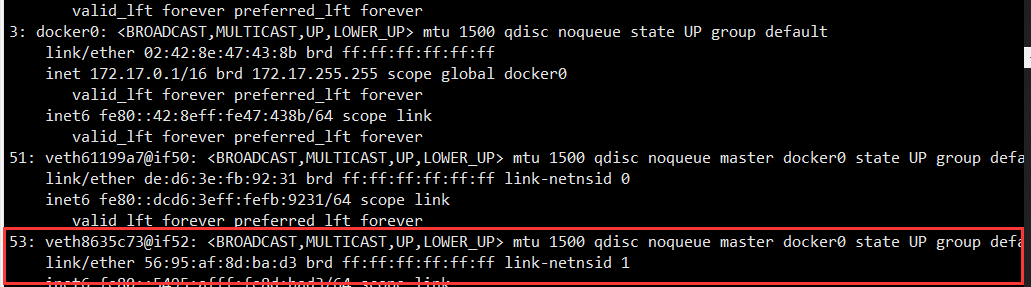
Found another 53: veth8635c73@if52 Network card information
Enter the new container to view the ip information

There is also a 52: eth0@if53 Network card information
explain
51: veth61199a7@if50 And 50: eth0@if51 ,53: veth8635c73@if52 And 52: eth0@if53 These two pairs of network card information are the implementation of evth pair technology. In docker network, evth pair technology is used to realize network interworking
- Evth pair is a pair of virtual device interfaces. They all appear in pairs. One end is connected to the protocol and the other end is connected to each other
- We generally use evth pair as a bridge to realize docker communication. With the above examples, we can draw and understand
Summary
All network interfaces in docker are virtual because the virtual interface has high forwarding efficiency.
However, as long as the container is stopped or deleted, the address assigned by the corresponding bridge and docker0 will become invalid. When it is started again, a new pair of evth pair interfaces and network addresses will be assigned.
Thinking: in the microservice scenario, when using JDBC to connect to the database, you usually need to set database url = ip. If the container collapses or stops, the ip will change, and JDBC cannot connect to MySQL. How to solve it?
Solution: use the ID or service name of the container to connect the communication instead of ip. Access the container through the service name. The docker solution is -- link
docker Network -- link
# Start two tomcat, use tomcat1 to ping and test tomcat2
docker exec -it tomcat1 ping tomcat2
# Status False unable to find tomcat2 service
ping: tomcat2: Name or service not known

# --link demonstration
#Start a tomcat3 again and connect with tomcat2 in the form of -- link
docker run -d -P --name tomcat3 --link tomcat2 tomcat
# tomcat3 ping tomcat2
docker exec -it tomcat3 ping tomcat2
# Status Ok
PING tomcat2 (172.17.0.2) 56(84) bytes of data.
64 bytes from tomcat2 (172.17.0.2): icmp_seq=1 ttl=64 time=0.169 ms
64 bytes from tomcat2 (172.17.0.2): icmp_seq=2 ttl=64 time=0.082 ms
......
# tomcat2 ping tomcat3
docker exec -it tomcat2 ping tomcat3
# Status False
ping: tomcat3: Name or service not known

# Conclusion: after using the -- link command, tomcat3 can ping tomcat2, but tomcat2 cannot Ping tomcat3
# Principle Exploration
# Looking at the hosts file of tomcat3, you can find that the line marked with green binds the address container name, so tomcat3 can ping through tomcat2
docker exec -it tomcat3 cat /etc/hosts
127.0.0.1	localhost
::1	localhost ip6-localhost ip6-loopback
fe00::0	ip6-localnet
ff00::0	ip6-mcastprefix
ff02::1	ip6-allnodes
ff02::2	ip6-allrouters
`172.17.0.2	tomcat2 1bdb7bc92c17`
172.17.0.4	b4240695272c


# error
OCI runtime exec failed: exec failed: container_linux.go:380: starting container process caused: exec: "ping": executable file not found in $PATH: unknown

# solve
# Enter container
apt-get update
apt install iputils-ping
Note: – link is no longer recommended, but uses a custom network
docker Network - custom network
Container interconnection generally refers to user-defined network implementation. Although it can be implemented using – link, it is not flexible enough
# View all docker networks
docker network ls

# Network mode
* bridge 	 : Bridging mode      docker0 And custom network
* none	 	 : Do not configure network	Generally not
* host	 	 : Host mode		 Share network with host
* contairner : Container network connection	Rarely used(It has great limitations) Data shall be self checked
# Test: create a custom network

# When you start the container directly from the image, docker0 will be used by default, and the parameters in [] will be added by default, such as the following command
docker run -d -P --name tomcat1 [--net bridge] tomcat
# docker0 features: by default, the domain name cannot be accessed. Although it can be accessed through -- link, it is not flexible enough

# Customize a network
docker network create --driver bridge --subnet 192.168.0.0/16 --gateway 192.168.0.1 ynet

# Parameter interpretation
--driver bridge			 : Specify bridging mode
--subnet 192.168.0.0/16	 : Specify network segment
--gateway 192.168.0.1	 : Specify gateway
ynet 					 : Custom network name

# View all network information again
docker network ls

# Specify the network to start two tomcat
docker run -d -P --name tomcat1 --net ynet tomcat
docker run -d -P --name tomcat2 --net ynet tomcat

# ping test with container name
docker exec -it tomcat1 ping tomcat2
# Status OK

Therefore, when using a custom network, no configuration is required. docker maintains a good relationship for us. Containers in the same network segment can be interconnected through container names. Moreover, when building a cluster, different clusters use different networks and do not affect each other
docker Network - interconnection of containers in different network segments
Case: the above two containers under the ynet network segment can be ping ed. If you use the default docker0 to create a tomcat3, can tomcat3 connect with tomcat1 and tomcat2?
# Use the default docker0 to create a tomcat3 container
docker run -d -P --name tomcat3 tomcat

# Use tomcat3 to ping tomcat1 and tomcat2
docker exec -it tomcat3 ping tomcat2
docker exec -it tomcat3 ping tomcat1

# Status False
ping: tomcat2: Name or service not known
ping: tomcat1: Name or service not known

# Reason: tomcat3, tomcat2 and tomcat1 are not in the same network segment, so they will not work naturally
# solve:
# Use the docker network --help command to find the connect parameter
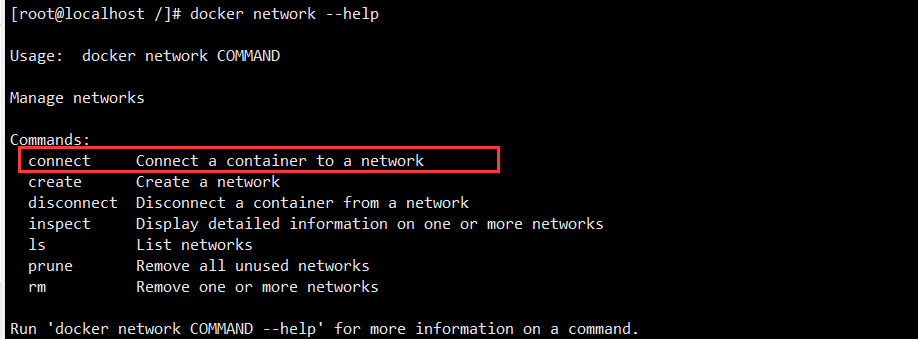
# Use the connect parameter to complete the interconnection of containers in different network segments
docker network connect ynet tomcat3

# Use tomcat3 to ping tomcat1 and tomcat2
docker exec -it tomcat3 ping tomcat2
docker exec -it tomcat3 ping tomcat1

#Status: OK

#Principle:

- Through the docker network inspect ynet command, you can see that in the above information, ynet directly assigns an address of this network segment to tomcat3
- Its essence is a container with two addresses

To cancel interconnection, you can use the disconnect parameter, such as
docker network disconnect ynet tomcat3
Course links
https://www.bilibili.com/video/BV1og4y1q7M4?spm_id_from=333.999.0.0