1, About docker
2, Three core concepts of docker
1. Mirror image
2. Container
3. Warehouse
3, Basic operation of installation and docker
1. Installation and start up
2. Image operation of docker
3. Container operation of docker
1, About docker
Docker, as the most popular project in the open source community, is an open source tool for running applications in Linux containers. It is a lightweight "virtual machine". All the source code of docker is maintained at https://github.com/docker. Its official website is: https://www.docker.com .
The reason why docker has many advantages is inseparable from the characteristics of operating system virtualization itself. Traditional virtual machines need to have additional hypervisor and operating system layer of virtual machines, while docker is the virtualization realized directly on the operating system layer. The working diagram of the two is as follows: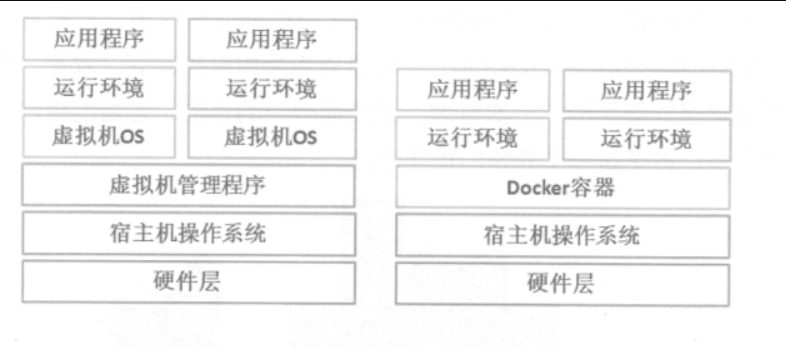
The differences between docker and virtual machine are as follows: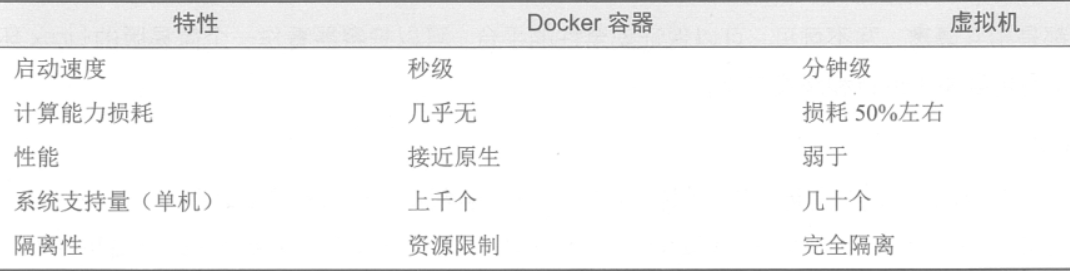
2, Three core concepts of docker
1. Mirror image
Docker image is the foundation of container creation, similar to the snapshot of virtual machine, which can be understood as a read-only template for docker container engine. For example, an image can be a complete centos operating system environment, called a centos image; it can be an application with MySQL installed, called a MySQL image, and so on.
docker provides a simple mechanism to create and update the existing image. We can also download the completed application image from the Internet for direct use.
2. Container
docker's container is a running instance created from the image, which can be started, stopped, and deleted. Each container created is isolated and invisible to each other, which can ensure the security of the platform. The container can be regarded as a simple version of Linux environment. docker uses the container to run and isolate applications.
3. Warehouse
docker warehouse is used for several places to save images. After you create your own image, you can use the push command to upload it to the shared warehouse or private warehouse, so that the next time you want to use the image on another machine, you only need to pull it from the warehouse.
The warehouse registration server is the place to store the warehouse, which contains multiple warehouses. Each warehouse stores a certain kind of image, and uses different labels to distinguish them. At present, the largest public warehouse is docker hub, which stores a large number of images for users to download.
The default storage directory of docker is / var/lib/docker. The image, container, log and other contents of docker are all stored here. You can use large capacity partition to store these contents, and generally choose to establish LVM logical volume, so as to avoid the problem of insufficient storage directory capacity during the operation of docker.
3, Basic operation of installation and docker
1. Installation and start up
During installation, you must ensure that the server configuration can be connected to the Internet, or you can configure the local yum source by yourself,
[root@localhost ~]# Yum - y install docker <! -- direct install -- >
[root@localhost ~]# Systemctl start docker <! -- start docker Service -- >
[root@localhost ~]# Systemctl enable docker <! -- set to power on self start -- >
[root@localhost ~]# Docker version <! -- View installed docker version -- >
2. Image operation of docker
1) Find image
Before the docker runs the container, there needs to be a local image. If there is no local image, the docker will try to find it from the default image warehouse https://hub.docker.com /.
[root@localhost ~]# Docker search DHCP <! -- search image with DHCP as keyword -- >
INDEX       NAME                                           DESCRIPTION                                     STARS     OFFICIAL   AUTOMATED
docker.io   docker.io/networkboot/dhcpd                    Suitable for running a DHCP server for you...   40                   [OK]
docker.io   docker.io/joebiellik/dhcpd                     DHCP server running on Alpine Linux             14                   [OK]
docker.io   docker.io/gns3/dhcp                            A DHCP container for GNS3 using dnsmasq         2                    [OK]
docker.io   docker.io/instantlinux/dhcpd-dns-pxe           Serve DNS, DHCP and TFTP from a small Alpi...   2                    [OK]
docker.io   docker.io/ictu/dhcpd-tftpd                     dhcpd tftpd container                           1                    [OK]
                         .................<!--Omit part of the content-->
Many images containing DHCP keywords are returned, including image NAME, DESCRIPTION, STARS, OFFICIAL and AUTOMATED. The default output results will be sorted according to the star rating, indicating the popularity of the image. When downloading the image, you can refer to this item. The higher the star rating is, the more popular it is. Whether it is an OFFICIAL image is an image created and maintained by the OFFICIAL project team. Generally, the image maintained by the OFFICIAL project team uses a single word as the image NAME, which we call basic Mirror or root image. For example, / reinblau/dhcp is a named image created and maintained by reinblau, the user of docker hub, with the prefix of user NAME; whether to actively create resources refers to whether users are allowed to verify the source and content of the image.
2) Download Image
Search for images that meet the requirements. You can use the docker pull command to download images from the network to use locally.
Command format: docker pull warehouse name [: label]
For docker image, if you do not specify a label when downloading the image, the latest version of the image in the warehouse will be downloaded by default, that is, you can select the label as latest, or you can download a specific version of the image through the specified label. Here the label is used to distinguish the image version.
Download an image as follows:
[root@localhost ~]# Docker pull docker.io/networkboot/dhcpd <! -- download a queried image -- >
[root@localhost ~]# Docker images <! -- Query downloaded images -- >
REPOSITORY                    TAG                 IMAGE ID            CREATED             SIZE
docker.io/networkboot/dhcpd   latest              52cbff801df2        5 months ago        105 MB
//The following information can be read out from the echoed information:
#Repositionary: the warehouse to which the image belongs;
#TAG: the label information of the image, marking different images in the same warehouse;
#IMAGE ID: the unique ID number of the image, which uniquely identifies the image;
#CREATED: the time when the image was CREATED;
#SIZE: the SIZE of the mirror
//The user can also obtain the detailed information of the image according to the unique ID number of the image. The command is as follows:
[root@localhost ~]# Docker inspection 52cbff801df2 <! -- get image details -- >
#Image details include creation time, system version, host name, domain name, user, volume, label, operating system, device ID and other information.
#In order to use this image in subsequent work, you can use the docker tag command to add a new label for the local image,
#Command format: docker tag name: [label] new name: [new label], the specific operations are as follows:
[root@localhost ~]# Docker tag docker.io/networkboot/dhcpd DCHP: DHCP <! -- change new name and label -- >
[root@localhost ~]# docker images
REPOSITORY                    TAG                 IMAGE ID            CREATED             SIZE
dchp                          dhcp                52cbff801df2        5 months ago        105 MB
docker.io/networkboot/dhcpd   latest              52cbff801df2        5 months ago        105 MB
3) Delete image
You will find that the original image is still there, so try deleting the original image!
The docker rmi command can be used to delete redundant images. You can specify a label or an ID to delete the image
Command format for deleting image: docker rmi warehouse Name: label or docker rmi Image ID number: when an image has multiple labels, the specified label is just to delete the specified label in multiple labels of the image, which will not affect the image file. It is equivalent to just deleting one label of the image. However, when the image has only one label left, you should pay attention to it, and then use the delete command to completely delete the image.
[root@localhost ~]# Docker RMI docker.io/networkboot/dhcpd <! -- delete the original image label -- >
Untagged: docker.io/networkboot/dhcpd:latest
Untagged: docker.io/networkboot/dhcpd@sha256:fdc7ff6f265249a104f32f1d7aed0aedaf2f2fc62ea10eebf596e2af3b670477
When using the docker rmi command to keep up with the ID number of the image, you must make sure that the image is not used by the container. When deleting, the system will first delete all labels pointing to the image, and then delete the image file itself. If the image has been used by the container, the correct way is to delete all containers that depend on the image, and then delete the image
.
4) Export image
When you need to migrate the image on one machine to another machine, you need to save the image to a local file. This process is called exporting the image. You can use the docker save command to save the image, and then you can copy the file to another machine.
Command format: docker save -o save image as local file
As follows:
[root@localhost ~]# Docker images <! -- get image name and label -- >
REPOSITORY          TAG                 IMAGE ID            CREATED             SIZE
dchp                dhcp                52cbff801df2        5 months ago        105 MB
[root@localhost ~]# docker save -o dhcptest dchp:dhcp      #Export to local mirror
[root@localhost ~]# Du - SH dhcptest <! -- will be exported to the local current working directory -- >
103M    dhcptest
5) Load image
Copy the exported image from machine A to machine B. you need to use the image on machine B to import the exported file into the image library of machine B. this process is called loading image.
The command format is (load the image from the file dhcp into the image import local image library):
[root@localhost ~]# docker load --input dhcp
<!--perhaps-->
[root@localhost ~]# docker load < dhcp
6) Upload image
As more and more images are stored locally, you need to specify a special place to store these images - the warehouse. The simpler is the public warehouse, which is uploaded to the official warehouse of dockerhub by default. You need to register an account using the public warehouse, and you can use docker login command is used to enter user name, password and email to complete registration and login. Before uploading the image, you need to add a new label to the local image, and then use the docker push command to upload.
Command format: docker push Warehouse name:label
[root@localhost ~]# docker login
Login with your Docker ID to push and pull images from Docker Hub. If you don't have a Docker ID, head over to https://hub.docker.com to create one.
Username: lyxtest      <!--Enter registered user name-->
Password:          <!--Input password-->
Login Succeeded                     <!--Prompt for successful login-->
[root@localhost ~]# docker push docker.io/lyxtest/dhcp
<!--When logging in and uploading here, an error is reported. It is found that there is a problem with the warehouse name of the image. If you change the warehouse name according to the prompt, the upload is successful-->
The push refers to a repository [docker.io/lyxtest/dhcp]
8d3d1c857813: Pushed
37ee4253c76e: Pushed
b57c79f4a9f3: Pushed
d60e01b37e74: Pushed
e45cfbc98a50: Pushed
762d8e1a6054: Pushed
testdhcp: digest: sha256:fdc7ff6f265249a104f32f1d7aed0aedaf2f2fc62ea10eebf596e2af3b670477 size: 1569
3. Container operation of docker
Container is another core concept of docker. Simply speaking, container is a running instance of image, an application or a group of applications running independently and their necessary running environment, including file system, system class library, shell environment, etc. The image is a read-only template, and the container will give the read-only template an additional writable layer.
1) Creation and start of container
The creation of docker is the process of loading the image into the container. The container of docker is very lightweight, and users can create or delete it at any time. The newly created container is in the stop state by default, and does not run any programs. You need to start a process in one of them to start the container. This process is the only process of the container, so when the process ends, the container will stop completely. The stopped container can be restarted and the original changes retained. You can use the docker create command to create a new container.
① Create container
The command is as follows (- i: to keep the input of the container open, that is, the container is running all the time; - t: to assign a pseudo terminal to the docker):
[root@localhost ~]# Docker create - it DCHP: DHCP / bin / bash <! -- create a container and specify the pseudo terminal -- >
2304f92a815800305804987bcb2ee20aca5f4d651d577427c476554d54171f2d
#If the container command is created at this time, an error is reported: "WARNING:IPv4 forwarding is disabled.Network will bot
#work. ", open / usr/lib/sysctl.d/00-system.conf file with vim editor, and add
#Net. IPv4. IP? Forward = 1, then restart the network service with systemctl start network command
[root@localhost ~]# docker ps -a
CONTAINER ID        IMAGE               COMMAND                  CREATED             STATUS              PORTS               NAMES
2304f92a8158        dchp:dhcp           "/entrypoint.sh /b..."   8 minutes ago       Created                                 naughty_perlman
#The output information shows the ID number of the container, loaded image, running program, creation time, current status, port mapping, container name, etc.
#The status column found above is create, indicating that the current container is newly created and in the stopped state.
② Start and stop container
[root@localhost ~]# Docker PS - a <! -- find out the ID number of the container first -- >
CONTAINER ID        IMAGE               COMMAND                  CREATE
2304f92a8158        dchp:dhcp           "/entrypoint.sh /b..."   10 min
[root@localhost ~]# Docker start 2304f92a8158 <! -- when starting, you need to specify the ID number of the container -- >
2304f92a8158
[root@localhost ~]# Docker PS - a <! -- if you query the status of the container again, you will find that the status bar becomes up -- >
CONTAINER ID        IMAGE               COMMAND                  CREATED             STATUS              PORTS               NAMES
2304f92a8158        dchp:dhcp           "/entrypoint.sh /b..."   23 minutes ago      Up 42 seconds                           naughty_perlman
[root@localhost ~]# Docker stop 2304f92a8158 <! -- stop this container -- >
2304f92a8158
[root@localhost ~]# Docker PS - a <! -- if you check the status again, you will find that the status bar changes to exited -- >
CONTAINER ID        IMAGE               COMMAND                  CREATED             STATUS                     PORTS               NAMES
2304f92a8158        dchp:dhcp           "/entrypoint.sh /b..."   About an hour ago   Exited (0) 4 seconds ago                       naughty_perlman
③ Enter container
[root@localhost ~]# Docker start 2304f92a8158 <! -- start this container again -- >
[root@localhost ~]# Docker exec - it 2304f92a8158 / bin / bash <! -- enter this container -- >
root@2304f92a8158:/# Ls <! -- check the root directory of the container, and you can see that the command prompt changes after entering the container -- >
bin   dev            etc   lib    media  opt   root  sbin  sys  usr
boot  entrypoint.sh  home  lib64  mnt    proc  run   srv   tmp  var
root@2304f92a8158:/# Exit <! -- exit this container -- >
exit
[root@localhost ~]#
2) Export and import of containers
[root@localhost ~]# Docker PS - a <! -- query the ID number of the container -- >
CONTAINER ID        IMAGE               COMMAND                  CREATED             STATUS              PORTS               NAMES
2304f92a8158        dchp:dhcp           "/entrypoint.sh /b..."   About an hour ago   Up 6 minutes                            naughty_perlman
[root@localhost ~]# docker export 2304f92a8158>centos7dhcp
   <!--Export to the current working directory and define the name as centos7dhcp-->
[root@localhost ~]# Ls <! -- view the exported file. The following marked red is the exported file -- >
anaconda-ks.cfg  'centos7dhcp'  dhcptest  initial-setup-ks.cfg
<!--Copy the exported file to another server, and then use docker  import Command import, mirror-->
[root@localhost ~]# scp root@192.168.1.1:/root/centos7dhcp /tmp
         <!--Replication on another server-->
root@192.168.1.1's password:                 <!--Enter the user password of the opposite end-->
centos7dhcp                         100%   84MB  95.2MB/s   00:00
[root@localhost ~]# cd /tmp
[root@localhost tmp]# Ls <! -- make sure to copy -- >
centos7dhcp
 .............<!--Omit part of the content-->
 [root@localhost tmp]# cat centos7dhcp | docker import - centos7:dhcp
          <!--Import file centos7dhcp Become a local mirror-->
sha256:e016fa46360492daa9323a0d35bccec76610433f03ba9171fe6d9a5500f823ff
[root@localhost tmp]# Docker images | grep centos7 <! -- make sure the image is imported successfully -- >
centos7                  dhcp                e016fa463604        14 minutes ago      84.7 MB
3) Deletion of container
You can use the docker rm command to delete a container that has been terminated.
[root@localhost ~]# Docker PS - a <! -- still need to find out the ID of the container -- >
CONTAINER ID        IMAGE               COMMAND                  CREATED             STATUS              PORTS               NAMES
2304f92a8158        dchp:dhcp           "/entrypoint.sh /b..."   About an hour ago   Up 35 minutes                           naughty_perlman
[root@localhost ~]# Docker stop 2304f92a8158 <! -- you need to stop the container before deleting it -- >
2304f92a8158
[root@localhost ~]# Docker RM 2304f92a8158 <! -- delete container -- >
2304f92a8158
[root@localhost ~]# Docker RM - f $(docker PS - A - Q) <! -- delete all containers -- >
If you delete a running container, you can add the - f option to force the deletion, but it is recommended that you stop the container before deleting it.
————————Thank you for reading————————