Docker
1, Overview
The deployment environment (Redis, ES, Hadoop...) is required to publish a project. It is very troublesome to redeploy the environment on the server and cannot cross platform.
Therefore, it is processed by Docker with Windows, and finally released to Linux.
Traditional: development jar, operation and maintenance deployment environment
Now: the development is packaged and deployed, and a set of processes is completed
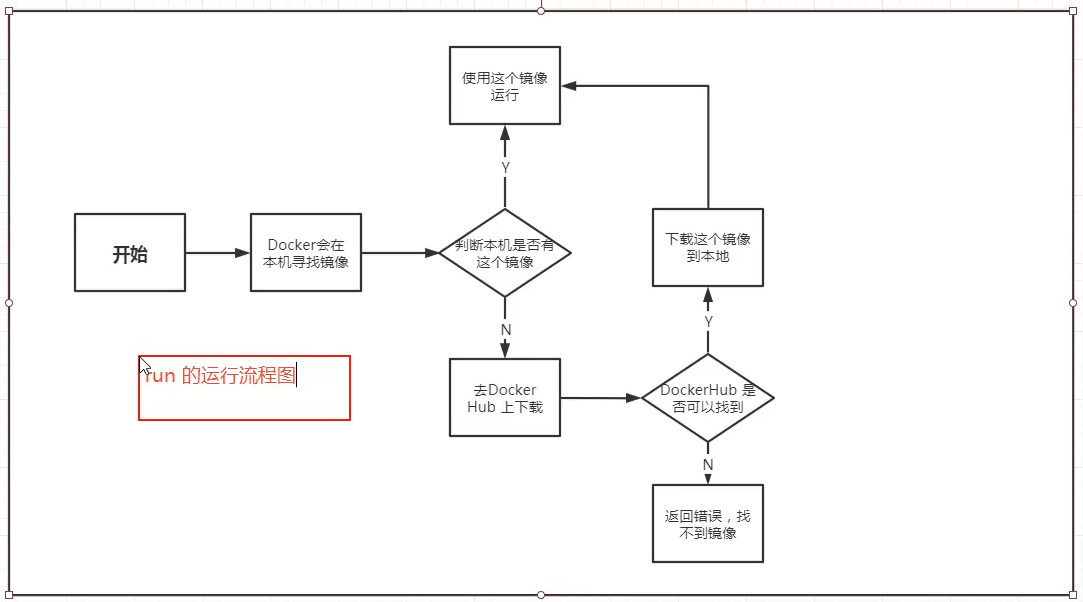
Docker provides a set of solutions to solve the problem of deployment. Build images and download them directly during deployment.
Docker uses server space to the extreme through an isolation mechanism.
Document address: https://docs.docker.com/get-started/
Warehouse address: https://hub.docker.com/
What can docker do
-
Faster delivery and deployment
Traditional: a bunch of help files, installer
Docker: packaging image release test, one click operation
-
Faster upgrade and maintenance
After using Docker, you can package the project into an image, server A, server B
-
Simpler system operation and maintenance
Containerization makes the environment highly consistent
-
More efficient use of computer resources
Docker is kernel level virtualization, which can run many containers, and server resources can be fully utilized
2, Installation
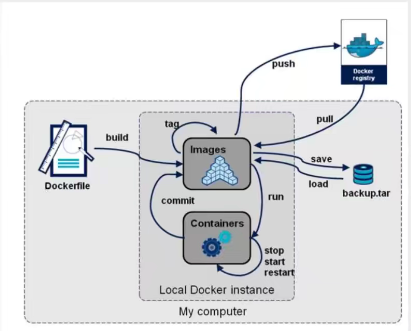
2.1 basic composition of docker
Image: like a template, you can create containers through this template. Multiple containers can be created through this image. The final project runs in the container
Container: Docker can run one or a group of containers independently through container technology.
Start, stop, delete... Basic commands
repository: it is divided into private and shared warehouses. Docker Hub is foreign by default, and domestic images can be configured
2.2 installation
Environmental preparation
- linux foundation
- CentOS7
- XShell
Environment view
Confirm that the kernel version is above 3.10
[root@iZvjqtq16uz5ygZ /]# uname -r
3.10.0-957.21.3.el7.x86_64
Confirm that the system version is OS7
[root@iZvjqtq16uz5ygZ /]# cat /etc/os-release
NAME="CentOS Linux"
VERSION="7 (Core)"
ID="centos"
ID_LIKE="rhel fedora"
VERSION_ID="7"
PRETTY_NAME="CentOS Linux 7 (Core)"
ANSI_COLOR="0;31"
CPE_NAME="cpe:/o:centos:centos:7"
HOME_URL="https://www.centos.org/"
BUG_REPORT_URL="https://bugs.centos.org/"
install
# Delete old docker
sudo yum remove docker \
                  docker-client \
                  docker-client-latest \
                  docker-common \
                  docker-latest \
                  docker-latest-logrotate \
                  docker-logrotate \
                  docker-engine

# Install required packages
sudo yum install -y yum-utils

# Set docker image address
# Alicloud version
yum-config-manager --add-repo http://mirrors.aliyun.com/docker-ce/linux/centos/docker-ce.repo

# Update package index
sudo yum makecache fast

# Install docker
sudo yum install docker-ce docker-ce-cli containerd.io

# Start docker
sudo systemctl start docker

# View installation success
sudo docker version

# test
sudo docker run hello-world

# View mirror
sudo docker images
uninstall
sudo yum remove docker-ce docker-ce-cli containerd.io

sudo rm -rf /var/lib/docker
sudo rm -rf /var/lib/containerd
2.3 Alibaba cloud image acceleration
- Log in to alicloud and find the container service
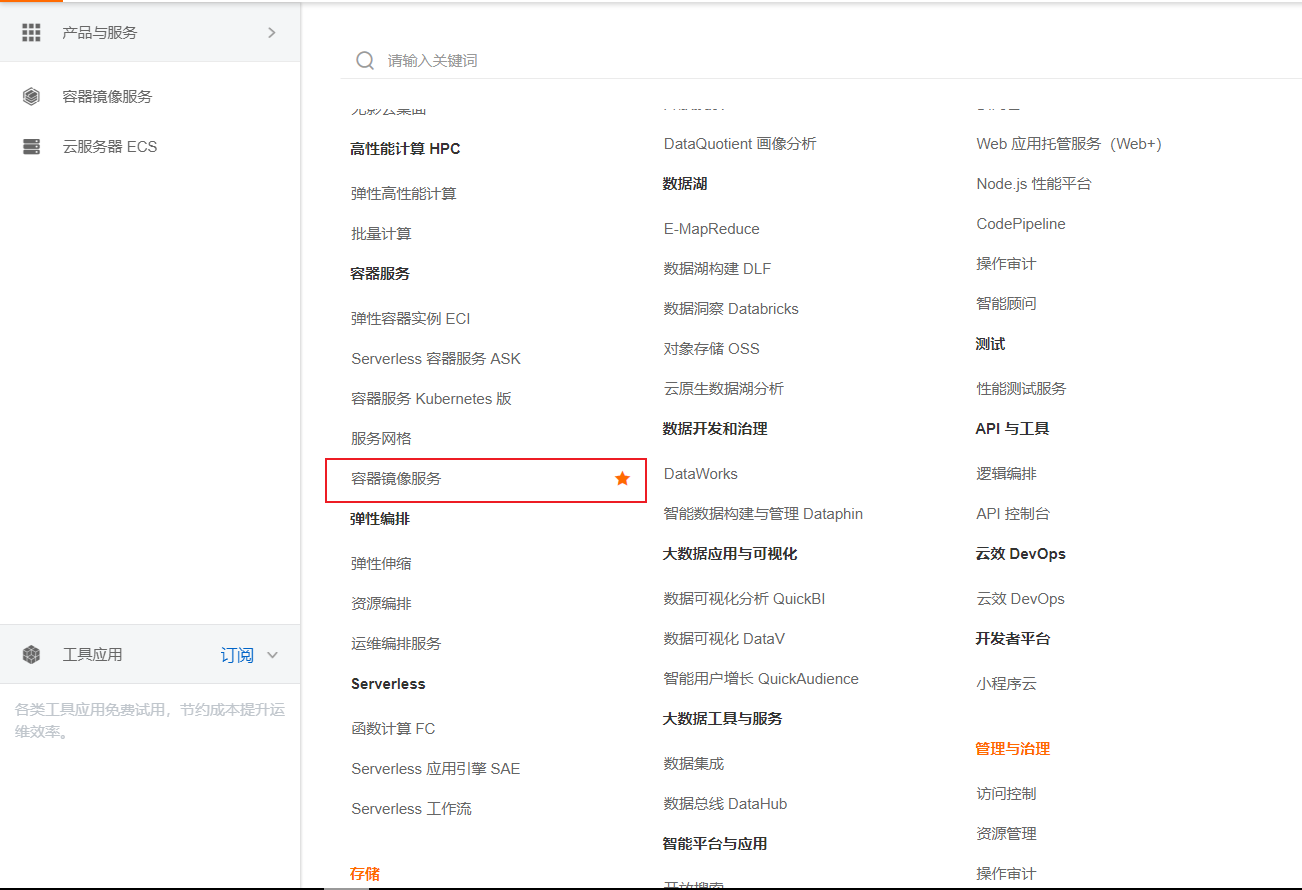
- Image acceleration address found
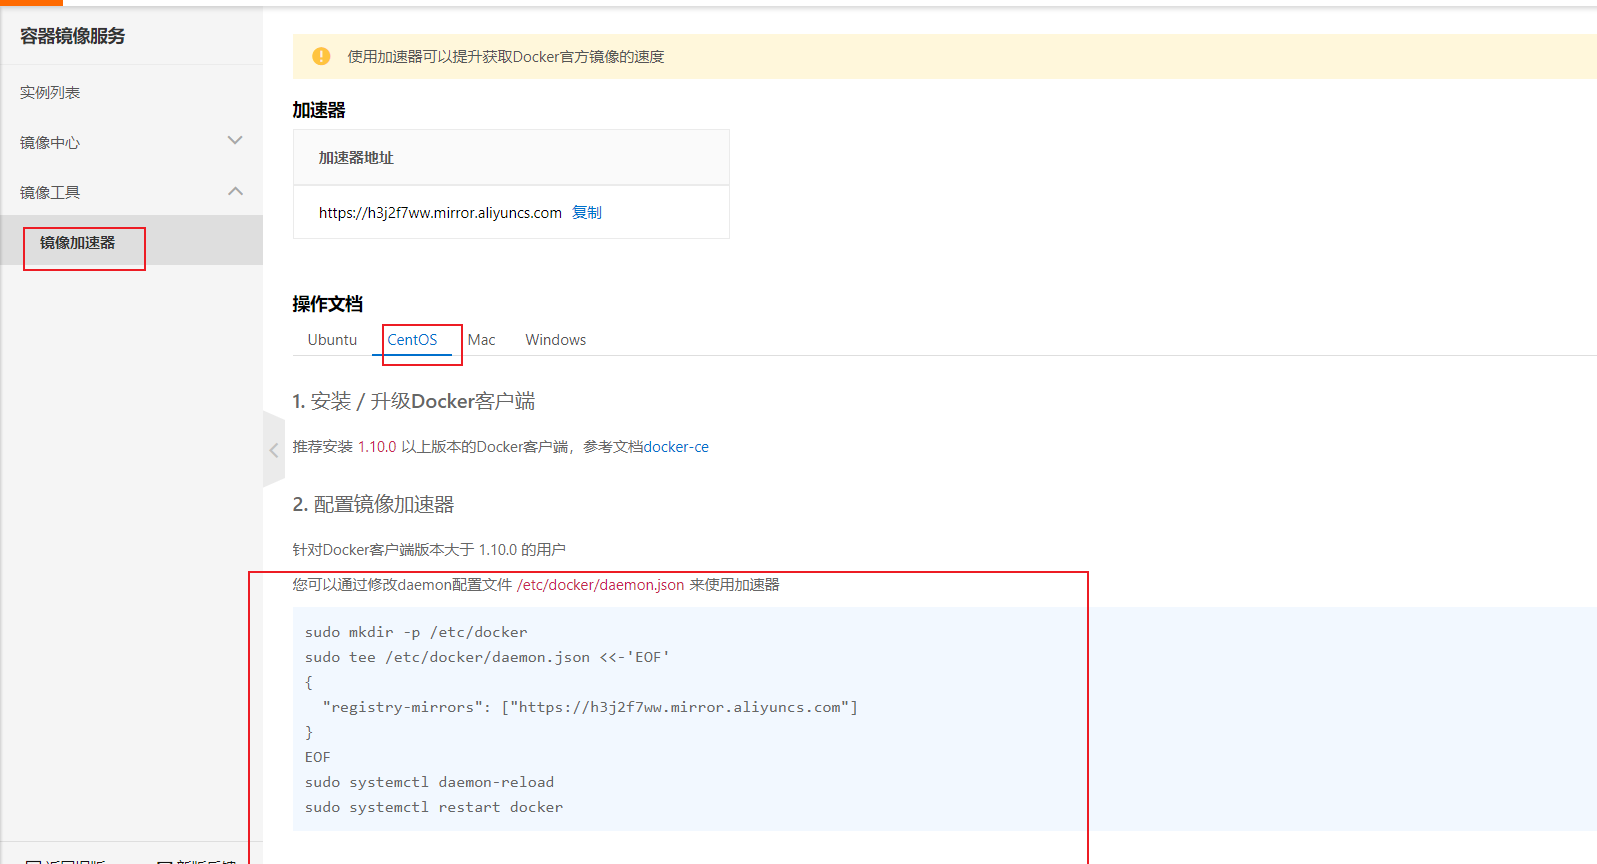
sudo mkdir -p /etc/docker
sudo tee /etc/docker/daemon.json <<-'EOF'
{
  "registry-mirrors": ["https://h3j2f7ww.mirror.aliyuncs.com"]
}
EOF
sudo systemctl daemon-reload
sudo systemctl restart docker
2.3 review Hello World
Execution sequence
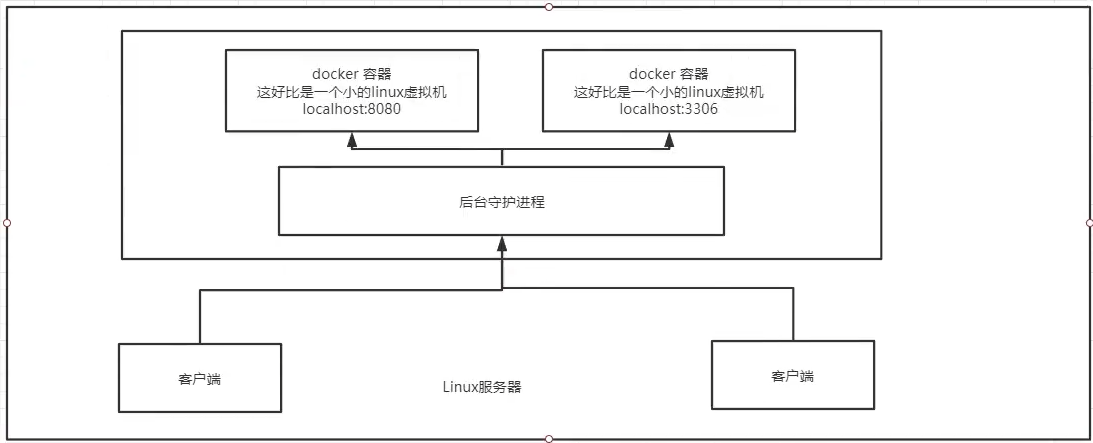
2.4 docker operation principle
docker is a cs structure, which requests the daemon through the client
Why is docker faster than vm
- docker has fewer abstraction layers than virtual machines
- It uses the kernel of the host, and the vm needs the guest os
3, Common commands
3.1 help command
docker version		   # Version information
docker info			   # docker container information, including the number of images and containers
docker command --help      #	Help command
3.2 mirror command
docker images view images
[root@iZvjqtq16uz5ygZ ~]# docker images
REPOSITORY    TAG       IMAGE ID       CREATED        SIZE
hello-world   latest    d1165f221234   5 months ago   13.3kB

# explain
REPOSITORY	# Mirror warehouse source
Tag			# Mirror label
IMAGE ID	# Mirror ID
CREATED		# Image creation time
SIZE		# Mirror size
# parameter
-a	View all
-q	Show only id
-f	screen
docker search search image
[root@iZvjqtq16uz5ygZ ~]# docker search mysql
NAME                              DESCRIPTION                                     STARS     OFFICIAL   AUTOMATED
mysql                             MySQL is a widely used, open-source relation...   11273     [OK]
mariadb                           MariaDB Server is a high performing open sou...   4279      [OK]
mysql/mysql-server                Optimized MySQL Server Docker images. Create...   836                  [OK]
# parameter
-f	screen
	--filter=STARS=3000	# Search for more than 3000 favorites

[root@iZvjqtq16uz5ygZ ~]# docker search mysql --filter=stars=3000
NAME      DESCRIPTION                                     STARS     OFFICIAL   AUTOMATED
mysql     MySQL is a widely used, open-source relation...   11273     [OK]
mariadb   MariaDB Server is a high performing open sou...   4279      [OK]
docker pull Download Image
# Download by image name
[root@iZvjqtq16uz5ygZ ~]# docker pull mysql
Using default tag: latest	# Do not specify the version. Download the latest version by default
latest: Pulling from library/mysql
33847f680f63: Pull complete 	# Layered Download
5cb67864e624: Pull complete
1a2b594783f5: Pull complete
b30e406dd925: Pull complete
48901e306e4c: Pull complete
603d2b7147fd: Pull complete
802aa684c1c4: Pull complete
715d3c143a06: Pull complete
6978e1b7a511: Pull complete
f0d78b0ac1be: Pull complete
35a94d251ed1: Pull complete
36f75719b1a9: Pull complete
Digest: sha256:8b928a5117cf5c2238c7a09cd28c2e801ac98f91c3f8203a8938ae51f14700fd	# autograph
Status: Downloaded newer image for mysql:latest
docker.io/library/mysql:latest	# Real address

# equivalence
docker pull mysql
docker pull docker.io/library/mysql:latest
# Pass the image name and specify the version
[root@iZvjqtq16uz5ygZ ~]# docker pull mysql:5.7
5.7: Pulling from library/mysql
33847f680f63: Already exists # Existing will not be downloaded
5cb67864e624: Already exists
1a2b594783f5: Already exists
b30e406dd925: Already exists
48901e306e4c: Already exists
603d2b7147fd: Already exists
802aa684c1c4: Already exists
5b5a19178915: Pull complete
f9ce7411c6e4: Pull complete
f51f6977d9b2: Pull complete
aeb6b16ce012: Pull complete
Digest: sha256:be70d18aedc37927293e7947c8de41ae6490ecd4c79df1db40d1b5b5af7d9596
Status: Downloaded newer image for mysql:5.7
docker.io/library/mysql:5.7
docker rmi delete image
# Delete by id or name
[root@iZvjqtq16uz5ygZ ~]# docker images
REPOSITORY    TAG       IMAGE ID       CREATED        SIZE
mysql         5.7       8cf625070931   3 weeks ago    448MB
mysql         latest    c60d96bd2b77   3 weeks ago    514MB
hello-world   latest    d1165f221234   5 months ago   13.3kB
[root@iZvjqtq16uz5ygZ ~]# docker rmi -f 8cf625070931
Untagged: mysql:5.7
Untagged: mysql@sha256:be70d18aedc37927293e7947c8de41ae6490ecd4c79df1db40d1b5b5af7d9596
Deleted: sha256:8cf6250709314f2fcd2669e8643f5d3bdebfe715bddb63990c8c96e5d261d6fc
Deleted: sha256:452fe6896278c26338d547f8d1092011d923785247c46629b374d3477fe28c84
Deleted: sha256:bd40bf60af5d06e6b93eaf5a648393d97f70998faa3bfa1b85af55b5a270cb35
Deleted: sha256:c43e9e7d1e833650e0ed54be969d6410efa4e7fa6e27a236a44a2b97e412ee93
Deleted: sha256:70f18560bbf492ddb2eadbc511c58c4d01e51e8f5af237e3dbb319632f16335b
[root@iZvjqtq16uz5ygZ ~]# docker images
REPOSITORY    TAG       IMAGE ID       CREATED        SIZE
mysql         latest    c60d96bd2b77   3 weeks ago    514MB
hello-world   latest    d1165f221234   5 months ago   13.3kB
# Delete all mirrors
[root@iZvjqtq16uz5ygZ ~]# docker rmi -f $(docker images -aq)
Untagged: mysql:latest
Untagged: mysql@sha256:8b928a5117cf5c2238c7a09cd28c2e801ac98f91c3f8203a8938ae51f14700fd
Deleted: sha256:c60d96bd2b771a8e3cae776e02e55ae914a6641139d963defeb3c93388f61707
Deleted: sha256:5c8c91273faab368a6d659156f2569fa9f40b0e0139222fdf9eef073df4b3797
Deleted: sha256:33d8196a776f42a16f10395b66f10f91443b1fb194bca2a9b8dfb0deff5babb8
Deleted: sha256:3ec63323025213e3cabf17ac7933506dc5520ec49226a9764418f77ea60d35c8
Deleted: sha256:1f129b005b51b049ac84ed0775b82096d480b7d9308a9a137697f37346562266
Deleted: sha256:80ed209bd0434faa1ce31fbaab8508124dddf8f6502c5736ee4b8e46697a8477
Deleted: sha256:e53f0d35c77064014a5c1c1332d84d5f421a58418ca9c208bc470691c0e483e3
Deleted: sha256:75209fb28131d5537e73406ff0f6f508f3eb1f4d86c43d1d16df76fd28b9cc35
Deleted: sha256:34a01bee1a62a01034ffc3da48a3cb45716a0cf2e264c26663e02288e81c7ec2
Deleted: sha256:9f8bca37a56017fd3462d4fc329b0b20f97c2dd4c15e55a8e6ad1c023ab5552b
Deleted: sha256:c8a6e3f9a2412c28cd8c48e2c7bed5e7fbaa0ab6649add2dbe8641cb29b967f6
Deleted: sha256:0a26eacdbd862e75d064d817e8a5bcf5e060c2680c10f77ffa52757c0b8c3328
Deleted: sha256:814bff7343242acfd20a2c841e041dd57c50f0cf844d4abd2329f78b992197f4
Untagged: hello-world:latest
Untagged: hello-world@sha256:776b0895d5e2fcd5e80bcdd607adc45461ba11143ef3df531174bf00679f43fe
Deleted: sha256:d1165f2212346b2bab48cb01c1e39ee8ad1be46b87873d9ca7a4e434980a7726
[root@iZvjqtq16uz5ygZ ~]# docker images
REPOSITORY   TAG       IMAGE ID   CREATED   SIZE
3.3 container command
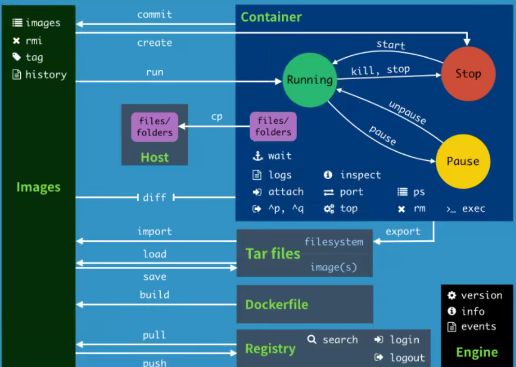
Common commands
port  	  # View the internal source port of the container corresponding to the mapped port
pause	  # Pause container
ps        # Orion container list
pull      # Pull the specified image or library image from the docker image source server
push      # Push the specified image or library image to the docker source server
restart   # Restart the running container
rm        # Remove one or more containers
rmi       # Remove one or more images (the image can be deleted only if there is no container, otherwise the relevant container needs to be deleted before continuing or -f forced deletion)
run       # Create a new container and run a command
save      # Save an image as a tar package [corresponding to load]
search    # Search for images in docker hub
start     # Start container
stop      # Stop container
tag       # Label images in source
top       # View the process information running in the container
unpause   # Unsuspend container
version   # View docker version number
wait      # Intercepts the exit status value when the container stops
You can create a container only with an image. Let's download the centos image to learn
[root@iZvjqtq16uz5ygZ ~]# docker pull centos
docker run creates a new container and starts it
docker run [Optional parameters] image

# parameter
--name="Name"	Container word, used to distinguish containers
-d				Background operation
-it				Run in interactive mode and enter the container to view the content
-p				Specify container port	-p 8080:8080
	-p ip:Host port:Container port
	-p Host port:Container port(Commonly used)
	-p Container port
	Container port
-P				Randomly assigned port

# Test, start and enter the container
# The host name is the image id
[root@iZvjqtq16uz5ygZ ~]# docker run -it centos /bin/bash
[root@a59a9d04ad2c /]#
[root@a59a9d04ad2c /]# ls		# Many centos commands in the container are not perfect
bin  dev  etc  home  lib  lib64  lost+found  media  mnt  opt  proc  root  run  sbin  srv  sys  tmp  usr  var
[root@a59a9d04ad2c /]# exit		# Stop and exit
exit
[root@iZvjqtq16uz5ygZ ~]#
docker ps lists all running containers
# docker ps command
		# Show running containers
# parameter
-a		# Show running + ever running
-n=?	# Show recently run
-q		# Show only container numbers


[root@iZvjqtq16uz5ygZ ~]# docker ps
CONTAINER ID   IMAGE     COMMAND   CREATED   STATUS    PORTS     NAMES
[root@iZvjqtq16uz5ygZ ~]# docker ps -a
CONTAINER ID   IMAGE          COMMAND       CREATED         STATUS                      PORTS     NAMES
a59a9d04ad2c   centos         "/bin/bash"   3 minutes ago   Exited (0) 48 seconds ago             inspiring_allen
61d006a19cdb   centos         "/bin/bash"   3 minutes ago   Exited (0) 3 minutes ago              awesome_elbakyan
8312aad0f6c6   d1165f221234   "/hello"      4 days ago      Exited (0) 4 days ago                 recursing_banzai
Exit container
# Stop and exit
exit
# Quit without stopping
ctrl + P + Q
Delete container
# Delete the specified container (you can't delete the running container if you want to delete it) 	- f)
docker rm container id

# Delete all containers
docker rm $(docker ps -aq)
docker ps -a -q|xargs docker rm
Start and stop containers
docker start container id	# Start container
docker stop container id	# Stop container
docker restart container id	# Restart container
docker kill container id	# Force stop container
3.4 other common commands
Background run container
# Command: docker run -d container

# Problem docker ps found no container
# Common pitfalls: the docker container runs in the background. There must be a foreground process. If docker finds no application, it will stop
# nigix: after the container starts, it finds that it does not provide services, that is, there is no program
view log
# Command: docker logs -t -f --tail view number of containers

# parameter
[root@iZvjqtq16uz5ygZ ~]# docker logs --help

Usage:  docker logs [OPTIONS] CONTAINER

Fetch the logs of a container

Options:
      --details        Show extra details provided to logs
  -f, --follow         Follow log output
      --since string   Show logs since timestamp (e.g. 2013-01-02T13:23:37Z) or relative (e.g. 42m for 42 minutes)
  -n, --tail string    Number of lines to show from the end of the logs (default "all")
  -t, --timestamps     Show timestamps
      --until string   Show logs before a timestamp (e.g. 2013-01-02T13:23:37Z) or relative (e.g. 42m for 42 minutes)
View process information in container
# Commands: docker top container
[root@iZvjqtq16uz5ygZ ~]# docker top fd5dcdb7e3e9
UID                 PID                 PPID                C                   STIME               TTY                 TIME                CMD
root                21913               21893               0                   23:33               pts/0               00:00:00            /bin/bash
View container information
# Command: docker inspect container
[root@iZvjqtq16uz5ygZ ~]# docker inspect fd5dcdb7e3e9
[
    {
        "Id": "fd5dcdb7e3e9897cbab2dad9724cbb6fb436187e53e316af4fe5ad6cd42a86ba",
        "Created": "2021-08-18T15:33:45.889519607Z",
        "Path": "/bin/bash",
        "Args": [],
        "State": {
            "Status": "running",
            "Running": true,
            "Paused": false,
            "Restarting": false,
            "OOMKilled": false,
            "Dead": false,
            "Pid": 21913,
            "ExitCode": 0,
            "Error": "",
            "StartedAt": "2021-08-18T15:33:46.140591444Z",
            "FinishedAt": "0001-01-01T00:00:00Z"
        },
        "Image": "sha256:300e315adb2f96afe5f0b2780b87f28ae95231fe3bdd1e16b9ba606307728f55",
        "ResolvConfPath": "/var/lib/docker/containers/fd5dcdb7e3e9897cbab2dad9724cbb6fb436187e53e316af4fe5ad6cd42a86ba/resolv.conf",
        "HostnamePath": "/var/lib/docker/containers/fd5dcdb7e3e9897cbab2dad9724cbb6fb436187e53e316af4fe5ad6cd42a86ba/hostname",
        "HostsPath": "/var/lib/docker/containers/fd5dcdb7e3e9897cbab2dad9724cbb6fb436187e53e316af4fe5ad6cd42a86ba/hosts",
        "LogPath": "/var/lib/docker/containers/fd5dcdb7e3e9897cbab2dad9724cbb6fb436187e53e316af4fe5ad6cd42a86ba/fd5dcdb7e3e9897cbab2dad9724cbb6fb436187e53e316af4fe5ad6cd42a86ba-json.log",
        "Name": "/sharp_lichterman",
        "RestartCount": 0,
        "Driver": "overlay2",
        "Platform": "linux",
        "MountLabel": "",
        "ProcessLabel": "",
        "AppArmorProfile": "",
        "ExecIDs": null,
        "HostConfig": {
            "Binds": null,
            "ContainerIDFile": "",
            "LogConfig": {
                "Type": "json-file",
                "Config": {}
            },
            "NetworkMode": "default",
            "PortBindings": {},
            "RestartPolicy": {
                "Name": "no",
                "MaximumRetryCount": 0
            },
            "AutoRemove": false,
            "VolumeDriver": "",
            "VolumesFrom": null,
            "CapAdd": null,
            "CapDrop": null,
            "CgroupnsMode": "host",
            "Dns": [],
            "DnsOptions": [],
            "DnsSearch": [],
            "ExtraHosts": null,
            "GroupAdd": null,
            "IpcMode": "private",
            "Cgroup": "",
            "Links": null,
            "OomScoreAdj": 0,
            "PidMode": "",
            "Privileged": false,
            "PublishAllPorts": false,
            "ReadonlyRootfs": false,
            "SecurityOpt": null,
            "UTSMode": "",
            "UsernsMode": "",
            "ShmSize": 67108864,
            "Runtime": "runc",
            "ConsoleSize": [
                0,
                0
            ],
            "Isolation": "",
            "CpuShares": 0,
            "Memory": 0,
            "NanoCpus": 0,
            "CgroupParent": "",
            "BlkioWeight": 0,
            "BlkioWeightDevice": [],
            "BlkioDeviceReadBps": null,
            "BlkioDeviceWriteBps": null,
            "BlkioDeviceReadIOps": null,
            "BlkioDeviceWriteIOps": null,
            "CpuPeriod": 0,
            "CpuQuota": 0,
            "CpuRealtimePeriod": 0,
            "CpuRealtimeRuntime": 0,
            "CpusetCpus": "",
            "CpusetMems": "",
            "Devices": [],
            "DeviceCgroupRules": null,
            "DeviceRequests": null,
            "KernelMemory": 0,
            "KernelMemoryTCP": 0,
            "MemoryReservation": 0,
            "MemorySwap": 0,
            "MemorySwappiness": null,
            "OomKillDisable": false,
            "PidsLimit": null,
            "Ulimits": null,
            "CpuCount": 0,
            "CpuPercent": 0,
            "IOMaximumIOps": 0,
            "IOMaximumBandwidth": 0,
            "MaskedPaths": [
                "/proc/asound",
                "/proc/acpi",
                "/proc/kcore",
                "/proc/keys",
                "/proc/latency_stats",
                "/proc/timer_list",
                "/proc/timer_stats",
                "/proc/sched_debug",
                "/proc/scsi",
                "/sys/firmware"
            ],
            "ReadonlyPaths": [
                "/proc/bus",
                "/proc/fs",
                "/proc/irq",
                "/proc/sys",
                "/proc/sysrq-trigger"
            ]
        },
        "GraphDriver": {
            "Data": {
                "LowerDir": "/var/lib/docker/overlay2/61f37a5a2acff47895e36f41643be6964ccf17288d24c807117fcce5364fcd6e-init/diff:/var/lib/docker/overlay2/3d0f44460bad8c9f659010f235579de50bb06b8cd48198e90098626252e85940/diff",
                "MergedDir": "/var/lib/docker/overlay2/61f37a5a2acff47895e36f41643be6964ccf17288d24c807117fcce5364fcd6e/merged",
                "UpperDir": "/var/lib/docker/overlay2/61f37a5a2acff47895e36f41643be6964ccf17288d24c807117fcce5364fcd6e/diff",
                "WorkDir": "/var/lib/docker/overlay2/61f37a5a2acff47895e36f41643be6964ccf17288d24c807117fcce5364fcd6e/work"
            },
            "Name": "overlay2"
        },
        "Mounts": [],
        "Config": {
            "Hostname": "fd5dcdb7e3e9",
            "Domainname": "",
            "User": "",
            "AttachStdin": true,
            "AttachStdout": true,
            "AttachStderr": true,
            "Tty": true,
            "OpenStdin": true,
            "StdinOnce": true,
            "Env": [
                "PATH=/usr/local/sbin:/usr/local/bin:/usr/sbin:/usr/bin:/sbin:/bin"
            ],
            "Cmd": [
                "/bin/bash"
            ],
            "Image": "centos",
            "Volumes": null,
            "WorkingDir": "",
            "Entrypoint": null,
            "OnBuild": null,
            "Labels": {
                "org.label-schema.build-date": "20201204",
                "org.label-schema.license": "GPLv2",
                "org.label-schema.name": "CentOS Base Image",
                "org.label-schema.schema-version": "1.0",
                "org.label-schema.vendor": "CentOS"
            }
        },
        "NetworkSettings": {
            "Bridge": "",
            "SandboxID": "4f2e2f5c5d18962c52f9dc1aa9c158229ceba25218de723989ef07a00ce21182",
            "HairpinMode": false,
            "LinkLocalIPv6Address": "",
            "LinkLocalIPv6PrefixLen": 0,
            "Ports": {},
            "SandboxKey": "/var/run/docker/netns/4f2e2f5c5d18",
            "SecondaryIPAddresses": null,
            "SecondaryIPv6Addresses": null,
            "EndpointID": "b92b0c256a421f4c7f4f91fed818a4a1d99ea9602aba55763a15cfbfe94031d4",
            "Gateway": "172.17.0.1",
            "GlobalIPv6Address": "",
            "GlobalIPv6PrefixLen": 0,
            "IPAddress": "172.17.0.3",
            "IPPrefixLen": 16,
            "IPv6Gateway": "",
            "MacAddress": "02:42:ac:11:00:03",
            "Networks": {
                "bridge": {
                    "IPAMConfig": null,
                    "Links": null,
                    "Aliases": null,
                    "NetworkID": "d3816c025268349314dc2077d29c90f6bafeb26db39dfaff8803797ca61a0d9d",
                    "EndpointID": "b92b0c256a421f4c7f4f91fed818a4a1d99ea9602aba55763a15cfbfe94031d4",
                    "Gateway": "172.17.0.1",
                    "IPAddress": "172.17.0.3",
                    "IPPrefixLen": 16,
                    "IPv6Gateway": "",
                    "GlobalIPv6Address": "",
                    "GlobalIPv6PrefixLen": 0,
                    "MacAddress": "02:42:ac:11:00:03",
                    "DriverOpts": null
                }
            }
        }
    }
]
Enter a running container
# Command 1:docker exec -it container / bin/bash

# Command 2:docker attach container / bin/bash

# The first is to open a new terminal after entering the container, which can be operated inside
# The second is to open the currently running terminal after entering the container
Copy file
# Command 1:docker cp container: path within container destination host path
# This command copies the contents of the container to the outside

# Command 2:docker cp destination host path container: path in container
# This command is to copy the external contents into the container (there is mount behind)
4, Mission
4.1 deploy nginx
-
Search for images (search is not recommended, but dockerhub is recommended)
-
Download Image
[root@iZvjqtq16uz5ygZ ~]# docker pull nginx
Using default tag: latest
latest: Pulling from library/nginx
e1acddbe380c: Pull complete
e21006f71c6f: Pull complete
f3341cc17e58: Pull complete
2a53fa598ee2: Pull complete
12455f71a9b5: Pull complete
b86f2ba62d17: Pull complete
Digest: sha256:4d4d96ac750af48c6a551d757c1cbfc071692309b491b70b2b8976e102dd3fef
Status: Downloaded newer image for nginx:latest
docker.io/library/nginx:latest
- View mirror
[root@iZvjqtq16uz5ygZ ~]# docker images
REPOSITORY   TAG       IMAGE ID       CREATED        SIZE
nginx        latest    dd34e67e3371   28 hours ago   133MB
centos       latest    300e315adb2f   8 months ago   209MB
- Start container
[root@iZvjqtq16uz5ygZ ~]# docker run -d --name nginx1 -p 3344:80 nginx
81e8a171d4bfbf9417e72b879fe8262b4bf010fa39139069a98be56f7039b931
- test
[root@iZvjqtq16uz5ygZ ~]# curl localhost:3306
<!DOCTYPE html>
<html>
<head>
<title>Welcome to nginx!</title>
<style>
    body {
        width: 35em;
        margin: 0 auto;
        font-family: Tahoma, Verdana, Arial, sans-serif;
    }
</style>
</head>
<body>
<h1>Welcome to nginx!</h1>
<p>If you see this page, the nginx web server is successfully installed and
working. Further configuration is required.</p>

<p>For online documentation and support please refer to
<a href="http://nginx.org/">nginx.org</a>.<br/>
Commercial support is available at
<a href="http://nginx.com/">nginx.com</a>.</p>

<p><em>Thank you for using nginx.</em></p>
</body>
</html>
[root@iZvjqtq16uz5ygZ ~]# docker rm $(docker ps -aq)
Error response from daemon: You cannot remove a running container 81e8a171d4bfbf9417e72b879fe8262b4bf010fa39139069a98be56f7039b931. Stop the container before attempting removal or force remove
Error response from daemon: You cannot remove a running container fd5dcdb7e3e9897cbab2dad9724cbb6fb436187e53e316af4fe5ad6cd42a86ba. Stop the container before attempting removal or force remove
[root@iZvjqtq16uz5ygZ ~]# docker rm -f $(docker ps -aq)
81e8a171d4bf
fd5dcdb7e3e9
- Enter the container to find the nginx configuration file
[root@iZvjqtq16uz5ygZ ~]# docker exec -it nginx1 /bin/bash
root@2b266e3c6ade:/# whereis nginx
nginx: /usr/sbin/nginx /usr/lib/nginx /etc/nginx /usr/share/nginx
root@2b266e3c6ade:/# cd /etc/nginx/
root@2b266e3c6ade:/etc/nginx# ls
conf.d	fastcgi_params	mime.types  modules  nginx.conf  scgi_params  uwsgi_params
4.2 deploying tomcat
Official use
# docker run -it --rm tomcat:9.0

# We can find the containers we run before after they are closed. When -- rm is added, the containers will be deleted after they are closed. It is generally used for testing

# We download the image normally and then use it
[root@iZvjqtq16uz5ygZ ~]# docker pull tomcat

# start-up
[root@iZvjqtq16uz5ygZ ~]# docker run -d -p 3355:8080 --name tomcat1 tomcat
733463ab9a58c6193d80ddfe8422529e3e4ec3544ef87697bdedf948f9ec67e3

# There is no problem with internet access, but 404

# We enter the container and find that webapps is empty. We copy all the contents of webapps.dist into webapps. There will be no 404 at this time
root@733463ab9a58:/usr/local/tomcat/webapps.dist# cp -r webapps.dist/* webapps
root@733463ab9a58:/usr/local/tomcat/webapps# ls
ROOT  docs  examples  host-manager  manager
4.3 deployment of ES+Kibana
# es exposes many ports
# es takes up a lot of memory
# es data is generally placed in a secure directory

# --net somenetwork  ?  network configuration
docker run -d --name elasticsearch -p 9200:9200 -p 9300:9300 -e "discovery.type=single-node" elasticsearch:7.6.2

# Check for success
{
  "name" : "b432915594c4",
  "cluster_name" : "docker-cluster",
  "cluster_uuid" : "VOvkXodJT7SwTGeCGdB0ng",
  "version" : {
    "number" : "7.6.2",
    "build_flavor" : "default",
    "build_type" : "docker",
    "build_hash" : "ef48eb35cf30adf4db14086e8aabd07ef6fb113f",
    "build_date" : "2020-03-26T06:34:37.794943Z",
    "build_snapshot" : false,
    "lucene_version" : "8.4.0",
    "minimum_wire_compatibility_version" : "6.8.0",
    "minimum_index_compatibility_version" : "6.0.0-beta1"
  },
  "tagline" : "You Know, for Search"
}

# Using docker stats to check the cpu, you can see that es takes up a lot of memory
CONTAINER ID   NAME            CPU %     MEM USAGE / LIMIT     MEM %     NET I/O         BLOCK I/O
b432915594c4   elasticsearch   5.73%     1.249GiB / 1.694GiB   73.72%    1.18kB / 942B   314MB / 729kB
PIDS
43
# After startup, it is found that the card is very, and even the server is stuck, which es consumes memory. So how to solve it?
# Let's stop all containers and limit their memory
# By modifying the configuration file -e environment configuration,
docker run -d --name elasticsearch -p 9200:9200 -p 9300:9300 -e "discovery.type=single-node" -e ES_JAVA_OPTS="-Xms64m -Xmx512m" elasticsearch:7.6.2
5, Detailed explanation of docker image
5.1 what is mirroring
Image is a lightweight and executable independent software package, which is used to package software running environment and software developed based on environment. It contains all the contents required by a software.
All applications can run directly by directly packaging the docker image!
How to get the image?
- Download from warehouse
- Friend copy to you
- Make your own image
5.2 docker image principle
Unionfs (Federated file system)
This is what we see when we download!
Unionfs (Federated file system): it is a layered, lightweight and high-performance file system. It supports the modification of the file system as a submission to stack layer by layer. At the same time, it can mount the fixed directory to the same virtual file system. The Union file system is the basis of docker image.
Features: multiple file systems can be loaded at the same time, but from the outside, only one file system can be seen. Joint loading will stack all layers of files, so that the final file system will contain all underlying files and directories
Loading principle of Docker image
The image of docker is actually composed of a layer by layer file system, which is called UnionFS.
bootfs(boot file system) mainly includes bootloader and kernel. Bootloader is mainly used to boot and load the kernel. Bootfs file system will be loaded when Linux starts up. Bootfs is at the bottom of Docker image. This layer is the same as our typical Linux/Unix system, including boot loader and kernel. After the boot is loaded, the whole kernel is in memory. At this time, the right to use the memory has been transferred from bootfs to the kernel. At this time, the system will also unload bootfs.
rootfs (root file system), above bootfs. It contains standard directories and files such as / dev, /proc, /bin, /etc in a typical Linux system. rootfs is a variety of operating system distributions, such as Ubuntu, Centos and so on.
Usually, the CentOS installed into the virtual machine are several G's. why is docker only 200M here??
For a thin OS, rootfs can be very small. It only needs to include the most basic commands, tools and program libraries. Because the underlying layer directly uses the Host kernel, it only needs to provide rootfs itself. It can be seen that for different linux distributions, bootfs are basically the same, and rootfs will be different. Therefore, different distributions can share bootfs.
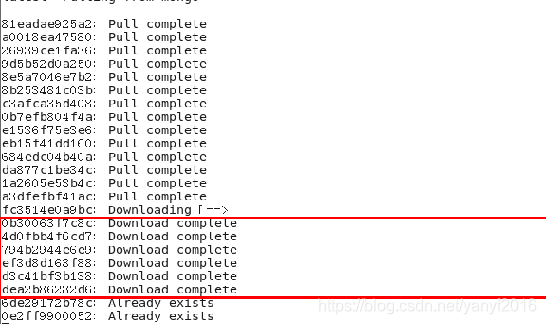
Tiered mirroring
Take our pull as an example. During downloading, we can see that the image of docker seems to be downloading layer by layer
Why does Docker image adopt this hierarchical structure
One of the biggest benefits is sharing resources
For example, if multiple images are built from the same base image, the host only needs to save one base image on the disk,
At the same time, only one base image needs to be loaded in memory to serve all containers. And every layer of the image can be shared.
characteristic
Docker images are read-only. When the container starts, a new writable layer is loaded to the top of the image.
This layer is usually called "container layer", and those below "container layer" are called "mirror layer".

5.3 commit the image
docker commit Submit the container as a new copy

docker commit -m="Submit information" -a="author" container id Target image name:[TAG]
Actual test
# We copy the contents in the webapps.dist folder in the official tomcat to webapps (the official one cannot be run directly)

# Then exit to exit the mirror

# Submit our own image
[root@iZvjqtq16uz5ygZ ~]# docker commit -m="add webapps" -a="JinWeimin" 733463ab9a58 mytomcat:1.0
sha256:d10f7bf3719ec5177044f850862d0983ca9fa550df3b3f6a0099e139ba084e40
# At this time, our own tomcat is already inside
[root@iZvjqtq16uz5ygZ ~]# docker images
REPOSITORY            TAG       IMAGE ID       CREATED          SIZE
mytomcat              1.0       d10f7bf3719e   25 seconds ago   673MB
nginx                 latest    dd34e67e3371   7 days ago       133MB
tomcat                latest    710ec5c56683   2 weeks ago      668MB
portainer/portainer   latest    580c0e4e98b0   5 months ago     79.1MB
centos                latest    300e315adb2f   8 months ago     209MB
elasticsearch         7.6.2     f29a1ee41030   17 months ago    791MB
6, Container data volume
6.1 what is a container data volume
If the application and environment run in the container, the data will be lost if the container is deleted (database data, etc.)
We want to make this data persistent
At this time, we need a container to see the data sharing technology, save the data locally, and synchronize the changes in the Docker container to the local!
This is volume technology!
To mount the directory, synchronize the directory in our container to the local.
Summary: container persistence and synchronization! Data sharing between containers
6.2 using data volumes
Method 1: mount by command
docker run -it -v Host Directory:In container directory

# test
# Create a container and mount it
# Use docker inspect to view the mount
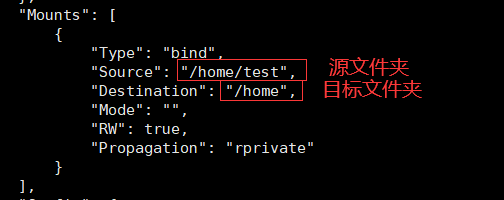
# Container--
[root@iZvjqtq16uz5ygZ usr]# docker run -it --name="myCentos" -v /home/test:/home centos
[root@a67776510c8c ~]# cd /home
[root@a67776510c8c home]# touch test.c

# Local--
[root@iZvjqtq16uz5ygZ home]# cd test
[root@iZvjqtq16uz5ygZ test]# ls
test.c
# At this point, you can find that after the container is mounted, all changes to the mounted folder will be synchronized in the locally mounted folder
Benefits: we only need to modify the configuration locally in the future
6.3 actual combat: data persistence of mysql
mysql data is placed in the data directory
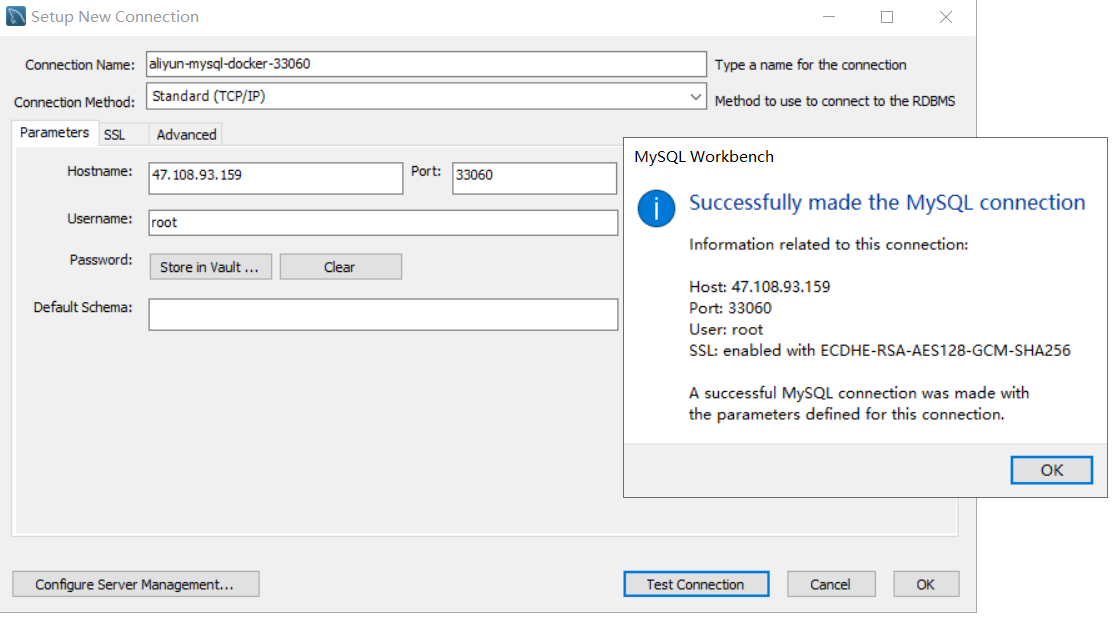
# Install mysql image
[root@iZvjqtq16uz5ygZ test]# docker pull mysql:8.0.21

# Create container # To install mysql, you need to configure the password
 official: docker run --name some-mysql -e MYSQL_ROOT_PASSWORD=my-secret-pw -d mysql:tag
# Some MySQL is the container name 	 tag is the version number 		 My secret PW is the password

# On this basis, configure dataset mount
docker run --name mysql1 \
-e MYSQL_ROOT_PASSWORD=123456 \
-d \
-p 33060:3306 \
-v /home/docker/mysql/conf:/etc/mysql/conf.d \
-v /home/docker/mysql/data:/var/lib/mysql \
mysql:8.0.21

# After successful startup, we use workbench to connect to the mysql database
6.4 named mount and anonymous mount
# Anonymous mount
# docker run -P -d --name nginx1 -v /etc/nginx nginx

# View all volumes
# docker volume ls
[root@iZvjqtq16uz5ygZ conf]# docker volume ls
DRIVER    VOLUME NAME
local     06e0151f0bd1ce53e9a3b105f3fa8e99fa0c068da523ab50028881420ff6ada4
local     637afa56c8ed6519a0b1e46b4ae564aed10042cd295cded5c7f5f8eff231033b
# This is anonymous mount


# Named mount
# docker run -P -d --name nginx2 -v jumingnginx:/etc/nginx nginx
# Viewing volumes
[root@iZvjqtq16uz5ygZ conf]# docker volume ls
DRIVER    VOLUME NAME
local     jumingnginx
# This is named mount
When no directory is specified, all volumes in the docker container are in '/ var / lib / docker / volumes / XXXXXX'/_ Under 'data'
We can easily find our volumes through named mount
How do I determine whether to mount anonymously, named or specified path?
-v In container path			# Anonymous mount
-v Volume name:In container path		   # Named mount
-v Path outside container:In container path	 # Specified path mount

# expand
# Add ro/rw after the path in the container to change the read and write permissions
docker run -P -d --name nginx2 -v jumingnginx:/etc/nginx:ro nginx	# read-only
docker run -P -d --name nginx2 -v jumingnginx:/etc/nginx:rw nginx	# read-write

# As long as there is ro, it can only be modified by the host, not by volume
6.5 getting to know DockerFile
We can also build data volumes through DockerFile
DockerFile is the script used to build the image
Image is layer by layer. The commands of the script are layer by layer image
We first write a simple DockerFile in the / home / docker test directory
# /home/docker-test/dockerFile1
# File contents: commands 	 parameter

FROM centos

VOLUME ["volume1","volume2"]

CMD echo "----end----"

CMD /bin/bash

# Each command line is a layer of mirroring
Build an image from this file
# -f 	 Path to dockerFile
# -t 	 Image name
[root@iZvjqtq16uz5ygZ docker-volume]# docker build -f ./dockerFile1 -t test/image .
Sending build context to Docker daemon  2.048kB
Step 1/4 : FROM centos
 ---> 300e315adb2f
Step 2/4 : VOLUME ["volume1","volume2"]
 ---> Using cache
 ---> 334c4fdb5982
Step 3/4 : CMD echo "----end----"
 ---> Using cache
 ---> c09b17886130
Step 4/4 : CMD /bin/bash
 ---> Using cache
 ---> 671b3b46a050
Successfully built 671b3b46a050
Successfully tagged test/image:latest
[root@iZvjqtq16uz5ygZ docker-volume]# docker images
REPOSITORY      TAG       IMAGE ID       CREATED          SIZE
test/image      latest    671b3b46a050   11 minutes ago   209MB			# This is the image we created
mytomcat        1.0       d10f7bf3719e   2 days ago       673MB
nginx           latest    dd34e67e3371   10 days ago      133MB
tomcat          latest    710ec5c56683   2 weeks ago      668MB
centos          latest    300e315adb2f   8 months ago     209MB
mysql           8.0.21    8e85dd5c3255   10 months ago    544MB
elasticsearch   7.6.2     f29a1ee41030   17 months ago    791MB
We create a new container from this image
[root@iZvjqtq16uz5ygZ docker-volume]# docker run -it 671b3b46a050 /bin/bash
[root@732c2589347e /]# ls -lah
total 64K
drwxr-xr-x   1 root root 4.0K Aug 27 15:41 .
drwxr-xr-x   1 root root 4.0K Aug 27 15:41 ..
-rwxr-xr-x   1 root root    0 Aug 27 15:41 .dockerenv
lrwxrwxrwx   1 root root    7 Nov  3  2020 bin -> usr/bin
drwxr-xr-x   5 root root  360 Aug 27 15:41 dev
drwxr-xr-x   1 root root 4.0K Aug 27 15:41 etc
drwxr-xr-x   2 root root 4.0K Nov  3  2020 home
lrwxrwxrwx   1 root root    7 Nov  3  2020 lib -> usr/lib
lrwxrwxrwx   1 root root    9 Nov  3  2020 lib64 -> usr/lib64
drwx------   2 root root 4.0K Dec  4  2020 lost+found
drwxr-xr-x   2 root root 4.0K Nov  3  2020 media
drwxr-xr-x   2 root root 4.0K Nov  3  2020 mnt
drwxr-xr-x   2 root root 4.0K Nov  3  2020 opt
dr-xr-xr-x 104 root root    0 Aug 27 15:41 proc
dr-xr-x---   2 root root 4.0K Dec  4  2020 root
drwxr-xr-x  11 root root 4.0K Dec  4  2020 run
lrwxrwxrwx   1 root root    8 Nov  3  2020 sbin -> usr/sbin
drwxr-xr-x   2 root root 4.0K Nov  3  2020 srv
dr-xr-xr-x  13 root root    0 Aug 27 15:41 sys
drwxrwxrwt   7 root root 4.0K Dec  4  2020 tmp
drwxr-xr-x  12 root root 4.0K Dec  4  2020 usr
drwxr-xr-x  20 root root 4.0K Dec  4  2020 var
drwxr-xr-x   2 root root 4.0K Aug 27 15:41 volume1			# volume1 and volume2 are found here
drwxr-xr-x   2 root root 4.0K Aug 27 15:41 volume2			# Description volume1 and volume2 have been mounted
Because we did not specify the name of volume in dockerFile, it means that this is an anonymous mount, and the mounted folder is also in the default directory
This method of creating data volumes is a common method
6.6 data volume container
When building a container, the -- volumes from parameter allows the container to use the same container data volume
We may want to synchronize the data of multiple containers, such as mysql data synchronization
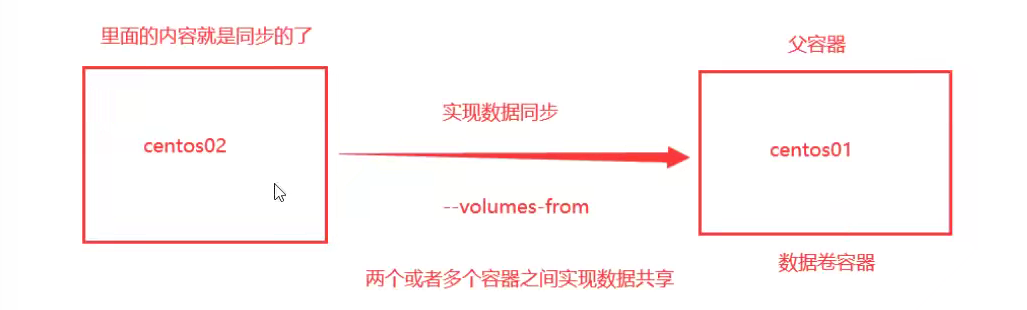
Let's first create a container for our own image
# Docker01 (data volume container)
[root@iZvjqtq16uz5ygZ docker-volume]# docker run -it --name docker01  671b3b46a050 /bin/bash
[root@745b1830cc3a /]# ls -lah
total 64K
drwxr-xr-x   1 root root 4.0K Aug 27 15:59 .
drwxr-xr-x   1 root root 4.0K Aug 27 15:59 ..
-rwxr-xr-x   1 root root    0 Aug 27 15:59 .dockerenv
lrwxrwxrwx   1 root root    7 Nov  3  2020 bin -> usr/bin
drwxr-xr-x   5 root root  360 Aug 27 15:59 dev
drwxr-xr-x   1 root root 4.0K Aug 27 15:59 etc
drwxr-xr-x   2 root root 4.0K Nov  3  2020 home
lrwxrwxrwx   1 root root    7 Nov  3  2020 lib -> usr/lib
lrwxrwxrwx   1 root root    9 Nov  3  2020 lib64 -> usr/lib64
drwx------   2 root root 4.0K Dec  4  2020 lost+found
drwxr-xr-x   2 root root 4.0K Nov  3  2020 media
drwxr-xr-x   2 root root 4.0K Nov  3  2020 mnt
drwxr-xr-x   2 root root 4.0K Nov  3  2020 opt
dr-xr-xr-x 106 root root    0 Aug 27 15:59 proc
dr-xr-x---   2 root root 4.0K Dec  4  2020 root
drwxr-xr-x  11 root root 4.0K Dec  4  2020 run
lrwxrwxrwx   1 root root    8 Nov  3  2020 sbin -> usr/sbin
drwxr-xr-x   2 root root 4.0K Nov  3  2020 srv
dr-xr-xr-x  13 root root    0 Aug 27 15:41 sys
drwxrwxrwt   7 root root 4.0K Dec  4  2020 tmp
drwxr-xr-x  12 root root 4.0K Dec  4  2020 usr
drwxr-xr-x  20 root root 4.0K Dec  4  2020 var
drwxr-xr-x   2 root root 4.0K Aug 27 15:59 volume1
drwxr-xr-x   2 root root 4.0K Aug 27 15:59 volume2
Then create the second and third containers and use -- volumes from to synchronize the data
docker run -it --name docker02 --volumes-from 745b1830cc3a 671b3b46a050 /bin/bash
docker run -it --name docker03 --volumes-from 745b1830cc3a 671b3b46a050 /bin/bash
We found through docker inspect ion that the directories mounted by the three containers are the same, that is, they share a data volume
Modifying data in the mounted folder in any of the three containers will have the same effect
In fact, the mounted parts of them use the same address on the local machine, that is, the default address of volume
Deleting any container at this time will not affect other containers
At this point, data sharing is achieved
Data sharing with multiple mysql
# First mysql container
docker run --name mysql1 \
-e MYSQL_ROOT_PASSWORD=123456 \
--name mysql01 \
-d \
-p 33060:3306 \
-v /etc/mysql/conf.d \
-v /var/lib/mysql \
mysql

# The second mysql container
docker run --name mysql1 \
-e MYSQL_ROOT_PASSWORD=123456 \
--name mysql02 \
-d \
-p 33061:3306 \
--volumes-from mysql01 \
mysql
7, DockerFile
7.1 basic knowledge
dockerFile is the file used to build the image
Construction steps:
- Write a docker file
- docker build create image
- docker push publishing image (docker hub / Alibaba cloud warehouse)
7.2 docker file construction
Basics:
- Each keyword (instruction) is capitalized
- Instructions run from top to bottom
- Every command is a layer
7.3 docker file instruction
| instructions | effect |
|---|---|
| FROM | Basic image. The image is built based on this basic image |
| MAINTAINER(deprecate) | Who wrote the image |
| LABEL | Add original data to mirror |
| RUN | Commands to be executed during image construction |
| ADD | The content to be added -- for example, to add a tomcat, you need the ADDcomcat compressed package |
| WORKDIR | Mirrored working directory |
| VOLUME | Mounted directory |
| EXPOSE | Exposed port settings (random mapping) |
| CMD | Specifies the command to be executed when the container is started. Only the last one will take effect and can be replaced |
| ENTRYPOINT | Specify the commands to be executed when the container starts, and you can append commands |
| ONBUILD | When building an inherited docker file, ONBUILD will be executed |
| COPY | Similar to ADD, copy the file to the image |
| ENV | Setting environment variables at build time |
7.4 actual measurement and design
Most images in Docker are FROM scratch
Create your own centos
- Write docker file
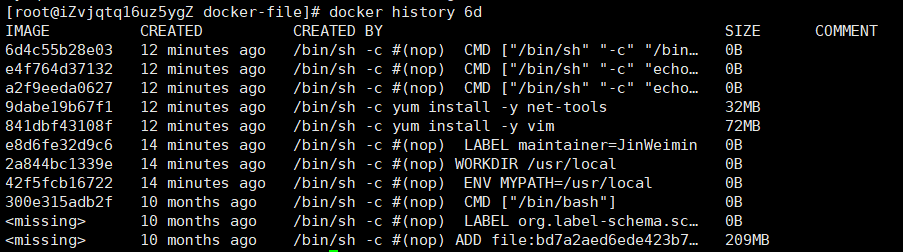
FROM centos

ENV MYPATH /usr/local

WORKDIR $MYPATH

LABEL "maintainer"="JinWeimin"

RUN yum install -y vim

RUN yum install -y net-tools

EXPOSE 80

CMD echo $MYPATH
CMD echo "--end--"
CMD /bin/bash
- Build through the build command
# -f 	 Path to dockerFile
# -t 	 Image name
docker build -f ./my-centos-docker-file -t my-centos:1.0 .
We can view the construction history of the image through docker history
Create tomcat
- Prepare compressed packages for tomcat and jdk

- Write a Dockerfile file. The official recommended Dockerfile is the file name. At this time, you do not need to specify - f
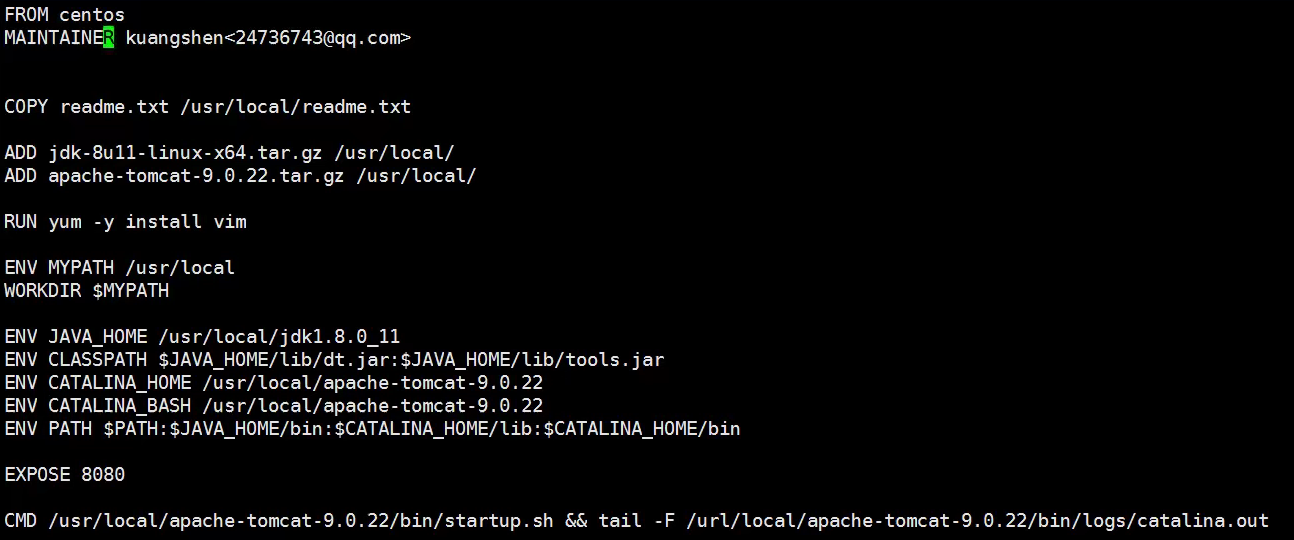
- Build image through docker build
7.5 publish your own image
Dockerhub
Log in to your dockerhub account
docker login -u 123456
Push image
# Give the image a new name first
docker tag my-tomcat jin/my-tomcat:1.0
# Push image
docker push jin/my-tomcat:1.0
Alibaba cloud
-
Log in to alicloud
-
Mirror warehouse found
-
Create namespace
-
Create container image
-
Push according to Alibaba cloud commands
8, Docker network
8.1 understanding docker0
docker0 is the default network card
Every time docker creates a container, a new pair of network cards will be created. The containers access each other by bridging with docker0 (bridge mode)
linux system accesses eth0 network card through NAT (network address translation) to interconnect with internet
8.2 custom network
View all networks
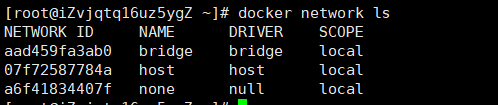
docker network ls
Network mode:
- Bridge: bridge mode
- none: do not configure network
- Host: share network with host
- Container: container network interconnection (less used, very limited)
Test:
# docker0 is used by default when we create a new container
docker run -d -P --net bridge tomcat
establish
docker network create --subnet 192.168.0.0/16 --gateway 255.255.0.0 mynet
8.3 network connection
Different networks cannot access each other normally, so we need to connect to the network
# mynet here is our custom network, and tomcat is a container under the default network
docker network connect mynet tomcat
# After connecting, we can let tomcat access the container in mynet
9, Spring boot packaging image
- Package springboot project
- Write dockerfile
FROM java:8
COPY *.jar /app.jar
CMD ["--server.port=8080"]
EXPOSE 8080
ENTRYPOINT [ "java" , "-jar" , " / app.jar"]
-
Build mirror
-
Publish run
IDEA plug-in - > docker
Docker Compose
1. Initial experience
- Create a folder
mkdir composedir
cd composedir
- Create an app.py file
import time

import redis
from flask import Flask

app = Flask(__name__)
cache = redis.Redis(host='redis', port=6379)

def get_hit_count():
    retries = 5
    while True:
        try:
            return cache.incr('hits')
        except redis.exceptions.ConnectionError as exc:
            if retries == 0:
                raise exc
            retries -= 1
            time.sleep(0.5)

@app.route('/')
def hello():
    count = get_hit_count()
    return 'Hello World! I have been seen {} times.\n'.format(count)
- Create requirements.txt
flask
redis
- Create Dockerfile
FROM python:3.7-alpine
WORKDIR /code
ENV FLASK_APP=app.py
ENV FLASK_RUN_HOST=0.0.0.0
RUN apk add --no-cache gcc musl-dev linux-headers
COPY requirements.txt requirements.txt
RUN pip install -r requirements.txt
EXPOSE 5000
COPY . .
CMD ["flask", "run"]
- Define the service in a Compose file
version: "3.0"
services:
  web:
    build: .
    ports:
      - "5000:5000"
  redis:
    image: "redis:alpine"
- Run docker compose
docker-compose up
Docker compose operation process
- Create network
- Run yml file
- Start service