Docker compose project is an official open source project of docker. Its main responsibility is to realize the rapid orchestration of docker container clusters. Docker compose divides the managed containers into three layers: project, service and container. All files (docker-compose.yml, extensions files or environment variable files, etc.) in the docker compose running directory form a project. Unless otherwise specified, the project name is the current directory name. A project can contain multiple services. Each service defines the image, parameters and dependencies of the container. A service can include multiple container instances. Docker compose does not solve the problem of load balancing. Therefore, it is necessary to use other tools to realize service discovery and load balancing. The project configuration file of docker compose is docker-compose.yml by default. You can use the environment variable compose_ The file or - f parameter defines a custom configuration file that defines multiple dependent services and the container in which each service runs. Using a Dockerfile template file allows users to easily define a separate application container. In work, we often encounter the situation that multiple containers need to cooperate with each other to complete a task. For example, to implement a Web project, in addition to the Web service container itself, you often need to add the back-end database service container, and even the load balancing container. Meanwhile, Docker Compose allows users to define a group of associated application containers as a project through a separate docker-compose.yml template file (YAML format). The Docker Compose project is written in Python and calls the API provided by the Docker service to manage the container. Therefore, as long as the operating platform supports Docker API, composition can be used for orchestration management.
I often use this tool for local development in a microservice environment. It is also lightweight and requires little effort. Through this tool, we can pre configure the required environment and services, and then focus on the development of current services without paying too much attention to the operation mode of each service and the mutual call relationship between services and components. It's really unnecessary unless we have to.
With docker compose, we can configure a reasonable network for application services, volumes, mount points, environment variables (almost all contents) and dependent components involved.
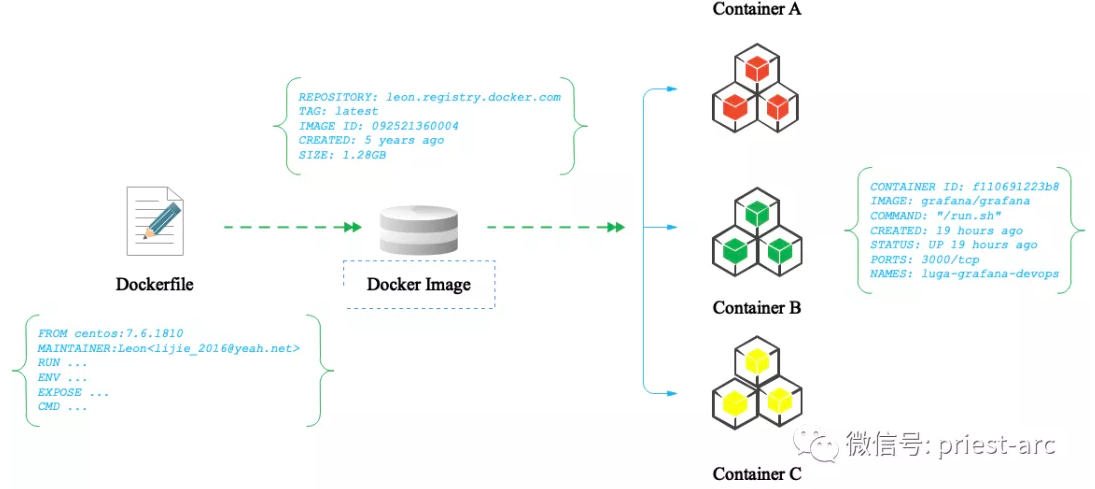
Before introducing the docker compose tool, let's first understand the dockerfile. Dockerfile is a text file that contains all commands that users can call on the command line to assemble Images. We can think of it as a Shell Script. It collects multiple commands into a document to complete a task. The brief process is as follows:
Basic structure of Dockerfile
Dockerfile is generally divided into four parts: basic image information, maintainer information, image operation instructions and instructions executed when the container is started. '#' is the comment in dockerfile.
Dockerfile file description
Docker runs the Dockerfile instructions in top-down order. In order to specify the base image, the first instruction must be FROM. A declaration that begins with a character is considered a comment. You can use RUN, CMD, FROM, EXPOSE, ENV and other instructions in the docker file for related operations.
Let's take a look at the basic template of Dockerfile. Take Nginx component service as an example, as shown below:
 [administrator@JavaLangOutOfMemory ~ %]vi Dockerfile
# Version 1.0

# Base images base images
FROM centos:7.6.1810

# MAINTAINER maintainer information
MAINTAINER  Leon<lijie_2016@migu.cn>

# Define service component version information
ENV TENGINE_VERSION 2.1.2

# Define service component environment variables
ENV CONFIG "\
    --prefix=/etc/nginx \
    --sbin-path=/usr/sbin/nginx \
    --conf-path=/etc/nginx/nginx.conf \
    --error-log-path=/var/log/nginx/error.log \
    --http-log-path=/var/log/nginx/access.log \
    --pid-path=/var/run/nginx.pid \
    --lock-path=/var/run/nginx.lock \
    --http-client-body-temp-path=/var/cache/nginx/client_temp \
    --http-proxy-temp-path=/var/cache/nginx/proxy_temp \
    --http-fastcgi-temp-path=/var/cache/nginx/fastcgi_temp \
    --http-uwsgi-temp-path=/var/cache/nginx/uwsgi_temp \
    --http-scgi-temp-path=/var/cache/nginx/scgi_temp \
    --user=nginx \
    --group=nginx \
    --with-http_ssl_module \
    --with-http_realip_module \
    --with-http_addition_module \
    --with-http_sub_module \
    --with-http_dav_module \
    --with-http_flv_module \
    --with-http_mp4_module \
    --with-http_gunzip_module \
    --with-http_gzip_static_module \
    --with-http_random_index_module \
    --with-http_secure_link_module \
    --with-http_auth_request_module \
    --with-mail \
    --with-mail_ssl_module \
    --with-file-aio \
    --with-http_spdy_module \
    --with-ipv6 \
    --with-jemalloc \
    "
# Define information about file directory operations
ADD ngx_user.patch /

ADD repositories /etc/apk/repositories

# Perform related operations
RUN \
  addgroup -S nginx \
  && adduser -D -S -h /var/cache/nginx -s /sbin/nologin -G nginx nginx \
  && apk add --no-cache --virtual .build-deps \
    gcc \
    libc-dev \
    make \
    openssl-dev \
    pcre-dev \
    zlib-dev \
    linux-headers \
    curl \
    jemalloc-dev \
  && curl "http://tengine.taobao.org/download/tengine-$TENGINE_VERSION.tar.gz" -o tengine.tar.gz \
  && mkdir -p /usr/src \
  && tar -zxC /usr/src -f tengine.tar.gz \
  && rm tengine.tar.gz \
  && cd /usr/src/tengine-$TENGINE_VERSION/src/os/unix/ \
  && mv /ngx_user.patch ./ngx_user.patch \
  && patch ngx_user.c ngx_user.patch \
  && rm ngx_user.patch \
  && cd ../../../ \
#  && cd /usr/src/tengine-$TENGINE_VERSION \
  && ./configure $CONFIG --with-debug \
  && make \
  && mv objs/nginx objs/nginx-debug \
  && ./configure $CONFIG \
  && make \
  && make install \
  && rm -rf /etc/nginx/html/ \
  && mkdir /etc/nginx/conf.d/ \
  && mkdir -p /usr/share/nginx/html/ \
  && install -m644 html/index.html /usr/share/nginx/html/ \
  && install -m644 html/50x.html /usr/share/nginx/html/ \
  && install -m755 objs/nginx-debug /usr/sbin/nginx-debug \
  && strip /usr/sbin/nginx* \
  && runDeps="$( \
    scanelf --needed --nobanner /usr/sbin/nginx \
      | awk '{ gsub(/,/, "\nso:", $2); print "so:" $2 }' \
      | sort -u \
      | xargs -r apk info --installed \
      | sort -u \
  )" \
  && apk add --virtual .nginx-rundeps $runDeps \
  && apk del .build-deps \
  && rm -rf /usr/src/nginx-$NGINX_VERSION \
  && apk add --no-cache gettext \
  \
  # forward request and error logs to docker log collector
  && ln -sf /dev/stdout /var/log/nginx/access.log \
  && ln -sf /dev/stderr /var/log/nginx/error.log

# Relevant operation information of definition file
COPY nginx.conf /etc/nginx/nginx.conf

COPY nginx.vh.default.conf /etc/nginx/conf.d/default.conf

# Define the port information exposed by the service component
EXPOSE 80 443

# Define service component start command
CMD ["nginx", "-g", "daemon off;"]
The above is a brief Dockerfile file, and then we build it. The specific commands are as follows:
[administrator@JavaLangOutOfMemory ~ %]docker build -f Dockerfile -t leon-tengine .
- docker build: Command keywords for building images with Dockerfile.
- [OPTIONS]: command OPTIONS. Common instructions include - t specifying the name of the image.
- -f displays the Dockerfile file of the specified build image (Dockerfile may not be in the current path).
- If - f is not used, the file named Dockerfile under the context path is considered as the "Dockerfile" for building the image by default.
- Context path | URL: Specifies the path of the context in which the image is built. During the process of building the image, you can and can only reference any file in the context.
So far, the construction of a complete container image is completed. At this time, you only need to start it directly with the help of the Docker command line. From the above introduction, we can see that Dockerfile is quite personalized. It can develop custom images according to our personal preferences.
Next, let's analyze the Docker compose tool. The above example starts the container deployment of only a single component with the help of the Docker command. If in a specific scenario, we need to quickly deploy clustered application scenarios or services of multiple different components and facilitate management, the Docker compose tool is the most appropriate.
The following is a brief template, as follows:
[administrator@JavaLangOutOfMemory ~ %]vi docker-compose-elk.yaml
version: '3'
services:
  elasticsearch:
    image: docker.leon.com/elasticsearch/elasticsearch:7.4.2
    container_name: elasticsearch
    restart: always
    volumes:
      - elasticsearch:/usr/share/elasticsearch/data
      - /etc/localtime:/etc/localtime:ro
    ports:
      - "9200:9200"
    networks:
      - elastic
    environment:
      - discovery.type=single-node

  kibana:
    image: docker.leon.com/kibana/kibana:7.4.2
    container_name: kibana
    restart: always
    volumes:
      - kibana:/usr/share/kibana/config:rw
      - /etc/localtime:/etc/localtime
    depends_on:
      - elasticsearch
    ports:
      - "5601:5601"
    networks:
      - elastic
    environment:
      SERVER_NAME: kibana.example.org
      ELASTICSEARCH_HOSTS: http://elasticsearch:9200

  logstash:
    image: docker.leon.com/logstash/logstash:7.4.2
    container_name: logstach
    command: logstash -f /usr/share/logstash/conf/logstash-kafka.conf
    restart: always
    tty: true
    ports:
      - "5044:5044"
    volumes:
      - /etc/localtime:/etc/localtime:ro
      - logstash:/usr/share/logstash/conf/
    networks:
      - elastic
    depends_on:
      - elasticsearch
    environment:
      - elasticsearch.hosts=http://elasticsearch:9200
      - xpack.monitoring.elasticsearch.hosts=http://elasticsearch:9200

  zookeeper:
    image: docker.leon.com/zookeeper
    container_name: zookeeper
    restart: always
    volumes:
      - /etc/localtime:/etc/localtime:ro
      - zookeeper:/data
      - zookeeper_log:/datalog
    networks:
      - elastic
    ports:
      - "2181:2181"

  kafka:
    container_name: kafka
    image: docker.leon.com/kafka
    depends_on:
      - zookeeper
    volumes:
      - /var/run/docker.sock:/var/run/docker.sock
      - kafka:/kafka
      - /etc/localtime:/etc/localtime:ro
    links:
      - zookeeper
    ports:
      - "9092:9092"
    networks:
      - elastic
    environment:
      - KAFKA_LISTENERS=INTERNAL://kafka:9092, OUT://kafka:29092
      - KAFKA_ADVERTISED_LISTENERS=INTERNAL://kafka:9092, OUT://kafka:29092
      - KAFKA_LISTENER_SECURITY_PROTOCOL_MAP=INTERNAL:PLAINTEXT,OUT:PLAINTEXT
      - KAFKA_INTER_BROKER_LISTENER_NAME=OUT
      - KAFKA_ZOOKEEPER_CONNECT=zookeeper:2181
      - KAFKA_MESSAGE_MAX_BYTES=2000000
      - KAFKA_CREATE_TOPICS=logs:1:1

volumes:
  elasticsearch:
    driver: local-persist
    driver_opts:
      mountpoint: /elk/elasticsearch/
  kibana:
    driver: local-persist
    driver_opts:
      mountpoint: /elk/kibana/
  logstash:
    driver: local-persist
    driver_opts:
      mountpoint: /elk/logstash/conf/
  zookeeper:
    driver: local-persist
    driver_opts:
      mountpoint: /elk/zookeeper/data/
  zookeeper_log:
    driver: local-persist
    driver_opts:
      mountpoint: /elk/zookeeper/datalog/
  kafka:
    driver: local-persist
    driver_opts:
      mountpoint: /elk/kafka/

networks:
  elastic:
Based on the above yaml documents, we briefly analyze the "core" label as follows:
The docker Compose template file is a yaml file that defines services, networks, and volumes. The default path of the Compose template file is docker-compose.yml in the current directory. You can use. YML or. yaml as the file extension.
The docker compose standard template file contains three parts: version, services and networks. The most important parts are services and networks.
Version tag: there are three versions of compose: Version 1, version 2 and Version 3. Compose distinguishes between version 1 and version 2 (Compose 1.6.0 +, Docker Engine 1.10.0 +). Version 2 supports more instructions. Version 1 will be deprecated in the future.
Image tag: Specifies the image name or image ID of the service. If the image does not exist locally, docker compose will try to pull the image.
depends_on tag: used to solve the problems of container dependency and startup sequence. When using Compose, the biggest advantage is to less open the startup command, but the general project container startup order is required. If you start the container directly from top to bottom, it will inevitably fail to start because of container dependency. For example, if the application container is started when the database container is not started, the application container will exit because the database cannot be found.
volumes label: mount a directory or an existing data volume container. You can directly use [HOST:CONTAINER] format or [HOST:CONTAINER:ro] format. For the container, the data volume is read-only and can effectively protect the file system of the host. The specified path can be a relative path. Use. Or.. to specify a relative directory. If you do not use the path of the host, you can specify a volume_driver. For example: volume_driver: mydriver.
Links tag: links to containers in other services. Use the service name (also as an alias), or "service name: Service alias" (such as SERVICE:ALIAS).
networks tab: mainly sets the network mode.
The following are the command lines related to docker compose:
[administrator@JavaLangOutOfMemory ~ %] docker-compose up (-d)
... docker-compose down
... docker-compose build
... docker-compose logs (-f)
... docker-compose run (--no-deps)
...
For detailed and complete operation, please refer to the previous article: Analysis of Docker GUI tool - Portal.
The above is about the relevant analysis of docker compose tool. I hope it will be helpful to technology lovers, especially beginners. You are welcome to leave messages and communicate with us at any time about various technical problems.